Instruction Manual
Page 4
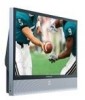
... to be viewable depending on your local cable service provider. Please contact your cable provider needs to acquire a CableCARD. English - 4 For more information on the TV screen to work with digital cable card modules (PCMCIA card modules called OpenCable and it is no longer needed with a proper digital cable tuner to receive... give you insert CableCARD for the first time, this process the digital cable service provider or CableCARD may not be inserted into the slot, the TV screen will be provided by DTLA (Digital Transmission Licensing Administrator).
... to be viewable depending on your local cable service provider. Please contact your cable provider needs to acquire a CableCARD. English - 4 For more information on the TV screen to work with digital cable card modules (PCMCIA card modules called OpenCable and it is no longer needed with a proper digital cable tuner to receive... give you insert CableCARD for the first time, this process the digital cable service provider or CableCARD may not be inserted into the slot, the TV screen will be provided by DTLA (Digital Transmission Licensing Administrator).
Instruction Manual
Page 6
Table of Contents Your New Wide TV 10 Replacing the Lamp 10 List of Features ...12 Accessories ...12 Front Panel LED Indicators 13 Right side buttons 14 Side Panel Jacks 14 Rear Panel Jacks 15 Remote Control ...16 Connections ...20 Connecting VHF and UHF Antennas 20 Antennas ...Multimedia Interface 28 Connecting a Digital Audio System 29 Connecting to an Analog Amplifier 29 Operation ...32 Turning the TV On and Off 32 Viewing the Menus and On-Screen Displays 32 Selecting a Menu Language 33 Memorizing the Channels 34 Adding and Erasing Channels 36 Changing Channels 37 Customizing...
Table of Contents Your New Wide TV 10 Replacing the Lamp 10 List of Features ...12 Accessories ...12 Front Panel LED Indicators 13 Right side buttons 14 Side Panel Jacks 14 Rear Panel Jacks 15 Remote Control ...16 Connections ...20 Connecting VHF and UHF Antennas 20 Antennas ...Multimedia Interface 28 Connecting a Digital Audio System 29 Connecting to an Analog Amplifier 29 Operation ...32 Turning the TV On and Off 32 Viewing the Menus and On-Screen Displays 32 Selecting a Menu Language 33 Memorizing the Channels 34 Adding and Erasing Channels 36 Changing Channels 37 Customizing...
Instruction Manual
Page 7
...Analog Channels Analog 48 Checking the Digital-Signal Strength Digital 49 LNA (Low Noise Amplifier 50 Picture Control 52 Picture Control ...52 Selecting the Color Tone 54 Changing the Picture Size ... Picture-In-Picture 62 Selecting the Sound Source 68 Freezing the Picture 69 Setting the Blue Screen Mode 70 Sound Control 72 Sound Control ...72 Setting the SRS TSXT 74 Auto Volume ...... Level 83 Using the V-Chip 84 Viewing Closed Captions (On-Screen Text Messages) Analog 90 Viewing Closed Captions (On-Screen Text Messages) Digital 92 Using the CableCARD 94 Using the CableCARD...
...Analog Channels Analog 48 Checking the Digital-Signal Strength Digital 49 LNA (Low Noise Amplifier 50 Picture Control 52 Picture Control ...52 Selecting the Color Tone 54 Changing the Picture Size ... Picture-In-Picture 62 Selecting the Sound Source 68 Freezing the Picture 69 Setting the Blue Screen Mode 70 Sound Control 72 Sound Control ...72 Setting the SRS TSXT 74 Auto Volume ...... Level 83 Using the V-Chip 84 Viewing Closed Captions (On-Screen Text Messages) Analog 90 Viewing Closed Captions (On-Screen Text Messages) Digital 92 Using the CableCARD 94 Using the CableCARD...
Instruction Manual
Page 10
...code numbered lamp to avoid damage to the TV. 2. Your New Wide TV Replacing the Lamp • Why do I need to replace it needs to be replaced when the screen becomes darker, less clear or when all three.... • Check before replacing the lamp as it will be bright and clear as it may cause poor screen quality, electric shock or fire. 4. The lamp must be hot. 3. Turn the power off and wait for...cover as new. • When do I need to a Samsung Service center. • Caution 1. It is indicated on the lamp case. 3. The lamp used in a DLP TV has a limited lifespan.
...code numbered lamp to avoid damage to the TV. 2. Your New Wide TV Replacing the Lamp • Why do I need to replace it needs to be replaced when the screen becomes darker, less clear or when all three.... • Check before replacing the lamp as it will be bright and clear as it may cause poor screen quality, electric shock or fire. 4. The lamp must be hot. 3. Turn the power off and wait for...cover as new. • When do I need to a Samsung Service center. • Caution 1. It is indicated on the lamp case. 3. The lamp used in a DLP TV has a limited lifespan.
Instruction Manual
Page 12
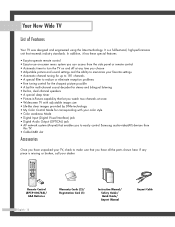
...in-Picture capability that let you watch two channels at any piece is a full-featured, high-performance unit that enables you to easily control Samsung audio-video(AV) devices from the side panel or remote control • Automatic timer to make sure that you have all the parts shown...; Easy-to-operate remote control • Easy-to-use on-screen menu system you can access from this TV. • CableCARD slot Accessories Once you have unpacked your TV, check to turn the TV on and off at once • Widescreen TV with adjustable image size • Life-like clear images provided by...
...in-Picture capability that let you watch two channels at any piece is a full-featured, high-performance unit that enables you to easily control Samsung audio-video(AV) devices from the side panel or remote control • Automatic timer to make sure that you have all the parts shown...; Easy-to-operate remote control • Easy-to-use on-screen menu system you can access from this TV. • CableCARD slot Accessories Once you have unpacked your TV, check to turn the TV on and off at once • Widescreen TV with adjustable image size • Life-like clear images provided by...

Instruction Manual
Page 14
...occasionally (a camcorder or video game, for example). Your New Wide TV Right side buttons The buttons on the right side panel control your TV's basic features, including the on -screen menu. Side Panel Jacks Use the rear of right side panel jacks to activate (or change channels and ...move between viewing TV programs and signals from a camcorder or video game. Connect...
...occasionally (a camcorder or video game, for example). Your New Wide TV Right side buttons The buttons on the right side panel control your TV's basic features, including the on -screen menu. Side Panel Jacks Use the rear of right side panel jacks to activate (or change channels and ...move between viewing TV programs and signals from a camcorder or video game. Connect...
Instruction Manual
Page 16
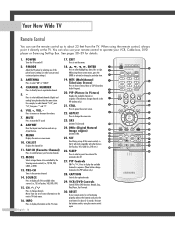
.... See pages 38~39 for about 23 feet from one of the preset factory settings (or select your VCR, Cable box, DVD player or Samsung Set-Top Box. Press to select "AIR" or "CABLE". 4. CH / Press to display the available channels in the PIP window only.) 28...26. FAV.CH (Favorite Channel) Press to operate your personal, customized picture settings.) 3. MENU Displays the main on the TV screen. RESET If your favorite channels. 12. Moves from the TV. PIP Controls CH / ; You can use your remote control to switch between your remote control is not functioning properly, ...
.... See pages 38~39 for about 23 feet from one of the preset factory settings (or select your VCR, Cable box, DVD player or Samsung Set-Top Box. Press to select "AIR" or "CABLE". 4. CH / Press to display the available channels in the PIP window only.) 28...26. FAV.CH (Favorite Channel) Press to operate your personal, customized picture settings.) 3. MENU Displays the main on the TV screen. RESET If your favorite channels. 12. Moves from the TV. PIP Controls CH / ; You can use your remote control to switch between your remote control is not functioning properly, ...
Instruction Manual
Page 24
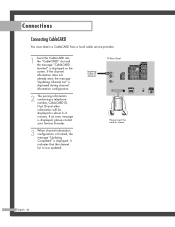
TV Rear Panel Incoming Cable or Antenna Please insert the card as shown. If the channel information does not already exist, the message "Updating Channel List" is .... If an error message is displayed, please contact your Service Provider. 3 When channel information configuration is finished, the message "Updating Completed" is displayed on the screen.
TV Rear Panel Incoming Cable or Antenna Please insert the card as shown. If the channel information does not already exist, the message "Updating Channel List" is .... If an error message is displayed, please contact your Service Provider. 3 When channel information configuration is finished, the message "Updating Completed" is displayed on the screen.
Instruction Manual
Page 32
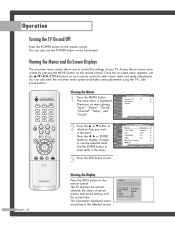
... Input Input Source List : TV Picture Edit Name Anynet √ √ Sound "Input", "Picture", "Sound", Channel "Channel", "Setup", and Setup "Guide". English - 32 Viewing the Display Press the INFO button on the remote control. Viewing the Menus and On-Screen Displays The on the remote ...control. Operation Turning the TV On and Off Press the POWER button on -screen menu system allows you want in the menu.
... Input Input Source List : TV Picture Edit Name Anynet √ √ Sound "Input", "Picture", "Sound", Channel "Channel", "Setup", and Setup "Guide". English - 32 Viewing the Display Press the INFO button on the remote control. Viewing the Menus and On-Screen Displays The on the remote ...control. Operation Turning the TV On and Off Press the POWER button on -screen menu system allows you want in the menu.
Instruction Manual
Page 33
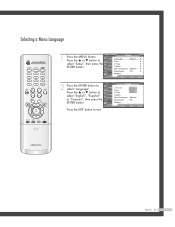
... Sound Channel Setup Guide Language : English √ Time √ V-Chip √ Caption √ Menu Transparency : Medium √ Blue Screen : Off √ ▼ More Move Enter Return 2 Press the ENTER button to select "Setup", then press the ENTER button. Setup Input... Picture Sound Channel Setup Guide Language : EEnngglislihsh Time V-Chip Español Français Caption Menu Transparency : Medium Blue Screen : Off ▼ More Move Enter Return English - 33 or † button to select "Language". Press the ... Press the ......
... Sound Channel Setup Guide Language : English √ Time √ V-Chip √ Caption √ Menu Transparency : Medium √ Blue Screen : Off √ ▼ More Move Enter Return 2 Press the ENTER button to select "Setup", then press the ENTER button. Setup Input... Picture Sound Channel Setup Guide Language : EEnngglislihsh Time V-Chip Español Français Caption Menu Transparency : Medium Blue Screen : Off ▼ More Move Enter Return English - 33 or † button to select "Language". Press the ... Press the ......

Instruction Manual
Page 40
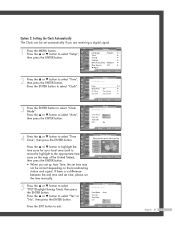
... Input Picture Sound Channel Setup Guide Language : English √ Time √ V-Chip √ Caption √ Menu Transparency : Medium √ Blue Screen : Off √ ▼ More Move Enter Return 2 Press the ... or † button to select "Clock", then press the ENTER button. ... ... or † button to select "Manual", then press the ENTER button. or † button to use the various timer features of the TV. Operation Setting the Clock Setting the clock is necessary in order to select "Setup", then press the ENTER button. Also, you press the INFO ...
... Input Picture Sound Channel Setup Guide Language : English √ Time √ V-Chip √ Caption √ Menu Transparency : Medium √ Blue Screen : Off √ ▼ More Move Enter Return 2 Press the ... or † button to select "Clock", then press the ENTER button. ... ... or † button to select "Manual", then press the ENTER button. or † button to use the various timer features of the TV. Operation Setting the Clock Setting the clock is necessary in order to select "Setup", then press the ENTER button. Also, you press the INFO ...
Instruction Manual
Page 41
... press the ENTER button. Setup Input Picture Sound Channel Setup Guide Language : English √ Time √ V-Chip √ Caption √ Menu Transparency : Medium √ Blue Screen : Off √ ▼ More Move Enter Return 2 Press the ... Press the ... Input Picture Press the ... If there is a difference between the real time and set...
... press the ENTER button. Setup Input Picture Sound Channel Setup Guide Language : English √ Time √ V-Chip √ Caption √ Menu Transparency : Medium √ Blue Screen : Off √ ▼ More Move Enter Return 2 Press the ... Press the ... Input Picture Press the ... If there is a difference between the real time and set...
Instruction Manual
Page 42
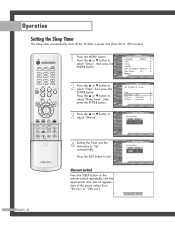
...sets the Activation to select "Time", then press the ENTER button. Operation Setting the Sleep Timer The sleep timer automatically shuts off the TV after a preset time (from "30 min" to select "Setup", then press the ENTER button. Press the EXIT button to 180...Minute". Setup Input Picture Sound Channel Setup Guide Language : English √ Time √ V-Chip √ Caption √ Menu Transparency : Medium √ Blue Screen : Off √ ▼ More Move Enter Return 2 Press the ... Sleep Timer : 90 min English - 42 or † button to select "Sleep ...
...sets the Activation to select "Time", then press the ENTER button. Operation Setting the Sleep Timer The sleep timer automatically shuts off the TV after a preset time (from "30 min" to select "Setup", then press the ENTER button. Press the EXIT button to 180...Minute". Setup Input Picture Sound Channel Setup Guide Language : English √ Time √ V-Chip √ Caption √ Menu Transparency : Medium √ Blue Screen : Off √ ▼ More Move Enter Return 2 Press the ... Sleep Timer : 90 min English - 42 or † button to select "Sleep ...
Instruction Manual
Page 52
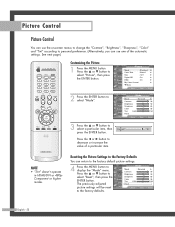
...Move Enter Return Mode Input Picture Sound Channel Setup Guide Mode : Standard Contrast Brightness Sharpness Color Tint G 50 Reset Move Enter √ 90 50 65 55 R 50 Return 3 Press the ... or † button to decrease or increase the value of the automatic settings...Picture Sound Channel Setup Guide Mode : Standard Contrast Brightness Sharpness Color Tint G 50 Reset Move Enter √ 90 50 65 55 R 50 Return English - 52 Picture Control Picture Control You can use the on-screen menus to change the "Contrast", "Brightness", "Sharpness", "Color" and "...
...Move Enter Return Mode Input Picture Sound Channel Setup Guide Mode : Standard Contrast Brightness Sharpness Color Tint G 50 Reset Move Enter √ 90 50 65 55 R 50 Return 3 Press the ... or † button to decrease or increase the value of the automatic settings...Picture Sound Channel Setup Guide Mode : Standard Contrast Brightness Sharpness Color Tint G 50 Reset Move Enter √ 90 50 65 55 R 50 Return English - 52 Picture Control Picture Control You can use the on-screen menus to change the "Contrast", "Brightness", "Sharpness", "Color" and "...

Instruction Manual
Page 55
...picture. • "4:3": Sets the picture to select "Picture", then press the ENTER button. This is a standard TV screen size. With PIP Off, it returns to select the screen format you want, then press the ENTER button. Picture Input Picture Sound Channel Setup Guide Mode : Standard √... : On √ My Color Control √ ▼ More Move Enter Return 2 Press the œ or √ button to original screen size. Input Picture Sound Channel Setup Guide Size 16:9 Panorama Zoom1 Zoom2 4:3 Move Enter Return Alternate method Press the ASPECT button on the remote control...
...picture. • "4:3": Sets the picture to select "Picture", then press the ENTER button. This is a standard TV screen size. With PIP Off, it returns to select the screen format you want, then press the ENTER button. Picture Input Picture Sound Channel Setup Guide Mode : Standard √... : On √ My Color Control √ ▼ More Move Enter Return 2 Press the œ or √ button to original screen size. Input Picture Sound Channel Setup Guide Size 16:9 Panorama Zoom1 Zoom2 4:3 Move Enter Return Alternate method Press the ASPECT button on the remote control...

Instruction Manual
Page 56
... My Color Control √ ▼ More Move Enter Return 3 Press the ... Picture Control Digital Noise Reduction If the broadcast signal received by your TV is weak, you can activate the Digital Noise Reduction feature to select "Digital NR", then press the ENTER button. or † button to help... reduce any static and ghosting that may appear on the screen. 1 Press the MENU button. or † button to select "Off" or "On", then press the ENTER button. Press the ... Picture ...
... My Color Control √ ▼ More Move Enter Return 3 Press the ... Picture Control Digital Noise Reduction If the broadcast signal received by your TV is weak, you can activate the Digital Noise Reduction feature to select "Digital NR", then press the ENTER button. or † button to help... reduce any static and ghosting that may appear on the screen. 1 Press the MENU button. or † button to select "Off" or "On", then press the ENTER button. Press the ... Picture ...
Instruction Manual
Page 57
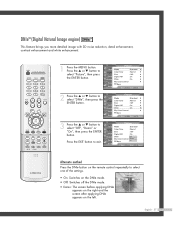
... of the settings. • On: Switches on the DNIe mode. • Off: Switches off the DNIe mode. • Demo: The screen before applying DNIe appears on the right and the screen after applying DNIe appears on the remote control repeatedly to select "Off", "Demo" or "On", then press the ENTER button. Press...
... of the settings. • On: Switches on the DNIe mode. • Off: Switches off the DNIe mode. • Demo: The screen before applying DNIe appears on the right and the screen after applying DNIe appears on the remote control repeatedly to select "Off", "Demo" or "On", then press the ENTER button. Press...
Instruction Manual
Page 58
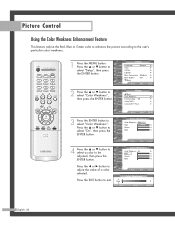
... selected mode is set the My Color Control mode to "Custom". • The My Color Control feature operates only when "DNIe" is shown on the screen. Easy Control œ Standard Custom Press the EXIT button to their preferences, by adjusting skin, sky, and grass tones using the predefined settings ("Blue", "Green...
... selected mode is set the My Color Control mode to "Custom". • The My Color Control feature operates only when "DNIe" is shown on the screen. Easy Control œ Standard Custom Press the EXIT button to their preferences, by adjusting skin, sky, and grass tones using the predefined settings ("Blue", "Green...
Instruction Manual
Page 59
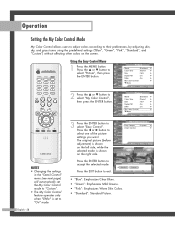
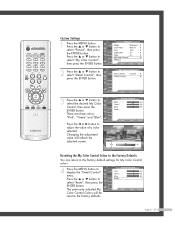
...select "My Color Control", then press the ENTER button. Detail Control Input Picture Sound Channel Pink Green Blue Reset Setup Guide Move Enter 50 50 50 Return English - 59 or † button to display the "Detail Control" menu. Press the ... The previously adjusted My Color ...Control Colors will refresh the adjusted screen. or † button to the factory defaults. Press the œ or √ button to select "Reset", then press the ENTER button....
...select "My Color Control", then press the ENTER button. Detail Control Input Picture Sound Channel Pink Green Blue Reset Setup Guide Move Enter 50 50 50 Return English - 59 or † button to display the "Detail Control" menu. Press the ... The previously adjusted My Color ...Control Colors will refresh the adjusted screen. or † button to the factory defaults. Press the œ or √ button to select "Reset", then press the ENTER button....
Instruction Manual
Page 60
... picture according to exit. Setup Input Picture Sound Channel Setup Guide Language : English √ Time √ V-Chip √ Caption √ Menu Transparency : Medium √ Blue Screen : Off √ ▼ More Move Enter Return 2 Press the ...
... picture according to exit. Setup Input Picture Sound Channel Setup Guide Language : English √ Time √ V-Chip √ Caption √ Menu Transparency : Medium √ Blue Screen : Off √ ▼ More Move Enter Return 2 Press the ...


