Instruction Manual
Page 3
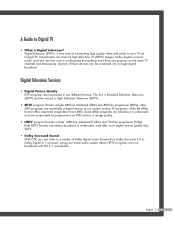
... higher picture quality than one program on the same TV channel) and datacasting. Using DTV, broadcasters can transmit high definition TV (HDTV) images, Dolby digital surround audio, and new services such as multicasting (transmitting more than SDTV. • Dolby Surround Sound With DTV, you can be combined into a single digital broadcast. Digital television (DTV) is a new way of transmitting high quality video and audio to your home audio system. Many HDTV programs...
... higher picture quality than one program on the same TV channel) and datacasting. Using DTV, broadcasters can transmit high definition TV (HDTV) images, Dolby digital surround audio, and new services such as multicasting (transmitting more than SDTV. • Dolby Surround Sound With DTV, you can be combined into a single digital broadcast. Digital television (DTV) is a new way of transmitting high quality video and audio to your home audio system. Many HDTV programs...
Instruction Manual
Page 5
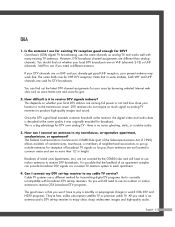
... receive DTV signals indoors? You can find out whether your area by the OTARD rules and will still need a different antenna. Cable TV systems use a different method for your local DTV broadcasts are no noise, ghosting, static, or scratchy audio. 3. Q&A 1. Is the antenna I connect my DTV set -top receiver to produce high-quality images and sound. You should find out the latest DTV channel assignments for transmitting digital TV programs...
... receive DTV signals indoors? You can find out whether your area by the OTARD rules and will still need a different antenna. Cable TV systems use a different method for your local DTV broadcasts are no noise, ghosting, static, or scratchy audio. 3. Q&A 1. Is the antenna I connect my DTV set -top receiver to produce high-quality images and sound. You should find out the latest DTV channel assignments for transmitting digital TV programs...
Instruction Manual
Page 6
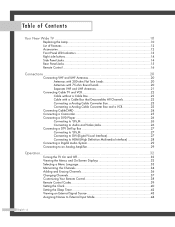
... Connecting to HDMI (High Definition Multimedia Interface 28 Connecting a Digital Audio System 29 Connecting to an Analog Amplifier 29 Operation ...32 Turning the TV On and Off 32 Viewing the Menus and On-Screen Displays 32 Selecting a Menu Language 33 Memorizing the Channels 34 Adding and Erasing Channels 36 Changing Channels 37 Customizing Your Remote Control 38 Remote Control Codes 39 Setting the Clock 40 Setting the Sleep Timer 42 Viewing an External Signal Source 43 Assigning Names to External Input Mode...
... Connecting to HDMI (High Definition Multimedia Interface 28 Connecting a Digital Audio System 29 Connecting to an Analog Amplifier 29 Operation ...32 Turning the TV On and Off 32 Viewing the Menus and On-Screen Displays 32 Selecting a Menu Language 33 Memorizing the Channels 34 Adding and Erasing Channels 36 Changing Channels 37 Customizing Your Remote Control 38 Remote Control Codes 39 Setting the Clock 40 Setting the Sleep Timer 42 Viewing an External Signal Source 43 Assigning Names to External Input Mode...
Instruction Manual
Page 12
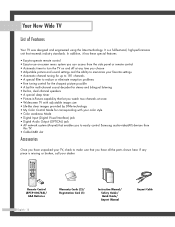
... Color Control Mode for corresponding with your color style • Color weakness Mode • Digital Input (Digital Visual Interface) jack • Digital Audio Output (OPTICAL) jack • AV network system (Anynet) that you have all the parts shown here. In addition, it has these special features: • Easy-to-operate remote control • Easy-to-use on-screen menu system you can access from the side panel or remote control • Automatic timer to turn the TV...
... Color Control Mode for corresponding with your color style • Color weakness Mode • Digital Input (Digital Visual Interface) jack • Digital Audio Output (OPTICAL) jack • AV network system (Anynet) that you have all the parts shown here. In addition, it has these special features: • Easy-to-operate remote control • Easy-to-use on-screen menu system you can access from the side panel or remote control • Automatic timer to turn the TV...
Instruction Manual
Page 15
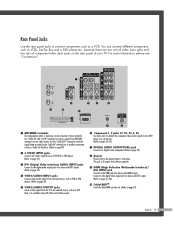
... independent cables or antennas can connect different components such as VCRs, Set-Top Box and a DVD player etc., because there are two sets of video input jacks and two sets of component video input jacks on the rear panel of a device with DVI output. (Refer to page 27) ¨ VIDEO/AUDIO INPUT jacks Connect video/audio signals from external sources, such as VCR or DVD players. (Refer to page 26) ˆ VIDEO/AUDIO OUTPUT jacks Sends a video signal from the TV to the digital audio output...
... independent cables or antennas can connect different components such as VCRs, Set-Top Box and a DVD player etc., because there are two sets of video input jacks and two sets of component video input jacks on the rear panel of a device with DVI output. (Refer to page 27) ¨ VIDEO/AUDIO INPUT jacks Connect video/audio signals from external sources, such as VCR or DVD players. (Refer to page 26) ˆ VIDEO/AUDIO OUTPUT jacks Sends a video signal from the TV to the digital audio output...
Instruction Manual
Page 16
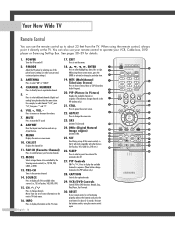
... 17. PIP (Picture In Picture) Displays the available channels in TV Guide menu. 16. SRS Activates TruSurround. 24. PIP Controls CH / ; Re-insert the batteries and try using the remote control, always point it will work compatibly with other devices (Set-Top box, VCR, Cable box, DVD, etc.) 26. ANTENNA Press to pause the current screen. 22. INFO Press to the next in sequence. (These buttons change channels. EXIT Press to exit the menu. 18...
... 17. PIP (Picture In Picture) Displays the available channels in TV Guide menu. 16. SRS Activates TruSurround. 24. PIP Controls CH / ; Re-insert the batteries and try using the remote control, always point it will work compatibly with other devices (Set-Top box, VCR, Cable box, DVD, etc.) 26. ANTENNA Press to pause the current screen. 22. INFO Press to the next in sequence. (These buttons change channels. EXIT Press to exit the menu. 18...
Instruction Manual
Page 26
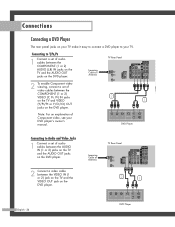
... Antenna TV Rear Panel 2 Connect a video cable between the COMPONENT (1 or 2) AUDIO (L,R) IN jacks on the TV and the AUDIO OUT jacks on the DVD player. TV Rear Panel Incoming Cable or Antenna 2 To enable Component video viewing, connect a set of video cables between the AUDIO IN (1 or 2) jacks on the TV and the AUDIO OUT jacks on the DVD player. Connections Connecting a DVD Player The rear panel jacks on your TV make it easy to connect a DVD player to your DVD player's owner's manual. Connecting to Audio and Video Jacks 1 Connect a set of Component video, see your TV. DVD...
... Antenna TV Rear Panel 2 Connect a video cable between the COMPONENT (1 or 2) AUDIO (L,R) IN jacks on the TV and the AUDIO OUT jacks on the DVD player. TV Rear Panel Incoming Cable or Antenna 2 To enable Component video viewing, connect a set of video cables between the AUDIO IN (1 or 2) jacks on the TV and the AUDIO OUT jacks on the DVD player. Connections Connecting a DVD Player The rear panel jacks on your TV make it easy to connect a DVD player to your DVD player's owner's manual. Connecting to Audio and Video Jacks 1 Connect a set of Component video, see your TV. DVD...
Instruction Manual
Page 27
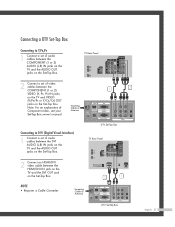
... a Cable Converter. Note: For an explanation of Component video, see your Set-Top Box owner's manual. DTV Set-Top Box TV Rear Panel 2 Connect an HDMI/DVI video cable between the DVI AUDIO (L,R) IN jacks on the TV and the AUDIO OUT jacks on the Set-Top Box. Incoming Cable or Antenna 2 1 DTV Set-Top Box English - 27 TV Rear Panel 2 Connect a set of video cables between the COMPONENT (1 or 2) AUDIO (L,R) IN jacks on the TV and the AUDIO OUT jacks on the Set-Top Box. Connecting a DTV Set-Top Box Connecting to DVI (Digital...
... a Cable Converter. Note: For an explanation of Component video, see your Set-Top Box owner's manual. DTV Set-Top Box TV Rear Panel 2 Connect an HDMI/DVI video cable between the DVI AUDIO (L,R) IN jacks on the TV and the AUDIO OUT jacks on the Set-Top Box. Incoming Cable or Antenna 2 1 DTV Set-Top Box English - 27 TV Rear Panel 2 Connect a set of video cables between the COMPONENT (1 or 2) AUDIO (L,R) IN jacks on the TV and the AUDIO OUT jacks on the Set-Top Box. Connecting a DTV Set-Top Box Connecting to DVI (Digital...
Instruction Manual
Page 29
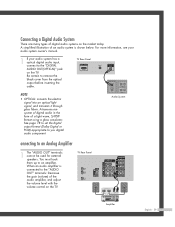
... TV. TV Rear Panel Amplifier English - 29 Be certain to you digital audio component. When an audio amplifier is shown below. See page 78 to set the digital output format (Dolby Digital or PCM) appropriate to remove the black cover from the optical output before inserting the cable. You must hook them up to the "AUDIO OUT" terminals: Decrease the gain (volume) of the audio amplifier, and adjust the volume level with the volume control...
... TV. TV Rear Panel Amplifier English - 29 Be certain to you digital audio component. When an audio amplifier is shown below. See page 78 to set the digital output format (Dolby Digital or PCM) appropriate to remove the black cover from the optical output before inserting the cable. You must hook them up to the "AUDIO OUT" terminals: Decrease the gain (volume) of the audio amplifier, and adjust the volume level with the volume control...
Instruction Manual
Page 32
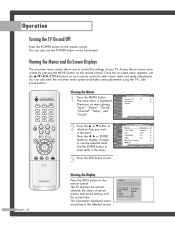
... your remote control to enter items in the menu. Once the on-screen menu appears, use the POWER button on your TV. You can also use the ENTER buttons on the front panel. There are six menu groups: Input Input Source List : TV Picture Edit Name Anynet √ √ Sound "Input", "Picture", "Sound", Channel "Channel", "Setup", and Setup "Guide". or † button to select an item you to control the settings of certain picture and sound settings and the current time. Picture Input Picture Sound Channel Setup Guide Mode : Standard √ Color Tone...
... your remote control to enter items in the menu. Once the on-screen menu appears, use the POWER button on your TV. You can also use the ENTER buttons on the front panel. There are six menu groups: Input Input Source List : TV Picture Edit Name Anynet √ √ Sound "Input", "Picture", "Sound", Channel "Channel", "Setup", and Setup "Guide". or † button to select an item you to control the settings of certain picture and sound settings and the current time. Picture Input Picture Sound Channel Setup Guide Mode : Standard √ Color Tone...
Instruction Manual
Page 34
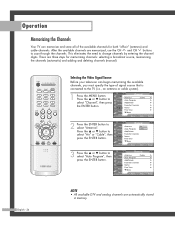
...; button to change channels by entering the channel digits. Channel Input Picture Sound Channel Setup Guide Antenna : Cable Auto Program Add/Delete Favorite Channels Name Fine Tune ▼ More Move Enter Return 2 Press the ENTER button to select "Auto Program", then press the ENTER button. Selecting the Video Signal Source Before your television can memorize and store all of signal source that is connected to the TV (i.e., an antenna or cable system). 1 Press the MENU button. or † button to select "Antenna". Channel Input Picture Sound Channel Setup...
...; button to change channels by entering the channel digits. Channel Input Picture Sound Channel Setup Guide Antenna : Cable Auto Program Add/Delete Favorite Channels Name Fine Tune ▼ More Move Enter Return 2 Press the ENTER button to select "Auto Program", then press the ENTER button. Selecting the Video Signal Source Before your television can memorize and store all of signal source that is connected to the TV (i.e., an antenna or cable system). 1 Press the MENU button. or † button to select "Antenna". Channel Input Picture Sound Channel Setup...

Instruction Manual
Page 40
... button to exit. Move Adjust Return English - 40 Press the EXIT button to select "Clock Mode". Setup Input Picture Sound Channel Setup Guide Language : English √ Time √ V-Chip √ Caption √ Menu Transparency : Medium √ Blue Screen : Off √ ▼ More Move Enter Return 2 Press the ... Clock Input Picture Sound Channel Setup Clock Mode Clock Set Time Zone DST : MAauntoual Auto : No Guide Move Enter Return 4 Press the ... or † button to use the various timer features of the TV. Operation Setting...
... button to exit. Move Adjust Return English - 40 Press the EXIT button to select "Clock Mode". Setup Input Picture Sound Channel Setup Guide Language : English √ Time √ V-Chip √ Caption √ Menu Transparency : Medium √ Blue Screen : Off √ ▼ More Move Enter Return 2 Press the ... Clock Input Picture Sound Channel Setup Clock Mode Clock Set Time Zone DST : MAauntoual Auto : No Guide Move Enter Return 4 Press the ... or † button to use the various timer features of the TV. Operation Setting...
Instruction Manual
Page 41
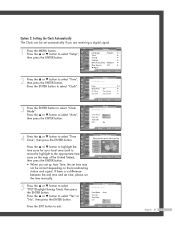
... the highlight to select "Time Zone", then press the ENTER button. Sound Channel Setup Guide • When you set up Auto Time, the set time may not be set the time manually. Guide Move Enter Return English - 41 Clock Input Picture Sound Channel Setup Clock Mode Clock Set Time Zone DST : MAauntoual Auto : No Guide Move Enter Return 4 Press the ... Time Zone Select the time zone in which you are receiving a digital signal. 1 Press the MENU button. Option 2: Setting the Clock Automatically The...
... the highlight to select "Time Zone", then press the ENTER button. Sound Channel Setup Guide • When you set up Auto Time, the set time may not be set the time manually. Guide Move Enter Return English - 41 Clock Input Picture Sound Channel Setup Clock Mode Clock Set Time Zone DST : MAauntoual Auto : No Guide Move Enter Return 4 Press the ... Time Zone Select the time zone in which you are receiving a digital signal. 1 Press the MENU button. Option 2: Setting the Clock Automatically The...
Instruction Manual
Page 42
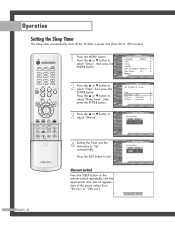
...; Move Adjust Return Alternate method Press the SLEEP button on the remote control repeatedly until the appropriate time interval appears (any of the preset values from 30 to 180 minutes). 1 Press the MENU button. Sleep Timer : 90 min English - 42 Press the ... Press the ... Input Picture Sound Channel Setup Guide Sleep Timer Set sleep timer Minute Activation ▲ --- Operation Setting the Sleep Timer The sleep timer automatically shuts off the TV after a preset time...
...; Move Adjust Return Alternate method Press the SLEEP button on the remote control repeatedly until the appropriate time interval appears (any of the preset values from 30 to 180 minutes). 1 Press the MENU button. Sleep Timer : 90 min English - 42 Press the ... Press the ... Input Picture Sound Channel Setup Guide Sleep Timer Set sleep timer Minute Activation ▲ --- Operation Setting the Sleep Timer The sleep timer automatically shuts off the TV after a preset time...
Instruction Manual
Page 52
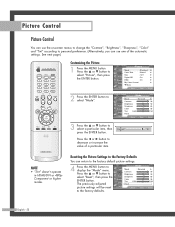
... the ... or † button to select "Mode". Mode Input Picture Sound Channel Setup Guide Mode : Standard Contrast Brightness Sharpness Color Tint G 50 Reset Move Enter √ 90 50 65 55 R 50 Return English - 52 Press the ... Picture Control Picture Control You can use one of a particular item. See next page.) Customizing the Picture 1 Press the MENU button. Resetting the Picture Settings to the Factory Defaults You can use the on-screen menus to change the "Contrast", "Brightness", "Sharpness", "Color" and "Tint" according to...
... the ... or † button to select "Mode". Mode Input Picture Sound Channel Setup Guide Mode : Standard Contrast Brightness Sharpness Color Tint G 50 Reset Move Enter √ 90 50 65 55 R 50 Return English - 52 Press the ... Picture Control Picture Control You can use one of a particular item. See next page.) Customizing the Picture 1 Press the MENU button. Resetting the Picture Settings to the Factory Defaults You can use the on-screen menus to change the "Contrast", "Brightness", "Sharpness", "Color" and "Tint" according to...
Instruction Manual
Page 58
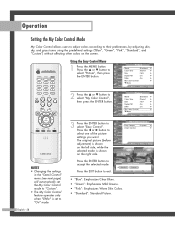
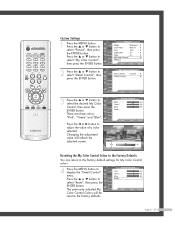
... Return NOTES • Changing the settings in the "Detail Control" menu (see next page) will automatically set to "On" mode. 3 Press the ENTER button to select "Easy Control". My Color Control Input Easy Control : Custom √ Picture Detail Control √ Sound Channel Setup Guide Move Enter Return Original Custom Press the ENTER button to select "My Color Control", then press the ENTER button. Picture Input Picture Sound Channel Setup Guide Mode : Standard √ Color Tone : Warm1 √ Size : 16:9 √ Digital NR : On...
... Return NOTES • Changing the settings in the "Detail Control" menu (see next page) will automatically set to "On" mode. 3 Press the ENTER button to select "Easy Control". My Color Control Input Easy Control : Custom √ Picture Detail Control √ Sound Channel Setup Guide Move Enter Return Original Custom Press the ENTER button to select "My Color Control", then press the ENTER button. Picture Input Picture Sound Channel Setup Guide Mode : Standard √ Color Tone : Warm1 √ Size : 16:9 √ Digital NR : On...
Instruction Manual
Page 59
... My Color Control colors. 4 Press the MENU button to select the desired My Color Control, then press the ENTER button. Detail Control Input Picture Sound Channel Pink Green Blue Reset Setup Guide Move Enter 50 50 50 Return English - 59 Picture Input Picture Sound Channel Setup Guide Mode : Standard √ Color Tone : Warm1 √ Size : 16:9 √ Digital NR : On √ DNIe : On √ My Color Control √ ▼ More Move Enter Return 2 Press the ... or † button to display the "Detail Control" menu. Press the ... Changing the adjustment...
... My Color Control colors. 4 Press the MENU button to select the desired My Color Control, then press the ENTER button. Detail Control Input Picture Sound Channel Pink Green Blue Reset Setup Guide Move Enter 50 50 50 Return English - 59 Picture Input Picture Sound Channel Setup Guide Mode : Standard √ Color Tone : Warm1 √ Size : 16:9 √ Digital NR : On √ DNIe : On √ My Color Control √ ▼ More Move Enter Return 2 Press the ... or † button to display the "Detail Control" menu. Press the ... Changing the adjustment...
Instruction Manual
Page 84
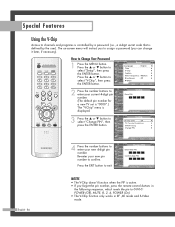
...the EXIT button to confirm. Special Features Using the V-Chip Access to assign a password (you can change it later, if necessary). Press the ... Input Enter PIN Picture * V-Chip (The default pin number for Sound a new TV set is "0000".) Channel The "V-Chip" menu is defined by the user). The on-screen menu will instruct you to channels and programs is controlled by a password (i.e., a 4-digit secret code that is Setup displayed. Setup Input Picture Sound Channel Setup Guide Language : English √ Time √ V-Chip √ Caption √ Menu Transparency...
...the EXIT button to confirm. Special Features Using the V-Chip Access to assign a password (you can change it later, if necessary). Press the ... Input Enter PIN Picture * V-Chip (The default pin number for Sound a new TV set is "0000".) Channel The "V-Chip" menu is defined by the user). The on-screen menu will instruct you to channels and programs is controlled by a password (i.e., a 4-digit secret code that is Setup displayed. Setup Input Picture Sound Channel Setup Guide Language : English √ Time √ V-Chip √ Caption √ Menu Transparency...
Instruction Manual
Page 100
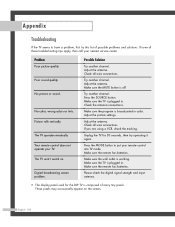
Poor sound quality. Adjust the antenna. Check the antenna connections. Adjust the picture settings. Make sure the TV is composed of many tiny pixels. English - 100 If none of possible problems and solutions. Picture rolls vertically. Try another channel. Press the SOURCE button. Check all wire connections. Please check the digital signal strength and input antenna. • The display panel used for 30 seconds, then try this list of these troubleshooting tips apply, then call your nearest service center...
Poor sound quality. Adjust the antenna. Check the antenna connections. Adjust the picture settings. Make sure the TV is composed of many tiny pixels. English - 100 If none of possible problems and solutions. Picture rolls vertically. Try another channel. Press the SOURCE button. Check all wire connections. Please check the digital signal strength and input antenna. • The display panel used for 30 seconds, then try this list of these troubleshooting tips apply, then call your nearest service center...
Instruction Manual
Page 101
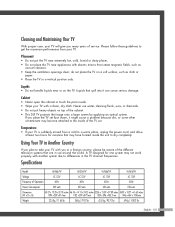
... DLP TV projects the image onto a large screen by applying an optical system. Liquids that are in a vertical position only. If you place the TV set . Liquids • Do not handle liquids near appliances with electric motors that may have formed inside the unit to dry completely. Never use around the world. Cabinet • Never open the cabinet or touch the parts inside...
... DLP TV projects the image onto a large screen by applying an optical system. Liquids that are in a vertical position only. If you place the TV set . Liquids • Do not handle liquids near appliances with electric motors that may have formed inside the unit to dry completely. Never use around the world. Cabinet • Never open the cabinet or touch the parts inside...


