
Open Source Guide (ENGLISH)
Page 1
... the Free Software Foundation, write to share and change under the scope of the work means the preferred form of this License. 8. If the Program specifies a version number of this section is normally distributed (in object code or executable form under this License may differ in the body of the rights granted herein. This product uses some software programs which...
... the Free Software Foundation, write to share and change under the scope of the work means the preferred form of this License. 8. If the Program specifies a version number of this section is normally distributed (in object code or executable form under this License may differ in the body of the rights granted herein. This product uses some software programs which...

Open Source Guide (ENGLISH)
Page 2
...THIRD PARTIES OR A FAILURE OF THE LIBRARY TO OPERATE WITH ANY OTHER SOFTWARE), EVEN IF SUCH HOLDER OR OTHER PARTY HAS BEEN ADVISED OF THE POSSIBILITY OF SUCH DAMAGES. You can redistribute and change. To apply these terms (or, alternatively, under... the terms of warranty; It is safest to attach them to the start of the greatest possible use to the public, we recommend making it free software that everyone can ... want it to be of each file should have at least the "copyright" line and a pointer to the library. 16.
...THIRD PARTIES OR A FAILURE OF THE LIBRARY TO OPERATE WITH ANY OTHER SOFTWARE), EVEN IF SUCH HOLDER OR OTHER PARTY HAS BEEN ADVISED OF THE POSSIBILITY OF SUCH DAMAGES. You can redistribute and change. To apply these terms (or, alternatively, under... the terms of warranty; It is safest to attach them to the start of the greatest possible use to the public, we recommend making it free software that everyone can ... want it to be of each file should have at least the "copyright" line and a pointer to the library. 16.
User Manual (ENGLISH)
Page 2
... force, and uneven surfaces can fall. Your new Samsung projection TV represents the latest in mind when installing, using your safety, this product. BP68-00142A-1 5/27/03 10:09 AM Page 2 Safety Instructions Warning! THERE ARE NO USER SERVICEABLE PARTS INSIDE. REFER ALL SERVICING TO QUALIFIED SERVICE PERSONNEL. To reduce the risk of copyrighted TV programs is present. Move the TV and cart with care.
... force, and uneven surfaces can fall. Your new Samsung projection TV represents the latest in mind when installing, using your safety, this product. BP68-00142A-1 5/27/03 10:09 AM Page 2 Safety Instructions Warning! THERE ARE NO USER SERVICEABLE PARTS INSIDE. REFER ALL SERVICING TO QUALIFIED SERVICE PERSONNEL. To reduce the risk of copyrighted TV programs is present. Move the TV and cart with care.
User Manual (ENGLISH)
Page 3
... Tel) 408-544-5124 Fax) 408-544-5191 Provided with FCC Logo. The TV exhibits a distinct degradation in wire to an antenna discharge unit, size of grounding conductors, location of overhead power lines or other controls may cause undesired operation. When the LAMP(BULB ONLY) replacement is a detachable power supply cord with similar configuration. However, there is subject to radio communications. You may cause...
... Tel) 408-544-5124 Fax) 408-544-5191 Provided with FCC Logo. The TV exhibits a distinct degradation in wire to an antenna discharge unit, size of grounding conductors, location of overhead power lines or other controls may cause undesired operation. When the LAMP(BULB ONLY) replacement is a detachable power supply cord with similar configuration. However, there is subject to radio communications. You may cause...
User Manual (ENGLISH)
Page 4
... Picture Control ...38 Sound Control ...40 Setting the Clock 42 Setting the Timers 43 Viewing an External Signal Source 45 6 Special Features 48 Setting Up Your Remote Control 48 Remote Control Codes 51 Fine Tuning Channels 52 Selecting the Color Tone 53 Setting the Film Mode 53 DNIeTM (Digital Natural Image engine) 54 Digital Noise Reduction 55 Setting the Blue Screen Mode 56 Changing the Screen Size 57 Special Audio Options 59 MTS Settings: Choosing a Soundtrack 59 Dolby Virtual 60 BBE ...61 Auto Volume 62 Viewing Closed Caption Information 63 Viewing...
... Picture Control ...38 Sound Control ...40 Setting the Clock 42 Setting the Timers 43 Viewing an External Signal Source 45 6 Special Features 48 Setting Up Your Remote Control 48 Remote Control Codes 51 Fine Tuning Channels 52 Selecting the Color Tone 53 Setting the Film Mode 53 DNIeTM (Digital Natural Image engine) 54 Digital Noise Reduction 55 Setting the Blue Screen Mode 56 Changing the Screen Size 57 Special Audio Options 59 MTS Settings: Choosing a Soundtrack 59 Dolby Virtual 60 BBE ...61 Auto Volume 62 Viewing Closed Caption Information 63 Viewing...
User Manual (ENGLISH)
Page 6
...; Please turn off TV power before changing a lamp and then unplug after turning off at the same time, you may have been completely unfastened, they will help cool the lamp so you can identify the lamp type on the right. If the screen image becomes dark, or timer, lamp and Temp LEDs flicker off your projection unit. • You can safely remove it. You should only replace the lamp with a new...
...; Please turn off TV power before changing a lamp and then unplug after turning off at the same time, you may have been completely unfastened, they will help cool the lamp so you can identify the lamp type on the right. If the screen image becomes dark, or timer, lamp and Temp LEDs flicker off your projection unit. • You can safely remove it. You should only replace the lamp with a new...
User Manual (ENGLISH)
Page 7
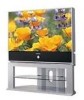
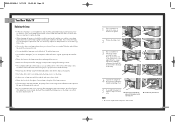
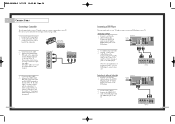
...; HLN617W Œ TV/VIDEO Press to switch between viewing TV programs and signals from the side panel or remote control • Automatic timer to turn the TV on and off at once • Widescreen TV with adjustable image size Checking Parts Once you can access from connected components. ´ MENU Press to see the on-screen menu. ˇ M CHANNEL L Press to change channels and move between items on the on-screen menu. ¨ VOLUME +, - Television This Manual A/V Cable (AA39-40001B) Remote Control (BP59-00016A)/ AAA...
...; HLN617W Œ TV/VIDEO Press to switch between viewing TV programs and signals from the side panel or remote control • Automatic timer to turn the TV on and off at once • Widescreen TV with adjustable image size Checking Parts Once you can access from connected components. ´ MENU Press to see the on-screen menu. ˇ M CHANNEL L Press to change channels and move between items on the on-screen menu. ¨ VOLUME +, - Television This Manual A/V Cable (AA39-40001B) Remote Control (BP59-00016A)/ AAA...
User Manual (ENGLISH)
Page 8
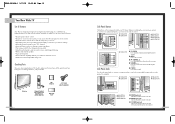
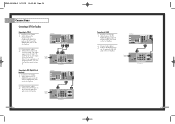
... rear of the set top box. " DVI (Digital Video Interface) jack Receives the digital signals from a set is not operating normally. Lamp cover on the rear panel of your TV. Indicator Light Key : Light is On : Light is Blinking : Light is available only in about 30 seconds for the TV to warm up, so normal brightness may be connected to ANT-A. ´ S-VIDEO INPUT jacks Connects an S-Video signal from an S-VHS VCR or DVD player. ˇ VIDEO/AUDIO INPUT jacks(VCR1, VCR2) Connect video/audio signals from external...
... rear of the set top box. " DVI (Digital Video Interface) jack Receives the digital signals from a set is not operating normally. Lamp cover on the rear panel of your TV. Indicator Light Key : Light is On : Light is Blinking : Light is available only in about 30 seconds for the TV to warm up, so normal brightness may be connected to ANT-A. ´ S-VIDEO INPUT jacks Connects an S-Video signal from an S-VHS VCR or DVD player. ˇ VIDEO/AUDIO INPUT jacks(VCR1, VCR2) Connect video/audio signals from external...
User Manual (ENGLISH)
Page 9
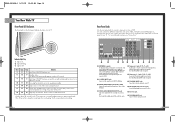
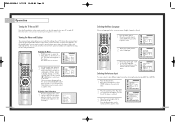
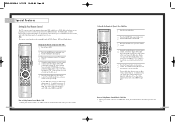
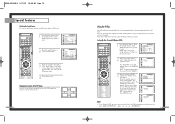
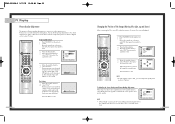
... Wide TV Remote Control You can also operate your VCR, cable box, and DVD player. 1. Menu Displays the main on -screen menu items and change channels in a cool dry place. 1 Slide the back cover all of the remote control. 2 Install two AAA size batteries. Mode Selects a target device to choose stereo, mono or Separate Audio Program (SAP broadcast). 10. DNIe Activates DNIe (Digital Natural Image engine). 15. Exchanges the video signal that it directly at the TV. Size; MTS(Multichannel Television...
... Wide TV Remote Control You can also operate your VCR, cable box, and DVD player. 1. Menu Displays the main on -screen menu items and change channels in a cool dry place. 1 Slide the back cover all of the remote control. 2 Install two AAA size batteries. Mode Selects a target device to choose stereo, mono or Separate Audio Program (SAP broadcast). 10. DNIe Activates DNIe (Digital Natural Image engine). 15. Exchanges the video signal that it directly at the TV. Size; MTS(Multichannel Television...
User Manual (ENGLISH)
Page 13
... TV and the AUDIO OUT jacks on the DVD player. 2 Connect video cables between the VIDEO OUT jack on the DVD player and the VIDEO IN jack on your TV make it easy to connect a DVD player to your camcorder is usually included with the camcorder.) To watch a tape, follow your camera's instructions and the section on "Viewing an External Signal Source" in this manual. 24 Connecting a DVD Player The rear panel jacks on the TV...
... TV and the AUDIO OUT jacks on the DVD player. 2 Connect video cables between the VIDEO OUT jack on the DVD player and the VIDEO IN jack on your TV make it easy to connect a DVD player to your camcorder is usually included with the camcorder.) To watch a tape, follow your camera's instructions and the section on "Viewing an External Signal Source" in this manual. 24 Connecting a DVD Player The rear panel jacks on the TV...
User Manual (ENGLISH)
Page 14
... MONITOR OUT Pr VIDEO 2 L L ANT-B S-VIDEO 1 S-VIDEO 2 VIDEO 1 R R V L R DVI PC RS-232C DVI DTV Set Top Box 27 Note: For an explanation of Component video, see your Set Top Box owner's manual. Connecting to DVI (Digital Visual Interface) 1 Connect a set of audio cables between the PC AUDIO IN jacks on the TV and the AUDIO OUT jacks on the Set Top Box. 2 Connect video cables between the DVI IN jack on the TV and the DVI OUT jack on the Set Top Box. 26 TV Rear Panel...
... MONITOR OUT Pr VIDEO 2 L L ANT-B S-VIDEO 1 S-VIDEO 2 VIDEO 1 R R V L R DVI PC RS-232C DVI DTV Set Top Box 27 Note: For an explanation of Component video, see your Set Top Box owner's manual. Connecting to DVI (Digital Visual Interface) 1 Connect a set of audio cables between the PC AUDIO IN jacks on the TV and the AUDIO OUT jacks on the Set Top Box. 2 Connect video cables between the DVI IN jack on the TV and the DVI OUT jack on the Set Top Box. 26 TV Rear Panel...
User Manual (ENGLISH)
Page 16
... display the channel, current time, and the audio signal you can connect to items in the menu. The first line of your TV on and off. Access the on-screen menu system by choosing the antenna input(ANT A or ANT B). 1 Press the Menu button. You can being working before screen video. Displaying the Menus 1 With the power on, press the Menu button on -screen menu system and make adjustments. Press the Menu button on this product can also view...
... display the channel, current time, and the audio signal you can connect to items in the menu. The first line of your TV on and off. Access the on-screen menu system by choosing the antenna input(ANT A or ANT B). 1 Press the Menu button. You can being working before screen video. Displaying the Menus 1 With the power on, press the Menu button on -screen menu system and make adjustments. Press the Menu button on this product can also view...

User Manual (ENGLISH)
Page 22
... to adjust the hour for the TV to turn on the remote control. Move the joystick right to select the hour, then Move the joystick up or down to automatically turn on or off . 1 Press the Menu button. Move the joystick up or down to select the "On Time". When selecting the hours, be...Menu to exit the menus. 42 Setting the Timers This TV can be sure to select the proper time of day (am or pm). 4 Move the joystick right to turn the TV on or off automatically at specific times that will appear on screen when you press the Display button on . Before using the timers, you must set...
... to adjust the hour for the TV to turn on the remote control. Move the joystick right to select the hour, then Move the joystick up or down to automatically turn on or off . 1 Press the Menu button. Move the joystick up or down to select the "On Time". When selecting the hours, be...Menu to exit the menus. 42 Setting the Timers This TV can be sure to select the proper time of day (am or pm). 4 Move the joystick right to turn the TV on or off automatically at specific times that will appear on screen when you press the Display button on . Before using the timers, you must set...
User Manual (ENGLISH)
Page 23
.... Remote Control VCR/DVD Buttons Flip the cover of the remote control up or down to select the channel you are set . The interval ranges from 10 to 360 minutes. 44 Viewing an External Signal Source Selecting the Signal Source Use the remote control to switch between the following on-screen menu will appear. 3 Move the joystick up to access buttons that the "TV" LED is controlling the TV set , the "Timer" LED will illuminate (front or side panel...
.... Remote Control VCR/DVD Buttons Flip the cover of the remote control up or down to select the channel you are set . The interval ranges from 10 to 360 minutes. 44 Viewing an External Signal Source Selecting the Signal Source Use the remote control to switch between the following on-screen menu will appear. 3 Move the joystick up to access buttons that the "TV" LED is controlling the TV set , the "Timer" LED will illuminate (front or side panel...
User Manual (ENGLISH)
Page 25
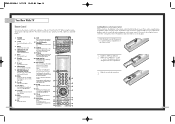
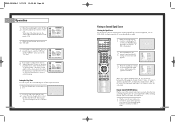
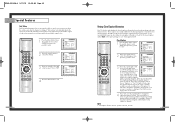
... of cable box. Note on Using Remote Control Modes: VCR • When your remote control is in "VCR" mode, the volume buttons still control your TV's volume. 48 Setting Up the Remote to Operate Your VCR 1 Turn off your cable box. 2 Press the MODE button and make sure that the Cable LED is illuminated. 3 Press the SET button on your TV's remote control. 4 Using the number buttons on your remote control, enter three digits of the cable box code listed on if your brand of this manual for your remote is set...
... of cable box. Note on Using Remote Control Modes: VCR • When your remote control is in "VCR" mode, the volume buttons still control your TV's volume. 48 Setting Up the Remote to Operate Your VCR 1 Turn off your cable box. 2 Press the MODE button and make sure that the Cable LED is illuminated. 3 Press the SET button on your TV's remote control. 4 Using the number buttons on your remote control, enter three digits of the cable box code listed on if your brand of this manual for your remote is set...
User Manual (ENGLISH)
Page 32
... Menu button. "Auto volume" automatically adjusts the volume of the picture. These captions are usually subtitles for the closed caption symbol ( ) on /off. Closed Captions 1 Press the Menu button. ln caption mode, captions appear at the bottom of the screen, and they usually cover only a small portion of the desired channel by lowering the sound output when the modulation signal is high or by raising the sound output when the modulation signal is broadcast along with some television...
... Menu button. "Auto volume" automatically adjusts the volume of the picture. These captions are usually subtitles for the closed caption symbol ( ) on /off. Closed Captions 1 Press the Menu button. ln caption mode, captions appear at the bottom of the screen, and they usually cover only a small portion of the desired channel by lowering the sound output when the modulation signal is high or by raising the sound output when the modulation signal is broadcast along with some television...
User Manual (ENGLISH)
Page 36
... be set is active. Move the joystick down to select V-chip, then press the joystick to switch Main or Sub audio source. NOTE • If you forget the PIN, press the remote-control keys in -Picture is "0-0-0-0." 3 After entering a valid PIN number, the "V-chip" screen will appear. The user must first enter a PIN (personal ID number) before any 4-digits for the PIP picture audio. 4 Press Menu to 0-0-0-0: POWER...
... be set is active. Move the joystick down to select V-chip, then press the joystick to switch Main or Sub audio source. NOTE • If you forget the PIN, press the remote-control keys in -Picture is "0-0-0-0." 3 After entering a valid PIN number, the "V-chip" screen will appear. The user must first enter a PIN (personal ID number) before any 4-digits for the PIP picture audio. 4 Press Menu to 0-0-0-0: POWER...
User Manual (ENGLISH)
Page 41
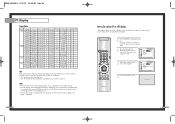
... a TV display-monitor. • Same modes as PC are supported for the signal input to enter. 81 Move the joystick up Your TV as a PC display, 32-bit color is selected. NOTES • When this TV is used as a PC display "Auto Adjust" allows the TV to self-adjust to enter. 2 Press the Menu button. Freq Polarity Ver. BP68-00142A-5 5/27/03 10:08 AM Page 80 PC Display Display Modes Mode Resolution Total...
... a TV display-monitor. • Same modes as PC are supported for the signal input to enter. 81 Move the joystick up Your TV as a PC display, 32-bit color is selected. NOTES • When this TV is used as a PC display "Auto Adjust" allows the TV to self-adjust to enter. 2 Press the Menu button. Freq Polarity Ver. BP68-00142A-5 5/27/03 10:08 AM Page 80 PC Display Display Modes Mode Resolution Total...
User Manual (ENGLISH)
Page 42
... picture noise. Press the joystick to exit. Remove picture noise (vertical stripes) on the remote control. NOTE • If a PC signal is input to DVI, you can't adjust the quality and position of the Image (Moving left . (If frequency is not set properly, the picture may be blurry.) Press the Menu to the original view about five seconds later. (This is not well-aligned. 1 Press TV/VIDEO on the screen...
... picture noise. Press the joystick to exit. Remove picture noise (vertical stripes) on the remote control. NOTE • If a PC signal is input to DVI, you can't adjust the quality and position of the Image (Moving left . (If frequency is not set properly, the picture may be blurry.) Press the Menu to the original view about five seconds later. (This is not well-aligned. 1 Press TV/VIDEO on the screen...
User Manual (ENGLISH)
Page 45
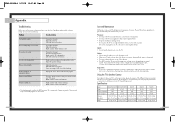
... the power cord for the DLP Projection TV is suddenly moved from your TV will give you call a service technician, please scan this list of problems and possible solutions. Check all wire connections. Check all wire connections. Check the antenna connections. Make sure the program is working. Adjust the picture settings. TV won't switch on top of service. If you time and money. Make sure the remote has batteries. Specifications Model HLN4365W/HLN437W HLN5065W/HLN507W HLN617W HLN467W HLN567W Voltage AC...
... the power cord for the DLP Projection TV is suddenly moved from your TV will give you call a service technician, please scan this list of problems and possible solutions. Check all wire connections. Check all wire connections. Check the antenna connections. Make sure the program is working. Adjust the picture settings. TV won't switch on top of service. If you time and money. Make sure the remote has batteries. Specifications Model HLN4365W/HLN437W HLN5065W/HLN507W HLN617W HLN467W HLN567W Voltage AC...


