
Open Source Guide (ENGLISH)
Page 1
... customarily used for such interactive use to the public, the best way to achieve this General Public License. The original manual has wrong versions of this free software. This product uses some software programs which are not derived from the Program, and can redistribute and change . And you do one of the following: a) Accompany it with a work based on the Program) on a volume of...
... customarily used for such interactive use to the public, the best way to achieve this General Public License. The original manual has wrong versions of this free software. This product uses some software programs which are not derived from the Program, and can redistribute and change . And you do one of the following: a) Accompany it with a work based on the Program) on a volume of...

Open Source Guide (ENGLISH)
Page 2
You can redistribute and change. It is found. and each file should have at least the "copyright" line and a pointer to where the full notice is safest... to the public, we recommend making it free software that everyone can do so by permitting redistribution under these terms (or, alternatively, under the terms of the greatest possible use to the library. IN NO EVENT UNLESS ...TO USE THE LIBRARY (INCLUDING BUT NOT LIMITED TO LOSS OF DATA OR DATA BEING RENDERED INACCURATE OR LOSSES SUSTAINED BY YOU OR THIRD PARTIES OR A FAILURE OF THE LIBRARY TO OPERATE WITH ANY OTHER SOFTWARE), EVEN...
You can redistribute and change. It is found. and each file should have at least the "copyright" line and a pointer to where the full notice is safest... to the public, we recommend making it free software that everyone can do so by permitting redistribution under these terms (or, alternatively, under the terms of the greatest possible use to the library. IN NO EVENT UNLESS ...TO USE THE LIBRARY (INCLUDING BUT NOT LIMITED TO LOSS OF DATA OR DATA BEING RENDERED INACCURATE OR LOSSES SUSTAINED BY YOU OR THIRD PARTIES OR A FAILURE OF THE LIBRARY TO OPERATE WITH ANY OTHER SOFTWARE), EVEN...
User Manual (ENGLISH)
Page 3
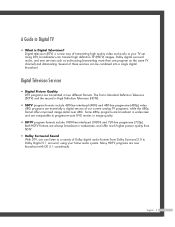
... same TV channel) and datacasting. Digital television (DTV) is a new way of these services can listen to a variety of our current analog TV programs, while the 480p format offers improved image detail over 480i. English - 3 Digital Television Services • Digital Picture Quality DTV programs are comparable to your home audio system. Several of transmitting high quality video and audio to progressive-scan DVD movies in two different formats. Both HDTV formats...
... same TV channel) and datacasting. Digital television (DTV) is a new way of these services can listen to a variety of our current analog TV programs, while the 480p format offers improved image detail over 480i. English - 3 Digital Television Services • Digital Picture Quality DTV programs are comparable to your home audio system. Several of transmitting high quality video and audio to progressive-scan DVD movies in two different formats. Both HDTV formats...
User Manual (ENGLISH)
Page 5
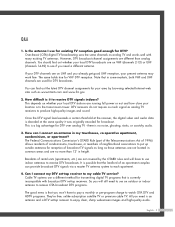
... I use indoor antennas to watch OTA DTV and HDTV programs. They're free, unlike subscription satellite TV or premium cable TV. Once the DTV signal level exceeds a certain threshold at the same quality it to produce high-quality images and sound. You should find out the latest DTV channel assignments for reception of rental units (apartments, etc.) are no noise, ghosting, static, or scratchy audio...
... I use indoor antennas to watch OTA DTV and HDTV programs. They're free, unlike subscription satellite TV or premium cable TV. Once the DTV signal level exceeds a certain threshold at the same quality it to produce high-quality images and sound. You should find out the latest DTV channel assignments for reception of rental units (apartments, etc.) are no noise, ghosting, static, or scratchy audio...

User Manual (ENGLISH)
Page 6
... 28 Connecting a Digital Audio System 29 Connecting to an Analog Amplifier 29 Operation ...32 Turning the TV On and Off 32 Viewing the Menus and On-Screen Displays 32 Selecting a Menu Language 33 Memorizing the Channels 34 Adding and Erasing Channels 36 Changing Channels 37 Customizing Your Remote Control 38 Remote Control Codes 39 Setting the Clock 40 Setting the On/Off Timer 42 Setting the Sleep Timer 43 Viewing an External Signal Source 44 Assigning Names to External Input Mode...
... 28 Connecting a Digital Audio System 29 Connecting to an Analog Amplifier 29 Operation ...32 Turning the TV On and Off 32 Viewing the Menus and On-Screen Displays 32 Selecting a Menu Language 33 Memorizing the Channels 34 Adding and Erasing Channels 36 Changing Channels 37 Customizing Your Remote Control 38 Remote Control Codes 39 Setting the Clock 40 Setting the On/Off Timer 42 Setting the Sleep Timer 43 Viewing an External Signal Source 44 Assigning Names to External Input Mode...
User Manual (ENGLISH)
Page 7
... Analog Channels Analog 50 Checking the Digital-Signal Strength Digital 51 LNA (Low Noise Amplifier 52 Picture Control 54 Picture Control ...54 Selecting the Color Tone 56 Changing the Picture Size 57 Digital Noise Reduction 58 DNIeTM (Digital Natural Image engine) 59 Setting the My Color Control Mode 60 Using the Color Weakness Enhancement Feature 62 Setting the Film Mode 63 Viewing Picture-In-Picture 64 Selecting the Sound Source 70 Freezing the Picture 71 Setting the Blue Screen Mode 72 Sound Control 74 Sound Control ...74 Setting the SRS TSXT 76 Auto Volume...
... Analog Channels Analog 50 Checking the Digital-Signal Strength Digital 51 LNA (Low Noise Amplifier 52 Picture Control 54 Picture Control ...54 Selecting the Color Tone 56 Changing the Picture Size 57 Digital Noise Reduction 58 DNIeTM (Digital Natural Image engine) 59 Setting the My Color Control Mode 60 Using the Color Weakness Enhancement Feature 62 Setting the Film Mode 63 Viewing Picture-In-Picture 64 Selecting the Sound Source 70 Freezing the Picture 71 Setting the Blue Screen Mode 72 Sound Control 74 Sound Control ...74 Setting the SRS TSXT 76 Auto Volume...
User Manual (ENGLISH)
Page 10
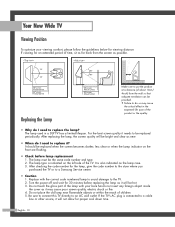
... purchased the TV or to a Samsung Service center. • Caution 1. It should be the same code number and type. 2. Your New Wide TV Viewing Position To optimize your bare hands nor insert any foreign object inside the cover as new. • When do I need to the TV. 2. The lamp type is also indicated on the front are flashing. • Check before replacing the lamp as possible...
... purchased the TV or to a Samsung Service center. • Caution 1. It should be the same code number and type. 2. Your New Wide TV Viewing Position To optimize your bare hands nor insert any foreign object inside the cover as new. • When do I need to the TV. 2. The lamp type is also indicated on the front are flashing. • Check before replacing the lamp as possible...
User Manual (ENGLISH)
Page 12
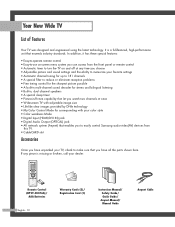
... once • Widescreen TV with adjustable image size • Life-like clear images provided by DNle technology • My Color Control Mode for corresponding with your color style • Color weakness Mode • Digital Input (HDMI/DVI IN) jack • Digital Audio Output (OPTICAL) jack • AV network system (Anynet) that enables you to easily control Samsung audio-video(AV) devices from the front panel or remote control • Automatic timer to turn the TV on and off at...
... once • Widescreen TV with adjustable image size • Life-like clear images provided by DNle technology • My Color Control Mode for corresponding with your color style • Color weakness Mode • Digital Input (HDMI/DVI IN) jack • Digital Audio Output (OPTICAL) jack • AV network system (Anynet) that enables you to easily control Samsung audio-video(AV) devices from the front panel or remote control • Automatic timer to turn the TV on and off at...
User Manual (ENGLISH)
Page 16
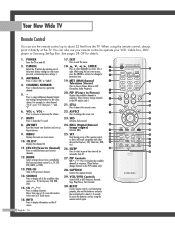
... switch between your VCR, Cable box, DVD player or Samsung Set-Top Box. FAV.CH (Favorite Channel) Press to mute the TV sound. 8. INFO Press to display information on and off . 27. MTS (Multichannel Television Stereo) Press to pause the current screen. 22. STILL Press to choose Stereo, Mono or SAP (Secondary Audio Program). 20. CAPTION Controls the caption decoder. 29. You can use your remote control to operate your favorite channels. 12. P.MODE Adjust the TV picture...
... switch between your VCR, Cable box, DVD player or Samsung Set-Top Box. FAV.CH (Favorite Channel) Press to mute the TV sound. 8. INFO Press to display information on and off . 27. MTS (Multichannel Television Stereo) Press to pause the current screen. 22. STILL Press to choose Stereo, Mono or SAP (Secondary Audio Program). 20. CAPTION Controls the caption decoder. 29. You can use your remote control to operate your favorite channels. 12. P.MODE Adjust the TV picture...
User Manual (ENGLISH)
Page 26
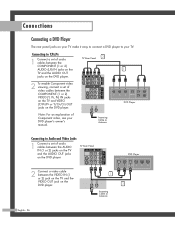
..., PR) IN jacks on the TV and VIDEO (Y/PB/PR or Y/CB/CR) OUT jacks on your TV make it easy to connect a DVD player to Y,PB,PR 1 Connect a set of audio cables between the TV Rear Panel 2 COMPONENT (1 or 2) AUDIO (L,R) IN jacks on the 1 TV and the AUDIO OUT jacks on the DVD player. 2 To enable Component video viewing, connect a set of Component video, see your TV. Connecting to your DVD player's owner's manual. Connections Connecting a DVD Player The rear panel jacks on the DVD player.
..., PR) IN jacks on the TV and VIDEO (Y/PB/PR or Y/CB/CR) OUT jacks on your TV make it easy to connect a DVD player to Y,PB,PR 1 Connect a set of audio cables between the TV Rear Panel 2 COMPONENT (1 or 2) AUDIO (L,R) IN jacks on the 1 TV and the AUDIO OUT jacks on the DVD player. 2 To enable Component video viewing, connect a set of Component video, see your TV. Connecting to your DVD player's owner's manual. Connections Connecting a DVD Player The rear panel jacks on the DVD player.
User Manual (ENGLISH)
Page 29
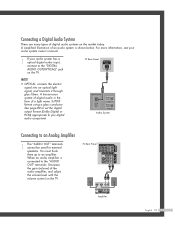
... the "AUDIO OUT" terminals: Decrease the gain (volume) of the audio amplifier, and adjust the volume level with the volume control on the TV. For more information, see your audio system owner's manual. 1 If your audio system has a optical digital audio input, connect to an Analog Amplifier 1 The "AUDIO OUT" terminals cannot be used for external speakers. A simplified illustration of an audio system is connected to you digital audio component. TV Rear Panel Audio System Connecting to the "DIGITAL AUDIO OUT(OPTICAL)" jack...
... the "AUDIO OUT" terminals: Decrease the gain (volume) of the audio amplifier, and adjust the volume level with the volume control on the TV. For more information, see your audio system owner's manual. 1 If your audio system has a optical digital audio input, connect to an Analog Amplifier 1 The "AUDIO OUT" terminals cannot be used for external speakers. A simplified illustration of an audio system is connected to you digital audio component. TV Rear Panel Audio System Connecting to the "DIGITAL AUDIO OUT(OPTICAL)" jack...
User Manual (ENGLISH)
Page 32
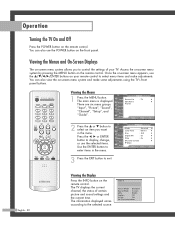
...; or ENTER button to display, change, or use the POWER button on the front panel. Viewing the Menus and On-Screen Displays The on -screen menu system and make adjustments. Access the on-screen menu system by pressing the MENU button on the remote control. You can also use the selected items. Use the ENTER button to control the settings of certain picture and sound settings and the current time. Picture Input Picture Sound Channel Setup Guide Mode : Standard √ Color Tone : Warm1 √ Size : 16:9 √ Digital NR : On...
...; or ENTER button to display, change, or use the POWER button on the front panel. Viewing the Menus and On-Screen Displays The on -screen menu system and make adjustments. Access the on-screen menu system by pressing the MENU button on the remote control. You can also use the selected items. Use the ENTER button to control the settings of certain picture and sound settings and the current time. Picture Input Picture Sound Channel Setup Guide Mode : Standard √ Color Tone : Warm1 √ Size : 16:9 √ Digital NR : On...
User Manual (ENGLISH)
Page 40
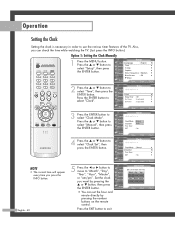
...; Time √ V-Chip √ Caption √ Menu Transparency : Medium √ Blue Screen : Off √ ▼ More Move Enter Return 2 Press the ... Clock Input Picture Sound Channel Setup Clock Mode Clock Set Time Zone DST : Manual : No Guide Move Enter Return NOTE • The current time will appear every time you can set the hour and minute directly by pressing the ... or † button, then press the ENTER button. • You can check the time...
...; Time √ V-Chip √ Caption √ Menu Transparency : Medium √ Blue Screen : Off √ ▼ More Move Enter Return 2 Press the ... Clock Input Picture Sound Channel Setup Clock Mode Clock Set Time Zone DST : Manual : No Guide Move Enter Return NOTE • The current time will appear every time you can set the hour and minute directly by pressing the ... or † button, then press the ENTER button. • You can check the time...

User Manual (ENGLISH)
Page 41
... the EXIT button to select "Time", then press the ENTER button. or † button to exit. Sound Channel Setup Guide • When you set up Auto Time, the set time may not be set the time manually. Time Zone Select the time zone in which you are receiving a digital signal. 1 Press the MENU button. or † button to select "Auto", then press the ENTER button. Setup Input Picture Sound Channel Setup Guide Language : English √ Time √ V-Chip √ Caption √ Menu Transparency : Medium √ Blue Screen : Off √...
... the EXIT button to select "Time", then press the ENTER button. or † button to exit. Sound Channel Setup Guide • When you set up Auto Time, the set time may not be set the time manually. Time Zone Select the time zone in which you are receiving a digital signal. 1 Press the MENU button. or † button to select "Auto", then press the ENTER button. Setup Input Picture Sound Channel Setup Guide Language : English √ Time √ V-Chip √ Caption √ Menu Transparency : Medium √ Blue Screen : Off √...
User Manual (ENGLISH)
Page 42
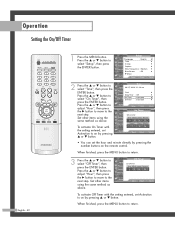
Setup Input Picture Sound Channel Setup Guide Language : English √ Time √ V-Chip √ Caption √ Menu Transparency : Medium √ Blue Screen : Off √ ▼ More Move Enter Return 2 Press the ... Press the ... Time Input 08/ 17/ 2004/ 10 : 20 am Air ▼ Channel Volume Activation 3 10 No Move Adjust Return • You can set the hour and minute directly by pressing ... Input Picture Sound Channel Setup Guide Off Timer Set off timer. Hour Minute am/pm Activation ▲ 12 00...
Setup Input Picture Sound Channel Setup Guide Language : English √ Time √ V-Chip √ Caption √ Menu Transparency : Medium √ Blue Screen : Off √ ▼ More Move Enter Return 2 Press the ... Press the ... Time Input 08/ 17/ 2004/ 10 : 20 am Air ▼ Channel Volume Activation 3 10 No Move Adjust Return • You can set the hour and minute directly by pressing ... Input Picture Sound Channel Setup Guide Off Timer Set off timer. Hour Minute am/pm Activation ▲ 12 00...

User Manual (ENGLISH)
Page 54
... the MENU button to display the "Mode" menu. Picture Input Picture Sound Channel Setup Guide Mode : Standard √ Color Tone : Warm1 √ Size : 16:9 √ Digital NR : On √ DNIe : On √ My Color Control √ ▼ More Move Enter Return Mode Input Picture Sound Channel Setup Guide Mode : Standard Contrast Brightness Sharpness Color Tint G 50 Reset Move Enter √ 90 50 65 55 R 50 Return 3 Press the ... The previously adjusted picture settings will be reset to select "Mode". NOTE • "Tint" doesn't operate in HDMI/DVI...
... the MENU button to display the "Mode" menu. Picture Input Picture Sound Channel Setup Guide Mode : Standard √ Color Tone : Warm1 √ Size : 16:9 √ Digital NR : On √ DNIe : On √ My Color Control √ ▼ More Move Enter Return Mode Input Picture Sound Channel Setup Guide Mode : Standard Contrast Brightness Sharpness Color Tint G 50 Reset Move Enter √ 90 50 65 55 R 50 Return 3 Press the ... The previously adjusted picture settings will be reset to select "Mode". NOTE • "Tint" doesn't operate in HDMI/DVI...
User Manual (ENGLISH)
Page 60
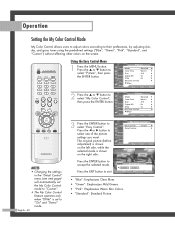
... Control". Press the ... Picture Input Picture Sound Channel Setup Guide Mode : Standard √ Color Tone : Warm1 √ Size : 16:9 √ Digital NR : On √ DNIe : On √ My Color Control √ ▼ More Move Enter Return NOTES • Changing the settings in the "Detail Control" menu (see next page) will automatically set to "On" and "Demo" mode. The original picture (before adjustment) is shown on the screen. Operation Setting the My Color Control Mode My Color Control allows users to adjust colors according...
... Control". Press the ... Picture Input Picture Sound Channel Setup Guide Mode : Standard √ Color Tone : Warm1 √ Size : 16:9 √ Digital NR : On √ DNIe : On √ My Color Control √ ▼ More Move Enter Return NOTES • Changing the settings in the "Detail Control" menu (see next page) will automatically set to "On" and "Demo" mode. The original picture (before adjustment) is shown on the screen. Operation Setting the My Color Control Mode My Color Control allows users to adjust colors according...
User Manual (ENGLISH)
Page 86
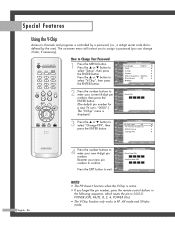
... Using the V-Chip Access to Change Your Password 1 Press the MENU button. Press the ... V-Chip Input Picture Sound Channel V-Chip Lock : Off TV Parental Guidelines MPAA Rating Change PIN Setup Guide Move Enter Return 4 Press the number buttons to enter your new 4-digit pin number. How to channels and programs is controlled by a password (i.e., a 4-digit secret code that is displayed. or † button to exit. Press the EXIT button to select "Setup", then press the ENTER button. The on-screen menu will instruct you to assign a password...
... Using the V-Chip Access to Change Your Password 1 Press the MENU button. Press the ... V-Chip Input Picture Sound Channel V-Chip Lock : Off TV Parental Guidelines MPAA Rating Change PIN Setup Guide Move Enter Return 4 Press the number buttons to enter your new 4-digit pin number. How to channels and programs is controlled by a password (i.e., a 4-digit secret code that is displayed. or † button to exit. Press the EXIT button to select "Setup", then press the ENTER button. The on-screen menu will instruct you to assign a password...
User Manual (ENGLISH)
Page 102
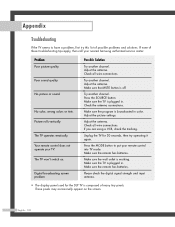
... digital signal strength and input antenna. • The display panel used for 30 seconds, then try this list of possible problems and solutions. If none of many tiny pixels. The TV operates erratically. Make sure the TV is composed of these troubleshooting tips apply, then call your remote control into TV mode. These pixels may occasionally appear on . No color, wrong colors or tints. Make sure the TV is working. Adjust the picture settings...
... digital signal strength and input antenna. • The display panel used for 30 seconds, then try this list of possible problems and solutions. If none of many tiny pixels. The TV operates erratically. Make sure the TV is composed of these troubleshooting tips apply, then call your remote control into TV mode. These pixels may occasionally appear on . No color, wrong colors or tints. Make sure the TV is working. Adjust the picture settings...

User Manual (ENGLISH)
Page 103
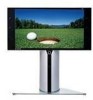
...DLP TV projects the image onto a large screen by applying an optical system. Specifications Model Voltage Frequency of the different television systems that create magnetic fields, such as cloth or paper. • Place the TV in use water, cleaning fluids, wax, or chemicals. • Do not put the TV... the TV. Cleaning and Maintaining Your TV With proper care, your TV will give you place the TV set face down, it can cause serious damage. Please follow these guidelines to a foreign country, please be aware of Operation Power Consumption Dimensions (W x D x H) Weight HL-R5087W AC ...
...DLP TV projects the image onto a large screen by applying an optical system. Specifications Model Voltage Frequency of the different television systems that create magnetic fields, such as cloth or paper. • Place the TV in use water, cleaning fluids, wax, or chemicals. • Do not put the TV... the TV. Cleaning and Maintaining Your TV With proper care, your TV will give you place the TV set face down, it can cause serious damage. Please follow these guidelines to a foreign country, please be aware of Operation Power Consumption Dimensions (W x D x H) Weight HL-R5087W AC ...


