User Manual (ENGLISH)
Page 3
... the lens of children or animals to build up and distort the camera body or cause a fire. If an accident should be the case, allow the camera to sit idle for a few minutes to extreme temperatures may result in places subject to you or your dealer or Samsung Camera Service... centre. This could pose a risk of injury from the camera's moving parts. ƈ Batteries and camera may become hot during prolonged use which may adversely affect the cameraŖs internal components and could increase the risk of ...
... the lens of children or animals to build up and distort the camera body or cause a fire. If an accident should be the case, allow the camera to sit idle for a few minutes to extreme temperatures may result in places subject to you or your dealer or Samsung Camera Service... centre. This could pose a risk of injury from the camera's moving parts. ƈ Batteries and camera may become hot during prolonged use which may adversely affect the cameraŖs internal components and could increase the risk of ...
User Manual (ENGLISH)
Page 7
... 42 ƈSetting the Date and Time 44 ƃAttaching the Lens 46 ƃAdjusting the Viewfinder Dioptre 48 Basic Operations ƃBasic Shooting Operation 50 ƈHolding the Camera 50 ƈLetting the Camera Choose the Optimal Settings 51 ƈOperating the shutter release button 53...Shooting 62 ƈRemote Control Shooting (Remote Control F : Sold Separately 65 ƈUsing Mirror Lock Up Function to Prevent Camera Shake 68 ƃUsing the Zoom Lens 69 ƃUsing the Built-in Flash 70 ƈSelecting Flash Mode 71 ƈUsing Auto Discharge , 72 ƈUsing...
... 42 ƈSetting the Date and Time 44 ƃAttaching the Lens 46 ƃAdjusting the Viewfinder Dioptre 48 Basic Operations ƃBasic Shooting Operation 50 ƈHolding the Camera 50 ƈLetting the Camera Choose the Optimal Settings 51 ƈOperating the shutter release button 53...Shooting 62 ƈRemote Control Shooting (Remote Control F : Sold Separately 65 ƈUsing Mirror Lock Up Function to Prevent Camera Shake 68 ƃUsing the Zoom Lens 69 ƃUsing the Built-in Flash 70 ƈSelecting Flash Mode 71 ƈUsing Auto Discharge , 72 ƈUsing...

User Manual (ENGLISH)
Page 14
...image as a 150 mm lens attached to 450 mm lens on a 35 mm camera. ŝ13Ş GX-10 Camera Characteristics The captured area (view angle) will differ between the GX-10 and 35 mm SLR cameras even if the same lens is equivalent to a 35 mm camera 150÷1.5=100 Use a 100 mm lens with the GX-10.... To obtain a focal length framing the same area, divide the focal length of the lens used with a 35 mm camera must be approximately 1.5 times longer than...
...image as a 150 mm lens attached to 450 mm lens on a 35 mm camera. ŝ13Ş GX-10 Camera Characteristics The captured area (view angle) will differ between the GX-10 and 35 mm SLR cameras even if the same lens is equivalent to a 35 mm camera 150÷1.5=100 Use a 100 mm lens with the GX-10.... To obtain a focal length framing the same area, divide the focal length of the lens used with a 35 mm camera must be approximately 1.5 times longer than...
User Manual (ENGLISH)
Page 16
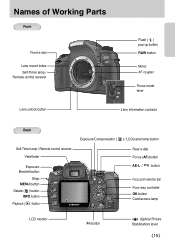
... index Self-Timer lamp / Remote control receiver Flash ( ) pop-up button RAW button Mirror AF coupler Focus mode lever Lens unlock button Lens information contacts Back Self-Timer lamp / Remote control receiver Viewfinder Exposure Bracket button Strap MENU button Delete ( ) button INFO button Playback ( ) button Exposure Compensation ( ) / LCD ...
... index Self-Timer lamp / Remote control receiver Flash ( ) pop-up button RAW button Mirror AF coupler Focus mode lever Lens unlock button Lens information contacts Back Self-Timer lamp / Remote control receiver Viewfinder Exposure Bracket button Strap MENU button Delete ( ) button INFO button Playback ( ) button Exposure Compensation ( ) / LCD ...
User Manual (ENGLISH)
Page 19
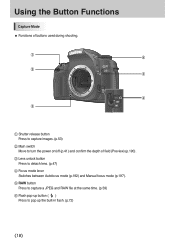
...; ںMain switch Move to turn the power on/off (p.41) and confirm the depth of field (Preview) (p.190). ڻLens unlock button Press to detach lens. (p.47) ڼFocus mode lever Switches between Autofocus mode (p.192) and Manual focus mode (p.197). ڽRAW button...
...; ںMain switch Move to turn the power on/off (p.41) and confirm the depth of field (Preview) (p.190). ڻLens unlock button Press to detach lens. (p.47) ڼFocus mode lever Switches between Autofocus mode (p.192) and Manual focus mode (p.197). ڽRAW button...

User Manual (ENGLISH)
Page 25
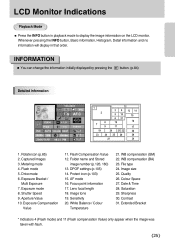
... mode (p.70) 5. Aperture Value (p.200) 8. Flash Exposure Value (p.75) 10. Exposure Bracket / Multi Exposure (p.206, 127) 11. White balance (p.76) 16. Recorded pixels (p.122) 21. Lens focal length (p.57) 26. Saturation (p.124) 27.
... mode (p.70) 5. Aperture Value (p.200) 8. Flash Exposure Value (p.75) 10. Exposure Bracket / Multi Exposure (p.206, 127) 11. White balance (p.76) 16. Recorded pixels (p.122) 21. Lens focal length (p.57) 26. Saturation (p.124) 27.
User Manual (ENGLISH)
Page 26
.... Sharpness 30. Exposure Compensation Value 11. Folder name and Stored image number (p.126, 160) 13. Protect icon (p.103) 15. WB compensation (BA) 23. Drive mode 6. Lens focal length 18. File type 24. Exposure Bracket / Multi Exposure 7. WB compensation (GM) 22. Quality 26. LCD Monitor Indications Playback Mode ƈ Press the INFO...
.... Sharpness 30. Exposure Compensation Value 11. Folder name and Stored image number (p.126, 160) 13. Protect icon (p.103) 15. WB compensation (BA) 23. Drive mode 6. Lens focal length 18. File type 24. Exposure Bracket / Multi Exposure 7. WB compensation (GM) 22. Quality 26. LCD Monitor Indications Playback Mode ƈ Press the INFO...
User Manual (ENGLISH)
Page 30
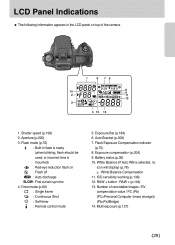
Aperture (p.200) 3. Number of the camera. 1. or incorrect lens is mounted) : Red-eye reduction flash on top of recordable images / EV compensation value / PC (Pb) (PC=Personal Computer (mass storage)) (Pb=PictBridge) 14. Auto ...
Aperture (p.200) 3. Number of the camera. 1. or incorrect lens is mounted) : Red-eye reduction flash on top of recordable images / EV compensation value / PC (Pb) (PC=Personal Computer (mass storage)) (Pb=PictBridge) 14. Auto ...

User Manual (ENGLISH)
Page 32
2 Getting Started This chapter explains your first steps from purchasing the camera to a Power Source 33 Using the memory card 38 Turning the Camera On and Off 41 Initial Settings 42 Attaching the Lens 46 Adjusting the Viewfinder Dioptre 48 31 Attaching the Strap 32 Connecting to taking pictures. Be sure to read it and follow the instructions.
2 Getting Started This chapter explains your first steps from purchasing the camera to a Power Source 33 Using the memory card 38 Turning the Camera On and Off 41 Initial Settings 42 Attaching the Lens 46 Adjusting the Viewfinder Dioptre 48 31 Attaching the Strap 32 Connecting to taking pictures. Be sure to read it and follow the instructions.
User Manual (ENGLISH)
Page 47
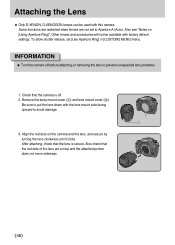
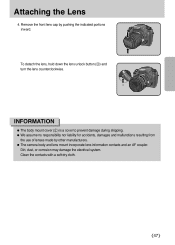
... does not move sideways. ŝ46Ş To allow shutter release, set to prevent unexpected lens problems. 1. INFORMATION ƃ Turn the camera off . 2. Also check that the red dots of the lens are not set [Use Aperture Ring] in [CUSTOM2 MENU] menu. Some functions are restricted when... Remove the body mount cover ( )ڹand lens mount cover ()ں. After attaching, check that the camera is secure. Align the red dots on the camera and the lens, and secure by turning the lens clockwise until it clicks. Other lenses and accessories will not ...
... does not move sideways. ŝ46Ş To allow shutter release, set to prevent unexpected lens problems. 1. INFORMATION ƃ Turn the camera off . 2. Also check that the red dots of the lens are not set [Use Aperture Ring] in [CUSTOM2 MENU] menu. Some functions are restricted when... Remove the body mount cover ( )ڹand lens mount cover ()ں. After attaching, check that the camera is secure. Align the red dots on the camera and the lens, and secure by turning the lens clockwise until it clicks. Other lenses and accessories will not ...
User Manual (ENGLISH)
Page 48
... by other manufacturers. ƃ The camera body and lens mount incorporate lens information contacts and an AF coupler. Attaching the Lens 4. To detach the lens, hold down the lens unlock button ( )ڻand turn the lens counterclockwise. Dirt, dust, or corrosion may damage the electrical system. INFORMATION ƃ The body mount cover ( )ڹ...
... by other manufacturers. ƃ The camera body and lens mount incorporate lens information contacts and an AF coupler. Attaching the Lens 4. To detach the lens, hold down the lens unlock button ( )ڻand turn the lens counterclockwise. Dirt, dust, or corrosion may damage the electrical system. INFORMATION ƃ The body mount cover ( )ڹ...
User Manual (ENGLISH)
Page 49
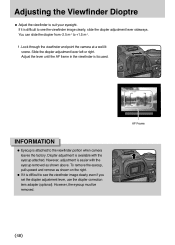
... focused. Diopter adjustment is difficult to see the viewfinder image clearly even if you set the diopter adjustment lever, use the diopter correction lens adapter (optional). To remove the eyecup, pull upward and remove as shown on the right. ƃ If it is available with the... the diopter adjustment lever left or right. Adjust the lever until the AF frame in the viewfinder is difficult to the viewfinder portion when camera leaves the factory. AF Frame ŝ48Ş However, adjustment is attached to see the viewfinder image clearly, slide the diopter adjustment ...
... focused. Diopter adjustment is difficult to see the viewfinder image clearly even if you set the diopter adjustment lever, use the diopter correction lens adapter (optional). To remove the eyecup, pull upward and remove as shown on the right. ƃ If it is available with the... the diopter adjustment lever left or right. Adjust the lever until the AF frame in the viewfinder is difficult to the viewfinder portion when camera leaves the factory. AF Frame ŝ48Ş However, adjustment is attached to see the viewfinder image clearly, slide the diopter adjustment ...
User Manual (ENGLISH)
Page 50
3 Basic Operations This chapter explains basic operations. For information about advanced functions and settings for taking pictures, refer to chapter 4 and onward. Basic Shooting Operation 50 OPS (Optical Picture Stabilisation 55 Using the RAW button 59 Other Shooting Modes 60 Using the Zoom Lens 69 Using the Built-in Flash 70 Using the White Balance 76 Using the ISO sensitivity 82 Playing Back Still Pictures 84 Deleting Images 98 Protecting Images 103 Setting the Printing Service (DPOF 105 Printing Using PictBridge 108
3 Basic Operations This chapter explains basic operations. For information about advanced functions and settings for taking pictures, refer to chapter 4 and onward. Basic Shooting Operation 50 OPS (Optical Picture Stabilisation 55 Using the RAW button 59 Other Shooting Modes 60 Using the Zoom Lens 69 Using the Built-in Flash 70 Using the White Balance 76 Using the ISO sensitivity 82 Playing Back Still Pictures 84 Deleting Images 98 Protecting Images 103 Setting the Printing Service (DPOF 105 Printing Using PictBridge 108

User Manual (ENGLISH)
Page 51
... shutter speeds slower than this. ƃ When using a telephoto lens, a tripod that is heavier than the total weight of the camera and lens is recommended to the oscillation of the OPS sensor. ŝ50Ş Basic Shooting Operation Holding the Camera ƈ How you hold the camera is important when taking a picture. [Horizontal position] [Vertical...
... shutter speeds slower than this. ƃ When using a telephoto lens, a tripod that is heavier than the total weight of the camera and lens is recommended to the oscillation of the OPS sensor. ŝ50Ş Basic Shooting Operation Holding the Camera ƈ How you hold the camera is important when taking a picture. [Horizontal position] [Vertical...
User Manual (ENGLISH)
Page 53
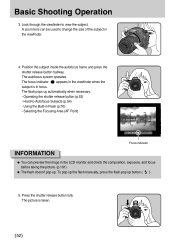
... the subject in the LCD monitor and check the composition, exposure, and focus before taking the picture. (p.191) ƃ The flash doesn't pop up. A zoom lens can preview the image in the viewfinder. 4. Operating the shutter release button (p.53) - The picture is in Flash (p.70) - Using the Built-in focus. Basic...
... the subject in the LCD monitor and check the composition, exposure, and focus before taking the picture. (p.191) ƃ The flash doesn't pop up. A zoom lens can preview the image in the viewfinder. 4. Operating the shutter release button (p.53) - The picture is in Flash (p.70) - Using the Built-in focus. Basic...

User Manual (ENGLISH)
Page 57
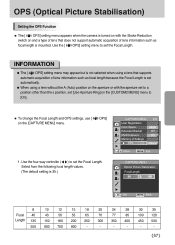
...turn off the OPS switch when using the [ OPS] menu. OPS (Optical Picture Stabilisation) Shake Reduction Function and Lens Focal Length ƈ The OPS function operates by using the camera with an external flash. ŝ56Ş Turning On the OPS Function ƈ Turn on . Press the .... ƃ Be sure to take a picture. appears in the following situations. Wait for about 2 seconds) right after turning on the camera or restoring from Auto Power Off. If a lens that information is automatically acquired is pressed halfway, viewfinder and the OPS function turns on the OPS switch.
...turn off the OPS switch when using the [ OPS] menu. OPS (Optical Picture Stabilisation) Shake Reduction Function and Lens Focal Length ƈ The OPS function operates by using the camera with an external flash. ŝ56Ş Turning On the OPS Function ƈ Turn on . Press the .... ƃ Be sure to take a picture. appears in the following situations. Wait for about 2 seconds) right after turning on the camera or restoring from Auto Power Off. If a lens that information is automatically acquired is pressed halfway, viewfinder and the OPS function turns on the OPS switch.
User Manual (ENGLISH)
Page 58
...[ on the [CAPTURE MENU] menu. OPS] 1. OPS (Optical Picture Stabilisation) Setting the OPS Function ƈ The [ OPS] setting menu appears when the camera is turned on with the aperture set to a position other than the s position, set [Use Aperture Ring] on and a type of... to set the Focal Length. INFORMATION ƃ The [ OPS] setting menu may appear but is not selected when using a lens that supports automatic acquisition of lens information such as focal length is 35.) CAPTURE MENU User Registration Color Space Extended Bracket Off Multi Exposure Off Memory of Settings OPS...
...[ on the [CAPTURE MENU] menu. OPS] 1. OPS (Optical Picture Stabilisation) Setting the OPS Function ƈ The [ OPS] setting menu appears when the camera is turned on with the aperture set to a position other than the s position, set [Use Aperture Ring] on and a type of... to set the Focal Length. INFORMATION ƃ The [ OPS] setting menu may appear but is not selected when using a lens that supports automatic acquisition of lens information such as focal length is 35.) CAPTURE MENU User Registration Color Space Extended Bracket Off Multi Exposure Off Memory of Settings OPS...

User Manual (ENGLISH)
Page 59
OPS (Optical Picture Stabilisation) INFORMATION ƃ If the focal length for your lens is not listed above, select the value closest to the actual focal length. ƃ When using a zoom lens, select the actual focal length at the zoom setting in the same manner. ŝ58Ş
OPS (Optical Picture Stabilisation) INFORMATION ƃ If the focal length for your lens is not listed above, select the value closest to the actual focal length. ƃ When using a zoom lens, select the actual focal length at the zoom setting in the same manner. ŝ58Ş
User Manual (ENGLISH)
Page 70
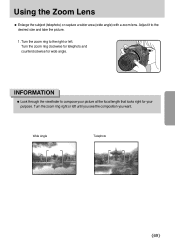
INFORMATION ƃ Look through the viewfinder to the desired size and take the picture. 1. Turn the zoom ring right or left . Turn the zoom ring to the right or left until you see the composition you want. Using the Zoom Lens ƈ Enlarge the subject (telephoto) or capture a wider area (wide angle) with a zoom lens. Adjust it to compose your picture at the focal length that looks right for wide angle. Wide Angle Telephoto ŝ69Ş Turn the zoom ring clockwise for telephoto and counterclockwise for your purpose.
INFORMATION ƃ Look through the viewfinder to the desired size and take the picture. 1. Turn the zoom ring right or left . Turn the zoom ring to the right or left until you see the composition you want. Using the Zoom Lens ƈ Enlarge the subject (telephoto) or capture a wider area (wide angle) with a zoom lens. Adjust it to compose your picture at the focal length that looks right for wide angle. Wide Angle Telephoto ŝ69Ş Turn the zoom ring clockwise for telephoto and counterclockwise for your purpose.
User Manual (ENGLISH)
Page 71
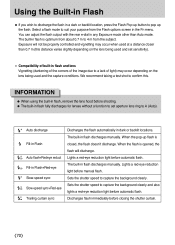
... Exposure will discharge. When the flash is opened, the flash will not be properly controlled and vignetting may occur depending on the lens being used and the capture conditions. The built-in flash discharges manually. You can adjust the flash output with the rear e-dial... flash mode to suit your purpose from the subject. We recommend taking a test shot to confirm this distance varies slightly depending on the lens being used at a distance closer than Auto mode. Sets the shutter speed to capture the background clearly. Discharges flash immediately before automatic flash....
... Exposure will discharge. When the flash is opened, the flash will not be properly controlled and vignetting may occur depending on the lens being used and the capture conditions. The built-in flash discharges manually. You can adjust the flash output with the rear e-dial... flash mode to suit your purpose from the subject. We recommend taking a test shot to confirm this distance varies slightly depending on the lens being used at a distance closer than Auto mode. Sets the shutter speed to capture the background clearly. Discharges flash immediately before automatic flash....


