Safety Guide (ENGLISH)
Page 1
... a location exposed to vibration. • Do not drop or impart any chemicals such as the airport, the train station etc. This will be exposed to pull out the power cord from the power outlet and wipe the product using a soft, dry cloth. Warning! THERE ARE NO USER SERVICEABLE PARTS INSIDE. This symbol alerts you to hold the power plug when...
... a location exposed to vibration. • Do not drop or impart any chemicals such as the airport, the train station etc. This will be exposed to pull out the power cord from the power outlet and wipe the product using a soft, dry cloth. Warning! THERE ARE NO USER SERVICEABLE PARTS INSIDE. This symbol alerts you to hold the power plug when...

Safety Guide (ENGLISH)
Page 5
... Inspection (BSMI) - If this monitor is a detachable power supply cord with NEMA configuration 6-15P type (tandem blades) plug cap. If necessary, consult with picture screens 13 inches or larger in a particular installation. This booklet was prepared by the Federal Communications Commission. It is available from that the ampere rating of television closed captioning in accordance with the instruction manual, may cause harmful interference to...
... Inspection (BSMI) - If this monitor is a detachable power supply cord with NEMA configuration 6-15P type (tandem blades) plug cap. If necessary, consult with picture screens 13 inches or larger in a particular installation. This booklet was prepared by the Federal Communications Commission. It is available from that the ampere rating of television closed captioning in accordance with the instruction manual, may cause harmful interference to...
Open Source Guide (ENGLISH)
Page 2
... is safest to attach them to the start of warranty; and each source file to the public, we recommend making it free software that everyone can do so by permitting redistribution under the terms of the...FOR DAMAGES, INCLUDING ANY GENERAL, SPECIAL, INCIDENTAL OR CONSEQUENTIAL DAMAGES ARISING OUT OF THE USE OR INABILITY TO USE THE LIBRARY (INCLUDING BUT NOT LIMITED TO LOSS OF DATA OR DATA BEING RENDERED INACCURATE ...OF THE LIBRARY TO OPERATE WITH ANY OTHER SOFTWARE), EVEN IF SUCH HOLDER OR OTHER PARTY HAS BEEN ADVISED OF THE POSSIBILITY OF SUCH DAMAGES. You can redistribute and change.
... is safest to attach them to the start of warranty; and each source file to the public, we recommend making it free software that everyone can do so by permitting redistribution under the terms of the...FOR DAMAGES, INCLUDING ANY GENERAL, SPECIAL, INCIDENTAL OR CONSEQUENTIAL DAMAGES ARISING OUT OF THE USE OR INABILITY TO USE THE LIBRARY (INCLUDING BUT NOT LIMITED TO LOSS OF DATA OR DATA BEING RENDERED INACCURATE ...OF THE LIBRARY TO OPERATE WITH ANY OTHER SOFTWARE), EVEN IF SUCH HOLDER OR OTHER PARTY HAS BEEN ADVISED OF THE POSSIBILITY OF SUCH DAMAGES. You can redistribute and change.

User Manual (ENGLISH)
Page 3
... at the same time. For the location of a SAMSUNG Authorized Service Center, please call toll-free: In the United States : 1-800-SAMSUNG (1-800-726-7864) In Canada : 1-800-SAMSUNG ➢ See the warranty card for , in normal use other . - For a better video reception, the Plasma TV needs a line of the product. The picture on the screen. - Conditions covered are connected to the WIRELESS unit, then a wireless signal is sent to...
... at the same time. For the location of a SAMSUNG Authorized Service Center, please call toll-free: In the United States : 1-800-SAMSUNG (1-800-726-7864) In Canada : 1-800-SAMSUNG ➢ See the warranty card for , in normal use other . - For a better video reception, the Plasma TV needs a line of the product. The picture on the screen. - Conditions covered are connected to the WIRELESS unit, then a wireless signal is sent to...
User Manual (ENGLISH)
Page 6
...; Menu Transparency Level 54 ■ Setting the Light Effect 54 ■ Using the Energy Saving Feature 55 ■ Preventing Screen Burn-in 55 ■ Reducing the Effects of Features 7 ■ Accessories 7 ■ Viewing the Control Panel 8 ■ Viewing the Connection Panel (Plasma TV 9 ■ Viewing the Connection Panel (WIRELESS HOME AV CENTER 9 ■ Remote Control 11 ■ Installing Batteries in the Remote Control 12 Connections ■ Connecting VHF and UHF Antennas 12 ■ Connecting Cable TV 13 ■ Connecting a DVD Player/Cable Box/Satellite receiver...
...; Menu Transparency Level 54 ■ Setting the Light Effect 54 ■ Using the Energy Saving Feature 55 ■ Preventing Screen Burn-in 55 ■ Reducing the Effects of Features 7 ■ Accessories 7 ■ Viewing the Control Panel 8 ■ Viewing the Connection Panel (Plasma TV 9 ■ Viewing the Connection Panel (WIRELESS HOME AV CENTER 9 ■ Remote Control 11 ■ Installing Batteries in the Remote Control 12 Connections ■ Connecting VHF and UHF Antennas 12 ■ Connecting Cable TV 13 ■ Connecting a DVD Player/Cable Box/Satellite receiver...
User Manual (ENGLISH)
Page 7
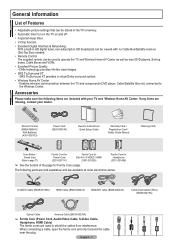
...) HDMI/DVI cable (BN39-00643A) Component Cables (RCA) (BN39-00279A) Optical Cable Antenna Cable (BN39-00333A) ➢ Ferrite Core (Power Cord, Audio/Video Cable, S-Video Cable, Headphone, HDMI Cable) The ferrite cores are missing, contact your TV and Wireless Home AV Center. SRS TruSurround XT provides a virtual Dolby surround system. • Wireless Home AV Center - RETURN FAV.CH Remote Control (BN59-00655A) / AAA Batteries (4301-000103) Power Cord (3903-000144) Owner's Instructions / Quick Setup Guide Warranty Card / Registration Card / Safety Guide Manual...
...) HDMI/DVI cable (BN39-00643A) Component Cables (RCA) (BN39-00279A) Optical Cable Antenna Cable (BN39-00333A) ➢ Ferrite Core (Power Cord, Audio/Video Cable, S-Video Cable, Headphone, HDMI Cable) The ferrite cores are missing, contact your TV and Wireless Home AV Center. SRS TruSurround XT provides a virtual Dolby surround system. • Wireless Home AV Center - RETURN FAV.CH Remote Control (BN59-00655A) / AAA Batteries (4301-000103) Power Cord (3903-000144) Owner's Instructions / Quick Setup Guide Warranty Card / Registration Card / Safety Guide Manual...

User Manual (ENGLISH)
Page 9
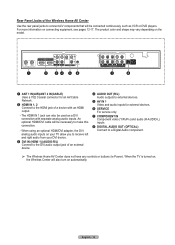
... TV 1 POWER IN Connect the supplied power cord. 2 Service For service only. 3 EX-LINK Connect this to the jack on the FP-T5894 functions as a camcorder or video game. 1 HEADPHONE You can connect a set of headphones if you to watch a television program without disturbing other people in the room. 2 AV IN 2 Audio and video inputs for external devices. 3 S-VIDEO(AV IN 2) S-Video input for serial data signals connected between a DTE (ie TV) and a DCE (ie Wall Mount). Viewing the Connection Panel (WIRELESS...
... TV 1 POWER IN Connect the supplied power cord. 2 Service For service only. 3 EX-LINK Connect this to the jack on the FP-T5894 functions as a camcorder or video game. 1 HEADPHONE You can connect a set of headphones if you to watch a television program without disturbing other people in the room. 2 AV IN 2 Audio and video inputs for external devices. 3 S-VIDEO(AV IN 2) S-Video input for serial data signals connected between a DTE (ie TV) and a DCE (ie Wall Mount). Viewing the Connection Panel (WIRELESS...
User Manual (ENGLISH)
Page 10
... the DVI audio output jack of an external device. 4 AUDIO OUT (R/L) Audio outputs to external devices. 5 AV IN 1 Video and audio inputs for an Air/Cable Network. 2 HDMI IN 1, 2 Connect to the HDMI jack of the Wireless Home AV Center Use the rear panel jacks to connect A/V components that will be connected continuously, such as a DVI connection with an HDMI output. - When using an optional HDMI/DVI adapter, the DVI analog audio inputs on , the Wireless Center will be used as VCR or DVD players. The product color...
... the DVI audio output jack of an external device. 4 AUDIO OUT (R/L) Audio outputs to external devices. 5 AV IN 1 Video and audio inputs for an Air/Cable Network. 2 HDMI IN 1, 2 Connect to the HDMI jack of the Wireless Home AV Center Use the rear panel jacks to connect A/V components that will be connected continuously, such as a DVI connection with an HDMI output. - When using an optional HDMI/DVI adapter, the DVI analog audio inputs on , the Wireless Center will be used as VCR or DVD players. The product color...
User Manual (ENGLISH)
Page 11
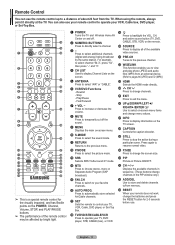
... TV, DVD player, STB, CABLE (box), or VCR. ( Press to backlight the VOL, CH, and active source button (TV, DVD, CABLE, STB, VCR) on the POWER, Channel, Volume, STOP, and PLAY/PAUSE buttons. ➢ The performance of the available video sources. Remote Control You can also use your remote control to operate your favorite channels. ^ AUTO PROG. ADD/DEL ➢ This is a special remote control for 2-3 seconds before use. b WISELINK This function enables you to display Channel Lists on the TV screen...
... TV, DVD player, STB, CABLE (box), or VCR. ( Press to backlight the VOL, CH, and active source button (TV, DVD, CABLE, STB, VCR) on the POWER, Channel, Volume, STOP, and PLAY/PAUSE buttons. ➢ The performance of the available video sources. Remote Control You can also use your remote control to operate your favorite channels. ^ AUTO PROG. ADD/DEL ➢ This is a special remote control for 2-3 seconds before use. b WISELINK This function enables you to display Channel Lists on the TV screen...
User Manual (ENGLISH)
Page 14
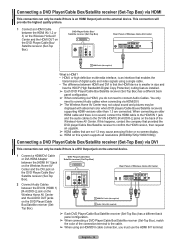
.../Cable Box/Satellite receiver (SetTop Box). 1 HDMI/DVI Cable (Not supplied) 2 Audio Cable (Not supplied) ➢ Each DVD Player/Cable Box/Satellite receiver (Set-Top Box) has a different back panel configuration. ➢ When connecting a DVD Player/Cable Box/Satellite receiver (Set-Top Box), match the color of the connection terminal to the DVI IN (HDMI1) [R-AUDIO-L] jacks on the back of digital audio and video signals using an HDMI/DVI cable connection, you do not need to connect Audio cables when connecting via HDMI/DVI. ➢ The Wireless Home AV Center may not output sound...
.../Cable Box/Satellite receiver (SetTop Box). 1 HDMI/DVI Cable (Not supplied) 2 Audio Cable (Not supplied) ➢ Each DVD Player/Cable Box/Satellite receiver (Set-Top Box) has a different back panel configuration. ➢ When connecting a DVD Player/Cable Box/Satellite receiver (Set-Top Box), match the color of the connection terminal to the DVI IN (HDMI1) [R-AUDIO-L] jacks on the back of digital audio and video signals using an HDMI/DVI cable connection, you do not need to connect Audio cables when connecting via HDMI/DVI. ➢ The Wireless Home AV Center may not output sound...

User Manual (ENGLISH)
Page 18
... Plug & Play Select the antennas to ANT 2 IN(CABLE), select Cable. ➢ If both Analog and Digital. The TV and Wireless Home AV Center will also turn them on the remote control. is automatically displayed. 3 Press the ◄ or ► button to select Shop or Home, then press the ENTER button. ➢ The default selection is Home. ➢ We recommend setting the TV to Home mode for the best picture...
... Plug & Play Select the antennas to ANT 2 IN(CABLE), select Cable. ➢ If both Analog and Digital. The TV and Wireless Home AV Center will also turn them on the remote control. is automatically displayed. 3 Press the ◄ or ► button to select Shop or Home, then press the ENTER button. ➢ The default selection is Home. ➢ We recommend setting the TV to Home mode for the best picture...
User Manual (ENGLISH)
Page 31
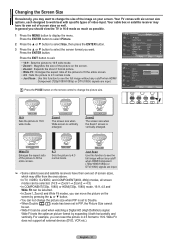
... entire screen. 4:3 Sets the picture to see the full image without any cutoff when HDMI/Component (720p/1080i/1080p) or DTV(1080i) signals are input. Press the ENTER button. Just Scan Use this function to 4:3 normal mode. Zoom1 The screen size when Wide screen is vertically enlarged. Your TV comes with six screen size options, each designed to work best with specific types of the image on the remote control to change the picture size when PIP is set to...
... entire screen. 4:3 Sets the picture to see the full image without any cutoff when HDMI/Component (720p/1080i/1080p) or DTV(1080i) signals are input. Press the ENTER button. Just Scan Use this function to 4:3 normal mode. Zoom1 The screen size when Wide screen is vertically enlarged. Your TV comes with six screen size options, each designed to work best with specific types of the image on the remote control to change the picture size when PIP is set to...
User Manual (ENGLISH)
Page 32
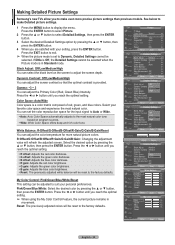
... Picture mode is set the color reproduction space for more precise picture settings than previous models. Press the ◄ or ► button until you reach the optimal setting. ➢ When using the My Color Control Feature, the current picture remains in Standard mode. Making Detailed Picture Settings Samsung's new TVs allow you to display the menu. Pink/Green/Blue/White: Select the desired color by pressing the ▲ or ▼ button, then press the ENTER button...
... Picture mode is set the color reproduction space for more precise picture settings than previous models. Press the ◄ or ► button until you reach the optimal setting. ➢ When using the My Color Control Feature, the current picture remains in Standard mode. Making Detailed Picture Settings Samsung's new TVs allow you to display the menu. Pink/Green/Blue/White: Select the desired color by pressing the ▲ or ▼ button, then press the ENTER button...
User Manual (ENGLISH)
Page 34
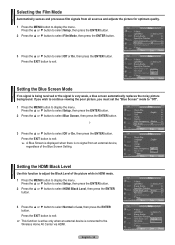
...; Wall-Mount Adjustment ► ▼ More Move Enter Return T V Setup ▲ More Light Effect : In Watching TV Energy Saving : Off Screen Burn Protection HDMI Black Level : Normal Film Mode : OOfff Wall-Mount Adjustment On ▼ More Move Enter Return Setting the Blue Screen Mode If no signal from all sources and adjusts the picture for optimum quality. 1 Press the MENU button to display the menu. T V Setup Plug & Play ► Language : English ► Time ► V-Chip ► Caption ► Menu Transparency : Medium ► Blue Screen...
...; Wall-Mount Adjustment ► ▼ More Move Enter Return T V Setup ▲ More Light Effect : In Watching TV Energy Saving : Off Screen Burn Protection HDMI Black Level : Normal Film Mode : OOfff Wall-Mount Adjustment On ▼ More Move Enter Return Setting the Blue Screen Mode If no signal from all sources and adjusts the picture for optimum quality. 1 Press the MENU button to display the menu. T V Setup Plug & Play ► Language : English ► Time ► V-Chip ► Caption ► Menu Transparency : Medium ► Blue Screen...
User Manual (ENGLISH)
Page 41
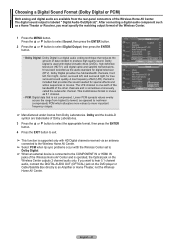
... lip sync problems occur witth the Wireless Center set to Dolby Digital. ➢ When an external device is connected to the COMPONENT IN or HDMI IN jacks of the Wireless Home AV Center and is a digital audio coding technique that reduces the amount of the other channels and is used with digital versatile discs (DVDs), high definition television (HDTV), and digital cable and satellite transmissions. Press the ▲ or ▼ button...
... lip sync problems occur witth the Wireless Center set to Dolby Digital. ➢ When an external device is connected to the COMPONENT IN or HDMI IN jacks of the Wireless Home AV Center and is a digital audio coding technique that reduces the amount of the other channels and is used with digital versatile discs (DVDs), high definition television (HDTV), and digital cable and satellite transmissions. Press the ▲ or ▼ button...
User Manual (ENGLISH)
Page 55
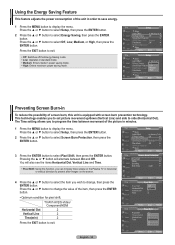
... Time setting allows you to set picture movement up/down (Vertical Line) and side to display the menu. Using the Energy Saving Feature This feature adjusts the power consumption of the unit in standard mode. • Medium: Enters medium power saving mode. • High: Enters maximum power saving mode. T V Setup ▲ More Light Effect : In Watching TV ► Energy Saving : Off ► Screen Burn Protection ► HDMI Black Level : Normal ► Film Mode : Off ► Wall-Mount Adjustment...
... Time setting allows you to set picture movement up/down (Vertical Line) and side to display the menu. Using the Energy Saving Feature This feature adjusts the power consumption of the unit in standard mode. • Medium: Enters medium power saving mode. • High: Enters maximum power saving mode. T V Setup ▲ More Light Effect : In Watching TV ► Energy Saving : Off ► Screen Burn Protection ► HDMI Black Level : Normal ► Film Mode : Off ► Wall-Mount Adjustment...
User Manual (ENGLISH)
Page 63
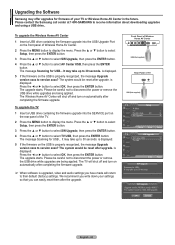
... a USB drive containing the firmware upgrade into the SERVICE port on automatically after completing the firmware upgrade. ➢ When software is upgraded, video and audio settings you can easily reset them after upgrade. The message Scanning for firmware of Wireless Home AV Center. 2 Press the MENU button to their default (factory) settings. The system would be reset after the upgrade. is displayed. The upgrade starts. To upgrade the TV 1 Insert a USB drive containing the firmware upgrade into the USB Upgrade Port on the front panel...
... a USB drive containing the firmware upgrade into the SERVICE port on automatically after completing the firmware upgrade. ➢ When software is upgraded, video and audio settings you can easily reset them after upgrade. The message Scanning for firmware of Wireless Home AV Center. 2 Press the MENU button to their default (factory) settings. The system would be reset after the upgrade. is displayed. The upgrade starts. To upgrade the TV 1 Insert a USB drive containing the firmware upgrade into the USB Upgrade Port on the front panel...
User Manual (ENGLISH)
Page 64
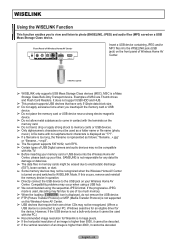
...-only device it cannot be compatible with this TV. ➢ Before inserting your memory card or USB device into the WISELINK jack (USB jack) on the front panel of Wireless Home AV Center. USB (Not supplied) ➢ WISELINK only supports USB Mass Storage Class devices (MSC). Compatibility problems may occur when using a USB hub. ➢ We recommended using the sequential JPEG format. SAMSUNG is not responsible for any...
...-only device it cannot be compatible with this TV. ➢ Before inserting your memory card or USB device into the WISELINK jack (USB jack) on the front panel of Wireless Home AV Center. USB (Not supplied) ➢ WISELINK only supports USB Mass Storage Class devices (MSC). Compatibility problems may occur when using a USB hub. ➢ We recommended using the sequential JPEG format. SAMSUNG is not responsible for any...
User Manual (ENGLISH)
Page 74
... time. Adjust the antenna. Depending on ), if the problem continues, call your equipment check (STB, DVD, etc) ; Also ensure there's no obstacle between PDP TV and Home AV Center The picture on . First, check the volume of the Wireless Home AV Center and the Plasma TV, the signal may be on the installation location of units connected to your remote control in . Press the TV button to put your TV (digital broadcasting receiver, DVD, cable...
... time. Adjust the antenna. Depending on ), if the problem continues, call your equipment check (STB, DVD, etc) ; Also ensure there's no obstacle between PDP TV and Home AV Center The picture on . First, check the volume of the Wireless Home AV Center and the Plasma TV, the signal may be on the installation location of units connected to your remote control in . Press the TV button to put your TV (digital broadcasting receiver, DVD, cable...
User Manual (ENGLISH)
Page 77
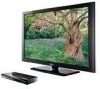
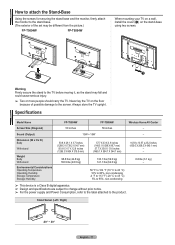
... picture.) FP-T5094W FP-T5894W When mounting your TV on a wall, install the cover (1) on the stand-base using two screws. Never lay the TV on the floor because of possible damage to the stand base. (The exterior of the set may fall and could cause serious injury. ➢ Two or more people should carry the TV. Specifications Model Name Screen Size (Diagonal) FP-T5094W 50 inches FP-T5894W 58 inches Wireless...
... picture.) FP-T5094W FP-T5894W When mounting your TV on a wall, install the cover (1) on the stand-base using two screws. Never lay the TV on the floor because of possible damage to the stand base. (The exterior of the set may fall and could cause serious injury. ➢ Two or more people should carry the TV. Specifications Model Name Screen Size (Diagonal) FP-T5094W 50 inches FP-T5894W 58 inches Wireless...


