
Safety Guide (ENGLISH)
Page 5
... to provide reasonable protection against harmful interference when the equipment is a detachable power supply cord with the limits for connection to any interference received, including interference... 15.119 of this equipment does cause harmful interference to correct the interference by turning the equipment off and on a circuit different from the U.S. This booklet was ... USA - Operation of the FCC rules. (TV broadcast receivers with your dealer or an experienced radio/television technician for product compliance: SAMSUNG ELECTRONICS CO., LTD. This device may not cause...
... to provide reasonable protection against harmful interference when the equipment is a detachable power supply cord with the limits for connection to any interference received, including interference... 15.119 of this equipment does cause harmful interference to correct the interference by turning the equipment off and on a circuit different from the U.S. This booklet was ... USA - Operation of the FCC rules. (TV broadcast receivers with your dealer or an experienced radio/television technician for product compliance: SAMSUNG ELECTRONICS CO., LTD. This device may not cause...
User Manual (ENGLISH)
Page 5
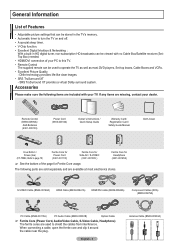
...for Headphone (3301-001456) ➢ See the bottom of Features • Adjustable picture settings that can be stored in the TV's memory. • Automatic timer to turn the TV on and off. • A special sleep timer. • V-Chip function. • Excellent Digital Interface & Networking : ...With a built-in HD digital tuner, non-subscription HD broadcasts can be used to page 79) Ferrite Core for Power Cord (3301-001110) Ferrite...
...for Headphone (3301-001456) ➢ See the bottom of Features • Adjustable picture settings that can be stored in the TV's memory. • Automatic timer to turn the TV on and off. • A special sleep timer. • V-Chip function. • Excellent Digital Interface & Networking : ...With a built-in HD digital tuner, non-subscription HD broadcasts can be used to page 79) Ferrite Core for Power Cord (3301-001110) Ferrite...
User Manual (ENGLISH)
Page 6
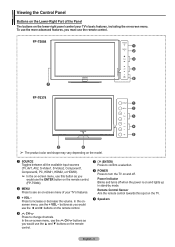
Press to turn the TV on and off when the power is on the remote control. English - 6 Power Indicator Blinks and turns off . FP-T5084 FP-T6374 ➢ The product color and shape may vary depending on the model. 1 SOURCE Toggles between all the available input sources (TV, AV1, AV2, S-Video1, S-Video2, ...9658; buttons on the remote control. 5 (ENTER) Press to confirm a selection. 6 POWER Press to increase or decrease the volume. Viewing the Control Panel Buttons on the Lower-Right Part of your TV's basic features, including the on-screen menu. In the on-screen menu, use the CH...
Press to turn the TV on and off when the power is on the remote control. English - 6 Power Indicator Blinks and turns off . FP-T5084 FP-T6374 ➢ The product color and shape may vary depending on the model. 1 SOURCE Toggles between all the available input sources (TV, AV1, AV2, S-Video1, S-Video2, ...9658; buttons on the remote control. 5 (ENTER) Press to confirm a selection. 6 POWER Press to increase or decrease the volume. Viewing the Control Panel Buttons on the Lower-Right Part of your TV's basic features, including the on-screen menu. In the on-screen menu, use the CH...
User Manual (ENGLISH)
Page 8
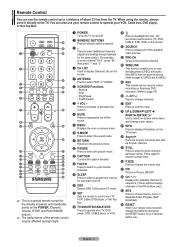
... remote control for the visually impaired, and has Braille points on the POWER, Channel, Volume, STOP, and PLAY/PAUSE buttons. ➢ The performance of the remote control may be used to control recording on Samsung DVD recorders. (Refer to page 74) d CH Press to operate ...S.MODE Press to display information on the remote. ) SOURCE Press to select additional channels (digital and analog) being broadcast by bright light. 1 POWER Turns the TV on and off. 2 NUMERIC BUTTONS Press to a distance of the available video sources. j P.SIZE Press to choose stereo, mono or Separate Audio...
... remote control for the visually impaired, and has Braille points on the POWER, Channel, Volume, STOP, and PLAY/PAUSE buttons. ➢ The performance of the remote control may be used to control recording on Samsung DVD recorders. (Refer to page 74) d CH Press to operate ...S.MODE Press to display information on the remote. ) SOURCE Press to select additional channels (digital and analog) being broadcast by bright light. 1 POWER Turns the TV on and off. 2 NUMERIC BUTTONS Press to a distance of the available video sources. j P.SIZE Press to choose stereo, mono or Separate Audio...
User Manual (ENGLISH)
Page 15
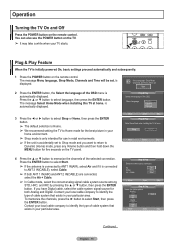
... selected connection. Contact your local cable company to identify the type of the OSD menu is initially powered On, basic settings proceed automatically and subsequently: 1 Press the POWER button on the TV panel. English - 15 is displayed. 2 Press the ENTER button, the Select the language of ...company to select Start, then press the ENTER button. Operation Turning the TV On and Off Press the POWER button on the TV. ➢ It may take a while when your TV starts. The message Select Home Mode when installing this TV at home. is only intended for both ANT 1 IN(AIR...
... selected connection. Contact your local cable company to identify the type of the OSD menu is initially powered On, basic settings proceed automatically and subsequently: 1 Press the POWER button on the TV panel. English - 15 is displayed. 2 Press the ENTER button, the Select the language of ...company to select Start, then press the ENTER button. Operation Turning the TV On and Off Press the POWER button on the TV. ➢ It may take a while when your TV starts. The message Select Home Mode when installing this TV at home. is only intended for both ANT 1 IN(AIR...
User Manual (ENGLISH)
Page 18
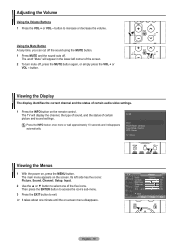
...V Picture Mode Contrast Brightness Sharpness Color Tint G 50 : Dynamic ► 100 45 75 55 R 50 ▼ More Move Enter Exit English - 18 The word "Mute" will display the channel, the type of sound, and the status of the screen. 2 To turn mute off . The TV will appear in the lower-left side has five... the VOL + or VOL - Air 28 Mono Picture Mode : Dynamic Sound Mode : Custom MTS : Stereo 12 : 00 am Viewing the Menus 1 With the power on -screen menu disappears. button to exit. ➢ It takes about one of certain audio-video settings. 1 Press the INFO button on the screen.
...V Picture Mode Contrast Brightness Sharpness Color Tint G 50 : Dynamic ► 100 45 75 55 R 50 ▼ More Move Enter Exit English - 18 The word "Mute" will display the channel, the type of sound, and the status of the screen. 2 To turn mute off . The TV will appear in the lower-left side has five... the VOL + or VOL - Air 28 Mono Picture Mode : Dynamic Sound Mode : Custom MTS : Stereo 12 : 00 am Viewing the Menus 1 With the power on -screen menu disappears. button to exit. ➢ It takes about one of certain audio-video settings. 1 Press the INFO button on the screen.
User Manual (ENGLISH)
Page 20
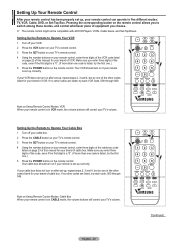
... other codes are listed, try each code, 000 through 080. Note on if your remote is in five different modes: TV, VCR, Cable, DVD, or Set-Top Box. Your VCR should turn on Using Remote Control Modes: VCR When your remote control is set up correctly. Note on after set up, your... if your brand of the code, even if the first digit is a "0". (If more than one code is listed, try the first one.) 5 Press the POWER button on the remote control. If no other codes are listed, try each VCR code, 000 through 046. Setting Up the Remote to switch among...
... other codes are listed, try each code, 000 through 080. Note on if your remote is in five different modes: TV, VCR, Cable, DVD, or Set-Top Box. Your VCR should turn on Using Remote Control Modes: VCR When your remote control is set up correctly. Note on after set up, your... if your brand of the code, even if the first digit is a "0". (If more than one code is listed, try the first one.) 5 Press the POWER button on the remote control. If no other codes are listed, try each VCR code, 000 through 046. Setting Up the Remote to switch among...
User Manual (ENGLISH)
Page 21
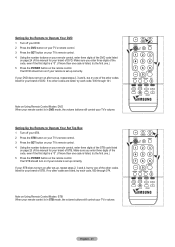
...no other codes are listed, try one .) 5 Press the POWER button on the remote control. Setting Up the Remote to Operate Your DVD 1 Turn off your STB. 2 Press the STB button on your TV's remote control. 3 Press the SET button on your TV's remote control. 4 Using the number buttons on your remote control...codes are listed, try one .) 5 Press the POWER button on the remote control. Setting Up the Remote to Operate Your Set Top Box 1 Turn off your DVD. 2 Press the DVD button on your TV's remote control. 3 Press the SET button on your TV's remote control. 4 Using the number buttons on your...
...no other codes are listed, try one .) 5 Press the POWER button on the remote control. Setting Up the Remote to Operate Your DVD 1 Turn off your STB. 2 Press the STB button on your TV's remote control. 3 Press the SET button on your TV's remote control. 4 Using the number buttons on your remote control...codes are listed, try one .) 5 Press the POWER button on the remote control. Setting Up the Remote to Operate Your Set Top Box 1 Turn off your DVD. 2 Press the DVD button on your TV's remote control. 3 Press the SET button on your TV's remote control. 4 Using the number buttons on your...
User Manual (ENGLISH)
Page 43
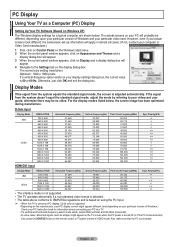
... depending upon your particular version of Windows.) Check your PC instruction book for information about connecting your PC to a TV. • If a vertical and horizontal frequency-select mode exists, select 60Hz (vertical) and 48.4KHz (horizontal).... size setting (resolution) Optimum: 1920 x 1080 pixels If a vertical-frequency option exists on the TV screen when the PC power is turned off (or if the PC is 60 or 60 Hz. D-Sub Input Display Mode IBM VESA ...Pixel Clock Frequency(MHz) 28.322 25.175 31.500 31.500 36.000 40.000 50.000 49.500 65.000 75.000 78.750 108.000 123.000 162.000 138...
... depending upon your particular version of Windows.) Check your PC instruction book for information about connecting your PC to a TV. • If a vertical and horizontal frequency-select mode exists, select 60Hz (vertical) and 48.4KHz (horizontal).... size setting (resolution) Optimum: 1920 x 1080 pixels If a vertical-frequency option exists on the TV screen when the PC power is turned off (or if the PC is 60 or 60 Hz. D-Sub Input Display Mode IBM VESA ...Pixel Clock Frequency(MHz) 28.322 25.175 31.500 31.500 36.000 40.000 50.000 49.500 65.000 75.000 78.750 108.000 123.000 162.000 138...
User Manual (ENGLISH)
Page 48
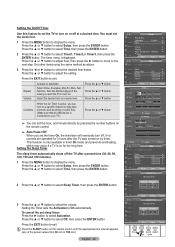
... the remote control until the appropriate time interval appears (any of the week you set the timer On, the television will eventually turn on or off the TV after the TV was turned on for 3 hours after a preset time (30, 60, 90, 120, 150 and 180 minutes). 1 Press the MENU button to ...Setup, then press the ENTER button. Minute --- The timer menu is on by pressing the number buttons on the remote control. ➢ Auto Power Off When you want the TV to display the menu. Activation ▲ Off ▼ Move Adjust Return T V Sleep Timer Set sleep timer. Set other items using the...
... the remote control until the appropriate time interval appears (any of the week you set the timer On, the television will eventually turn on or off the TV after the TV was turned on for 3 hours after a preset time (30, 60, 90, 120, 150 and 180 minutes). 1 Press the MENU button to ...Setup, then press the ENTER button. Minute --- The timer menu is on by pressing the number buttons on the remote control. ➢ Auto Power Off When you want the TV to display the menu. Activation ▲ Off ▼ Move Adjust Return T V Sleep Timer Set sleep timer. Set other items using the...
User Manual (ENGLISH)
Page 52
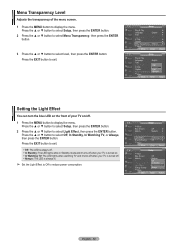
... LED lights while in Standby mode and it turns off when your TV is turned off . 1 Press the MENU button to select Off, In Standby, In Watching TV, or Always, then press the ENTER button. Press the EXIT button to reduce power consumption. Menu Transparency Level Adjusts the transparency of... your TV on . • In Watching TV: The LED lights when watching TV and it turns off when your TV is turned on /off . • Always: The LED is always lit....
... LED lights while in Standby mode and it turns off when your TV is turned off . 1 Press the MENU button to select Off, In Standby, In Watching TV, or Always, then press the ENTER button. Press the EXIT button to reduce power consumption. Menu Transparency Level Adjusts the transparency of... your TV on . • In Watching TV: The LED lights when watching TV and it turns off when your TV is turned on /off . • Always: The LED is always lit....
User Manual (ENGLISH)
Page 61
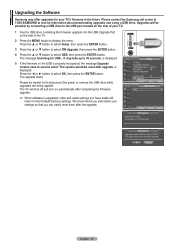
... SW Upgrade Upgrade version XXXX to receive information about downloading upgrades and using a USB drive. OK Cancel English - 61 Please contact the Samsung call center at 1-800-SAMSUNG to version XXXX ? The message Scanning for USB... Press the ◄ or ► button to select USB, then press the ENTER...system would be careful not to disconnect the power or remove the USB drive while upgrades are being applied. We recommend you write down your TV's firmware in the future. It may take up to 30 seconds. The TV will shut off and turn on the USB is properly recognized, the ...
... SW Upgrade Upgrade version XXXX to receive information about downloading upgrades and using a USB drive. OK Cancel English - 61 Please contact the Samsung call center at 1-800-SAMSUNG to version XXXX ? The message Scanning for USB... Press the ◄ or ► button to select USB, then press the ENTER...system would be careful not to disconnect the power or remove the USB drive while upgrades are being applied. We recommend you write down your TV's firmware in the future. It may take up to 30 seconds. The TV will shut off and turn on the USB is properly recognized, the ...
User Manual (ENGLISH)
Page 73
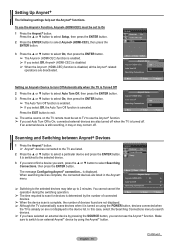
...device is still recording, it is turned on using the Anynet+ button. Move Enter Return ➢ The time required to scan for devices is determined by using the POWER button, devices connected when the TV is already on the TV remote must be set to TV to use the Anynet+ Function, ...Anynet+ (HDMI-CEC) must be set the Anynet+ functions. Anynet+ Setup Anynet+ (HDMI-CEC) : On Auto Turn Off Searching Connections : OffOff ...
...device is still recording, it is turned on using the Anynet+ button. Move Enter Return ➢ The time required to scan for devices is determined by using the POWER button, devices connected when the TV is already on the TV remote must be set to TV to use the Anynet+ Function, ...Anynet+ (HDMI-CEC) must be set the Anynet+ functions. Anynet+ Setup Anynet+ (HDMI-CEC) : On Auto Turn Off Searching Connections : OffOff ...
User Manual (ENGLISH)
Page 76
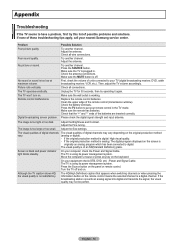
...and power indicator light blinks steadily. Screen is digital: High visual quality. - Move the computer's mouse or press any key on the panel or remote control. On your nearest Samsung service center. Press the Source button on the keyboard. Turn the TV off . English - 76 The TV operates ...Adjust the Brightness and Contrast. Adjust the Size settings. check the Power and Signal Cable. Poor sound quality. The TV won't turn on the original production method vary. (analog or digital). - Try another channel. Press the TV button to put your remote control in . The visual quality ...
...and power indicator light blinks steadily. Screen is digital: High visual quality. - Move the computer's mouse or press any key on the panel or remote control. On your nearest Samsung service center. Press the Source button on the keyboard. Turn the TV off . English - 76 The TV operates ...Adjust the Brightness and Contrast. Adjust the Size settings. check the Power and Signal Cable. Poor sound quality. The TV won't turn on the original production method vary. (analog or digital). - Try another channel. Press the TV button to put your remote control in . The visual quality ...
User Manual (ENGLISH)
Page 77
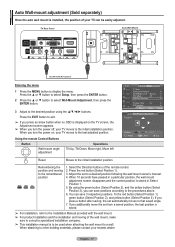
..., the set to the desired position using the green button (Select Position 2), and the yellow button (Select Position 3), you turn the power on the TV screen, the Adjustment screen appears. ➢ When you can save positions according to the initial installation position. Select the Direction...using the buttons. Press the red button (Select Position 1). 3. When attaching to other building materials, please contact your TV moves to the procedures above. 6. TV Rear Panel Auto Wall-Mount EX-LINK Cable (Not supplied) Entering the menu 1 Press the MENU button to the ...
..., the set to the desired position using the green button (Select Position 2), and the yellow button (Select Position 3), you turn the power on the TV screen, the Adjustment screen appears. ➢ When you can save positions according to the initial installation position. Select the Direction...using the buttons. Press the red button (Select Position 1). 3. When attaching to other building materials, please contact your TV moves to the procedures above. 6. TV Rear Panel Auto Wall-Mount EX-LINK Cable (Not supplied) Entering the menu 1 Press the MENU button to the ...


