User Manual
Page 1
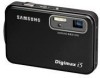
ENGLISH This manual will guide you for buying a Samsung Camera. Please read this manual carefully before using the application software. User's Manual Thank you through using the camera, including capturing images, downloading images and using your new camera.
ENGLISH This manual will guide you for buying a Samsung Camera. Please read this manual carefully before using the application software. User's Manual Thank you through using the camera, including capturing images, downloading images and using your new camera.
User Manual
Page 2
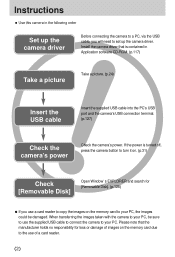
... reader to copy the images on the memory card to the use of a card reader. 《2》 Please note that is turned off, press the camera button to turn it on. (p.31) Check [Removable Disk] Open Window's EXPLORER and search for loss or damage of images on the memory card due... to your PC. Instructions ■ Use this camera in Application software CD-ROM. (p.117) Take a picture Take a picture. (p.24) Insert the USB cable Insert the supplied USB cable into the PC's USB port...
... reader to copy the images on the memory card to the use of a card reader. 《2》 Please note that is turned off, press the camera button to turn it on. (p.31) Check [Removable Disk] Open Window's EXPLORER and search for loss or damage of images on the memory card due... to your PC. Instructions ■ Use this camera in Application software CD-ROM. (p.117) Take a picture Take a picture. (p.24) Insert the USB cable Insert the supplied USB cable into the PC's USB port...

User Manual
Page 3
... 10 ■Front & Top 10 ■Back & Bottom 10 ■Bottom/ 5-function button 11 ■Cradle 11 ■Self-timer lamp 12 ■Camera Status Lamp 12 ■Mode icon 12 ●Connecting to a Power Source 13 ■Using the SAC-41 14 ■Using the battery 18 ■...Instructions on how to use the memory card 19 ●Inserting the memory card 21 ●Removing the memory card 21 ●When Using the Camera for the First Time 22 RECORDING ●LCD monitor indicator 23 ●Changing the recording mode 24 ■Selecting the [Mode] menu 24 ...
... 10 ■Front & Top 10 ■Back & Bottom 10 ■Bottom/ 5-function button 11 ■Cradle 11 ■Self-timer lamp 12 ■Camera Status Lamp 12 ■Mode icon 12 ●Connecting to a Power Source 13 ■Using the SAC-41 14 ■Using the battery 18 ■...Instructions on how to use the memory card 19 ●Inserting the memory card 21 ●Removing the memory card 21 ●When Using the Camera for the First Time 22 RECORDING ●LCD monitor indicator 23 ●Changing the recording mode 24 ■Selecting the [Mode] menu 24 ...
User Manual
Page 4
...;Playing back a movie clip 63 ■How to capture the movie clip 63 ■On camera movie trimming 64 ■Playing back a recorded voice 65 ●LCD monitor indicator 66 ●Using the camera buttons to adjust the camera 67 ■Play mode button 67 ●Thumbnail/ Enlargement button 68 ●Voice memo... 131 ●Removing the removable disk 132 ●Setting up the USB Driver for MAC 133 ●Using the USB Driver for MAC 133 ●Digimax Viewer 2.1 134 ●Digimax Reader 135 ●Using PhotoImpression 137 ●FAQ 139
...;Playing back a movie clip 63 ■How to capture the movie clip 63 ■On camera movie trimming 64 ■Playing back a recorded voice 65 ●LCD monitor indicator 66 ●Using the camera buttons to adjust the camera 67 ■Play mode button 67 ●Thumbnail/ Enlargement button 68 ●Voice memo... 131 ●Removing the removable disk 132 ●Setting up the USB Driver for MAC 133 ●Using the USB Driver for MAC 133 ●Digimax Viewer 2.1 134 ●Digimax Reader 135 ●Using PhotoImpression 137 ●FAQ 139
User Manual
Page 5
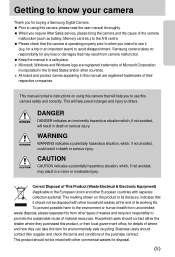
... product names appearing in this manual are registered trademarks of Microsoft Corporation incorporated in a safe place. Getting to know your camera Thank you for buying a Samsung Digital Camera. ● Prior to using this camera that will help prevent danger and injury to others. This will help you intend to promote the sustainable reuse of the...
... product names appearing in this manual are registered trademarks of Microsoft Corporation incorporated in a safe place. Getting to know your camera Thank you for buying a Samsung Digital Camera. ● Prior to using this camera that will help prevent danger and injury to others. This will help you intend to promote the sustainable reuse of the...

User Manual
Page 6
...product and accessories out of reach of extreme variances in camera malfunction. the memory card slot and battery chamber. Warning ■ Do not use this product in fire, injury, electric shock or severe damage to you or your dealer or Samsung Camera Service centre. ■ Please do not use the ...flash in any form of liquid or a foreign object enter the camera, do not cover the camera or AC Charger. Switch off the camera, and then disconnect the power source. Danger ■ ...
...product and accessories out of reach of extreme variances in camera malfunction. the memory card slot and battery chamber. Warning ■ Do not use this product in fire, injury, electric shock or severe damage to you or your dealer or Samsung Camera Service centre. ■ Please do not use the ...flash in any form of liquid or a foreign object enter the camera, do not cover the camera or AC Charger. Switch off the camera, and then disconnect the power source. Danger ■ ...
User Manual
Page 7
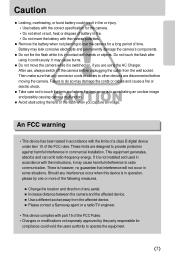
...are designed to provide protection against harmful interference in accordance with the limits of a class B digital device under item 15 of the FCC rules. Battery may cause harmful interference to radio communication....when you are disconnected before unplugging the cable from the affected device. ■ Please contact a Samsung agent or a radio/TV engineer. •This device complies with part 15 of the FCC ... could result in fire or injury. •Use battery with the correct specification for the camera. •Do not short circuit, heat or dispose of time. There is in contact with...
...are designed to provide protection against harmful interference in accordance with the limits of a class B digital device under item 15 of the FCC rules. Battery may cause harmful interference to radio communication....when you are disconnected before unplugging the cable from the affected device. ■ Please contact a Samsung agent or a radio/TV engineer. •This device complies with part 15 of the FCC ... could result in fire or injury. •Use battery with the correct specification for the camera. •Do not short circuit, heat or dispose of time. There is in contact with...
User Manual
Page 8
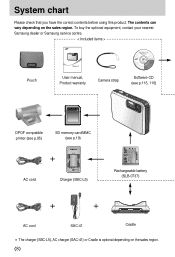
... Please check that you have the correct contents before using this product. To buy the optional equipment, contact your nearest Samsung dealer or Samsung service centre. < Included items > Pouch User manual, Product warranty Camera strap Software CD (see p.115, 116) DPOF compatible printer (see p.85) SD memory card/MMC (see p.19) AC cord...
... Please check that you have the correct contents before using this product. To buy the optional equipment, contact your nearest Samsung dealer or Samsung service centre. < Included items > Pouch User manual, Product warranty Camera strap Software CD (see p.115, 116) DPOF compatible printer (see p.85) SD memory card/MMC (see p.19) AC cord...

User Manual
Page 9
...;9》 System chart Computer System Requirements PictBridge compatible printer(see p.101) CAUTION When you connect the camera to a computer, printer or external monitor, you have to use the USB/ AV cable supplied with processor better than MMX Pentium 233MHz (XP : Pentium II ...
...;9》 System chart Computer System Requirements PictBridge compatible printer(see p.101) CAUTION When you connect the camera to a computer, printer or external monitor, you have to use the USB/ AV cable supplied with processor better than MMX Pentium 233MHz (XP : Pentium II ...
User Manual
Page 10
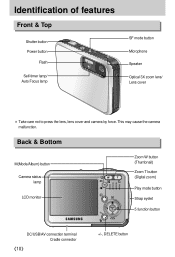
This may cause the camera malfunction. Back & Bottom M(Mode/Album) button Camera status lamp LCD monitor Zoom W button (Thumbnail) Zoom T button (Digital zoom) Play mode button Strap eyelet 5 function button DC/USB/AV connection terminal Cradle connector 《10》 +/-, DELETE button Identification of features Front & Top Shutter button Power button Flash Self-timer lamp/ Auto Focus lamp SF mode button Microphone Speaker Optical 3X zoom lens/ Lens cover ※ Take care not to press the lens, lens cover and camera by force.
This may cause the camera malfunction. Back & Bottom M(Mode/Album) button Camera status lamp LCD monitor Zoom W button (Thumbnail) Zoom T button (Digital zoom) Play mode button Strap eyelet 5 function button DC/USB/AV connection terminal Cradle connector 《10》 +/-, DELETE button Identification of features Front & Top Shutter button Power button Flash Self-timer lamp/ Auto Focus lamp SF mode button Microphone Speaker Optical 3X zoom lens/ Lens cover ※ Take care not to press the lens, lens cover and camera by force.

User Manual
Page 11
Identification of features Bottom / 5-function button Memory card slot Battery chamber Battery holder Battery chamber cover Voice memo/ Voice recording/ UP button MENU/ OK button FLASH/ LEFT button SELF-TIMER/ RIGHT button Macro / DOWN button Play & Pause button Cradle ■ You can recharge your rechargeable battery, transfer a captured image to print, and download images with the cradle. (Refer to page 14, 89 and 127) ● Top Camera connection terminal ● Back DC connection terminal USB port AV connection terminal 《11》
Identification of features Bottom / 5-function button Memory card slot Battery chamber Battery holder Battery chamber cover Voice memo/ Voice recording/ UP button MENU/ OK button FLASH/ LEFT button SELF-TIMER/ RIGHT button Macro / DOWN button Play & Pause button Cradle ■ You can recharge your rechargeable battery, transfer a captured image to print, and download images with the cradle. (Refer to page 14, 89 and 127) ● Top Camera connection terminal ● Back DC connection terminal USB port AV connection terminal 《11》

User Manual
Page 12
...intervals. Icon - 《12》 A picture will be taken after about 10 seconds and 2 seconds later a Blinking second picture will be taken. ■ Camera Status Lamp Status Power on After taking a picture When the USB cable is inserted to a PC Transmitting Data with a PC Description The lamp turns on... and off when the camera is ready to take a picture The lamp blinks while saving the image data and turns off when the camera is ready to take a picture The lamp lights up (LCD monitor turns off after initializing...
...intervals. Icon - 《12》 A picture will be taken after about 10 seconds and 2 seconds later a Blinking second picture will be taken. ■ Camera Status Lamp Status Power on After taking a picture When the USB cable is inserted to a PC Transmitting Data with a PC Description The lamp turns on... and off when the camera is ready to take a picture The lamp blinks while saving the image data and turns off when the camera is ready to take a picture The lamp lights up (LCD monitor turns off after initializing...
User Manual
Page 13
... camera body may become warm. Based on the following shooting conditions Using the fully charged battery 640X480 image size 30fps frame rate ※ These figures are measured under Samsung's standard conditions and Shooting conditions and may vary depending on the following shooting conditions... Using the fully charged battery Auto mode, 5M image size Fine image quality, Shot to leaking if kept inside the camera. ● Low temperatures (...
... camera body may become warm. Based on the following shooting conditions Using the fully charged battery 640X480 image size 30fps frame rate ※ These figures are measured under Samsung's standard conditions and Shooting conditions and may vary depending on the following shooting conditions... Using the fully charged battery Auto mode, 5M image size Fine image quality, Shot to leaking if kept inside the camera. ● Low temperatures (...
User Manual
Page 14
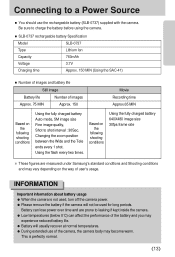
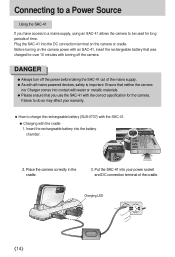
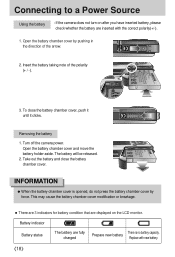
...Failure to do so may affect your power socket and DC connection terminal of the cradle. Ensure that neither the camera nor Charger comes into the DC connection terminal on the camera power with an SAC-41, insert the rechargeable battery that you have access to a mains supply, using an ...the SAC-41. ● Charging with the cradle 1. Put the SAC-41 into the battery chamber. 2. Place the camera correctly in the cradle. 3. DANGER ● Always turn off the camera. Plug the SAC-41 into contact with water or metallic materials. ● Please ensure that was charged for over 10...
...Failure to do so may affect your power socket and DC connection terminal of the cradle. Ensure that neither the camera nor Charger comes into the DC connection terminal on the camera power with an SAC-41, insert the rechargeable battery that you have access to a mains supply, using an ...the SAC-41. ● Charging with the cradle 1. Put the SAC-41 into the battery chamber. 2. Place the camera correctly in the cradle. 3. DANGER ● Always turn off the camera. Plug the SAC-41 into contact with water or metallic materials. ● Please ensure that was charged for over 10...
User Manual
Page 15
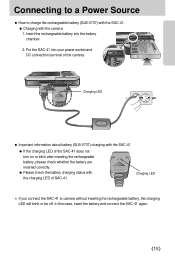
... battery, please check whether the battery are inserted correctly. ● Please check the battery charging status with the camera 1. Insert the rechargeable battery into your power socket and DC connection terminal of the camera. Put the SAC-41 into the battery chamber. 2. Charging LED ※ If you connect the SAC-41 to... of SAC-41. In this case, insert the battery and connect the SAC-41 again. 《15》 Connecting to a Power Source ■ How to camera without inserting the rechargeable battery, the charging LED will brink or be off.
... battery, please check whether the battery are inserted correctly. ● Please check the battery charging status with the camera 1. Insert the rechargeable battery into your power socket and DC connection terminal of the camera. Put the SAC-41 into the battery chamber. 2. Charging LED ※ If you connect the SAC-41 to... of SAC-41. In this case, insert the battery and connect the SAC-41 again. 《15》 Connecting to a Power Source ■ How to camera without inserting the rechargeable battery, the charging LED will brink or be off.

User Manual
Page 16
... connections are in place. ● A USB cable for charging the rechargeable battery. ■ Charging time (When the camera is turned off or blinking ● If there is discharged again. 《16》 The camera may be turned on because of the SAC-41 Status Using the cradle Being Charged Red LED is... on Charging is complete Green LED is on Charging error Red LED is off or blinking Direct to the camera Red LED is on Green LED is on , the battery can 't be used for transmitting data can 't charge fully. Charge the battery for over 10...
... connections are in place. ● A USB cable for charging the rechargeable battery. ■ Charging time (When the camera is turned off or blinking ● If there is discharged again. 《16》 The camera may be turned on because of the SAC-41 Status Using the cradle Being Charged Red LED is... on Charging is complete Green LED is on Charging error Red LED is off or blinking Direct to the camera Red LED is on Green LED is on , the battery can 't be used for transmitting data can 't charge fully. Charge the battery for over 10...
User Manual
Page 17
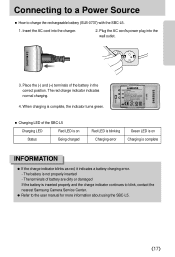
... the (-) and (+) terminals of battery are dirty or damaged If the battery is inserted properly and the charge indicator continues to blink, contact the nearest Samsung Camera Service Center. ● Refer to charge the rechargeable battery (SLB-0737) with the SBC-L5. 1. Plug the AC cord's power plug into the charger. 2. The...
... the (-) and (+) terminals of battery are dirty or damaged If the battery is inserted properly and the charge indicator continues to blink, contact the nearest Samsung Camera Service Center. ● Refer to charge the rechargeable battery (SLB-0737) with the SBC-L5. 1. Plug the AC cord's power plug into the charger. 2. The...
User Manual
Page 18
...battery are inserted with new battery. 《18》 Open the battery chamber cover by force. Removing the battery 1. Turn off the camera power. INFORMATION ● When the battery chamber cover is no battery capacity. charged Replace with the correct polarity(+/-). 1. The battery will... be released. 2. Connecting to a Power Source Using the battery : If the camera does not turn on the LCD monitor. This may cause the battery chamber cover modification or breakage. ■ There are 3 indicators for...
...battery are inserted with new battery. 《18》 Open the battery chamber cover by force. Removing the battery 1. Turn off the camera power. INFORMATION ● When the battery chamber cover is no battery capacity. charged Replace with the correct polarity(+/-). 1. The battery will... be released. 2. Connecting to a Power Source Using the battery : If the camera does not turn on the LCD monitor. This may cause the battery chamber cover modification or breakage. ■ There are 3 indicators for...
User Manual
Page 19
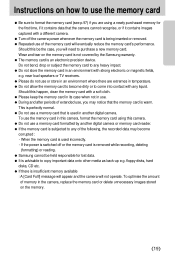
...● Please do not use or store in an environment where there are using this camera. ● Do not use a memory card formatted by the Samsung warranty. ● The memory card is used in another digital camera or memory card reader. ● If the memory card is subjected to any of... If there is insufficient memory available : A [Card Full!] message will appear and the camera will eventually reduce the memory card's performance. Wear and tear on the memory card is not covered by another digital camera. Instructions on how to use the memory card ● Be sure to format the memory...
...● Please do not use or store in an environment where there are using this camera. ● Do not use a memory card formatted by the Samsung warranty. ● The memory card is used in another digital camera or memory card reader. ● If the memory card is subjected to any of... If there is insufficient memory available : A [Card Full!] message will appear and the camera will eventually reduce the memory card's performance. Wear and tear on the memory card is not covered by another digital camera. Instructions on how to use the memory card ● Be sure to format the memory...
User Manual
Page 20
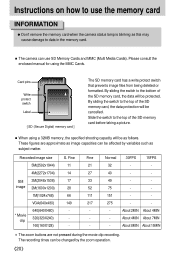
... Fine Fine Normal 30FPS 15FPS 5M(2592x1944) 11 21 32 - - 4M(2272x1704) 14 27 40 - - Card pins Write protect switch Label [ SD (Secure Digital) memory card ] The SD memory card has a write protect switch that prevents image files from being deleted or formatted. Slide the switch to the top... can use the memory card INFORMATION ● Don't remove the memory card when the camera status lamp is blinking as this may cause damage to data in the memory card. ■ The camera can be changed by variables such as subject matter. Recorded image size S. About 4MIN About...
... Fine Fine Normal 30FPS 15FPS 5M(2592x1944) 11 21 32 - - 4M(2272x1704) 14 27 40 - - Card pins Write protect switch Label [ SD (Secure Digital) memory card ] The SD memory card has a write protect switch that prevents image files from being deleted or formatted. Slide the switch to the top... can use the memory card INFORMATION ● Don't remove the memory card when the camera status lamp is blinking as this may cause damage to data in the memory card. ■ The camera can be changed by variables such as subject matter. Recorded image size S. About 4MIN About...


