User Manual Ver.1.1 (English)
Page 9
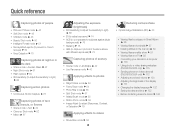
... the memory f 89 • Viewing files as a slide show f 91 • Viewing files on a TV f 99 • Connecting your camera to a computer f 100 • Using photo or video sharing websites (DV300F/DV305F only) f 115 • Sending photos or videos via email (DV300F/DV305F only) f 118 • Adjusting sound and volume f 130 • Adjusting the brightness of the display f 131 • Changing the display language f 132 • Setting the date and time...
... the memory f 89 • Viewing files as a slide show f 91 • Viewing files on a TV f 99 • Connecting your camera to a computer f 100 • Using photo or video sharing websites (DV300F/DV305F only) f 115 • Sending photos or videos via email (DV300F/DV305F only) f 118 • Adjusting sound and volume f 130 • Adjusting the brightness of the display f 131 • Changing the display language f 132 • Setting the date and time...
User Manual Ver.1.1 (English)
Page 10
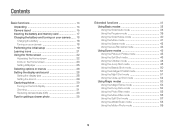
... display and sound 28 Setting the display type 28 Setting the sound 29 Capturing photos 30 Turning on the front display 31 Zooming 31 Reducing camera shake (OIS 33 Tips for getting a clearer photo 35 Extended functions 37 Using Basic modes 38 Using the Smart Auto mode 38 Using the Program mode 39 Using the Smart Movie mode 40 Using the Movie mode 41 Using the Scene mode 42 Using the Live Panorama mode 43 Using Scene modes 45 Using the Picture in Picture mode 45 Using the Self Shot mode...
... display and sound 28 Setting the display type 28 Setting the sound 29 Capturing photos 30 Turning on the front display 31 Zooming 31 Reducing camera shake (OIS 33 Tips for getting a clearer photo 35 Extended functions 37 Using Basic modes 38 Using the Smart Auto mode 38 Using the Program mode 39 Using the Smart Movie mode 40 Using the Movie mode 41 Using the Scene mode 42 Using the Live Panorama mode 43 Using Scene modes 45 Using the Picture in Picture mode 45 Using the Self Shot mode...
User Manual Ver.1.1 (English)
Page 11
... Detecting faces 70 Capturing a smile shot 71 Detecting eye blinking 71 Using Smart Face Recognition 72 Registering faces as your favorites (My Star 73 Adjusting brightness and color 74 Adjusting the exposure manually (EV 74 Compensating for backlighting (ACB 75 Changing the metering option 75 Selecting a White Balance setting 76 Using burst modes 78 Adjusting images 79 Reducing the sound of the zoom 80 Available shooting options by shooting mode 81 10
... Detecting faces 70 Capturing a smile shot 71 Detecting eye blinking 71 Using Smart Face Recognition 72 Registering faces as your favorites (My Star 73 Adjusting brightness and color 74 Adjusting the exposure manually (EV 74 Compensating for backlighting (ACB 75 Changing the metering option 75 Selecting a White Balance setting 76 Using burst modes 78 Adjusting images 79 Reducing the sound of the zoom 80 Available shooting options by shooting mode 81 10
User Manual Ver.1.1 (English)
Page 12
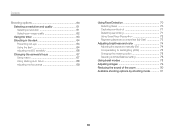
... a removable disk 103 Disconnecting the camera (for Windows XP 104 Transferring files to your Mac computer 105 Printing photos with a PictBridge photo printer ....... 106 Wireless network (DV300F/DV305F only 107 Connecting to a WLAN and configuring network settings 108 Connecting to a WLAN 108 Using the login browser 109 Network connection tips 110 Entering text 111 Sending photos or videos to a smart phone 112 Using a smart phone as a remote shutter...
... a removable disk 103 Disconnecting the camera (for Windows XP 104 Transferring files to your Mac computer 105 Printing photos with a PictBridge photo printer ....... 106 Wireless network (DV300F/DV305F only 107 Connecting to a WLAN and configuring network settings 108 Connecting to a WLAN 108 Using the login browser 109 Network connection tips 110 Entering text 111 Sending photos or videos to a smart phone 112 Using a smart phone as a remote shutter...
User Manual Ver.1.1 (English)
Page 14
... setup 19 Learning icons 21 Using the Home screen 22 Accessing the Home screen 22 Icons on the Home screen 23 Setting Wallpaper 25 Selecting options or menus 26 Setting the display and sound 28 Setting the display type 28 Setting the sound 29 Capturing photos 30 Turning on the front display 31 Zooming 31 Reducing camera shake (OIS 33 Tips for shooting. Unpacking 14 Camera layout 15 Inserting the battery and memory card ... 17 Charging...
... setup 19 Learning icons 21 Using the Home screen 22 Accessing the Home screen 22 Icons on the Home screen 23 Setting Wallpaper 25 Selecting options or menus 26 Setting the display and sound 28 Setting the display type 28 Setting the sound 29 Capturing photos 30 Turning on the front display 31 Zooming 31 Reducing camera shake (OIS 33 Tips for shooting. Unpacking 14 Camera layout 15 Inserting the battery and memory card ... 17 Charging...
User Manual Ver.1.1 (English)
Page 17
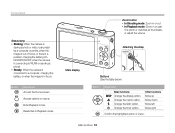
... the Home screen. Camera layout Status lamp • Blinking: When the camera is saving a photo or video, being read by a computer or printer, when the image is out of a photo or view files as thumbnails, or adjust the volume Main display Attaching the strap x y Buttons (See the table below) Button Description D c F t Basic functions Change the display option. Change the timer option. Access options or menus. Change the macro option. Basic functions 16 Enter Playback mode.
... the Home screen. Camera layout Status lamp • Blinking: When the camera is saving a photo or video, being read by a computer or printer, when the image is out of a photo or view files as thumbnails, or adjust the volume Main display Attaching the strap x y Buttons (See the table below) Button Description D c F t Basic functions Change the display option. Change the timer option. Access options or menus. Change the macro option. Basic functions 16 Enter Playback mode.
User Manual Ver.1.1 (English)
Page 32
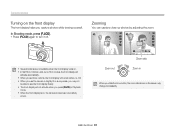
... photos Turning on , the camera consumes more battery power. Zooming You can capture close-up photos by adjusting the zoom. • Several buttons are not available when the front display turns on. • In Self Shot, Children, and Jump Shot modes, the front display will activate automatically. • When you set timer options, the front display will not activate when you press [F.LCD] in When you capture photos while viewing yourself. Basic functions 31 Zoom...
... photos Turning on , the camera consumes more battery power. Zooming You can capture close-up photos by adjusting the zoom. • Several buttons are not available when the front display turns on. • In Self Shot, Children, and Jump Shot modes, the front display will activate automatically. • When you set timer options, the front display will not activate when you press [F.LCD] in When you capture photos while viewing yourself. Basic functions 31 Zoom...
User Manual Ver.1.1 (English)
Page 36
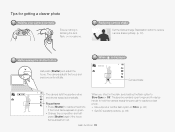
... Ensure nothing is displayed Camera shake The camera sets the aperture value and shutter speed automatically. When is blocking the lens, flash, or microphone. Focus frame • Press [Shutter] to reduce camera shake optically. (p. 33) Half-pressing the shutter button Half-press [Shutter] and adjust the focus. The camera adjusts the focus and exposure automatically. Reducing camera shake Set the Optical Image Stabilization option to capture the photo if the focus frame appears in red.
... Ensure nothing is displayed Camera shake The camera sets the aperture value and shutter speed automatically. When is blocking the lens, flash, or microphone. Focus frame • Press [Shutter] to reduce camera shake optically. (p. 33) Half-pressing the shutter button Half-press [Shutter] and adjust the focus. The camera adjusts the focus and exposure automatically. Reducing camera shake Set the Optical Image Stabilization option to capture the photo if the focus frame appears in red.
User Manual Ver.1.1 (English)
Page 46
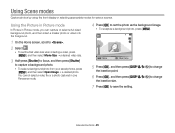
... . • To set the photo as the background image. • To recapture a background photo, press [m]. Using the Picture in Picture mode In Picture in Live Panorama mode. 4 Press [o] to set the final video size when inserting a video, press [m], and then select Movie Size “ a desired video size. 3 Half-press [Shutter] to focus, and then press [Shutter] to capture a background photo. • To select a background photo from your saved photos, press [m], and then select Open Image “ a desired...
... . • To set the photo as the background image. • To recapture a background photo, press [m]. Using the Picture in Picture mode In Picture in Live Panorama mode. 4 Press [o] to set the final video size when inserting a video, press [m], and then select Movie Size “ a desired video size. 3 Half-press [Shutter] to focus, and then press [Shutter] to capture a background photo. • To select a background photo from your saved photos, press [m], and then select Open Image “ a desired...
User Manual Ver.1.1 (English)
Page 47
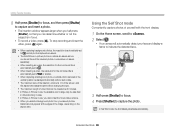
... screen, scroll to . 2 Select . • Your camera will activate automatically. In Self Shot mode, the front display will automatically detect your saved photos, black bars may be inserted is in focus. • To record a video, press [c]. Extended functions 46 To stop recording and insert the video, press [c] again. • When capturing background photos, the resolution is automatically set to and all photos captured are saved. • The final Picture...
... screen, scroll to . 2 Select . • Your camera will activate automatically. In Self Shot mode, the front display will automatically detect your saved photos, black bars may be inserted is in focus. • To record a video, press [c]. Extended functions 46 To stop recording and insert the video, press [c] again. • When capturing background photos, the resolution is automatically set to and all photos captured are saved. • The final Picture...
User Manual Ver.1.1 (English)
Page 48
... the front display You can prevent others from viewing the main display. • The camera will turn off when you press [h]. Extended functions 47 Half Shutter Off Smile Icon Eyesight catching Back Select Icon Description Off: No icon will turn off , the front display turns on when you press [F.LCD] again or press [POWER]. • The front display will turn on in Easy Self Shot mode. Smile Icon: Set an icon to appear that...
... the front display You can prevent others from viewing the main display. • The camera will turn off when you press [h]. Extended functions 47 Half Shutter Off Smile Icon Eyesight catching Back Select Icon Description Off: No icon will turn off , the front display turns on when you press [F.LCD] again or press [POWER]. • The front display will turn on in Easy Self Shot mode. Smile Icon: Set an icon to appear that...
User Manual Ver.1.1 (English)
Page 52
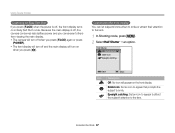
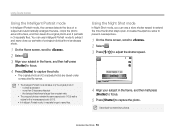
... detected - Using the Night Shot mode In Night Shot mode, you can use a slow shutter speed to extend the time the shutter stays open. no face is larger than 2 faces are saved under consecutive file names. • The Intelligent Portrait mode will save files. Increase the aperture value to prevent overexposure. 1 On the Home screen, scroll to . 2 Select . 3 Press [F/t] to prevent blurry photos. Using Scene modes Using the...
... detected - Using the Night Shot mode In Night Shot mode, you can use a slow shutter speed to extend the time the shutter stays open. no face is larger than 2 faces are saved under consecutive file names. • The Intelligent Portrait mode will save files. Increase the aperture value to prevent overexposure. 1 On the Home screen, scroll to . 2 Select . 3 Press [F/t] to prevent blurry photos. Using Scene modes Using the...
User Manual Ver.1.1 (English)
Page 54
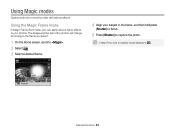
In Magic Frame mode, the resolution is automatically set to capture the photo. Using Magic modes Capture a photo or record a video with various effects. The shape and the feel of the photos will change according to the frame you can apply various frame effects to your subject in the frame, and then half-press [Shutter] to focus. 5 Press [Shutter] to . Mural Panel off Extended functions 53 Using the Magic Frame mode In Magic Frame Shot mode, you select. 1 On the Home screen, scroll to . 2 Select . 3 Select a desired frame. 4 Align your photos.
In Magic Frame mode, the resolution is automatically set to capture the photo. Using Magic modes Capture a photo or record a video with various effects. The shape and the feel of the photos will change according to the frame you can apply various frame effects to your subject in the frame, and then half-press [Shutter] to focus. 5 Press [Shutter] to . Mural Panel off Extended functions 53 Using the Magic Frame mode In Magic Frame Shot mode, you select. 1 On the Home screen, scroll to . 2 Select . 3 Select a desired frame. 4 Align your photos.
User Manual Ver.1.1 (English)
Page 61
... 61 Selecting an image quality 62 Using the timer 63 Shooting in Shooting mode. Shooting options Learn how to set the options in the dark 64 Preventing red-eye 64 Using the flash 64 Adjusting the ISO sensitivity 66 Changing the camera's focus 67 Using macro 67 Using tracking auto focus 68 Adjusting the focus area 69 Using Face Detection 70 Detecting faces 70 Capturing a smile shot 71 Detecting eye blinking 71 Using Smart Face Recognition 72...
... 61 Selecting an image quality 62 Using the timer 63 Shooting in Shooting mode. Shooting options Learn how to set the options in the dark 64 Preventing red-eye 64 Using the flash 64 Adjusting the ISO sensitivity 66 Changing the camera's focus 67 Using macro 67 Using tracking auto focus 68 Adjusting the focus area 69 Using Face Detection 70 Detecting faces 70 Capturing a smile shot 71 Detecting eye blinking 71 Using Smart Face Recognition 72...
User Manual Ver.1.1 (English)
Page 111
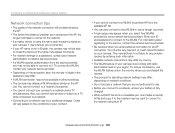
... it . Enter your camera to the network using Auto IP. The manufacturer is using the same radio frequency signal as your camera, it to the inserted memory card to connect to a network and a TV simultaneously. Also, you enter personal information for adjusting network settings may incur additional charges. Wireless network (DV300F/DV305F only) 110 txt file and copy it may interrupt your...
... it . Enter your camera to the network using Auto IP. The manufacturer is using the same radio frequency signal as your camera, it to the inserted memory card to connect to a network and a TV simultaneously. Also, you enter personal information for adjusting network settings may incur additional charges. Wireless network (DV300F/DV305F only) 110 txt file and copy it may interrupt your...

User Manual Ver.1.1 (English)
Page 132
... the mode to use when you connect the camera to a computer or printer with a USB cable. • Computer*: Connect your camera to a computer for transferring files. • Printer: Connect your camera to a printer for 30 seconds, the camera automatically switches to Power save mode. (Off*, On) • In Power save power. Settings menu Item Display Brightness Quick View Power Save * Default Description Adjust the brightness of the screen. (Auto*, Dark, Normal, Bright) Normal is fixed in Playback mode even if you connect your camera to...
... the mode to use when you connect the camera to a computer or printer with a USB cable. • Computer*: Connect your camera to a computer for transferring files. • Printer: Connect your camera to a printer for 30 seconds, the camera automatically switches to Power save mode. (Off*, On) • In Power save power. Settings menu Item Display Brightness Quick View Power Save * Default Description Adjust the brightness of the screen. (Auto*, Dark, Normal, Bright) Normal is fixed in Playback mode even if you connect your camera to...
User Manual Ver.1.1 (English)
Page 147
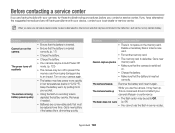
... lose power more quickly in Auto Power Off mode. (p. 133) • The camera may turn on your camera again. • The battery may be set to Off. Get a new memory card. • Make sure that the battery is inserted correctly. (p. 17) • Charge the battery. • Charge the battery. • Your camera may be replaced over time. Get a new battery if the battery life is defective. Cannot capture photos • The memory card is diminishing quickly. Appendixes...
... lose power more quickly in Auto Power Off mode. (p. 133) • The camera may turn on your camera again. • The battery may be set to Off. Get a new memory card. • Make sure that the battery is inserted correctly. (p. 17) • Charge the battery. • Charge the battery. • Your camera may be replaced over time. Get a new battery if the battery life is defective. Cannot capture photos • The memory card is diminishing quickly. Appendixes...
User Manual Ver.1.1 (English)
Page 151
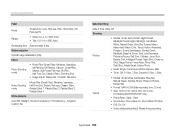
..., Zooming Shot • Image Adjust: Sharpness, Contrast, Saturation Video Shooting mode Movie Filter (Smart Filter): Miniature, Vignetting, Half Tone Dot, Sketch, Fish-eye, Classic, Retro, Palette Effect 1, Palette Effect 2, Palette Effect 3, Palette Effect 4 White Balance Auto WB, Daylight, Cloudy, Fluorescent_H, Fluorescent_L, Tungsten, Custom Set Date Imprinting Date & Time, Date, Off Shooting Photos • Modes: Smart Auto (Portrait, Night Portrait, Backlight Portrait, Night, Backlight, Landscape, White, Natural Green, Blue Sky, Sunset, Macro, Macro text, Macro Color, Tripod...
..., Zooming Shot • Image Adjust: Sharpness, Contrast, Saturation Video Shooting mode Movie Filter (Smart Filter): Miniature, Vignetting, Half Tone Dot, Sketch, Fish-eye, Classic, Retro, Palette Effect 1, Palette Effect 2, Palette Effect 3, Palette Effect 4 White Balance Auto WB, Daylight, Cloudy, Fluorescent_H, Fluorescent_L, Tungsten, Custom Set Date Imprinting Date & Time, Date, Off Shooting Photos • Modes: Smart Auto (Portrait, Night Portrait, Backlight Portrait, Night, Backlight, Landscape, White, Natural Green, Blue Sky, Sunset, Macro, Macro text, Macro Color, Tripod...
User Manual Ver.1.1 (English)
Page 164
... Beauty Shot mode 50 Blink Detection 71 Brightness Playback mode 96 Shooting mode 74 Burst modes Auto Exposure Bracket (AEB) 78 Continuous 78 Motion Capture 78 C Camera maintenance 137 Camera specifications 149 Capturing an image from video 93 Charging 18 Children mode 48 Cleaning Camera body 137 Display 137 Lens 137 Close-up Shot mode 52 Connecting to a computer Mac 105 Windows 100 Contrast Playback mode 96 Shooting mode 79 D Date/Time Set 132 Deleting files 88 Digital Print Order Format (DPOF) 98 Digital zoom...
... Beauty Shot mode 50 Blink Detection 71 Brightness Playback mode 96 Shooting mode 74 Burst modes Auto Exposure Bracket (AEB) 78 Continuous 78 Motion Capture 78 C Camera maintenance 137 Camera specifications 149 Capturing an image from video 93 Charging 18 Children mode 48 Cleaning Camera body 137 Display 137 Lens 137 Close-up Shot mode 52 Connecting to a computer Mac 105 Windows 100 Contrast Playback mode 96 Shooting mode 79 D Date/Time Set 132 Deleting files 88 Digital Print Order Format (DPOF) 98 Digital zoom...
User Manual Ver.1.1 (English)
Page 166
... Shooting portraits Blink Detection 71 Face Detection 70 Red-eye 65 Red-eye fix 65 Smart Face Recognition 72 Smile Shot 71 Shutter button 15 Slide show 91 Smart Album 86 Smart Auto mode 38 Smart Face Recognition 72 Smart Filter Photo shooting mode 55 Playback mode 95 Video recording mode 56 Smart Movie mode 40 Smile Shot 71 Sound settings 29 Split Shot mode 57 Start Image 130 Status lamp 16 T Thumbnails 87 Timer Shooting mode 63 Timer lamp 15 Time settings 19 Time...
... Shooting portraits Blink Detection 71 Face Detection 70 Red-eye 65 Red-eye fix 65 Smart Face Recognition 72 Smile Shot 71 Shutter button 15 Slide show 91 Smart Album 86 Smart Auto mode 38 Smart Face Recognition 72 Smart Filter Photo shooting mode 55 Playback mode 95 Video recording mode 56 Smart Movie mode 40 Smile Shot 71 Sound settings 29 Split Shot mode 57 Start Image 130 Status lamp 16 T Thumbnails 87 Timer Shooting mode 63 Timer lamp 15 Time settings 19 Time...


