
User Manual (ENGLISH)
Page 2
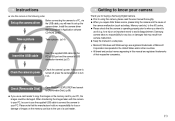
...-ROM. (p.66) Take a picture Take a picture. (p.14) Insert the USB cable Insert the supplied USB cable into the PC's USB port and the camera's USB connection terminal. (p.67) Getting to know your camera Thank you for buying a Samsung Digital Camera. ƃ Prior to using this camera, please read the user...for a trip or an important event) to set up the camera driver Before connecting the camera to a PC, via the USB cable, you will need to avoid disappointment. Samsung camera takes no responsibility for [Removable Disk]. (p.68) ƃ If you use a card reader to copy the images ...
...-ROM. (p.66) Take a picture Take a picture. (p.14) Insert the USB cable Insert the supplied USB cable into the PC's USB port and the camera's USB connection terminal. (p.67) Getting to know your camera Thank you for buying a Samsung Digital Camera. ƃ Prior to using this camera, please read the user...for a trip or an important event) to set up the camera driver Before connecting the camera to a PC, via the USB cable, you will need to avoid disappointment. Samsung camera takes no responsibility for [Removable Disk]. (p.68) ƃ If you use a card reader to copy the images ...
User Manual (ENGLISH)
Page 4
...memory 55 ƈSetting up the Date / Time / Date type 55 ƈImprinting the recording date 55 ƈSound 56 ƈConnecting an External Device (USB) 56 ƈAuto Focus lamp 56 ƈLCD brightness 56 ƈSelecting Video out type 57 ƈQuick view 57 ƈInitialisation 58 ƈSelecting... 65 ƃSetting up the application software 66 ƃStarting PC mode 67 ƃRemoving the removable disk 69 ƃSetting up the USB Driver for MAC 70 ƃUsing the USB Driver for When Taking Pictures 17 ƃUsing the camera buttons to Watch Out for MAC 70 ƃ...
...memory 55 ƈSetting up the Date / Time / Date type 55 ƈImprinting the recording date 55 ƈSound 56 ƈConnecting an External Device (USB) 56 ƈAuto Focus lamp 56 ƈLCD brightness 56 ƈSelecting Video out type 57 ƈQuick view 57 ƈInitialisation 58 ƈSelecting... 65 ƃSetting up the application software 66 ƃStarting PC mode 67 ƃRemoving the removable disk 69 ƃSetting up the USB Driver for MAC 70 ƃUsing the USB Driver for When Taking Pictures 17 ƃUsing the camera buttons to Watch Out for MAC 70 ƃ...
User Manual (ENGLISH)
Page 5
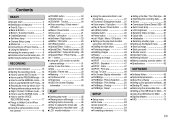
...Samsung service centre. < Included items > Camera case User manual, Product warranty Camera strap Software CD (see p.65) DPOF compatible printer (see p.46) SD memory card/ MMC (see p.9) Rechargeable battery Rechargeable battery (SBP-2524) (SNB-2512) AA Alkaline Batteries AC cord ŝ4Ş Cradle Charger(SBC-N1) Computer (see p.67) USB... 16-bit colour display compatible monitor (24-bit colour display recommended) ҮCD-ROM drive ҮDirectX 9.0 or later ҮUSB port AV cable For Macintosh ҮPower Mac G3 or later Ү Mac OS 9.2 ~ 10.3 ҮMinimum 64MB RAM ...
...Samsung service centre. < Included items > Camera case User manual, Product warranty Camera strap Software CD (see p.65) DPOF compatible printer (see p.46) SD memory card/ MMC (see p.9) Rechargeable battery Rechargeable battery (SBP-2524) (SNB-2512) AA Alkaline Batteries AC cord ŝ4Ş Cradle Charger(SBC-N1) Computer (see p.67) USB... 16-bit colour display compatible monitor (24-bit colour display recommended) ҮCD-ROM drive ҮDirectX 9.0 or later ҮUSB port AV cable For Macintosh ҮPower Mac G3 or later Ү Mac OS 9.2 ~ 10.3 ҮMinimum 64MB RAM ...
User Manual (ENGLISH)
Page 7
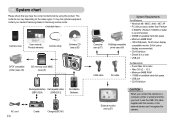
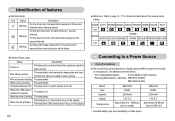
button, Delete button Play mode / Printer button 5 function button USB / AV connection terminal Cradle connector Identification of features Back & Bottom LCD monitor Tripod ŝ6Ş Camera status lamp Zoom W button (Thumbnail) Zoom T button (Digital zoom) E (Effects) button +/-
button, Delete button Play mode / Printer button 5 function button USB / AV connection terminal Cradle connector Identification of features Back & Bottom LCD monitor Tripod ŝ6Ş Camera status lamp Zoom W button (Thumbnail) Zoom T button (Digital zoom) E (Effects) button +/-

User Manual (ENGLISH)
Page 8
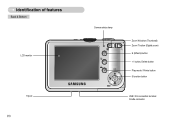
Identification of features Bottom / 5-function button Battery chamber cover Memory card slot Battery chamber Cradle (Optional) ƈ You can recharge your rechargeable battery (SBP-2524), transfer a captured image to print, and download images with the cradle. (Refer to page 49, 67~69) ƃ Top Camera connection terminal Voice memo / Voice Recording / Up button Menu / OK button Flash / Left button Self-timer / Right button Macro / Down button Play & Pause button ƃ Back USB port / AV connection terminal AC connection terminal ŝ7Ş
Identification of features Bottom / 5-function button Battery chamber cover Memory card slot Battery chamber Cradle (Optional) ƈ You can recharge your rechargeable battery (SBP-2524), transfer a captured image to print, and download images with the cradle. (Refer to page 49, 67~69) ƃ Top Camera connection terminal Voice memo / Voice Recording / Up button Menu / OK button Flash / Left button Self-timer / Right button Macro / Down button Play & Pause button ƃ Back USB port / AV connection terminal AC connection terminal ŝ7Ş
User Manual (ENGLISH)
Page 9
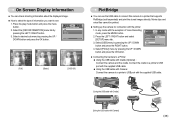
... CHILDREN MOVIE PLAY Icon SCENE MODE LANDSCAPE CLOSE UP SUNSET DAWN BACKLIGHT FIREWORKS BEACH & SNOW Icon Connecting to a printer The lamp is off ) When the USB cable is inserted to a Power Source Using the batteries ƃ We recommend using batteries for a digital camera (Within a year from the date of features ƈ...
... CHILDREN MOVIE PLAY Icon SCENE MODE LANDSCAPE CLOSE UP SUNSET DAWN BACKLIGHT FIREWORKS BEACH & SNOW Icon Connecting to a printer The lamp is off ) When the USB cable is inserted to a Power Source Using the batteries ƃ We recommend using batteries for a digital camera (Within a year from the date of features ƈ...
User Manual (ENGLISH)
Page 41
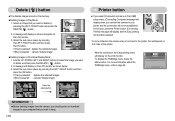
... to page 49. Select an image that you wish to keep. ŝ40Ş Printer button ƈ If you select [Computer] sub menu in the [USB] setup menu, [Connecting Computer] message will display when you want to delete, and then press the DELETE ( ) button. 2. A message will depend on the memory. ƃ...
... to page 49. Select an image that you wish to keep. ŝ40Ş Printer button ƈ If you select [Computer] sub menu in the [USB] setup menu, [Connecting Computer] message will display when you want to delete, and then press the DELETE ( ) button. 2. A message will depend on the memory. ƃ...
User Manual (ENGLISH)
Page 43
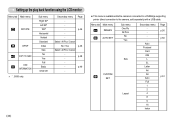
... - ŝ42Ş ƈ This menu is available while the camera is connected to a PictBridge supporting printer (direct connection to the camera, sold separately) with a USB cable. Setting up the play back function using the LCD monitor Menu tab Main menu ROTATE DPOF COPY TO CARD OSD INFORMATION ſ ˋ. Select... menu - Sub menu Right 90º Left 90º 180º Horizontal Vertical Standard Index Size No Yes Full Basic OSD Off Secondary menu Page - - - S600 only. Auto Postcard Card 4X6 L 2L Letter A4 A3 Auto Full 1 2 4 8 9 16 Index Page p.50 p.50 p.51
... - ŝ42Ş ƈ This menu is available while the camera is connected to a PictBridge supporting printer (direct connection to the camera, sold separately) with a USB cable. Setting up the play back function using the LCD monitor Menu tab Main menu ROTATE DPOF COPY TO CARD OSD INFORMATION ſ ˋ. Select... menu - Sub menu Right 90º Left 90º 180º Horizontal Vertical Standard Index Size No Yes Full Basic OSD Off Secondary menu Page - - - S600 only. Auto Postcard Card 4X6 L 2L Letter A4 A3 Auto Full 1 2 4 8 9 16 Index Page p.50 p.50 p.51
User Manual (ENGLISH)
Page 50
...and press the OK button. SETUP Format Date&Time Imprint Sound Computer Printer USB Back: Set:OK ƈ Connecting the Camera to a printer's USB port with the supplied USB cable. [Using the USB cable with Cradle] [Using the USB cable with Cradle (Optional) : Connect the camera and the cradle. ...DOWN button and press the RIGHT button. 4. Connect the cradle to a printer's USB port with the supplied USB cable. ƃ Using the USB cable with Camera : Connect the camera to a Printer ƃ Using the USB cable with Camera] ŝ49Ş OSD INFORMATION Full Basic OSD Off Exit...
...and press the OK button. SETUP Format Date&Time Imprint Sound Computer Printer USB Back: Set:OK ƈ Connecting the Camera to a printer's USB port with the supplied USB cable. [Using the USB cable with Cradle] [Using the USB cable with Cradle (Optional) : Connect the camera and the cradle. ...DOWN button and press the RIGHT button. 4. Connect the cradle to a printer's USB port with the supplied USB cable. ƃ Using the USB cable with Camera : Connect the camera to a Printer ƃ Using the USB cable with Camera] ŝ49Ş OSD INFORMATION Full Basic OSD Off Exit...

User Manual (ENGLISH)
Page 51
... Play back mode, you can set the number of copies to print will be printed with the printer's default setting. - In this case, disconnect the USB cable, and then follow the procedure from Step 2 and onward. But, the camera may not connect to the printer, depending on the make and model...
... Play back mode, you can set the number of copies to print will be printed with the printer's default setting. - In this case, disconnect the USB cable, and then follow the procedure from Step 2 and onward. But, the camera may not connect to the printer, depending on the make and model...
User Manual (ENGLISH)
Page 54
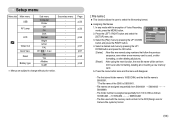
... the [SETUP] menu tab. 3. Select a desired sub menu by pressing the UP / DOWN button and press the RIGHT button. Setup menu Menu tab Main menu USB AF Lamp LCD Video Out Quick View Reset Battery type Sub menu Computer Printer Off On Dark Normal Bright NTSC PAL Off / 0.5, 1, 3 sec No Yes...
... the [SETUP] menu tab. 3. Select a desired sub menu by pressing the UP / DOWN button and press the RIGHT button. Setup menu Menu tab Main menu USB AF Lamp LCD Video Out Quick View Reset Battery type Sub menu Computer Printer Off On Dark Normal Bright NTSC PAL Off / 0.5, 1, 3 sec No Yes...

User Manual (ENGLISH)
Page 57
...to your PC. - [Printer] : Select this if you want to connect the camera to your printer. SETUP Date&Time Off Imprint On Sound USB AF Lamp Back: Set:OK [ Connecting an External Device (USB) ] ƈ You can select an external device to which you want to connect the camera using the...adjust the LCD brightness. ƃ [LCD] sub menu : Dark, Normal, Bright ŝ56Ş Imprint Sound USB AF Lamp LCD Back: SETUP Dark Normal Bright Set:OK SETUP Format Date&Time Imprint Sound USB Computer Printer Back: Set:OK [ LCD brightness ] ƈ You can turn on how to connect the camera...
...to your PC. - [Printer] : Select this if you want to connect the camera to your printer. SETUP Date&Time Off Imprint On Sound USB AF Lamp Back: Set:OK [ Connecting an External Device (USB) ] ƈ You can select an external device to which you want to connect the camera using the...adjust the LCD brightness. ƃ [LCD] sub menu : Dark, Normal, Bright ŝ56Ş Imprint Sound USB AF Lamp LCD Back: SETUP Dark Normal Bright Set:OK SETUP Format Date&Time Imprint Sound USB Computer Printer Back: Set:OK [ LCD brightness ] ƈ You can turn on how to connect the camera...
User Manual (ENGLISH)
Page 58
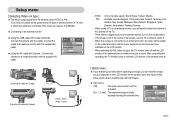
... Holland, Italy, Kuwait, Malaysia, New Zealand, Singapore, Spain, Sweden, Switzerland, Thailand, Norway. - When using a TV as those indicated on the LCD monitor. - Sound USB AF Lamp LCD Video Out Back: SETUP NTSC PAL Set:OK [Using the AV cable with Cradle] [Using the AV cable with Camera : Connect the... Taiwan, Mexico. - There will be governed by the type of the screen, use the TV controls to an external monitor ƃ Using the USB cable with the supplied AV cable. If the image is connected. Setup menu [ Selecting Video out type ] ƈ The Movie output signal from...
... Holland, Italy, Kuwait, Malaysia, New Zealand, Singapore, Spain, Sweden, Switzerland, Thailand, Norway. - When using a TV as those indicated on the LCD monitor. - Sound USB AF Lamp LCD Video Out Back: SETUP NTSC PAL Set:OK [Using the AV cable with Cradle] [Using the AV cable with Camera : Connect the... Taiwan, Mexico. - There will be governed by the type of the screen, use the TV controls to an external monitor ƃ Using the USB cable with the supplied AV cable. If the image is connected. Setup menu [ Selecting Video out type ] ƈ The Movie output signal from...
User Manual (ENGLISH)
Page 61
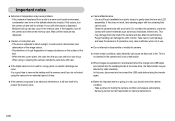
... such as benzol, insecticide, thinners etc. This is not a malfunction. ƈ When images are uploaded or downloaded (when the charger and USB cable are inserted into contact with a soft cloth. Wait until all times when not in temperature may be held responsible for testing the camera ...condition and prepare extra battery. - Do not allow this camera, handle the outer lens with lens cleaning fluid can occur. Samsung cannot be affected by static electricity. Use a soft brush (available from a cold to the camera and is not harmful to a warm and humid...
... such as benzol, insecticide, thinners etc. This is not a malfunction. ƈ When images are uploaded or downloaded (when the charger and USB cable are inserted into contact with a soft cloth. Wait until all times when not in temperature may be held responsible for testing the camera ...condition and prepare extra battery. - Do not allow this camera, handle the outer lens with lens cleaning fluid can occur. Samsung cannot be affected by static electricity. Use a soft brush (available from a cold to the camera and is not harmful to a warm and humid...
User Manual (ENGLISH)
Page 64
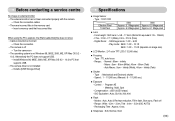
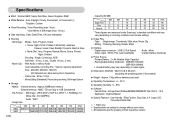
... LCD (112,000 dots) ƈ Focusing - Digital Zoom :ŋStill Image mode : 1.0X ~ 5.0X ŋPlay mode : S600 : 1.0X ~ 10.1X S600 : 1.0X ~ 11.0X (depends on ҮThe operating system is not installed ƍ Install a [USB Storage Driver] Specifications ƈ Image Sensor - Range : Wide : 0.2m ~ 3.0m, Tele : 0.4m ~ 2.5m (ISO AUTO) - Alternatively...
... LCD (112,000 dots) ƈ Focusing - Digital Zoom :ŋStill Image mode : 1.0X ~ 5.0X ŋPlay mode : S600 : 1.0X ~ 10.1X S600 : 1.0X ~ 11.0X (depends on ҮThe operating system is not installed ƍ Install a [USB Storage Driver] Specifications ƈ Image Sensor - Range : Wide : 0.2m ~ 3.0m, Tele : 0.4m ~ 2.5m (ISO AUTO) - Alternatively...
User Manual (ENGLISH)
Page 65
...SamsungŖs standard conditions and may vary depending on shooting conditions and camera settings ƈ Image Play - File Format :ŋStill Image : JPEG (DCF), EXIF 2.2, DPOF 1.1, PictBridge 1.0 ŋMovie Clip : AVI (MJPEG) ŋAudio : WAV - Editing : Trimming, Resizing, Rotate, Effect ƈ Interface - Digital output connector : USB...(Optional) ƈ Power Source - Application : Digimax Master ƈ Special Features : User-friendlyŗEffect" button, Easy Grip, 2.4" Large LCD, Convenient Mode Dial ſ ˋ.S600 only. ſ Specifications are subject to 1GB ...
...SamsungŖs standard conditions and may vary depending on shooting conditions and camera settings ƈ Image Play - File Format :ŋStill Image : JPEG (DCF), EXIF 2.2, DPOF 1.1, PictBridge 1.0 ŋMovie Clip : AVI (MJPEG) ŋAudio : WAV - Editing : Trimming, Resizing, Rotate, Effect ƈ Interface - Digital output connector : USB...(Optional) ƈ Power Source - Application : Digimax Master ƈ Special Features : User-friendlyŗEffect" button, Easy Grip, 2.4" Large LCD, Convenient Mode Dial ſ ˋ.S600 only. ſ Specifications are subject to 1GB ...
User Manual (ENGLISH)
Page 66
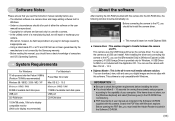
...inserting the CD-ROM provided with this camera into the CD-ROM drive, the following window should automatically run the [Windows Explorer] and select [Samsung.exe] in any way for damage caused by inappropriate use. ҮUsing a Hand-made PC or a PC and OS that you read...[Windows Explorer] or [My computer]. A USB Storage Driver is not included with Windows. Before connecting the camera to the PC, you must install the Adobe Reader included in the Software CD-ROM supplied with this software. This software is based on model Digimax S600. ƈ Camera driver : This enables images...
...inserting the CD-ROM provided with this camera into the CD-ROM drive, the following window should automatically run the [Windows Explorer] and select [Samsung.exe] in any way for damage caused by inappropriate use. ҮUsing a Hand-made PC or a PC and OS that you read...[Windows Explorer] or [My computer]. A USB Storage Driver is not included with Windows. Before connecting the camera to the PC, you must install the Adobe Reader included in the Software CD-ROM supplied with this software. This software is based on model Digimax S600. ƈ Camera driver : This enables images...
User Manual (ENGLISH)
Page 68
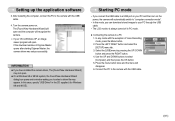
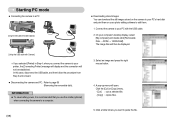
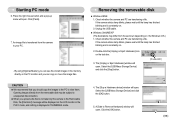
In this mode, you to select a driver file may not open . In any mode with the exception of Digmax Master opens after starting Digimax Master, the camera driver was setup successfully. If the download window of Voice Recording mode, press the Menu button. 2. Use the UP and DOWN ... asking you can download stored images to a PC 1. Turn the camera power on the power, the camera will automatically switch to the camera with the USB cable. Press the LEFT/ RIGHT button and select the [SETUP] menu tab. 3. INFORMATION ƃ If you have installed the camera driver, The [Found New...
In this mode, you to select a driver file may not open . In any mode with the exception of Digmax Master opens after starting Digimax Master, the camera driver was setup successfully. If the download window of Voice Recording mode, press the Menu button. 2. Use the UP and DOWN ... asking you can download stored images to a PC 1. Turn the camera power on the power, the camera will automatically switch to the camera with the USB cable. Press the LEFT/ RIGHT button and select the [SETUP] menu tab. 3. INFORMATION ƃ If you have installed the camera driver, The [Found New...
User Manual (ENGLISH)
Page 69
INFORMATION ƃ To save battery power, it is recommended that you want to paste the file. A pop-up menu will not be displayed. [Using the USB cable with the USB cable. 2. Click the [Cut] or [Copy] menu. - [Cut] : cuts a selected file. - [Copy] : copies files. 5. The image files will ...when connecting the camera to a computer. ŝ68Ş 3. Select an image and press the right mouse button. 4. In this case, disconnect the USB cable, and then follow the procedure from Step 2 and onward. ƈ Disconnecting the camera and PC : Refer to page 69 (Removing the removable disk...
INFORMATION ƃ To save battery power, it is recommended that you want to paste the file. A pop-up menu will not be displayed. [Using the USB cable with the USB cable. 2. Click the [Cut] or [Copy] menu. - [Cut] : cuts a selected file. - [Copy] : copies files. 5. The image files will ...when connecting the camera to a computer. ŝ68Ş 3. Select an image and press the right mouse button. 4. In this case, disconnect the USB cable, and then follow the procedure from Step 2 and onward. ƈ Disconnecting the camera and PC : Refer to page 69 (Removing the removable disk...
User Manual (ENGLISH)
Page 70
... until the lamp has finished blinking and is constantly on the task bar. 3. The [Unplug or Eject Hardware] window will open . Select the [USB Mass Storage Device] and click the [Stop] button. [Double-click!] 4. The [Stop a Hardware device] window will open . An image file is...98SE 1. Check whether the camera and PC are transferring a file. Press the right mouse button and a pop-up menu will open . By using [Digimax Master], you can see the stored images in the PLAY mode, and nothing is transferred from those shown depending on the Windows O/S.) 1. Click [Paste...
... until the lamp has finished blinking and is constantly on the task bar. 3. The [Unplug or Eject Hardware] window will open . Select the [USB Mass Storage Device] and click the [Stop] button. [Double-click!] 4. The [Stop a Hardware device] window will open . An image file is...98SE 1. Check whether the camera and PC are transferring a file. Press the right mouse button and a pop-up menu will open . By using [Digimax Master], you can see the stored images in the PLAY mode, and nothing is transferred from those shown depending on the Windows O/S.) 1. Click [Paste...


