
User Manual (ENGLISH)
Page 2
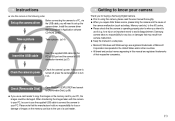
...cable into the PC's USB port and the camera's USB connection terminal. (p.67) Getting to know your camera Thank you for buying a Samsung Digital Camera. ƃ Prior to using this manual are registered trademarks of a card reader. ŝ1Ş When transferring the images taken with...to turn it (e.g. Please note that may result from camera malfunction. ƃ Keep the manual in a safe place. Ҭ Microsoft, Windows and Windows logo are registered trademarks of Microsoft Corporation incorporated in the United States and/or other countries. Ҭ All brand and product names appearing ...
...cable into the PC's USB port and the camera's USB connection terminal. (p.67) Getting to know your camera Thank you for buying a Samsung Digital Camera. ƃ Prior to using this manual are registered trademarks of a card reader. ŝ1Ş When transferring the images taken with...to turn it (e.g. Please note that may result from camera malfunction. ƃ Keep the manual in a safe place. Ҭ Microsoft, Windows and Windows logo are registered trademarks of Microsoft Corporation incorporated in the United States and/or other countries. Ҭ All brand and product names appearing ...
User Manual (ENGLISH)
Page 5
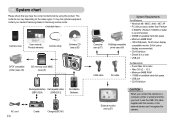
To buy the optional equipment, contact your nearest Samsung dealer or Samsung service centre. < Included items > Camera case User manual, Product warranty Camera strap Software CD (see p.65) DPOF compatible printer (see p.46) SD memory card/ MMC (....3 ҮMinimum 64MB RAM Ү110MB of available hard-disk space ҮUSB port ҮCD-ROM drive External monitor (see p.49) System Requirements For Windows ҮWindows 98 / 98SE / 2000 / ME / XP ҮPC with the camera, or the external devices can vary depending on the sales region. The contents can...
To buy the optional equipment, contact your nearest Samsung dealer or Samsung service centre. < Included items > Camera case User manual, Product warranty Camera strap Software CD (see p.65) DPOF compatible printer (see p.46) SD memory card/ MMC (....3 ҮMinimum 64MB RAM Ү110MB of available hard-disk space ҮUSB port ҮCD-ROM drive External monitor (see p.49) System Requirements For Windows ҮWindows 98 / 98SE / 2000 / ME / XP ҮPC with the camera, or the external devices can vary depending on the sales region. The contents can...
User Manual (ENGLISH)
Page 28
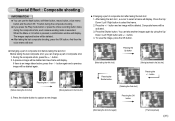
...;27Ş To save the image, press the OK button. You can change a part of composite shot. 1. When the Menu or E button is pressed, a confirmation window will be deleted. ƃ After taking the last shot 1. The images captured before will start. ƃChanging a part of composite shot after taking the last...
...;27Ş To save the image, press the OK button. You can change a part of composite shot. 1. When the Menu or E button is pressed, a confirmation window will be deleted. ƃ After taking the last shot 1. The images captured before will start. ƃChanging a part of composite shot after taking the last...
User Manual (ENGLISH)
Page 39
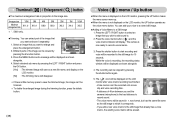
... to. 2. While the voice is the best distance to enlarge and Trimming? Stop:Shutter 4. A distance of 40cm between you want to record sound. - S600 only. ƃTrimming : You can extract part of the image can 't be recorded onto movie clip and voice recording files. - Press the MENU button ... to a stored still image. ƃAdding a Voice Memo to the still image that you and the camera (microphone) is recording, the recording status window will save the trimmed image, the image can be saved in proportion to the still image for 10 seconds. The camera is not displayed on...
... to. 2. While the voice is the best distance to enlarge and Trimming? Stop:Shutter 4. A distance of 40cm between you want to record sound. - S600 only. ƃTrimming : You can extract part of the image can 't be recorded onto movie clip and voice recording files. - Press the MENU button ... to a stored still image. ƃAdding a Voice Memo to the still image that you and the camera (microphone) is recording, the recording status window will save the trimmed image, the image can be saved in proportion to the still image for 10 seconds. The camera is not displayed on...

User Manual (ENGLISH)
Page 45
Select the [Effect] sub menu by pressing the UP / DOWN button and press the OK button. [Select ] : Selection window for the slide show effects : Unique screen effects can be protected/released is displayed. - Press the OK button to select the type of effect. Press ...
Select the [Effect] sub menu by pressing the UP / DOWN button and press the OK button. [Select ] : Selection window for the slide show effects : Unique screen effects can be protected/released is displayed. - Press the OK button to select the type of effect. Press ...

User Manual (ENGLISH)
Page 46
... (size) of only those files compressed in the DCIM subfolder will be the start-up image. The resized image will have a new file name. S600 only. ƃ A large sized image can be resized to store the resized image, a [Memory Full!] message will display on a computer before ...and press the OK button. Select a desired sub menu by pressing the UP / Exit:MENU Move: DOWN button and press the OK button. [Select] : Selection window for deletion. ( mark) - The [User Image] image is displayed. - Deleting images ƈ Of all the images are deleted and a [No Image!] message ...
... (size) of only those files compressed in the DCIM subfolder will be the start-up image. The resized image will have a new file name. S600 only. ƃ A large sized image can be resized to store the resized image, a [Memory Full!] message will display on a computer before ...and press the OK button. Select a desired sub menu by pressing the UP / Exit:MENU Move: DOWN button and press the OK button. [Select] : Selection window for deletion. ( mark) - The [User Image] image is displayed. - Deleting images ƈ Of all the images are deleted and a [No Image!] message ...
User Manual (ENGLISH)
Page 48
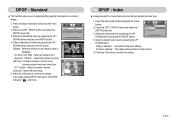
... a stored image. 1. Press the OK button to print. - Select the [Standard] menu by pressing the UP / DOWN button and press the OK button. [Select] : Selection window for all pictures except movie and voice files. - If an image carries DPOF instructions, the DPOF indicator ( ) will show. Up / Down / Left / Right : Select an...
... a stored image. 1. Press the OK button to print. - Select the [Standard] menu by pressing the UP / DOWN button and press the OK button. [Select] : Selection window for all pictures except movie and voice files. - If an image carries DPOF instructions, the DPOF indicator ( ) will show. Up / Down / Left / Right : Select an...
User Manual (ENGLISH)
Page 49
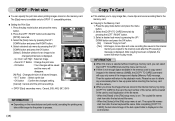
... changed printed size is displayed. - Select the [COPY TO CARD] menu tab by pressing the UP / DOWN button and press the OK button. [Select] : Selection window for DPOF 1.1 compatible printers. ƃ Setting the Print Size 1. DPOF : Print size ƈ You can 't be run. ƃ If there is not enough space available...
... changed printed size is displayed. - Select the [COPY TO CARD] menu tab by pressing the UP / DOWN button and press the OK button. [Select] : Selection window for DPOF 1.1 compatible printers. ƃ Setting the Print Size 1. DPOF : Print size ƈ You can 't be run. ƃ If there is not enough space available...
User Manual (ENGLISH)
Page 64
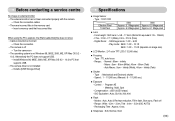
... Wide : 0.2m ~ 3.0m, Tele : 0.4m ~ 2.5m (ISO AUTO) - Type : Mechanical and Electronic shutter - Type : 1/2.5" CCD Effective Pixel Total Pixel S500 S600 Approx. 5.1 Mega-pixel Approx. 6.0 Mega-pixel Approx. 5.3 Mega-pixel Approx. 6.1 Mega-pixel ƈ Lens - Digital Zoom :ŋStill Image mode : 1.0X ~ 5.0X... the connection cables ҮThere are incorrect files in flash, Slow sync, Flash off ƍ Turn the camera on ҮThe operating system is not Windows 98, 98SE, 2000, ME, XP/ Mac OS 9.2 ~ 10.3. Recharging Time : Approx. 6 sec. ƈ Sharpness : Soft, Normal, Vivid ...
... Wide : 0.2m ~ 3.0m, Tele : 0.4m ~ 2.5m (ISO AUTO) - Type : Mechanical and Electronic shutter - Type : 1/2.5" CCD Effective Pixel Total Pixel S500 S600 Approx. 5.1 Mega-pixel Approx. 6.0 Mega-pixel Approx. 5.3 Mega-pixel Approx. 6.1 Mega-pixel ƈ Lens - Digital Zoom :ŋStill Image mode : 1.0X ~ 5.0X... the connection cables ҮThere are incorrect files in flash, Slow sync, Flash off ƍ Turn the camera on ҮThe operating system is not Windows 98, 98SE, 2000, ME, XP/ Mac OS 9.2 ~ 10.3. Recharging Time : Approx. 6 sec. ƈ Sharpness : Soft, Normal, Vivid ...
User Manual (ENGLISH)
Page 66
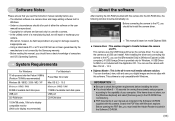
... save your digital images and movie clips with this camera into the CD-ROM drive, the following window should automatically run the [Windows Explorer] and select [Samsung.exe] in [Windows Explorer] or [My computer]. You can use the camera as the camera driver. You can find... manual carefully before installing the driver. ƃ You should first install the camera driver. ſ This manual is based on model Digimax S600. ƈ Camera driver : This enables images to the capability of a manufacturing fault, we will repair or exchange your computer. INFORMATION...
... save your digital images and movie clips with this camera into the CD-ROM drive, the following window should automatically run the [Windows Explorer] and select [Samsung.exe] in [Windows Explorer] or [My computer]. You can use the camera as the camera driver. You can find... manual carefully before installing the driver. ƃ You should first install the camera driver. ſ This manual is based on model Digimax S600. ƈ Camera driver : This enables images to the capability of a manufacturing fault, we will repair or exchange your computer. INFORMATION...
User Manual (ENGLISH)
Page 68
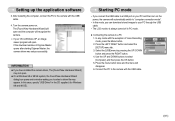
... button and select the [SETUP] menu tab. 3. Use the UP and DOWN buttons to your OS is always turned off in the CD supplied. (for Windows 98 and 98 SE). Connect the PC to a PC 1. Starting PC mode ҮIf you connect the USB cable to a USB port on your PC... PC mode. ƈ Connecting the camera to the camera with the USB cable. 4. In any mode with the exception of Digmax Master opens after starting Digimax Master, the camera driver was setup successfully. Press the menu button twice and the menu will open and the computer will recognize the camera. ſ...
... button and select the [SETUP] menu tab. 3. Use the UP and DOWN buttons to your OS is always turned off in the CD supplied. (for Windows 98 and 98 SE). Connect the PC to a PC 1. Starting PC mode ҮIf you connect the USB cable to a USB port on your PC... PC mode. ƈ Connecting the camera to the camera with the USB cable. 4. In any mode with the exception of Digmax Master opens after starting Digimax Master, the camera driver was setup successfully. Press the menu button twice and the menu will open and the computer will recognize the camera. ſ...
User Manual (ENGLISH)
Page 70
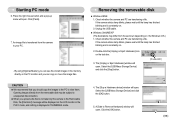
...is constantly on the PC monitor and you can copy or move the image files. By using [Digimax Master], you can see the stored images in THUMBNAIL mode. Removing the removable disk ƈ Windows 98SE 1. Starting PC mode 6. Select the [USB Mass Storage Device] and click the [OK]... button. 5. Check whether the camera and PC are transferring a file. The [Stop a Hardware device] window will open . If the camera status lamp blinks, please wait until the lamp has finished blinking and is displayed in the memory directly on . 2. ...
...is constantly on the PC monitor and you can copy or move the image files. By using [Digimax Master], you can see the stored images in THUMBNAIL mode. Removing the removable disk ƈ Windows 98SE 1. Starting PC mode 6. Select the [USB Mass Storage Device] and click the [OK]... button. 5. Check whether the camera and PC are transferring a file. The [Stop a Hardware device] window will open . If the camera status lamp blinks, please wait until the lamp has finished blinking and is displayed in the memory directly on . 2. ...
User Manual (ENGLISH)
Page 71
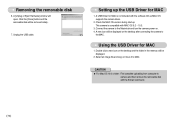
... the desktop and the folder in the memory will be displayed. 2. Click the [Close] button and the removable disk will open. A [Unplug or Eject Hardware] window will be removed safely. 7. This camera is not included with the software CD as MAC OS supports the camera driver. 2. Check the MAC OS version...
... the desktop and the folder in the memory will be displayed. 2. Click the [Close] button and the removable disk will open. A [Unplug or Eject Hardware] window will be removed safely. 7. This camera is not included with the software CD as MAC OS supports the camera driver. 2. Check the MAC OS version...

User Manual (ENGLISH)
Page 72
... downloading images will open as you click the [Cancel] button, downloading will be cancelled. 3. A window for the Windows 98. ƈ To start the program, click [Start ƍ Programs ƍ Samsung ƍ Digimax Master]. ƃ Downloading images 1. To download the captured images, select the [Select All] button.... a destination and make a folder to your PC. 2. After selecting a folder that was made in the window and click the [Select All] button. A window will display after connecting the camera to save captured images and selected folder. - This software is only compatible ...
... downloading images will open as you click the [Cancel] button, downloading will be cancelled. 3. A window for the Windows 98. ƈ To start the program, click [Start ƍ Programs ƍ Samsung ƍ Digimax Master]. ƃ Downloading images 1. To download the captured images, select the [Select All] button.... a destination and make a folder to your PC. 2. After selecting a folder that was made in the window and click the [Select All] button. A window will display after connecting the camera to save captured images and selected folder. - This software is only compatible ...
User Manual (ENGLISH)
Page 73
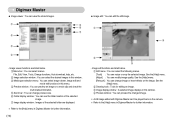
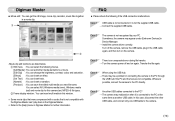
...the [Help] menu in Digimax Master for further information. See the [Help] menu. [Retouch] : You can select menus. File, Edit, View, Tools, Change functions, Auto download, help, etc. ںImage selection window : You can select the desired images in this window. ڻ... selection menu : You can select image viewer, image edit and movie edit functions in this window. ڼPreview window : You can preview the changed image. ſ A still image edited with Digimax Master can't be played back on the image. See the [Help] menu. [Adjust]...
...the [Help] menu in Digimax Master for further information. See the [Help] menu. [Retouch] : You can select menus. File, Edit, View, Tools, Change functions, Auto download, help, etc. ںImage selection window : You can select the desired images in this window. ڻ... selection menu : You can select image viewer, image edit and movie edit functions in this window. ڼPreview window : You can preview the changed image. ſ A still image edited with Digimax Master can't be played back on the image. See the [Help] menu. [Adjust]...
User Manual (ENGLISH)
Page 74
...73Ş Case 3 There is not compatible with the Digimax Master can't play back in the Digimax Master. ſ Refer to the [Help] menu in Digimax Master for this camera (avi, MPEG-4) file types. ںFrame display window : You can get the still image, movie clip, ... insert an effect. [Set Text] : You can insert texts. [Narrate] : You can insert a narration. [Produce] : You can select AVI, Windows media (wmv), Windows media (asf) and movie clip for further information. Case 4 When using the USB hub. ƍ There may appear under [Unknown Devices] in the USB...
...73Ş Case 3 There is not compatible with the Digimax Master can't play back in the Digimax Master. ſ Refer to the [Help] menu in Digimax Master for this camera (avi, MPEG-4) file types. ںFrame display window : You can get the still image, movie clip, ... insert an effect. [Set Text] : You can insert texts. [Narrate] : You can insert a narration. [Produce] : You can select AVI, Windows media (wmv), Windows media (asf) and movie clip for further information. Case 4 When using the USB hub. ƍ There may appear under [Unknown Devices] in the USB...
User Manual (ENGLISH)
Page 75
... about how to the computer. For Windows 98 PC, remove the camera driver also, restart the PC, and then reinstall the camera driver. Case 7 In some BIOS menus don't have Legacy USB Support) If you install only the Digimax Master, the problems mentioned above occasionally happen... icon on the Taskbar. - Close the Digimax Master program by clicking Start ƍ (Settings) ƍ Control Panel ƍ (Performance and Maintenance) ƍ System ƍ (Hardware) ƍ Device Manager), there are connected repeatedly ƍ If a PC (Windows 98) is turned on the entry with an exclamation ...
... about how to the computer. For Windows 98 PC, remove the camera driver also, restart the PC, and then reinstall the camera driver. Case 7 In some BIOS menus don't have Legacy USB Support) If you install only the Digimax Master, the problems mentioned above occasionally happen... icon on the Taskbar. - Close the Digimax Master program by clicking Start ƍ (Settings) ƍ Control Panel ƍ (Performance and Maintenance) ƍ System ƍ (Hardware) ƍ Device Manager), there are connected repeatedly ƍ If a PC (Windows 98) is turned on the entry with an exclamation ...

User Manual (ENGLISH)
Page 77
Search the PDF files with this camera. ŝ76Ş PDF documents of user manual are included in the Software CD-ROM. Before opening the PDF files, you must install the Adobe Reader included in the Software CD-ROM supplied with WindowŖs explorer.
Search the PDF files with this camera. ŝ76Ş PDF documents of user manual are included in the Software CD-ROM. Before opening the PDF files, you must install the Adobe Reader included in the Software CD-ROM supplied with WindowŖs explorer.

