
User Manual (ENGLISH)
Page 2
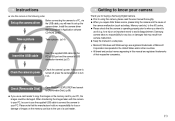
... is contained in Application software CD-ROM. (p.66) Take a picture Take a picture. (p.14) Insert the USB cable Insert the supplied USB cable into the PC's USB port and the camera's USB connection terminal. (p.67) Getting to use it on. Check the camera's power Check the camera's power. Please...the manufacturer holds no responsibility for a trip or an important event) to your PC, the images could be damaged. Samsung camera takes no responsibility for buying a Samsung Digital Camera. ƃ Prior to using this camera, please read the user manual thoroughly. ƃ When you require...
... is contained in Application software CD-ROM. (p.66) Take a picture Take a picture. (p.14) Insert the USB cable Insert the supplied USB cable into the PC's USB port and the camera's USB connection terminal. (p.67) Getting to use it on. Check the camera's power Check the camera's power. Please...the manufacturer holds no responsibility for a trip or an important event) to your PC, the images could be damaged. Samsung camera takes no responsibility for buying a Samsung Digital Camera. ƃ Prior to using this camera, please read the user manual thoroughly. ƃ When you require...
User Manual (ENGLISH)
Page 5
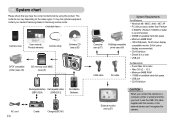
...Samsung service centre. < Included items > Camera case User manual, Product warranty Camera strap Software CD (see p.65) DPOF compatible printer (see p.46) SD memory card/ MMC (see p.9) Rechargeable battery Rechargeable battery (SBP-2524) (SNB-2512) AA Alkaline Batteries AC cord ŝ4Ş Cradle Charger(SBC-N1) Computer (see p.67) USB cable...colour display compatible monitor (24-bit colour display recommended) ҮCD-ROM drive ҮDirectX 9.0 or later ҮUSB port AV cable For Macintosh ҮPower Mac G3 or later Ү Mac OS 9.2 ~ 10.3 ҮMinimum 64MB RAM &#...
...Samsung service centre. < Included items > Camera case User manual, Product warranty Camera strap Software CD (see p.65) DPOF compatible printer (see p.46) SD memory card/ MMC (see p.9) Rechargeable battery Rechargeable battery (SBP-2524) (SNB-2512) AA Alkaline Batteries AC cord ŝ4Ş Cradle Charger(SBC-N1) Computer (see p.67) USB cable...colour display compatible monitor (24-bit colour display recommended) ҮCD-ROM drive ҮDirectX 9.0 or later ҮUSB port AV cable For Macintosh ҮPower Mac G3 or later Ү Mac OS 9.2 ~ 10.3 ҮMinimum 64MB RAM &#...
User Manual (ENGLISH)
Page 9
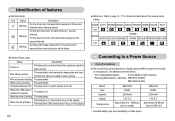
... memo recording The lamp blinks While voice recording The lamp blinks Transmitting Data with a PC The lamp turns on (LCD monitor turns off) When the USB cable is inserted to a printer The lamp is off When the printer is ready to page 14~17 for SBC-N1) ſ Included battery may vary...
... memo recording The lamp blinks While voice recording The lamp blinks Transmitting Data with a PC The lamp turns on (LCD monitor turns off) When the USB cable is inserted to a printer The lamp is off When the printer is ready to page 14~17 for SBC-N1) ſ Included battery may vary...
User Manual (ENGLISH)
Page 43
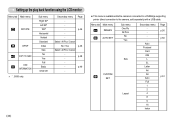
S600 only. Menu tab Main menu IMAGES AUTO SET Sub menu One Pic All Pics No Yes Size CUSTOM SET Layout Secondary menu - Select / All Pics / ... - ŝ42Ş ƈ This menu is available while the camera is connected to a PictBridge supporting printer (direct connection to the camera, sold separately) with a USB cable. Setting up the play back function using the LCD monitor Menu tab Main menu ROTATE DPOF COPY TO CARD OSD INFORMATION ſ ˋ. p.46 - -
S600 only. Menu tab Main menu IMAGES AUTO SET Sub menu One Pic All Pics No Yes Size CUSTOM SET Layout Secondary menu - Select / All Pics / ... - ŝ42Ş ƈ This menu is available while the camera is connected to a PictBridge supporting printer (direct connection to the camera, sold separately) with a USB cable. Setting up the play back function using the LCD monitor Menu tab Main menu ROTATE DPOF COPY TO CARD OSD INFORMATION ſ ˋ. p.46 - -
User Manual (ENGLISH)
Page 50
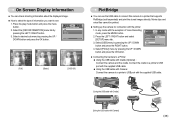
... and press the OK button. Connect the cradle to a printer's USB port with the supplied USB cable. ƃ Using the USB cable with Camera : Connect the camera to a printer's USB port with the supplied USB cable. [Using the USB cable with Cradle] [Using the USB cable with the printer 1. Press the play mode button and press the ... to select the type of Voice Recording mode, press the MENU button. 2. On Screen Display information ƈ You can use the USB cable to connect this camera to a printer that supports PictBridge (sold separately) and print the stored images directly. Select...
... and press the OK button. Connect the cradle to a printer's USB port with the supplied USB cable. ƃ Using the USB cable with Camera : Connect the camera to a printer's USB port with the supplied USB cable. [Using the USB cable with Cradle] [Using the USB cable with the printer 1. Press the play mode button and press the ... to select the type of Voice Recording mode, press the MENU button. 2. On Screen Display information ƈ You can use the USB cable to connect this camera to a printer that supports PictBridge (sold separately) and print the stored images directly. Select...

User Manual (ENGLISH)
Page 51
...:MENU Move: function will appear. 3. When [One Pic] is selected] - Select [One Pic] or [All Pics]. Press the Menu button. 2. In this case, disconnect the USB cable, and then follow the procedure from Step 2 and onward. But, the camera may not connect to the printer, depending on the make and model of...
...:MENU Move: function will appear. 3. When [One Pic] is selected] - Select [One Pic] or [All Pics]. Press the Menu button. 2. In this case, disconnect the USB cable, and then follow the procedure from Step 2 and onward. But, the camera may not connect to the printer, depending on the make and model of...

User Manual (ENGLISH)
Page 57
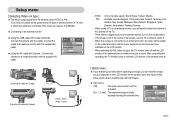
...can select an external device to which you want to connect the camera using the USB cable. ƃ Sub menus - [Computer] : Select this if you want to ...when buttons are pressed, so that you want to connect the camera to your printer. SETUP Format Date&Time Imprint Sound USB Computer Printer Back: Set:OK [ LCD brightness ] ƈ You can adjust the LCD brightness. ƃ [LCD...] sub menu : Dark, Normal, Bright ŝ56Ş Imprint Sound USB AF Lamp LCD Back: SETUP Dark Normal Bright Set:OK Setup menu [ Sound ] ƈ If you set sound to ...
...can select an external device to which you want to connect the camera using the USB cable. ƃ Sub menus - [Computer] : Select this if you want to ...when buttons are pressed, so that you want to connect the camera to your printer. SETUP Format Date&Time Imprint Sound USB Computer Printer Back: Set:OK [ LCD brightness ] ƈ You can adjust the LCD brightness. ƃ [LCD...] sub menu : Dark, Normal, Bright ŝ56Ş Imprint Sound USB AF Lamp LCD Back: SETUP Dark Normal Bright Set:OK Setup menu [ Sound ] ƈ If you set sound to ...
User Manual (ENGLISH)
Page 58
... only BDGHI. ƈ Connecting to which the camera is possible only with the supplied AV cable. Sound USB AF Lamp LCD Video Out Back: SETUP NTSC PAL Set:OK [Using the AV cable with Cradle] [Using the AV cable with Cradle (Optional) : Connect the camera and the cradle. PAL : Australia, Austria, ...movie. Your choice of the camera turns off and the LCD monitor of device (monitor or TV, etc.) to an external monitor ƃ Using the USB cable with Camera] Yellow - Video White - sound - When using a TV as those indicated on the LCD monitor for the duration set in the centre ...
... only BDGHI. ƈ Connecting to which the camera is possible only with the supplied AV cable. Sound USB AF Lamp LCD Video Out Back: SETUP NTSC PAL Set:OK [Using the AV cable with Cradle] [Using the AV cable with Cradle (Optional) : Connect the camera and the cradle. PAL : Australia, Austria, ...movie. Your choice of the camera turns off and the LCD monitor of device (monitor or TV, etc.) to an external monitor ƃ Using the USB cable with Camera] Yellow - Video White - sound - When using a TV as those indicated on the LCD monitor for the duration set in the centre ...
User Manual (ENGLISH)
Page 61
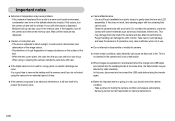
... a warm and humid environment, condensation can form on a trip, you do not intend using or cleaning this case, disconnect and re-connect the USB cable before trying the transfer again. ƈ Before an important event or going on the delicate electronic circuitry. Pay attention not to an electronic interference, ...the outer lens that you can cause the flash unit to remove the battery and the memory card if you should check the camera condition. - Samsung cannot be held responsible for an extended period of time. ƈ If the camera is a good idea to fire. It is exposed to...
... a warm and humid environment, condensation can form on a trip, you do not intend using or cleaning this case, disconnect and re-connect the USB cable before trying the transfer again. ƈ Before an important event or going on the delicate electronic circuitry. Pay attention not to an electronic interference, ...the outer lens that you can cause the flash unit to remove the battery and the memory card if you should check the camera condition. - Samsung cannot be held responsible for an extended period of time. ƈ If the camera is a good idea to fire. It is exposed to...
User Manual (ENGLISH)
Page 64
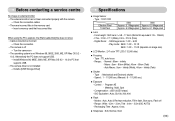
..., ME, XP/ Mac OS 9.2 ~ 10.3 to PC that has correct files When using the PC's explorer, the [Removable Disk] file does not show ҮCable connection is incorrect ƍ Check the connection ҮThe camera is off - Speed : 1 ~ 1/1,500 sec. (Manual : 8 ~ 1/1,500 sec.) ƈ... ~ 105mm) - Digital Zoom :ŋStill Image mode : 1.0X ~ 5.0X ŋPlay mode : S600 : 1.0X ~ 10.1X S600 : 1.0X ~ 11.0X (depends on ҮThe operating system is not installed ƍ Install a [USB Storage Driver] Specifications ƈ Image Sensor - Compensation : ±2EV (0.5EV steps) - Type : 1/2.5"...
..., ME, XP/ Mac OS 9.2 ~ 10.3 to PC that has correct files When using the PC's explorer, the [Removable Disk] file does not show ҮCable connection is incorrect ƍ Check the connection ҮThe camera is off - Speed : 1 ~ 1/1,500 sec. (Manual : 8 ~ 1/1,500 sec.) ƈ... ~ 105mm) - Digital Zoom :ŋStill Image mode : 1.0X ~ 5.0X ŋPlay mode : S600 : 1.0X ~ 10.1X S600 : 1.0X ~ 11.0X (depends on ҮThe operating system is not installed ƍ Install a [USB Storage Driver] Specifications ƈ Image Sensor - Compensation : ±2EV (0.5EV steps) - Type : 1/2.5"...
User Manual (ENGLISH)
Page 68
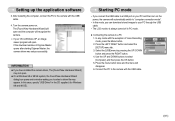
... Recording mode, press the Menu button. 2. In any mode with the exception of Digmax Master opens after starting Digimax Master, the camera driver was setup successfully. Format Date&time Imprint Sound USB Back: SETUP Computer Printer Set:OK ŝ67Ş In this mode, you to a PC 1. Use ... After restarting the computer, connect the PC to select [Computer], and then press the OK button. 5. Starting PC mode ҮIf you connect the USB cable to a USB port on . Press the menu button twice and the menu will open . ƃ On a Windows 98 or 98 SE system, the Found New ...
... Recording mode, press the Menu button. 2. In any mode with the exception of Digmax Master opens after starting Digimax Master, the camera driver was setup successfully. Format Date&time Imprint Sound USB Back: SETUP Computer Printer Set:OK ŝ67Ş In this mode, you to a PC 1. Use ... After restarting the computer, connect the PC to select [Computer], and then press the OK button. 5. Starting PC mode ҮIf you connect the USB cable to a USB port on . Press the menu button twice and the menu will open . ƃ On a Windows 98 or 98 SE system, the Found New ...
User Manual (ENGLISH)
Page 69
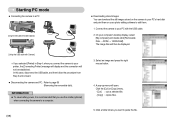
... (optional) when connecting the camera to page 69 (Removing the removable disk). The image files will then be displayed. [Using the USB cable with Camera] ſ If you selected [Printer] in Step 4, when you want to paste the file. In this case, disconnect the...[My computer] and double click [Removable Disk ƍ DCIM ƍ 100SSCAM]. Starting PC mode ƈ Connecting the camera to a PC [Using the USB cable with the USB cable. 2. A pop-up menu will not be established. INFORMATION ƃ To save battery power, it is recommended that you use a photo editing software to ...
... (optional) when connecting the camera to page 69 (Removing the removable disk). The image files will then be displayed. [Using the USB cable with Camera] ſ If you selected [Printer] in Step 4, when you want to paste the file. In this case, disconnect the...[My computer] and double click [Removable Disk ƍ DCIM ƍ 100SSCAM]. Starting PC mode ƈ Connecting the camera to a PC [Using the USB cable with the USB cable. 2. A pop-up menu will not be established. INFORMATION ƃ To save battery power, it is recommended that you use a photo editing software to ...
User Manual (ENGLISH)
Page 70
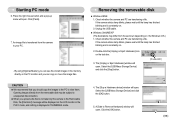
By using [Digimax Master], you can see the stored images in THUMBNAIL mode. CAUTION ƃ... task bar. 3. Removing the removable disk ƈ Windows 98SE 1. Unplug the USB cable. ƈ Windows 2000/ME/XP (The illustrations may be displayed on the Windows O/S.) 1. Select the [USB Mass Storage Device] and click the [OK] button. 5. Click [Paste]. 7.... Click the [OK] button. ŝ69Ş Check whether the camera and PC are transferring a file. Select the [USB Mass Storage Device] and click the [Stop] button. [Double-click!] 4. If the camera status lamp blinks, please wait until...
By using [Digimax Master], you can see the stored images in THUMBNAIL mode. CAUTION ƃ... task bar. 3. Removing the removable disk ƈ Windows 98SE 1. Unplug the USB cable. ƈ Windows 2000/ME/XP (The illustrations may be displayed on the Windows O/S.) 1. Select the [USB Mass Storage Device] and click the [OK] button. 5. Click [Paste]. 7.... Click the [OK] button. ŝ69Ş Check whether the camera and PC are transferring a file. Select the [USB Mass Storage Device] and click the [Stop] button. [Double-click!] 4. If the camera status lamp blinks, please wait until...
User Manual (ENGLISH)
Page 71
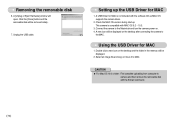
Unplug the USB cable. Setting up . Connect the camera to the Macintosh and turn the camera power on the desktop after connecting the camera to the MAC. CAUTION ƃ For Mac OS 10.0 or later : First complete uploading from computer to MAC. A new icon will be displayed. 2. A USB Driver for MAC is compatible... with MAC OS 9.2 ~ 10.3. 3. Check the MAC OS version during start-up the USB Driver for MAC 1. Using the USB Driver for MAC 1. Select an image file and copy or move it to camera and then remove the removable disk with the software CD ...
Unplug the USB cable. Setting up . Connect the camera to the Macintosh and turn the camera power on the desktop after connecting the camera to the MAC. CAUTION ƃ For Mac OS 10.0 or later : First complete uploading from computer to MAC. A new icon will be displayed. 2. A USB Driver for MAC is compatible... with MAC OS 9.2 ~ 10.3. 3. Check the MAC OS version during start-up the USB Driver for MAC 1. Using the USB Driver for MAC 1. Select an image file and copy or move it to camera and then remove the removable disk with the software CD ...
User Manual (ENGLISH)
Page 74
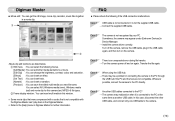
...You can insert multi media in Digimax Master for further information. Case 3 There is not the supplied USB cable. ƍ Connect the supplied USB cable. ں - Case 1 USB cable is not connected or it is not compatible with the Digimax Master can't play back in the Digimax Master. ſ Refer to ...file transfer. ƍ Turn the camera power off the camera, remove the USB cable, plug in Device Manager. ƍ Install the camera driver correctly. Case 2 The camera is not recognised by your PC. Digimax Master ƃ Movie edit : You can get the still image, movie clip...
...You can insert multi media in Digimax Master for further information. Case 3 There is not the supplied USB cable. ƍ Connect the supplied USB cable. ں - Case 1 USB cable is not connected or it is not compatible with the Digimax Master can't play back in the Digimax Master. ſ Refer to ...file transfer. ƍ Turn the camera power off the camera, remove the USB cable, plug in Device Manager. ƍ Install the camera driver correctly. Case 2 The camera is not recognised by your PC. Digimax Master ƃ Movie edit : You can get the still image, movie clip...


