
User Manual
Page 1
This manual will guide you for buying a Samsung Camera. ENGLISH User's Manual Thank you through using the camera, including capturing images, downloading images and using your new camera. Please read this manual carefully before using the application software.
This manual will guide you for buying a Samsung Camera. ENGLISH User's Manual Thank you through using the camera, including capturing images, downloading images and using your new camera. Please read this manual carefully before using the application software.
User Manual
Page 2
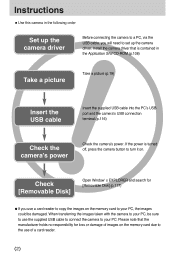
...copy the images on . When transferring the images taken with the camera to your PC, the images could be sure to use the supplied USB cable to connect the camera to turn it on the memory card to set up the camera driver. Check [Removable Disk] Open Window's EXPLORER and search ...[Removable Disk].(p.117) ●If you will need to your PC, be damaged. Please note that is turned off, press the camera button to your PC. Instructions ■Use this camera in the Application S/W CD-ROM.(p.106) Take a picture Take a picture (p.19) Insert the USB cable Insert the supplied USB ...
...copy the images on . When transferring the images taken with the camera to your PC, the images could be sure to use the supplied USB cable to connect the camera to turn it on the memory card to set up the camera driver. Check [Removable Disk] Open Window's EXPLORER and search ...[Removable Disk].(p.117) ●If you will need to your PC, be damaged. Please note that is turned off, press the camera button to your PC. Instructions ■Use this camera in the Application S/W CD-ROM.(p.106) Take a picture Take a picture (p.19) Insert the USB cable Insert the supplied USB ...
User Manual
Page 3
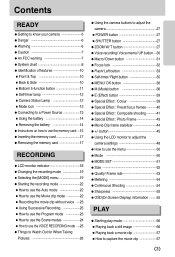
... of features 10 ■Front & Top 10 ■Back & Side 10 ■Bottom/ 5-function button 11 ■Self-timer lamp 12 ■Camera Status Lamp 12 ■Mode icon 12 ●Connecting to a Power Source 13 ■Using the battery 14 ■Removing the battery 14 ●... Display) information 55 PLAY ●Starting play mode ■Playing back a still image ■Playing back a movie clip ■How to adjust the camera 27 ■POWER button 27 ■SHUTTER button 27 ●ZOOM W/ T button 27 ●Voice recording/ Voice memo/ UP button 30 ●...
... of features 10 ■Front & Top 10 ■Back & Side 10 ■Bottom/ 5-function button 11 ■Self-timer lamp 12 ■Camera Status Lamp 12 ■Mode icon 12 ●Connecting to a Power Source 13 ■Using the battery 14 ■Removing the battery 14 ●... Display) information 55 PLAY ●Starting play mode ■Playing back a still image ■Playing back a movie clip ■How to adjust the camera 27 ■POWER button 27 ■SHUTTER button 27 ●ZOOM W/ T button 27 ●Voice recording/ Voice memo/ UP button 30 ●...
User Manual
Page 4
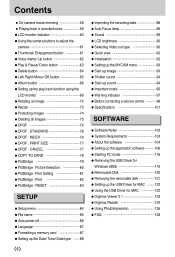
... a recorded voice 59 ●Auto Focus lamp 89 ●LCD monitor indicator 60 ●Sound 89 ●Using the camera buttons to adjust the ●LCD brightness 90 camera 61 ●Selecting Video out type 90 ●Thumbnail/ Enlargement button 61 ●Quick view 92 ●Voice memo/ ... disk 121 83 ●Setting up the USB Driver for MAC 122 ●Using the USB Driver for MAC 122 SETUP ●Digimax Viewer 2.1 123 ●Digimax Reader 124 ●Setup menu 84 ●Using PhotoImpression 126 ●File name 85 ●FAQ 128 ●Auto power off 86...
... a recorded voice 59 ●Auto Focus lamp 89 ●LCD monitor indicator 60 ●Sound 89 ●Using the camera buttons to adjust the ●LCD brightness 90 camera 61 ●Selecting Video out type 90 ●Thumbnail/ Enlargement button 61 ●Quick view 92 ●Voice memo/ ... disk 121 83 ●Setting up the USB Driver for MAC 122 ●Using the USB Driver for MAC 122 SETUP ●Digimax Viewer 2.1 123 ●Digimax Reader 124 ●Setup menu 84 ●Using PhotoImpression 126 ●File name 85 ●FAQ 128 ●Auto power off 86...
User Manual
Page 5
...Business users should not be mixed with separate collection systems) This marking shown on using this camera that it (e.g. Samsung camera takes no responsibility for any loss or damages that the camera is operating properly prior to when you intend to use this from other household wastes at the...to use it should contact their local government office, for details of where and how they can take this item for buying a Samsung Digital Camera. ●Prior to using this manual are registered trademarks of the purchase contract. This manual contains instructions on the product or ...
...Business users should not be mixed with separate collection systems) This marking shown on using this camera that it (e.g. Samsung camera takes no responsibility for any loss or damages that the camera is operating properly prior to when you intend to use this from other household wastes at the...to use it should contact their local government office, for details of where and how they can take this item for buying a Samsung Digital Camera. ●Prior to using this manual are registered trademarks of the purchase contract. This manual contains instructions on the product or ...
User Manual
Page 6
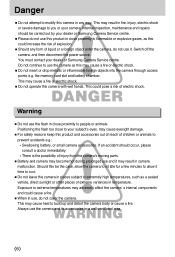
... to prevent accidents e.g.: •Swallowing battery, or small camera accessories. This may become hot during prolonged use this camera in camera malfunction. You must contact your camera. Always use the camera and its accessories in fire, injury, electric shock or severe damage to your dealer or Samsung Camera Service centre. ■Please do not use and it...
... to prevent accidents e.g.: •Swallowing battery, or small camera accessories. This may become hot during prolonged use this camera in camera malfunction. You must contact your camera. Always use the camera and its accessories in fire, injury, electric shock or severe damage to your dealer or Samsung Camera Service centre. ■Please do not use and it...
User Manual
Page 7
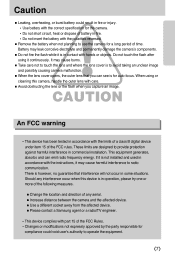
... the flash when you can emit radio frequency energy. Should any aerial. ■Increase distance between the camera and the affected device. ■Use a different socket away from the affected device. ■Please contact a Samsung agent or a radio/TV engineer. •This device complies with part 15 of the FCC Rules. •...
... the flash when you can emit radio frequency energy. Should any aerial. ■Increase distance between the camera and the affected device. ■Use a different socket away from the affected device. ■Please contact a Samsung agent or a radio/TV engineer. •This device complies with part 15 of the FCC Rules. •...
User Manual
Page 8
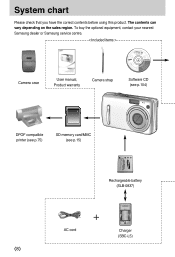
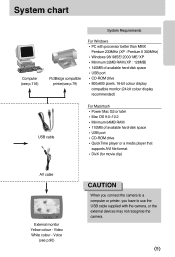
To buy the optional equipment, contact your nearest Samsung dealer or Samsung service centre. < Included items > Camera case User manual, Product warranty Camera strap Software CD (see p.104) DPOF compatible printer (see p.75) SD memory card/MMC (see p.15) Rechargeable battery (SLB-0837) 《8》 AC cord Charger (SBC-L5) System chart Please check that you have the correct contents before using this product. The contents can vary depending on the sales region.
To buy the optional equipment, contact your nearest Samsung dealer or Samsung service centre. < Included items > Camera case User manual, Product warranty Camera strap Software CD (see p.104) DPOF compatible printer (see p.75) SD memory card/MMC (see p.15) Rechargeable battery (SLB-0837) 《8》 AC cord Charger (SBC-L5) System chart Please check that you have the correct contents before using this product. The contents can vary depending on the sales region.
User Manual
Page 9
Video White colour - System chart Computer (see p.116) System Requirements PictBridge compatible printer(see p.90) CAUTION When you connect the camera to a computer or printer, you have to use the USB cable supplied with processor better than MMX Pentium 233MHz (XP : Pentium II 300MHz) •Windows ... that supports AVI file format. •DivX (for movie clip) AV cable External monitor Yellow colour - Voice (see p.79) For Windows •PC with the camera, or the external devices may not recognise the...
Video White colour - System chart Computer (see p.116) System Requirements PictBridge compatible printer(see p.90) CAUTION When you connect the camera to a computer or printer, you have to use the USB cable supplied with processor better than MMX Pentium 233MHz (XP : Pentium II 300MHz) •Windows ... that supports AVI file format. •DivX (for movie clip) AV cable External monitor Yellow colour - Voice (see p.79) For Windows •PC with the camera, or the external devices may not recognise the...
User Manual
Page 12
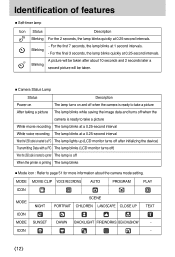
... Data with a PC The lamp blinks (LCD monitor turns off) When the USB cable is inserted to a printer The lamp is off when the camera is ready to take a picture While movie recording The lamp blinks at a 0.25-second interval While voice recording The lamp blinks at 0.25-second intervals... image data and turns off When the printer is printing The lamp blinks ■Mode icon : Refer to page 51 for more information about the camera mode setting. For the final 3 seconds, the lamp blinks quickly at 1 second intervals. Blinking - For the first 7 seconds, the lamp blinks at 0.25-...
... Data with a PC The lamp blinks (LCD monitor turns off) When the USB cable is inserted to a printer The lamp is off when the camera is ready to take a picture While movie recording The lamp blinks at a 0.25-second interval While voice recording The lamp blinks at 0.25-second intervals... image data and turns off When the printer is printing The lamp blinks ■Mode icon : Refer to page 51 for more information about the camera mode setting. For the final 3 seconds, the lamp blinks quickly at 1 second intervals. Blinking - For the first 7 seconds, the lamp blinks at 0.25-...
User Manual
Page 13
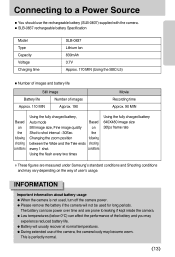
... following shooting conditions Using the fully charged battery, Auto mode Based 5M image size, Fine image quality on the way of the camera, the camera body may become warm. Connecting to a Power Source ■You should use of user's usage. INFORMATION Important information about battery ...image size 30fps frame rate ※These figures are prone to leaking if kept inside the camera. ●Low temperatures (below 0°C) can lose power over time and are measured under Samsung's standard conditions and Shooting conditions and may vary depending on Shot to shot interval : ...
... following shooting conditions Using the fully charged battery, Auto mode Based 5M image size, Fine image quality on the way of the camera, the camera body may become warm. Connecting to a Power Source ■You should use of user's usage. INFORMATION Important information about battery ...image size 30fps frame rate ※These figures are prone to leaking if kept inside the camera. ●Low temperatures (below 0°C) can lose power over time and are measured under Samsung's standard conditions and Shooting conditions and may vary depending on Shot to shot interval : ...
User Manual
Page 14
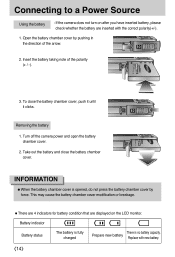
... and open the battery chamber cover. 2. To close the battery chamber cover. Connecting to a Power Source Using the battery : If the camera does not turn on after you have inserted battery, please check whether the battery are displayed on the LCD monitor. INFORMATION ●When the battery ...
... and open the battery chamber cover. 2. To close the battery chamber cover. Connecting to a Power Source Using the battery : If the camera does not turn on after you have inserted battery, please check whether the battery are displayed on the LCD monitor. INFORMATION ●When the battery ...
User Manual
Page 15
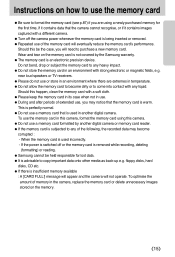
...9679;If the memory card is insufficient memory available : A [CARD FULL!] message will appear and the camera will not operate. Should this camera. ●Do not use a memory card formatted by the Samsung warranty. ●The memory card is advisable to copy important data onto other media as back-up ...any heavy impact. ●Do not store the memory card in an environment with a different camera. ●Turn off or the memory card is removed while recording, deleting (formatting) or reading. ●Samsung cannot be the case, you may become corrupted : - Wear and tear on the memory...
...9679;If the memory card is insufficient memory available : A [CARD FULL!] message will appear and the camera will not operate. Should this camera. ●Do not use a memory card formatted by the Samsung warranty. ●The memory card is advisable to copy important data onto other media as back-up ...any heavy impact. ●Do not store the memory card in an environment with a different camera. ●Turn off or the memory card is removed while recording, deleting (formatting) or reading. ●Samsung cannot be the case, you may become corrupted : - Wear and tear on the memory...
User Manual
Page 16
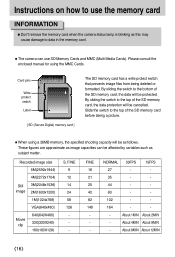
... as image capacities can use the memory card INFORMATION ●Don't remove the memory card when the camera status lamp is blinking as this may cause damage to data in the memory card. ■The camera can be as subject matter. About 1MIN About 2MIN - About 4MIN About 8MIN - Instructions on how...
... as image capacities can use the memory card INFORMATION ●Don't remove the memory card when the camera status lamp is blinking as this may cause damage to data in the memory card. ■The camera can be as subject matter. About 1MIN About 2MIN - About 4MIN About 8MIN - Instructions on how...
User Manual
Page 17
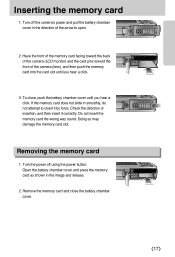
... so may damage the memory card slot. Have the front of the memory card facing toward the back of the camera (LCD monitor) and the card pins toward the front of the camera (lens), and then push the memory card into the card slot until you hear a click. 3. Check the direction of... the arrow to insert it correctly. Turn the power off the camera's power and pull the battery chamber cover in the image and release. 2. Open the battery chamber cover and press the memory card as shown in...
... so may damage the memory card slot. Have the front of the memory card facing toward the back of the camera (LCD monitor) and the card pins toward the front of the camera (lens), and then push the memory card into the card slot until you hear a click. 3. Check the direction of... the arrow to insert it correctly. Turn the power off the camera's power and pull the battery chamber cover in the image and release. 2. Open the battery chamber cover and press the memory card as shown in...
User Manual
Page 18
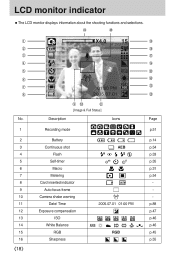
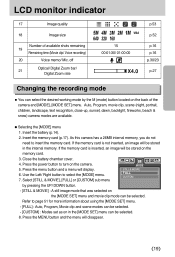
Description ⑨⑩ ⑪ [Image & Full Status] Icons Page 1 2 3 4 5 6 7 8 9 10 11 12 13 14 15 16 《18》 Recording mode Battery Continuous shot Flash Self-timer Macro Metering Card inserted indicator Auto focus frame Camera shake warning Date/ Time Exposure compensation ISO White Balance RGB Sharpness p.51 p.14 AEB p.54 p.33 p.35 p.31 p.54 - - - 2005.07.01 01:00 PM p.88 p.47 p.46 p.46 RGB p.45 p.55 LCD monitor indicator ■The LCD monitor displays information about the shooting functions and selections. ⑳ No.
Description ⑨⑩ ⑪ [Image & Full Status] Icons Page 1 2 3 4 5 6 7 8 9 10 11 12 13 14 15 16 《18》 Recording mode Battery Continuous shot Flash Self-timer Macro Metering Card inserted indicator Auto focus frame Camera shake warning Date/ Time Exposure compensation ISO White Balance RGB Sharpness p.51 p.14 AEB p.54 p.33 p.35 p.31 p.54 - - - 2005.07.01 01:00 PM p.88 p.47 p.46 p.46 RGB p.45 p.55 LCD monitor indicator ■The LCD monitor displays information about the shooting functions and selections. ⑳ No.
User Manual
Page 19
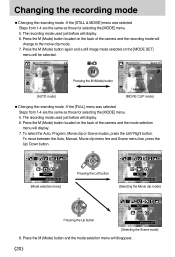
...card. 3. Select [STILL & MOVIE], [FULL] or [CUSTOM] sub menu MODE STILL & MOVIE FULL CUSTOM by the M (mode) button located on the camera. 5. Close the battery chamber cover. 4. Refer to turn on the back of available shots remaining 19 Remaining time (Movie clip/ Voice recording) 20 Voice ...memo/ Mic. As this camera has a 26MB internal memory, you do not need to select the [MODE] menu. 7. Press the menu button and a menu will disappear. 《...
...card. 3. Select [STILL & MOVIE], [FULL] or [CUSTOM] sub menu MODE STILL & MOVIE FULL CUSTOM by the M (mode) button located on the camera. 5. Close the battery chamber cover. 4. Refer to turn on the back of available shots remaining 19 Remaining time (Movie clip/ Voice recording) 20 Voice ...memo/ Mic. As this camera has a 26MB internal memory, you do not need to select the [MODE] menu. 7. Press the menu button and a menu will disappear. 《...
User Manual
Page 20
... Auto, Manual, Movie clip menu line and Scene menu line, press the Up/ Down button. Press the M (Mode) button located on the back of the camera and the mode selection menu will be selected. The recording mode used just before will display. 6. To select the Auto, Program, Movie clip or Scene... 1-4 are the same as those for selecting the [MODE] menu. 5. Press the M (Mode) button again and a still image mode selected on the back of the camera and the recording mode will disappear. 《20》
... Auto, Manual, Movie clip menu line and Scene menu line, press the Up/ Down button. Press the M (Mode) button located on the back of the camera and the mode selection menu will be selected. The recording mode used just before will display. 6. To select the Auto, Program, Movie clip or Scene... 1-4 are the same as those for selecting the [MODE] menu. 5. Press the M (Mode) button again and a still image mode selected on the back of the camera and the recording mode will disappear. 《20》

User Manual
Page 21
... the recording mode ●Changing the recording mode : If the [CUSTOM] menu was selected Steps from 1-4 are the same as on the back of the camera and the mode selection menu will display. 7. Press the M (Mode) button located on in the [MODE SET] menu by pressing the Up/ Down/ Left/ Right...
... the recording mode ●Changing the recording mode : If the [CUSTOM] menu was selected Steps from 1-4 are the same as on the back of the camera and the mode selection menu will display. 7. Press the M (Mode) button located on in the [MODE SET] menu by pressing the Up/ Down/ Left/ Right...
User Manual
Page 22
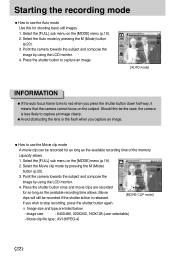
...the [MODE] menu (p.19). 2. Movie clips will still be recorded for as long as the available recording time of the memory capacity allows. 1. Point the camera towards the subject and compose the image by using the LCD monitor. 4. Select the Movie clip mode by pressing the M (Mode) button (p.20). 3. ... can be recorded if the shutter button is released. [MOVIE CLIP mode] If you press the shutter button down half way, it means that the camera cannot focus on the subject. Select the [FULL] sub menu on the [MODE] menu (p.19). 2. Press the shutter button once and movie clips...
...the [MODE] menu (p.19). 2. Movie clips will still be recorded for as long as the available recording time of the memory capacity allows. 1. Point the camera towards the subject and compose the image by using the LCD monitor. 4. Select the Movie clip mode by pressing the M (Mode) button (p.20). 3. ... can be recorded if the shutter button is released. [MOVIE CLIP mode] If you press the shutter button down half way, it means that the camera cannot focus on the subject. Select the [FULL] sub menu on the [MODE] menu (p.19). 2. Press the shutter button once and movie clips...


