
User Manual
Page 2
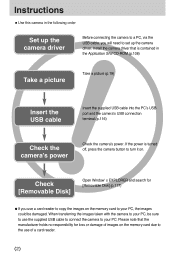
... Set up the camera driver. Check [Removable Disk] Open Window's EXPLORER and search for loss or damage of images on the memory card due to the use the supplied USB cable to connect the camera to copy the images on . Please note that is turned off, press the camera button to turn it on the memory card to your PC. Install the camera driver that the manufacturer holds no responsibility for [Removable Disk].(p.117) ●If you will need...
... Set up the camera driver. Check [Removable Disk] Open Window's EXPLORER and search for loss or damage of images on the memory card due to the use the supplied USB cable to connect the camera to copy the images on . Please note that is turned off, press the camera button to turn it on the memory card to your PC. Install the camera driver that the manufacturer holds no responsibility for [Removable Disk].(p.117) ●If you will need...
User Manual
Page 3
...;Size 52 ●Quality/ Frame rate 53 ●Metering 54 ●Continuous Shooting 54 ●Sharpness 55 ●OSD(On Screen Display) information 55 PLAY ●Starting play mode ■Playing back a still image ■Playing back a movie clip ■How to adjust the camera 27 ■POWER button 27 ■SHUTTER button 27 ●ZOOM W/ T button 27 ●Voice recording/ Voice memo/ UP button 30 ●Macro/ Down button 31 ●Focus lock 32 ●Flash/ Left button...
...;Size 52 ●Quality/ Frame rate 53 ●Metering 54 ●Continuous Shooting 54 ●Sharpness 55 ●OSD(On Screen Display) information 55 PLAY ●Starting play mode ■Playing back a still image ■Playing back a movie clip ■How to adjust the camera 27 ■POWER button 27 ■SHUTTER button 27 ●ZOOM W/ T button 27 ●Voice recording/ Voice memo/ UP button 30 ●Macro/ Down button 31 ●Focus lock 32 ●Flash/ Left button...
User Manual
Page 4
... ●Shutter sound 94 ●Album button 66 ●Start up sound 94 ●Setting up the play back function using the ●Important notes 95 LCD monitor 69 ●Warning indicator 97 ●Rotating an image 72 ●Before contacting a service centre 98 ●Resize 73 ●Specifications 101 ●Protecting images ●Deleting all images 74 75 SOFTWARE ●DPOF ●DPOF : STANDARD ●DPOF : INDEX ●DPOF : PRINT SIZE...
... ●Shutter sound 94 ●Album button 66 ●Start up sound 94 ●Setting up the play back function using the ●Important notes 95 LCD monitor 69 ●Warning indicator 97 ●Rotating an image 72 ●Before contacting a service centre 98 ●Resize 73 ●Specifications 101 ●Protecting images ●Deleting all images 74 75 SOFTWARE ●DPOF ●DPOF : STANDARD ●DPOF : INDEX ●DPOF : PRINT SIZE...
User Manual
Page 13
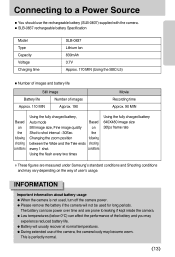
... Changing the zoom position following shooting conditions Using the fully charged battery, Auto mode Based 5M image size, Fine image quality on Shot to leaking if kept inside the camera. ●Low temperatures (below 0°C) can lose power over time and are measured under Samsung's standard conditions and Shooting conditions and may experience reduced battery life. ●Battery will not be used , turn off the camera power. ●Please remove the battery if the camera will...
... Changing the zoom position following shooting conditions Using the fully charged battery, Auto mode Based 5M image size, Fine image quality on Shot to leaking if kept inside the camera. ●Low temperatures (below 0°C) can lose power over time and are measured under Samsung's standard conditions and Shooting conditions and may experience reduced battery life. ●Battery will not be used , turn off the camera power. ●Please remove the battery if the camera will...
User Manual
Page 20
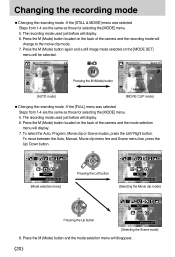
.../ Down button. AUTO MENU/OK:SET [Mode selection menu] Pressing the Left button MOVIE MENU/OK:SET [Selecting the Movie clip mode] NIGHT Pressing the Up button MENU/OK:SET [Selecting the Scene mode] 8. Press the M (Mode) button located on the [MODE SET] menu will display. 7. Press the M (Mode) button located on the back of the camera and the recording mode will display. 6. The recording mode used just before will disappear. 《20》 The recording mode used just before will change to the movie clip mode. 7.
.../ Down button. AUTO MENU/OK:SET [Mode selection menu] Pressing the Left button MOVIE MENU/OK:SET [Selecting the Movie clip mode] NIGHT Pressing the Up button MENU/OK:SET [Selecting the Scene mode] 8. Press the M (Mode) button located on the [MODE SET] menu will display. 7. Press the M (Mode) button located on the back of the camera and the recording mode will display. 6. The recording mode used just before will disappear. 《20》 The recording mode used just before will change to the movie clip mode. 7.
User Manual
Page 22
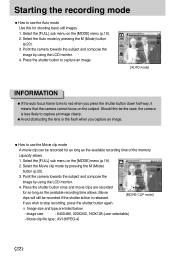
... the available recording time allows. Image size : 640X480, 320X240, 160X128 (user selectable) - Press the shutter button to capture an image. [AUTO mode] INFORMATION ●If the auto focus frame turns to red when you wish to use the Movie clip mode A movie clip can be recorded if the shutter button is released. [MOVIE CLIP mode] If you press the shutter button down half way, it means that the camera cannot focus on the [MODE] menu (p.19). 2. Movie clip file type : AVI...
... the available recording time allows. Image size : 640X480, 320X240, 160X128 (user selectable) - Press the shutter button to capture an image. [AUTO mode] INFORMATION ●If the auto focus frame turns to red when you wish to use the Movie clip mode A movie clip can be recorded if the shutter button is released. [MOVIE CLIP mode] If you press the shutter button down half way, it means that the camera cannot focus on the [MODE] menu (p.19). 2. Movie clip file type : AVI...
User Manual
Page 26
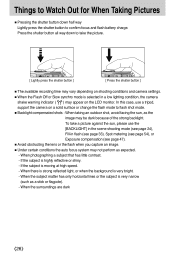
.... - To take the picture. [ Lightly press the shutter button ] [ Press the shutter button ] ■The available recording time may vary depending on shooting conditions and camera settings. ■When the Flash Off or Slow synchro mode is selected in flash (see page 33), Spot metering (see page 54), or Exposure compensation (see page 47). ■Avoid obstructing the lens or the flash when you capture an image. ■Under...
.... - To take the picture. [ Lightly press the shutter button ] [ Press the shutter button ] ■The available recording time may vary depending on shooting conditions and camera settings. ■When the Flash Off or Slow synchro mode is selected in flash (see page 33), Spot metering (see page 54), or Exposure compensation (see page 47). ■Avoid obstructing the lens or the flash when you capture an image. ■Under...

User Manual
Page 54
... the time to save each image file is hard to decide exposure of the object. SHOOTING SINGLE CONTINUOUS AEB [ PROGRAM mode ] ※ High resolution and picture quality increases file saving time, which increases stand-by camera shake may result in [PROGRAM mode] the centre is not the centre of the focus area, do not use exposure compensation. Metering ■If you cannot obtain suitable exposure conditions, you can change...
... the time to save each image file is hard to decide exposure of the object. SHOOTING SINGLE CONTINUOUS AEB [ PROGRAM mode ] ※ High resolution and picture quality increases file saving time, which increases stand-by camera shake may result in [PROGRAM mode] the centre is not the centre of the focus area, do not use exposure compensation. Metering ■If you cannot obtain suitable exposure conditions, you can change...
User Manual
Page 76
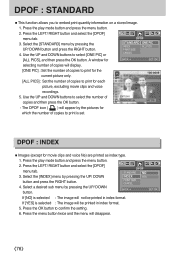
... menu button twice and the menu will display. [ONE PIC] : Set the number of copies to print is selected : The image will not be printed in index format. A window for movie clips and voice file) are printed as index type. 1. Select the [INDEX] menu by the pictures for which the number of copies to print for the current picture only. [ALL PICS] : Set the number of copies to print for each picture, excluding movie clips and voice 0 PRINTS recordings. 5. Press the play mode button...
... menu button twice and the menu will display. [ONE PIC] : Set the number of copies to print is selected : The image will not be printed in index format. A window for movie clips and voice file) are printed as index type. 1. Select the [INDEX] menu by the pictures for which the number of copies to print for the current picture only. [ALL PICS] : Set the number of copies to print for each picture, excluding movie clips and voice 0 PRINTS recordings. 5. Press the play mode button...
User Manual
Page 79
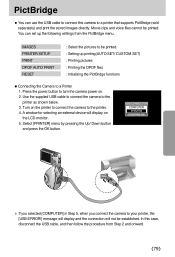
... the power button to the printer. 4. IMAGES PRINTER SETUP PRINT DPOF AUTO PRINT RESET : Select the pictures to be printed. : Setting up the following settings from Step 2 and onward. 《79》 PictBridge ■You can set up printing(AUTO SET/ CUSTOM SET) : Printing pictures : Printing the DPOF files : Initializing the PictBridge functions ●Connecting the Camera to a printer that supports PictBridge (sold separately) and print the stored images directly. Use the supplied USB cable to connect the camera to your printer, the [USB ERROR!] message will display...
... the power button to the printer. 4. IMAGES PRINTER SETUP PRINT DPOF AUTO PRINT RESET : Select the pictures to be printed. : Setting up the following settings from Step 2 and onward. 《79》 PictBridge ■You can set up printing(AUTO SET/ CUSTOM SET) : Printing pictures : Printing the DPOF files : Initializing the PictBridge functions ●Connecting the Camera to a printer that supports PictBridge (sold separately) and print the stored images directly. Use the supplied USB cable to connect the camera to your printer, the [USB ERROR!] message will display...
User Manual
Page 87
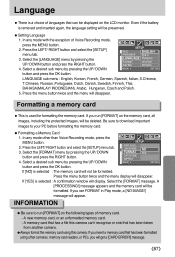
..., you ran FORMAT in Play mode, a [NO IMAGE!] message will disappear. SETUP FILE ENGLISH PWR SAVE 한국어 LANGUAGE FRANÇAIS FORMAT DEUTSCH D&TIME ESPAÑOL 4. Press the menu button twice and the menu will appear. Select the [FORMAT] message. If you will be displayed on the LCD monitor. A memory card that has a file this camera. Press the LEFT/ RIGHT button and select the [SETUP] menu tab. 3. Formatting a memory card ■This is used for formatting the memory card. Press...
..., you ran FORMAT in Play mode, a [NO IMAGE!] message will disappear. SETUP FILE ENGLISH PWR SAVE 한국어 LANGUAGE FRANÇAIS FORMAT DEUTSCH D&TIME ESPAÑOL 4. Press the menu button twice and the menu will appear. Select the [FORMAT] message. If you will be displayed on the LCD monitor. A memory card that has a file this camera. Press the LEFT/ RIGHT button and select the [SETUP] menu tab. 3. Formatting a memory card ■This is used for formatting the memory card. Press...
User Manual
Page 99
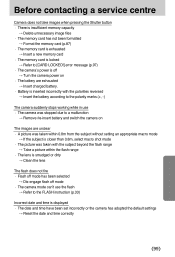
... a service centre Camera does not take images when pressing the Shutter button ㆍThere is insufficient memory capacity → Delete unnecessary image files ㆍThe memory card has not been formatted → Format the memory card (p.87) ㆍThe memory card is exhausted → Insert a new memory card ㆍThe memory card is locked → Refer to [CARD LOCKED!] error message (p.97) ㆍThe camera's power is off → Turn the camera power on ㆍThe battery are exhausted → Insert charged battery. ㆍBattery is...
... a service centre Camera does not take images when pressing the Shutter button ㆍThere is insufficient memory capacity → Delete unnecessary image files ㆍThe memory card has not been formatted → Format the memory card (p.87) ㆍThe memory card is exhausted → Insert a new memory card ㆍThe memory card is locked → Refer to [CARD LOCKED!] error message (p.97) ㆍThe camera's power is off → Turn the camera power on ㆍThe battery are exhausted → Insert charged battery. ㆍBattery is...
User Manual
Page 101
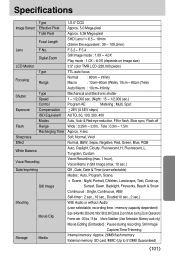
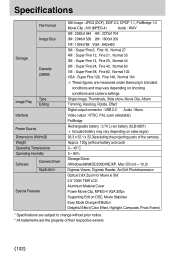
Digital Zoom LCD Monitor Type Focusing Range Shutter Exposure Flash Sharpness Effect Type Speed Control Compensation ISO Equivalent Modes Range Recharging Time White Balance Voice Recording Date Imprinting Still Image Shooting Movie Clip Storage Media 1/2.5" CCD Approx. 5.0 Mega-pixel Approx. 5.36 Mega-pixel SHD Lens f = 6.5 ~ 18mm (35mm film equivalent : 39 ~ 109.2mm) F 3.2 ~ F 5.4 Still Image mode : 1.0X ~ 4.0X Play mode : 1.0X ~ 8.0X (depends on image size) 2.5" color TMR LCD (230,000 pixels) TTL auto focus Normal : 80cm ~ infinity Macro : 10cm~80cm (Wide), 10cm...
Digital Zoom LCD Monitor Type Focusing Range Shutter Exposure Flash Sharpness Effect Type Speed Control Compensation ISO Equivalent Modes Range Recharging Time White Balance Voice Recording Date Imprinting Still Image Shooting Movie Clip Storage Media 1/2.5" CCD Approx. 5.0 Mega-pixel Approx. 5.36 Mega-pixel SHD Lens f = 6.5 ~ 18mm (35mm film equivalent : 39 ~ 109.2mm) F 3.2 ~ F 5.4 Still Image mode : 1.0X ~ 4.0X Play mode : 1.0X ~ 8.0X (depends on image size) 2.5" color TMR LCD (230,000 pixels) TTL auto focus Normal : 80cm ~ infinity Macro : 10cm~80cm (Wide), 10cm...
User Manual
Page 102
....2) Digimax Viewer, Digimax Reader, ArcSoft PhotoImpression Optical 2.8X Zoom for Movie & Still 2.5" 230K TMR LCD Aluminum Material Cover Power Movie Clip, MPEG-4 VGA 30fps Supporting Edit on DSC, Movie Stabilizer Easy Mode Change M Button Delightful Effect (Color Effect, Highlight, Composite, Photo Frame) * Specifications are subject to change without prior notice. * All trademarks are measured under Samsung's standard conditions and may vary depending on shooting conditions and camera settings. Single image, Thumbnails, Slide show, Movie...
....2) Digimax Viewer, Digimax Reader, ArcSoft PhotoImpression Optical 2.8X Zoom for Movie & Still 2.5" 230K TMR LCD Aluminum Material Cover Power Movie Clip, MPEG-4 VGA 30fps Supporting Edit on DSC, Movie Stabilizer Easy Mode Change M Button Delightful Effect (Color Effect, Highlight, Composite, Photo Frame) * Specifications are subject to change without prior notice. * All trademarks are measured under Samsung's standard conditions and may vary depending on shooting conditions and camera settings. Single image, Thumbnails, Slide show, Movie...
User Manual
Page 104
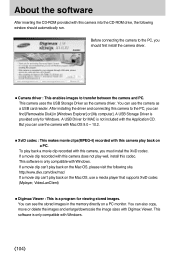
... use a media player that supports XviD codec (Mplayer, VideoLanClient) ■Digimax Viewer : This is not included with the Application CD. This software is only compatible with this camera does not play back on a PC. This software is only compatible with Digimax Viewer. But you can also copy, move or delete the images and enlarge/downscale the image sizes with Windows. 《104》 After installing the driver and connecting...
... use a media player that supports XviD codec (Mplayer, VideoLanClient) ■Digimax Viewer : This is not included with the Application CD. This software is only compatible with this camera does not play back on a PC. This software is only compatible with Digimax Viewer. But you can also copy, move or delete the images and enlarge/downscale the image sizes with Windows. 《104》 After installing the driver and connecting...

User Manual
Page 106
.... Installation is not installed and a window for installing the application softwares will display. [Preview] : You can 't be edited by an image editing program. http://www.samsungcamera.com : English http://www.samsungcamera.co.kr : Korean 1. Click the [Finish] button. [Click !] [Click !] 3. You can be selected. 《106》 After this camera with a PC, install the application software first. Setting up the application software To use this...
.... Installation is not installed and a window for installing the application softwares will display. [Preview] : You can 't be edited by an image editing program. http://www.samsungcamera.com : English http://www.samsungcamera.co.kr : Korean 1. Click the [Finish] button. [Click !] [Click !] 3. You can be selected. 《106》 After this camera with a PC, install the application software first. Setting up the application software To use this...
User Manual
Page 114
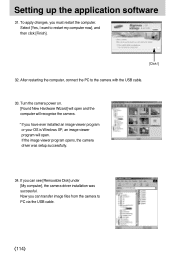
... [Removable Disk] under [My computer], the camera driver installation was setup successfully. 34. Now you can transfer image files from the camera to the camera with the USB cable. 33. Turn the camera power on. [Found New Hardware Wizard] will open . After restarting the computer, connect the PC to PC via the USB cable. 《114》 To apply changes, you have ever installed an image viewer program or your OS is Windows XP, an image...
... [Removable Disk] under [My computer], the camera driver installation was setup successfully. 34. Now you can transfer image files from the camera to the camera with the USB cable. 33. Turn the camera power on. [Found New Hardware Wizard] will open . After restarting the computer, connect the PC to PC via the USB cable. 《114》 To apply changes, you have ever installed an image viewer program or your OS is Windows XP, an image...
User Manual
Page 120
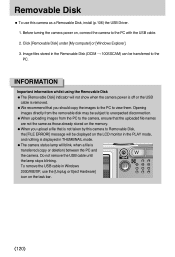
... camera. Image files stored in Windows 2000/ME/XP, use this camera to Removable Disk, the [FILE ERROR!] message will be transferred to view them. Do not remove the USB cable until the lamp stops blinking. Opening images directly from the removable disk may be subject to unexpected disconnection. ●When uploading images from the PC to the PC with the USB cable. 2. Click [Removable Disk] under [My computer] or [Windows Explorer]. 3. Removable Disk ■ To use the [Unplug or Eject Hardware] icon...
... camera. Image files stored in Windows 2000/ME/XP, use this camera to Removable Disk, the [FILE ERROR!] message will be transferred to view them. Do not remove the USB cable until the lamp stops blinking. Opening images directly from the removable disk may be subject to unexpected disconnection. ●When uploading images from the PC to the PC with the USB cable. 2. Click [Removable Disk] under [My computer] or [Windows Explorer]. 3. Removable Disk ■ To use the [Unplug or Eject Hardware] icon...
User Manual
Page 128
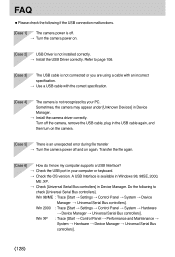
.... → Turn the camera power on. [Case 2] USB Driver is not installed correctly. → Install the USB Driver correctly. Turn off and on the camera. [Case 5] There is an unexpected error during file transfer → Turn the camera power off the camera, remove the USB cable, plug in your PC. FAQ ■Please check the following to page 106. [Case 3] The USB cable is not connected or you are using a cable with an incorrect specification. → Use a USB cable with...
.... → Turn the camera power on. [Case 2] USB Driver is not installed correctly. → Install the USB Driver correctly. Turn off and on the camera. [Case 5] There is an unexpected error during file transfer → Turn the camera power off the camera, remove the USB cable, plug in your PC. FAQ ■Please check the following to page 106. [Case 3] The USB cable is not connected or you are using a cable with an incorrect specification. → Use a USB cable with...
User Manual
Page 129
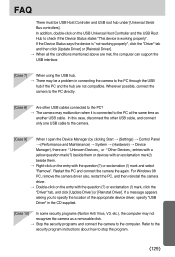
... driver, specify "USB Driver" in connecting the camera to the camera. [Case 9] When I open the Device Manager (by clicking Start → (Settings) → Control Panel → (Performance and Maintenance) → System → (Hardware) → Device Manager), there are not compatible. Restart the PC and connect the camera the again. In addition, double-click on the entry with the question(?) or exclamation (!) mark and select "Remove...
... driver, specify "USB Driver" in connecting the camera to the camera. [Case 9] When I open the Device Manager (by clicking Start → (Settings) → Control Panel → (Performance and Maintenance) → System → (Hardware) → Device Manager), there are not compatible. Restart the PC and connect the camera the again. In addition, double-click on the entry with the question(?) or exclamation (!) mark and select "Remove...


