
User Manual
Page 2
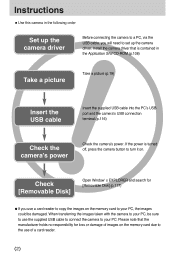
...Use this camera in the Application S/W CD-ROM.(p.106) Take a picture Take a picture (p.19) Insert the USB cable Insert the supplied USB cable into the PC's USB port and the camera's USB connection terminal.(p.116) Check the camera's power Check the camera's power. Install the camera driver that the manufacturer holds...117) ●If you will need to set up the camera driver Before connecting the camera to a PC, via the USB cable, you use the supplied USB cable to connect the camera to your PC, be damaged. Check [Removable Disk] Open Window's EXPLORER and search for loss or ...
...Use this camera in the Application S/W CD-ROM.(p.106) Take a picture Take a picture (p.19) Insert the USB cable Insert the supplied USB cable into the PC's USB port and the camera's USB connection terminal.(p.116) Check the camera's power Check the camera's power. Install the camera driver that the manufacturer holds...117) ●If you will need to set up the camera driver Before connecting the camera to a PC, via the USB cable, you use the supplied USB cable to connect the camera to your PC, be damaged. Check [Removable Disk] Open Window's EXPLORER and search for loss or ...
User Manual
Page 9
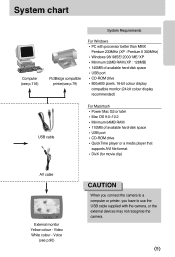
...see p.116) System Requirements PictBridge compatible printer(see p.90) CAUTION When you connect the camera to a computer or printer, you have to use the USB cable supplied with processor better than MMX Pentium 233MHz (XP : Pentium II 300MHz) •Windows 98/ 98SE/ 2000/ ME/ XP •Minimum 32MB ...RAM (XP : 128MB) •140MB of available hard-disk space •USB port •CD-ROM drive •800x600 pixels, 16-bit colour display compatible monitor (24-bit colour display recommended) USB cable For Macintosh •Power Mac G3 or later •Mac OS 9.0~10.2 •...
...see p.116) System Requirements PictBridge compatible printer(see p.90) CAUTION When you connect the camera to a computer or printer, you have to use the USB cable supplied with processor better than MMX Pentium 233MHz (XP : Pentium II 300MHz) •Windows 98/ 98SE/ 2000/ ME/ XP •Minimum 32MB ...RAM (XP : 128MB) •140MB of available hard-disk space •USB port •CD-ROM drive •800x600 pixels, 16-bit colour display compatible monitor (24-bit colour display recommended) USB cable For Macintosh •Power Mac G3 or later •Mac OS 9.0~10.2 •...
User Manual
Page 12
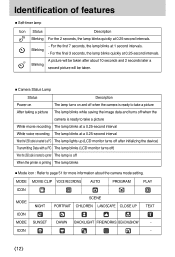
... The lamp lights up (LCD monitor turns off after initializing the device) Transmitting Data with a PC The lamp blinks (LCD monitor turns off) When the USB cable is inserted to a printer The lamp is off When the printer is printing The lamp blinks ■Mode icon : Refer to take a picture While movie...
... The lamp lights up (LCD monitor turns off after initializing the device) Transmitting Data with a PC The lamp blinks (LCD monitor turns off) When the USB cable is inserted to a printer The lamp is off When the printer is printing The lamp blinks ■Mode icon : Refer to take a picture While movie...

User Manual
Page 70
Menu tab Main menu IMAGES AUTO SET CUSTOM SET 《70》 Sub menu ONE PIC ALL PICS NO YES SIZE LAYOUT TYPE Secondary menu - Page p. 80 p. 81 p. 81 AUTO POSTCARD CARD LETTER 4X6 L 2L A4 A3 AUTO FULL 1 2 4 8 9 16 AUTO PLAIN PHOTO FAST PHO. Setting up the play back function using the LCD monitor ■This menu is available while the camera is connected to a PictBridge supporting printer (direct connection to the camera, sold separately) with a USB cable.
Menu tab Main menu IMAGES AUTO SET CUSTOM SET 《70》 Sub menu ONE PIC ALL PICS NO YES SIZE LAYOUT TYPE Secondary menu - Page p. 80 p. 81 p. 81 AUTO POSTCARD CARD LETTER 4X6 L 2L A4 A3 AUTO FULL 1 2 4 8 9 16 AUTO PLAIN PHOTO FAST PHO. Setting up the play back function using the LCD monitor ■This menu is available while the camera is connected to a PictBridge supporting printer (direct connection to the camera, sold separately) with a USB cable.
User Manual
Page 79
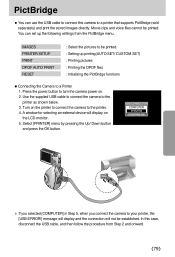
... DPOF AUTO PRINT RESET : Select the pictures to be printed. : Setting up the following settings from Step 2 and onward. 《79》 USB CONNECTION COMPUTER PRINTER CONFIRM:OK ※ If you selected [COMPUTER] in Step 5, when you connect the camera to a Printer 1. Press the power button...menu by pressing the Up/ Down button and press the OK button. Use the supplied USB cable to connect the camera to the printer. 4. You can use the USB cable to connect this case, disconnect the USB cable, and then follow the procedure from the PictBridge menu. A window for selecting an ...
... DPOF AUTO PRINT RESET : Select the pictures to be printed. : Setting up the following settings from Step 2 and onward. 《79》 USB CONNECTION COMPUTER PRINTER CONFIRM:OK ※ If you selected [COMPUTER] in Step 5, when you connect the camera to a Printer 1. Press the power button...menu by pressing the Up/ Down button and press the OK button. Use the supplied USB cable to connect the camera to the printer. 4. You can use the USB cable to connect this case, disconnect the USB cable, and then follow the procedure from the PictBridge menu. A window for selecting an ...
User Manual
Page 100
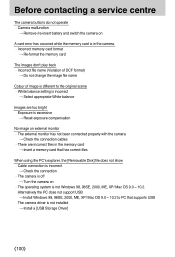
... and switch the camera on A card error has occurred while the memory card is in the memory card → Insert a memory card that supports USB ㆍThe camera driver is not Windows 98, 98SE, 2000, ME, XP/ Mac OS 9.0 ~ 10.2. Alternatively the PC does not support... → Reset exposure compensation No image on external monitor ㆍThe external monitor has not been connected properly with the camera → Check the connection cables ㆍThere are incorrect files in the camera. ㆍIncorrect memory card format → Re-format the memory card The images don't play back &#...
... and switch the camera on A card error has occurred while the memory card is in the memory card → Insert a memory card that supports USB ㆍThe camera driver is not Windows 98, 98SE, 2000, ME, XP/ Mac OS 9.0 ~ 10.2. Alternatively the PC does not support... → Reset exposure compensation No image on external monitor ㆍThe external monitor has not been connected properly with the camera → Check the connection cables ㆍThere are incorrect files in the camera. ㆍIncorrect memory card format → Re-format the memory card The images don't play back &#...
User Manual
Page 114
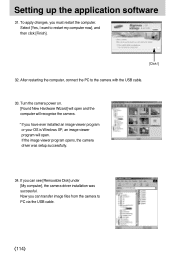
...will open and the computer will recognise the camera. * If you must restart the computer. Select [Yes, I want to the camera with the USB cable. 33. If you can see [Removable Disk] under [My computer], the camera driver installation was setup successfully. 34. After restarting the computer, connect... my computer now], and then click [Finish]. [Click !] 32. Now you can transfer image files from the camera to PC via the USB cable. 《114》 If the image viewer program opens, the camera driver was successful. Setting up the application software 31. To apply changes...
...will open and the computer will recognise the camera. * If you must restart the computer. Select [Yes, I want to the camera with the USB cable. 33. If you can see [Removable Disk] under [My computer], the camera driver installation was setup successfully. 34. After restarting the computer, connect... my computer now], and then click [Finish]. [Click !] 32. Now you can transfer image files from the camera to PC via the USB cable. 《114》 If the image viewer program opens, the camera driver was successful. Setting up the application software 31. To apply changes...
User Manual
Page 116
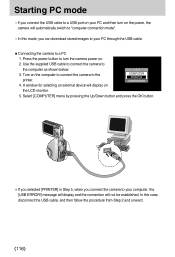
... to connect the camera to turn on the power, the camera will automatically switch to "computer connection mode". •In this case, disconnect the USB cable, and then follow the procedure from Step 2 and onward. 《116》 A window for selecting an external device will display on the LCD...] in Step 5, when you can download stored images to your computer, the [USB ERROR!] message will display and the connection will not be established. Starting PC mode •If you connect the USB cable to a USB port on your PC and then turn the camera power on. 2. Use the supplied...
... to connect the camera to turn on the power, the camera will automatically switch to "computer connection mode". •In this case, disconnect the USB cable, and then follow the procedure from Step 2 and onward. 《116》 A window for selecting an external device will display on the LCD...] in Step 5, when you can download stored images to your computer, the [USB ERROR!] message will display and the connection will not be established. Starting PC mode •If you connect the USB cable to a USB port on your PC and then turn the camera power on. 2. Use the supplied...
User Manual
Page 117
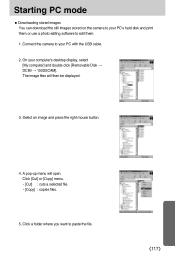
... to edit them. 1. Click [Cut] or [Copy] menu. - [Cut] : cuts a selected file. - [Copy] : copies files. 5. Click a folder where you want to your PC with the USB cable. 2. Connect the camera to paste the file. 《117》 Starting PC mode ■Downloading stored images You can download the still images stored on...
... to edit them. 1. Click [Cut] or [Copy] menu. - [Cut] : cuts a selected file. - [Copy] : copies files. 5. Click a folder where you want to your PC with the USB cable. 2. Connect the camera to paste the file. 《117》 Starting PC mode ■Downloading stored images You can download the still images stored on...
User Manual
Page 120
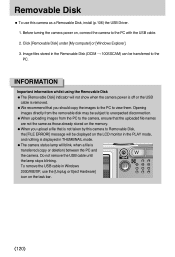
...a file that you should copy the images to the PC to the PC with the USB cable. 2. Do not remove the USB cable until the lamp stops blinking. Click [Removable Disk] under [My computer] or [Windows Explorer]. 3. To remove the USB cable in THUMBNAIL mode. ●The camera status lamp will be transferred to the PC.... INFORMATION Important information whilst using the Removable Disk ●The [Removable Disk] indicator will not show when the camera power is off or the USB cable is removed. ●We recommend that is transferred (copy or deletion) between the PC and the camera.
...a file that you should copy the images to the PC to the PC with the USB cable. 2. Do not remove the USB cable until the lamp stops blinking. Click [Removable Disk] under [My computer] or [Windows Explorer]. 3. To remove the USB cable in THUMBNAIL mode. ●The camera status lamp will be transferred to the PC.... INFORMATION Important information whilst using the Removable Disk ●The [Removable Disk] indicator will not show when the camera power is off or the USB cable is removed. ●We recommend that is transferred (copy or deletion) between the PC and the camera.

User Manual
Page 121
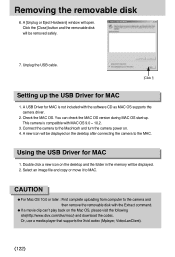
... Storage Device] and click the [OK] button. 5. Removing the removable disk ■Windows 98SE 1. Click the [OK] button. [Click !] [Click !] 《121》 Unplug the USB cable. ■Windows 2000/ME/XP (The illustrations may be different from the real display in accordance with the Windows O/S.) 1. Check whether the camera and PC...
... Storage Device] and click the [OK] button. 5. Removing the removable disk ■Windows 98SE 1. Click the [OK] button. [Click !] [Click !] 《121》 Unplug the USB cable. ■Windows 2000/ME/XP (The illustrations may be different from the real display in accordance with the Windows O/S.) 1. Check whether the camera and PC...
User Manual
Page 122
....divx.com/divx/mac/) and download the codec. CAUTION ●For Mac OS 10.0 or later : First complete uploading from computer to the MAC. A USB Driver for MAC is compatible with MAC OS 9.0 ~ 10.2. 3. Or, use a media player that supports the Xvid codec (Mplayer, VideoLanClient). 《122...》 Click the [Close] button and the removable disk will be displayed on the desktop and the folder in the memory will open. Unplug the USB cable. [Click !] Setting up . A new icon will be displayed. 2. Double click a new icon on the desktop after connecting the camera to the...
....divx.com/divx/mac/) and download the codec. CAUTION ●For Mac OS 10.0 or later : First complete uploading from computer to the MAC. A USB Driver for MAC is compatible with MAC OS 9.0 ~ 10.2. 3. Or, use a media player that supports the Xvid codec (Mplayer, VideoLanClient). 《122...》 Click the [Close] button and the removable disk will be displayed on the desktop and the folder in the memory will open. Unplug the USB cable. [Click !] Setting up . A new icon will be displayed. 2. Double click a new icon on the desktop after connecting the camera to the...
User Manual
Page 124
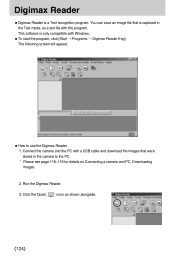
... camera and the PC with a USB cable and download the images that is a Text recognition program. Click the Open( ) icon as a text file with Windows. ■To start the program, click [Start → Programs → Digimax Reader Eng]. Digimax Reader ■Digimax Reader is captured in the camera ...to use the Digimax Reader 1. You can save an image file that were stored in the Text mode, as shown alongside....
... camera and the PC with a USB cable and download the images that is a Text recognition program. Click the Open( ) icon as a text file with Windows. ■To start the program, click [Start → Programs → Digimax Reader Eng]. Digimax Reader ■Digimax Reader is captured in the camera ...to use the Digimax Reader 1. You can save an image file that were stored in the Text mode, as shown alongside....
User Manual
Page 128
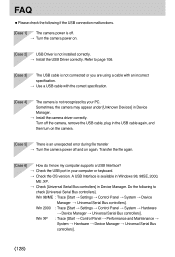
...] in your PC. FAQ ■Please check the following to page 106. [Case 3] The USB cable is not connected or you are using a cable with an incorrect specification. → Use a USB cable with the correct specification. [Case 4] The camera is not recognized by your computer or keyboard. ...Bus controllers]. Turn off the camera, remove the USB cable, plug in Device Manager. → Install the camera driver correctly. Do the following if the USB connection malfunctions. [Case 1] The camera power is off and on . [Case 2] USB Driver is an unexpected error during file transfer &#...
...] in your PC. FAQ ■Please check the following to page 106. [Case 3] The USB cable is not connected or you are using a cable with an incorrect specification. → Use a USB cable with the correct specification. [Case 4] The camera is not recognized by your computer or keyboard. ...Bus controllers]. Turn off the camera, remove the USB cable, plug in Device Manager. → Install the camera driver correctly. Do the following if the USB connection malfunctions. [Case 1] The camera power is off and on . [Case 2] USB Driver is an unexpected error during file transfer &#...
User Manual
Page 129
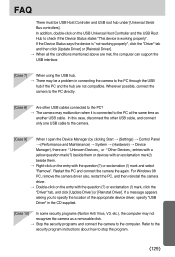
...PC and connect the camera the again. If the Device Status says the device is "not working properly". In this case, disconnect the other USB cables connected to the PC? → The camera may malfunction when it is working properly", click the "Driver" tab and then click [Update Driver]... camera to stop the program. 《129》 Wherever possible, connect the camera to the PC directly. [Case 8] Are other USB cable, and connect only one USB cable to the computer. If a message appears asking you to check if the Device Status states "This device is connected to the PC ...
...PC and connect the camera the again. If the Device Status says the device is "not working properly". In this case, disconnect the other USB cables connected to the PC? → The camera may malfunction when it is working properly", click the "Driver" tab and then click [Update Driver]... camera to stop the program. 《129》 Wherever possible, connect the camera to the PC directly. [Case 8] Are other USB cable, and connect only one USB cable to the computer. If a message appears asking you to check if the Device Status states "This device is connected to the PC ...


