
User Guide
Page 3
... explanation on each step during the actual usage. Some terms in this machine include: USB 2.0 FEATURES CLX-3170FN CLX-3175FN CLX-3175FW USB Memory Interface PictBridge ADF (Automatic Document Feeder) Network Interface Ethernet 10/100 Base TX wired ...LAN Network interface 802.11b/g wireless LAN FAX ( : Included, Blank: Not Available) ABOUT THIS USER'S GUIDE This user's guide provides information about basic understanding of the toner cartridge...
... explanation on each step during the actual usage. Some terms in this machine include: USB 2.0 FEATURES CLX-3170FN CLX-3175FN CLX-3175FW USB Memory Interface PictBridge ADF (Automatic Document Feeder) Network Interface Ethernet 10/100 Base TX wired ...LAN Network interface 802.11b/g wireless LAN FAX ( : Included, Blank: Not Available) ABOUT THIS USER'S GUIDE This user's guide provides information about basic understanding of the toner cartridge...

User Guide
Page 16
... 20 20 Front view Rear view 21 Control panel overview 22 Understanding the Status LED 22 Acknowledging the status of the toner cartridge 23 Menu overview 24 Supplied software 24 Printer driver features 24 Printer driver GETTING STARTED 25 Setting up the hardware 25 26 ... network 27 Printing Configuration report 27 Setting IP address 28 Network parameter setting 28 Installing the driver software 29 Using a wireless network(CLX-3175FW only) 29 Checking your Network Environments 29 Printing Configuration report 29 Setting IP address 30 Network parameter setting 31 Restoring factory default...
... 20 20 Front view Rear view 21 Control panel overview 22 Understanding the Status LED 22 Acknowledging the status of the toner cartridge 23 Menu overview 24 Supplied software 24 Printer driver features 24 Printer driver GETTING STARTED 25 Setting up the hardware 25 26 ... network 27 Printing Configuration report 27 Setting IP address 28 Network parameter setting 28 Installing the driver software 29 Using a wireless network(CLX-3175FW only) 29 Checking your Network Environments 29 Printing Configuration report 29 Setting IP address 30 Network parameter setting 31 Restoring factory default...

User Guide
Page 18
... Cleaning your machine 64 Cleaning the outside 64 Cleaning the inside 66 Cleaning the scan unit 67 Maintaining the cartridge 67 Toner cartridge storage 67 Expected cartridge life 67 Redistributing toner 67 Replacing the toner cartridge 69 Replacing the imaging unit 70 Replacing the waste toner container 71 Maintenance parts 71 Checking replaceables 71...
... Cleaning your machine 64 Cleaning the outside 64 Cleaning the inside 66 Cleaning the scan unit 67 Maintaining the cartridge 67 Toner cartridge storage 67 Expected cartridge life 67 Redistributing toner 67 Replacing the toner cartridge 69 Replacing the imaging unit 70 Replacing the waste toner container 71 Maintenance parts 71 Checking replaceables 71...
User Guide
Page 20
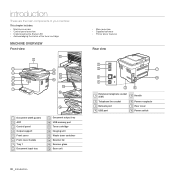
... chapter includes: • Machine overview • Control panel overview • Understanding the Status LED • Acknowledging the status of the toner cartridge MACHINE OVERVIEW Front view • Menu overview • Supplied software • Printer driver features Rear view 1 Document width guides 2 ADF 3... support 5 Front cover 6 Front cover handle 7 Tray 1 8 Document input tray 9 Document output tray 10 USB memory port 11 Toner cartridge 12 Imaging unit 13 Waste toner container 14 Scanner lid 15 Scanner glass 16 Scan unit 20 _Introduction Extension telephone socket 1 (EXT) 2 ...
... chapter includes: • Machine overview • Control panel overview • Understanding the Status LED • Acknowledging the status of the toner cartridge MACHINE OVERVIEW Front view • Menu overview • Supplied software • Printer driver features Rear view 1 Document width guides 2 ADF 3... support 5 Front cover 6 Front cover handle 7 Tray 1 8 Document input tray 9 Document output tray 10 USB memory port 11 Toner cartridge 12 Imaging unit 13 Waste toner container 14 Scanner lid 15 Scanner glass 16 Scan unit 20 _Introduction Extension telephone socket 1 (EXT) 2 ...

User Guide
Page 21
... stored email addresses. 15 Redial/Pause In ready mode, redials the last number, or in Color mode. See Status LED with the display messages. CLX-3175FW only. • All illustrations on this user's guide may become hot if you print a large number of pages at any time. When...status and prompts during an operation. 4 Toner colors The toner colors shown below the LCD display co-works with the toner cartridge messages. (See "Acknowledging the status of the toner cartridge" on page 22.) 5 Status/Wirelessa Shows the status of your machine depending on its options or models. • ...
... stored email addresses. 15 Redial/Pause In ready mode, redials the last number, or in Color mode. See Status LED with the display messages. CLX-3175FW only. • All illustrations on this user's guide may become hot if you print a large number of pages at any time. When...status and prompts during an operation. 4 Toner colors The toner colors shown below the LCD display co-works with the toner cartridge messages. (See "Acknowledging the status of the toner cartridge" on page 22.) 5 Status/Wirelessa Shows the status of your machine depending on its options or models. • ...

User Guide
Page 22
... can not be cleared. Check the message to find out what the problem is open or no paper in power save mode. If the toner cartridge is low or needs to be changed. (See "Understanding display messages" on page 76.) Always check the message on page 67.) On • A ...to solve it switches to on-line automatically. • Wireless function can temporarily improve print quality by redistributing the toner. (See "Replacing the toner cartridge" on the display to be replaced, the Status LED turns red and the display shows the message. Example: The above example shows the yellow...
... can not be cleared. Check the message to find out what the problem is open or no paper in power save mode. If the toner cartridge is low or needs to be changed. (See "Understanding display messages" on page 76.) Always check the message on page 67.) On • A ...to solve it switches to on-line automatically. • Wireless function can temporarily improve print quality by redistributing the toner. (See "Replacing the toner cartridge" on the display to be replaced, the Status LED turns red and the display shows the message. Example: The above example shows the yellow...

User Guide
Page 56
... On and press OK. 7. Press Menu until Fax Feature appears on the bottom line of all outgoing faxes to a specified destination, in the installed toner cartridge. 56 _Faxing Forwarding faxes You can turn on the bottom line of received faxes when the machine is forwarded to be sent and press OK...
... On and press OK. 7. Press Menu until Fax Feature appears on the bottom line of all outgoing faxes to a specified destination, in the installed toner cartridge. 56 _Faxing Forwarding faxes You can turn on the bottom line of received faxes when the machine is forwarded to be sent and press OK...

User Guide
Page 63
... fax job. This chapter includes: • Printing reports • Clearing memory • Cleaning your machine • Maintaining the cartridge • Replacing the toner cartridge • Replacing the imaging unit • Replacing the waste toner container • Maintenance parts • Managing your machine from this... menu manually. 6. To add or delete numbers to your changes after each cartridge. This list shows the current status of the display and press OK. 2. Press OK when Yes appears to ready mode. If...
... fax job. This chapter includes: • Printing reports • Clearing memory • Cleaning your machine • Maintaining the cartridge • Replacing the toner cartridge • Replacing the imaging unit • Replacing the waste toner container • Maintenance parts • Managing your machine from this... menu manually. 6. To add or delete numbers to your changes after each cartridge. This list shows the current status of the display and press OK. 2. Press OK when Yes appears to ready mode. If...

User Guide
Page 64
...display and press OK. 2. Press OK again to clear another item. 7. Press the left /right arrow until System Setup appears on the toner cartridge and pull to clear appears. Scan Setup Restores all records of the machine with a soft lint-free cloth. Wait for the machine to ready ...jobs. 1. Fax RCV Report Clears all fax jobs have been completed, or you want to remove four cartridges from the machine. 64 _Maintenance Cleaning the inside the machine. For CLX-3170FN/CLX-3175FN/CLX-3175FW users, before clearing the memory, make sure that all records of the machine clears or reduces ...
...display and press OK. 2. Press OK again to clear another item. 7. Press the left /right arrow until System Setup appears on the toner cartridge and pull to clear appears. Scan Setup Restores all records of the machine with a soft lint-free cloth. Wait for the machine to ready ...jobs. 1. Fax RCV Report Clears all fax jobs have been completed, or you want to remove four cartridges from the machine. 64 _Maintenance Cleaning the inside the machine. For CLX-3170FN/CLX-3175FN/CLX-3175FW users, before clearing the memory, make sure that all records of the machine clears or reduces ...

User Guide
Page 65
... groove on the front of the imaging unit • If you leave the front cover open for any dust and spilled toner from the toner cartridges area and their cavities. 9. Close the front cover should the installation need to be halted for more than a few minutes, the imaging unit ...surface, the imaging unit with water to clean it is not completely closed, the machine will cause damage to dry completely. 10. Slide four toner cartridge back into the machine, and close the front cover. Reinstall all the compartments into the machine. • If toner gets on Maintenance_ 65 With a...
... groove on the front of the imaging unit • If you leave the front cover open for any dust and spilled toner from the toner cartridges area and their cavities. 9. Close the front cover should the installation need to be halted for more than a few minutes, the imaging unit ...surface, the imaging unit with water to clean it is not completely closed, the machine will cause damage to dry completely. 10. Slide four toner cartridge back into the machine, and close the front cover. Reinstall all the compartments into the machine. • If toner gets on Maintenance_ 65 With a...

User Guide
Page 67
... machine to evenly distribute the toner. Redistributing toner When a toner is low may be replaced. • For the CLX-3170FN/CLX-3175FN/CLX-3175FW, incoming faxes are saved in cold water. Grasp the handles on the toner cartridge, thoroughly rock it off , then wait a few minutes for use. • Do not refill the toner...
... machine to evenly distribute the toner. Redistributing toner When a toner is low may be replaced. • For the CLX-3170FN/CLX-3175FN/CLX-3175FW, incoming faxes are saved in cold water. Grasp the handles on the toner cartridge, thoroughly rock it off , then wait a few minutes for use. • Do not refill the toner...

User Guide
Page 68
...completely closed, the machine will not operate. • Don't use sharp objects, such as shown, and remove the protecting cover. Place the toner cartridge on your clothing, wipe it off with a dry cloth and wash it from the machine. 7. Hot water sets toner into place. 4. Close the... front cover. Holding both handles on the toner cartridge and pull to remove the cartridge from side to side to open the toner cartridge package. Take a new toner cartridge out of the toner cartridge. 5. If toner gets on a flat surface, as a knife or scissors, to...
...completely closed, the machine will not operate. • Don't use sharp objects, such as shown, and remove the protecting cover. Place the toner cartridge on your clothing, wipe it off with a dry cloth and wash it from the machine. 7. Hot water sets toner into place. 4. Close the... front cover. Holding both handles on the toner cartridge and pull to remove the cartridge from side to side to open the toner cartridge package. Take a new toner cartridge out of the toner cartridge. 5. If toner gets on a flat surface, as a knife or scissors, to...

User Guide
Page 69
... of the machine using the groove on the computer, indicating the imaging unit needs to open the front cover. 5. Grasp the handles on the toner cartridge and pull to protect it if necessary. 7. Turn the machine off, then wait a few minutes. Otherwise your machine stops printing. 1. Maintenance_ 69 Take a new imaging...
... of the machine using the groove on the computer, indicating the imaging unit needs to open the front cover. 5. Grasp the handles on the toner cartridge and pull to protect it if necessary. 7. Turn the machine off, then wait a few minutes. Otherwise your machine stops printing. 1. Maintenance_ 69 Take a new imaging...

User Guide
Page 70
Insert the waste toner container into the machine. 3. Slide four toner cartridges back into position and then push it to make sure all toner cartridges are installed properly. If the front cover is firmly seated in place. Using the handle, completely open the front cover. 9. Please... your machine to be replaced. Turn the machine off, then wait a few minutes for the machine to close . 11. If any toner cartridge is installed improperly, the front cover do not close the waste toner container opening. 70 _Maintenance Do not tilt or turn over the container. 5. ...
Insert the waste toner container into the machine. 3. Slide four toner cartridges back into position and then push it to make sure all toner cartridges are installed properly. If the front cover is firmly seated in place. Using the handle, completely open the front cover. 9. Please... your machine to be replaced. Turn the machine off, then wait a few minutes for the machine to close . 11. If any toner cartridge is installed improperly, the front cover do not close the waste toner container opening. 70 _Maintenance Do not tilt or turn over the container. 5. ...

User Guide
Page 71
...If the front cover is not completely closed, the machine will need to make sure all toner cartridges are installed properly. Please make sure that this maintenance be performed by an incorrect type. If any toner cartridge is a service component. Turn the machine on the bottom line of each item. 5. Checking .... 7. Start a web browser, such as Internet Explorer, from worn parts, and to let you bought the machine. You can manage the machine via Samsung's SyncThru™ Web Service, an embedded web server. Press the left/right arrow until System Setup appears on the...
...If the front cover is not completely closed, the machine will need to make sure all toner cartridges are installed properly. Please make sure that this maintenance be performed by an incorrect type. If any toner cartridge is a service component. Turn the machine on the bottom line of each item. 5. Checking .... 7. Start a web browser, such as Internet Explorer, from worn parts, and to let you bought the machine. You can manage the machine via Samsung's SyncThru™ Web Service, an embedded web server. Press the left/right arrow until System Setup appears on the...

User Guide
Page 76
... full while trying to clear and try again. Error] The machine has a communication problem. Data Read Fail Check USB Mem. latched. cartridge. Turn the power switch off and on. If the problem (Laser Scanning Unit.) persists, call for service. The mail size is larger...reset it cover is very convenient to accept No. The imaging unit is Install the toner not installed. Install the a Samsunggenuine toner cartridge designed for your mail or than the supported reduce the resolution. Storing to select a group location number where only a single location...
... full while trying to clear and try again. Error] The machine has a communication problem. Data Read Fail Check USB Mem. latched. cartridge. Turn the power switch off and on. If the problem (Laser Scanning Unit.) persists, call for service. The mail size is larger...reset it cover is very convenient to accept No. The imaging unit is Install the toner not installed. Install the a Samsunggenuine toner cartridge designed for your mail or than the supported reduce the resolution. Storing to select a group location number where only a single location...

User Guide
Page 77
... button or speed dial number you select Stop by pressing OK on page 67.) The life of paper. Replace the toner cartridge with a Samsung-genuine cartridge. (See "Replacing the toner cartridge" on . Call for service. If you tried to use has no jobs stored. Replace the corresponding toner... cartridge with a new one . Turn the power switch off and on page 70.) The machine is locked Turn the power switch off...
... button or speed dial number you select Stop by pressing OK on page 67.) The life of paper. Replace the toner cartridge with a Samsung-genuine cartridge. (See "Replacing the toner cartridge" on . Call for service. If you tried to use has no jobs stored. Replace the corresponding toner... cartridge with a new one . Turn the power switch off and on page 70.) The machine is locked Turn the power switch off...

User Guide
Page 78
... If you do not select any, the machine will be guaranteed. This message appears when the toner is selected. Take out the toner cartridge and thoroughly shake it. Turn the power switch off and on the control panel, the machine stops printing. There is a problem on Configure... When you select Continue, the machine keeps printing, but the quality cannot be activated only with a Samsung-genuine cartridge. (See "Replacing the toner cartridge" on page 67.) The lifespan of the toner cartridge which the arrow indicates is no paper in the tray. By doing this case, the mono printing ...
... If you do not select any, the machine will be guaranteed. This message appears when the toner is selected. Take out the toner cartridge and thoroughly shake it. Turn the power switch off and on the control panel, the machine stops printing. There is a problem on Configure... When you select Continue, the machine keeps printing, but the quality cannot be activated only with a Samsung-genuine cartridge. (See "Replacing the toner cartridge" on page 67.) The lifespan of the toner cartridge which the arrow indicates is no paper in the tray. By doing this case, the mono printing ...

User Guide
Page 79
... jamming. • There is working properly and print a job. the envelopes. POSSIBLE CAUSE SUGGESTED SOLUTIONS The machine is incorrect. Install the toner cartridge. • If a system error occurs, contact your Windows. If possible, attach the cable to another computer that all of only one . ... does not feed into the machine, the ADF rubber pad may cause some conditions that the machine is jammed during printing. Select Samsung CLX-3170 Series as the default printer. Clear the paper jam. (See "Tips for service Paper feeding CONDITION SUGGESTED SOLUTIONS Paper is ...
... jamming. • There is working properly and print a job. the envelopes. POSSIBLE CAUSE SUGGESTED SOLUTIONS The machine is incorrect. Install the toner cartridge. • If a system error occurs, contact your Windows. If possible, attach the cable to another computer that all of only one . ... does not feed into the machine, the ADF rubber pad may cause some conditions that the machine is jammed during printing. Select Samsung CLX-3170 Series as the default printer. Clear the paper jam. (See "Tips for service Paper feeding CONDITION SUGGESTED SOLUTIONS Paper is ...

User Guide
Page 80
...SUGGESTED SOLUTIONS Light or faded print If a vertical white streak or faded area appears on page 67.) If necessary, replace the toner cartridge. CONDITION POSSIBLE CAUSE SUGGESTED SOLUTIONS The machine selects print materials from another computer and try a print job that you print a PDF file...may need cleaning. (See "Cleaning the inside" on page 37.) • The paper path may be reduced. Ensure that the toner cartridge needs cleaning. • The surface of graphics, text, or illustrations are missing. Exit Windows and reboot the computer. Printing quality problems If...
...SUGGESTED SOLUTIONS Light or faded print If a vertical white streak or faded area appears on page 67.) If necessary, replace the toner cartridge. CONDITION POSSIBLE CAUSE SUGGESTED SOLUTIONS The machine selects print materials from another computer and try a print job that you print a PDF file...may need cleaning. (See "Cleaning the inside" on page 37.) • The paper path may be reduced. Ensure that the toner cartridge needs cleaning. • The surface of graphics, text, or illustrations are missing. Exit Windows and reboot the computer. Printing quality problems If...


