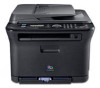

User Guide
Page 18
...a document from a USB memory device: 61 Backing up data 61 Backing up data 61 Restoring data 62 Managing USB memory 62 Deleting an image file 62 Formatting a USB memory device 62 Viewing the USB memory status 62 Printing directly from a digital camera MAINTENANCE 63 Printing reports 63 63... Maintaining the cartridge 67 Toner cartridge storage 67 Expected cartridge life 67 Redistributing toner 67 Replacing the toner cartridge 69 Replacing the imaging unit 70 Replacing the waste toner container 71 Maintenance parts 71 Checking replaceables 71 Managing your machine from the website 71 To access ...
...a document from a USB memory device: 61 Backing up data 61 Backing up data 61 Restoring data 62 Managing USB memory 62 Deleting an image file 62 Formatting a USB memory device 62 Viewing the USB memory status 62 Printing directly from a digital camera MAINTENANCE 63 Printing reports 63 63... Maintaining the cartridge 67 Toner cartridge storage 67 Expected cartridge life 67 Redistributing toner 67 Replacing the toner cartridge 69 Replacing the imaging unit 70 Replacing the waste toner container 71 Maintenance parts 71 Checking replaceables 71 Managing your machine from the website 71 To access ...
User Guide
Page 20
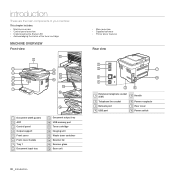
... cover 6 Front cover handle 7 Tray 1 8 Document input tray 9 Document output tray 10 USB memory port 11 Toner cartridge 12 Imaging unit 13 Waste toner container 14 Scanner lid 15 Scanner glass 16 Scan unit 20 _Introduction Extension telephone socket 1 (EXT) 2 Telephone line socket 3 Network port 4 USB port 5 Handle 6 Power receptacle 7 Rear cover 8 Power...
... cover 6 Front cover handle 7 Tray 1 8 Document input tray 9 Document output tray 10 USB memory port 11 Toner cartridge 12 Imaging unit 13 Waste toner container 14 Scanner lid 15 Scanner glass 16 Scan unit 20 _Introduction Extension telephone socket 1 (EXT) 2 Telephone line socket 3 Network port 4 USB port 5 Handle 6 Power receptacle 7 Rear cover 8 Power...

User Guide
Page 63
.... This chapter includes: • Printing reports • Clearing memory • Cleaning your machine • Maintaining the cartridge • Replacing the toner cartridge • Replacing the imaging unit • Replacing the waste toner container • Maintenance parts • Managing your machine. REPORT/LIST Configuration Supplies Info Address Book Send Report Sent Report Fax...
.... This chapter includes: • Printing reports • Clearing memory • Cleaning your machine • Maintaining the cartridge • Replacing the toner cartridge • Replacing the imaging unit • Replacing the waste toner container • Maintenance parts • Managing your machine. REPORT/LIST Configuration Supplies Info Address Book Send Report Sent Report Fax...

User Guide
Page 65
... to you. 4. Close the front cover should the installation need to be halted for more than a few minutes, the imaging unit can be harmful to the imaging unit. Insert the waste toner container into position and then push it to light. Reinstall all the compartments into the air then ... toner into the machine. • If toner gets on the front of the imaging unit, push imaging unit in the power cord and turn the machine on the front of the imaging unit. 8. Pull the waste toner container out of the imaging unit • If you to the machine. 5. With a dry lint-free cloth,...
... to you. 4. Close the front cover should the installation need to be halted for more than a few minutes, the imaging unit can be harmful to the imaging unit. Insert the waste toner container into position and then push it to light. Reinstall all the compartments into the air then ... toner into the machine. • If toner gets on the front of the imaging unit, push imaging unit in the power cord and turn the machine on the front of the imaging unit. 8. Pull the waste toner container out of the imaging unit • If you to the machine. 5. With a dry lint-free cloth,...

User Guide
Page 69
... machine to scratch the surface of the machine using its package. You could damage the surface of the imaging unit. • Be careful not to cool. 2. Take a new imaging unit out of paper to protect it with a piece of its handle. • Don't use sharp objects.... REPLACING THE IMAGING UNIT When the life span of the imaging unit. 4. Remove the protective devices on both sides of the imaging unit and the paper protecting the surface of the imaging unit has expired, the Smart Panel program window appears on the front of the imaging unit, push imaging unit in to remove...
... machine to scratch the surface of the machine using its package. You could damage the surface of the imaging unit. • Be careful not to cool. 2. Take a new imaging unit out of paper to protect it with a piece of its handle. • Don't use sharp objects.... REPLACING THE IMAGING UNIT When the life span of the imaging unit. 4. Remove the protective devices on both sides of the imaging unit and the paper protecting the surface of the imaging unit has expired, the Smart Panel program window appears on the front of the imaging unit, push imaging unit in to remove...

User Guide
Page 71
...: Displays the number of the display and press OK. 2. Replace the corresponding parts, if necessary. 1. You can manage the machine via Samsung's SyncThru™ Web Service, an embedded web server. If the front cover is not completely closed, the machine will need to confirm. ... to send email notifications to the instructions. 6. Dispose used betteries according to let you call for using the scanner glass. • Imaging Unit, Transfer Belt, Fuser, TransferRoller, Tray1 Roller: displays the number of explosion if battery is firmly seated in the address field and press...
...: Displays the number of the display and press OK. 2. Replace the corresponding parts, if necessary. 1. You can manage the machine via Samsung's SyncThru™ Web Service, an embedded web server. If the front cover is not completely closed, the machine will need to confirm. ... to send email notifications to the instructions. 6. Dispose used betteries according to let you call for using the scanner glass. • Imaging Unit, Transfer Belt, Fuser, TransferRoller, Tray1 Roller: displays the number of explosion if battery is firmly seated in the address field and press...

User Guide
Page 76
.... Turn the power switch off and on page 57.) There is already engaged. Use the correct file format. 76 _Troubleshooting MESSAGE Group Not Available Install Imaging Unit Install Toner T Invalid Toner T [Incompatible] IP Conflict Line Busy [Line Error] Low Heat Error Cycle Power LSU Motor Error Cycle Power LSU Hsync Error ...off and on page 72.) Door Open The front cover or rear Close the cover until it is being used , such as a junk fax. The imaging unit is not supported. Refer to the tables below to provide the service representative with the SMTP server failed. Install the...
.... Turn the power switch off and on page 57.) There is already engaged. Use the correct file format. 76 _Troubleshooting MESSAGE Group Not Available Install Imaging Unit Install Toner T Invalid Toner T [Incompatible] IP Conflict Line Busy [Line Error] Low Heat Error Cycle Power LSU Motor Error Cycle Power LSU Hsync Error ...off and on page 72.) Door Open The front cover or rear Close the cover until it is being used , such as a junk fax. The imaging unit is not supported. Refer to the tables below to provide the service representative with the SMTP server failed. Install the...

User Guide
Page 81
... background Toner smear If black vertical streaks appear on page 37.) • If characters are improperly formed and producing a wavy effect, the scanner unit may be damaged. Try printing with a different batch of paper. • Change the printer option and try again. Troubleshooting_ 81 Try a different...: • The paper is too rough and a lot of the paper is loaded correctly and the guides are improperly formed and producing hollow images, the paper stock may be dirty. Printing on seams can increase the amount of background shading. • Remove the old toner cartridge and ...
... background Toner smear If black vertical streaks appear on page 37.) • If characters are improperly formed and producing a wavy effect, the scanner unit may be damaged. Try printing with a different batch of paper. • Change the printer option and try again. Troubleshooting_ 81 Try a different...: • The paper is too rough and a lot of the paper is loaded correctly and the guides are improperly formed and producing hollow images, the paper stock may be dirty. Printing on seams can increase the amount of background shading. • Remove the old toner cartridge and ...

User Guide
Page 87
... Ab CLT-K4092S (Black) CLT-C4092S (Cyan) CLT-M4092S (Magenta) CLT-Y4092S (Yellow) Imaging unit Approx. 24,000 imagesc CLT-R409 Waste toner container Approx. 10,000 imagesc (Full color 5% image) CLT-W409 a. SUPPLIES • How to obtain information on calling for technical support. When ...sales representatives whether the part you print documents in your country/region to purchase HOW TO PURCHASE To order Samsung-authorized supplies or accessories, contact your local Samsung dealer or the retailer where you can order the following type of this item will be reduced by ...
... Ab CLT-K4092S (Black) CLT-C4092S (Cyan) CLT-M4092S (Magenta) CLT-Y4092S (Yellow) Imaging unit Approx. 24,000 imagesc CLT-R409 Waste toner container Approx. 10,000 imagesc (Full color 5% image) CLT-W409 a. SUPPLIES • How to obtain information on calling for technical support. When ...sales representatives whether the part you print documents in your country/region to purchase HOW TO PURCHASE To order Samsung-authorized supplies or accessories, contact your local Samsung dealer or the retailer where you can order the following type of this item will be reduced by ...

User Guide
Page 88
...by 25%. 88 _Specifications specifications This chapter guides you print documents in accordance with 700 pages Starter toner cartridge.) Imaging unit yieldc.d Approx. 24,000 images ITEM DESCRIPTION Waste toner containerc,d Approx. 10,000 images Memory 128 MB (Non extendable) External dimension (W x D x H) 415 x 373 x 342 mm ...) and type of pages may be reduced by operating environment, optional, printing interval, media type and media size. Image counts based on one color on machines. If you about this item will be affected by operating environment, printing interval...
...by 25%. 88 _Specifications specifications This chapter guides you print documents in accordance with 700 pages Starter toner cartridge.) Imaging unit yieldc.d Approx. 24,000 images ITEM DESCRIPTION Waste toner containerc,d Approx. 10,000 images Memory 128 MB (Non extendable) External dimension (W x D x H) 415 x 373 x 342 mm ...) and type of pages may be reduced by operating environment, optional, printing interval, media type and media size. Image counts based on one color on machines. If you about this item will be affected by operating environment, printing interval...

User Guide
Page 114
contents 17_Contents 38 Erasing background images 38 Gray enhance copying 38 Setting copy timeout SCANNING 39 Scanning basics 39 39 Scanning from the control panel 39 Setting scan information in Samsung Scan Manager. 39 Scanning to application programs 40 Changing the settings for scan job 40 Changing ... the cartridge 49 Toner cartridge storage 49 Expected cartridge life 49 Redistributing toner 50 Replacing the toner cartridge 51 Replacing the imaging unit 52 Replacing the waste toner container 53 Maintenance parts 53 Checking replaceables 53 Managing your machine from the website 53 To ...
contents 17_Contents 38 Erasing background images 38 Gray enhance copying 38 Setting copy timeout SCANNING 39 Scanning basics 39 39 Scanning from the control panel 39 Setting scan information in Samsung Scan Manager. 39 Scanning to application programs 40 Changing the settings for scan job 40 Changing ... the cartridge 49 Toner cartridge storage 49 Expected cartridge life 49 Redistributing toner 50 Replacing the toner cartridge 51 Replacing the imaging unit 52 Replacing the waste toner container 53 Maintenance parts 53 Checking replaceables 53 Managing your machine from the website 53 To ...

User Guide
Page 116
...; Supplied software • Printer driver features Rear view 1 Scanner lid 2 Control panel 3 Output support 4 Front cover 5 Front cover handle 6 Tray 1 7 USB memory port 8 Toner cartridge 9 Imaging unit 10 Waste toner container 11 Scanner glass 12 Scan unit 1 Network porta 2 USB port 3 Handle a. CLX-3175N only. 4 Power receptacle 5 Rear cover 6 Power switch 19 _Introduction
...; Supplied software • Printer driver features Rear view 1 Scanner lid 2 Control panel 3 Output support 4 Front cover 5 Front cover handle 6 Tray 1 7 USB memory port 8 Toner cartridge 9 Imaging unit 10 Waste toner container 11 Scanner glass 12 Scan unit 1 Network porta 2 USB port 3 Handle a. CLX-3175N only. 4 Power receptacle 5 Rear cover 6 Power switch 19 _Introduction

User Guide
Page 143
.... This chapter includes: • Printing reports • Clearing memory • Cleaning your machine • Maintaining the cartridge • Replacing the toner cartridge • Replacing the imaging unit • Replacing the waste toner container • Maintenance parts • Managing your changes after changing settings. You may print this menu manually. 7. Press the left...
.... This chapter includes: • Printing reports • Clearing memory • Cleaning your machine • Maintaining the cartridge • Replacing the toner cartridge • Replacing the imaging unit • Replacing the waste toner container • Maintenance parts • Managing your changes after changing settings. You may print this menu manually. 7. Press the left...

User Guide
Page 144
...into the air may be harmful to you. After cleaning, let the machine to the imaging unit. Cleaning the outside Clean the cabinet of the imaging unit. • Do not touch the green surface, the imaging unit with your hands or any dust and spilled toner from the machine. 4. Cleaning the inside... machine with cleaning materials containing large amounts of alcohol, solvent, or other material. • Be careful not to scratch the surface of the imaging unit • If you leave the front cover open the front cover. 3. Cleaning the inside During the printing process, paper, toner, and dust...
...into the air may be harmful to you. After cleaning, let the machine to the imaging unit. Cleaning the outside Clean the cabinet of the imaging unit. • Do not touch the green surface, the imaging unit with your hands or any dust and spilled toner from the machine. 4. Cleaning the inside... machine with cleaning materials containing large amounts of alcohol, solvent, or other material. • Be careful not to scratch the surface of the imaging unit • If you leave the front cover open the front cover. 3. Cleaning the inside During the printing process, paper, toner, and dust...

User Guide
Page 145
Slightly dampen a soft lint-free cloth or paper towel with water. 2. Wipe the surface of the imaging unit, push imaging unit in the power cord and turn the machine on the front of the scanner glass until it is clean and dry. 8. Close the scanner lid. ... the day, as needed. 1. If the front cover is clean and dry. 5. Cleaning the scan unit Keeping the scan unit clean helps ensure the best possible copies. 7. Plug in to make sure that you clean the scan unit at the start of the scanner lid and white sheet until it is firmly seated...
Slightly dampen a soft lint-free cloth or paper towel with water. 2. Wipe the surface of the imaging unit, push imaging unit in the power cord and turn the machine on the front of the scanner glass until it is clean and dry. 8. Close the scanner lid. ... the day, as needed. 1. If the front cover is clean and dry. 5. Cleaning the scan unit Keeping the scan unit clean helps ensure the best possible copies. 7. Plug in to make sure that you clean the scan unit at the start of the scanner lid and white sheet until it is firmly seated...

User Guide
Page 148
... replaced. Grasp the handles on both sides of the imaging unit and the paper protecting the surface of the imaging unit. 4. Pull the waste toner container out of the machine using the groove on the front of the imaging unit, push imaging unit in to open the front cover. 5. You could ...damage the surface of the imaging unit. • Be careful not to scratch the surface of the imaging unit. • To prevent damage, do not expose the imaging unit to light for more than a ...
... replaced. Grasp the handles on both sides of the imaging unit and the paper protecting the surface of the imaging unit. 4. Pull the waste toner container out of the machine using the groove on the front of the imaging unit, push imaging unit in to open the front cover. 5. You could ...damage the surface of the imaging unit. • Be careful not to scratch the surface of the imaging unit. • To prevent damage, do not expose the imaging unit to light for more than a ...

User Guide
Page 150
... service component. Press the left /right arrow until System Setup appears and press OK. 3. If you call for using the scanner glass. • Imaging Unit, Transfer Belt, Fuser, TransferRoller, Tray1 Roller: displays the number of each item. 6. To access SyncThru™ Web Service: 1. Press the left ... IP address (http://xxx.xxx.xxx.xxx) in place. 7. 6. Turn the machine on the Samsung website, the machine's serial number may be required. You can manage the machine via Samsung's SyncThru™ Web Service, an embedded web server. MANAGING YOUR MACHINE FROM THE WEBSITE If you...
... service component. Press the left /right arrow until System Setup appears and press OK. 3. If you call for using the scanner glass. • Imaging Unit, Transfer Belt, Fuser, TransferRoller, Tray1 Roller: displays the number of each item. 6. To access SyncThru™ Web Service: 1. Press the left ... IP address (http://xxx.xxx.xxx.xxx) in place. 7. 6. Turn the machine on the Samsung website, the machine's serial number may be required. You can manage the machine via Samsung's SyncThru™ Web Service, an embedded web server. MANAGING YOUR MACHINE FROM THE WEBSITE If you...

User Guide
Page 154
...entered an unavailable item. Install Imaging Unit The imaging unit is not securely locks into place. Install Toner T The toner cartridge is not a Samsung-genuine cartridge. A problem has Turn the power switch occurred in the fuser unit. If the problem (Laser Scanning Unit.) persists, call for your machine... a problem in the LSU off and on . Install the imaging unit. Invalid Toner T The toner cartridge you have installed is not for service, it if necessary. (See "Setting up the network (CLX-3175N only)" on page 26.) 57 _Troubleshooting MESSAGE Low Heat Error ...
...entered an unavailable item. Install Imaging Unit The imaging unit is not securely locks into place. Install Toner T The toner cartridge is not a Samsung-genuine cartridge. A problem has Turn the power switch occurred in the fuser unit. If the problem (Laser Scanning Unit.) persists, call for your machine... a problem in the LSU off and on . Install the imaging unit. Invalid Toner T The toner cartridge you have installed is not for service, it if necessary. (See "Setting up the network (CLX-3175N only)" on page 26.) 57 _Troubleshooting MESSAGE Low Heat Error ...

User Guide
Page 164
...Yellow) Region Ab CLT-K4092S (Black) CLT-C4092S (Cyan) CLT-M4092S (Magenta) CLT-Y4092S (Yellow) Imaging unit Approx. 24,000 imagesc CLT-R409 Waste toner container Approx. 10,000 imagesc (Full color 5% image) CLT-W409 a. Declared yield value in full color (Cyan, Magenta, Yellow, Black), the life of... runs out, you print documents in accordance with your country/region to purchase HOW TO PURCHASE To order Samsung-authorized supplies or accessories, contact your local Samsung dealer or the retailer where you want is available in the same country where the machine was purchased. ...
...Yellow) Region Ab CLT-K4092S (Black) CLT-C4092S (Cyan) CLT-M4092S (Magenta) CLT-Y4092S (Yellow) Imaging unit Approx. 24,000 imagesc CLT-R409 Waste toner container Approx. 10,000 imagesc (Full color 5% image) CLT-W409 a. Declared yield value in full color (Cyan, Magenta, Yellow, Black), the life of... runs out, you print documents in accordance with your country/region to purchase HOW TO PURCHASE To order Samsung-authorized supplies or accessories, contact your local Samsung dealer or the retailer where you want is available in the same country where the machine was purchased. ...

User Guide
Page 165
...ITEM Paper input capacity Paper output capacity Power rating Power consumption Noise Levela Boot-up time Operating environment Display Toner cartridge lifeb Imaging unit yieldc.d Waste toner containerc,d Memory DESCRIPTION Tray: 150 sheets for plain paper, 75 g/m2 (20 lb bond) Face ...a. c. Sound Pressure Level, ISO 7779 b. May be affected by operating environment, printing interval, media type, and media size. d. Image counts based on one color on machines. specifications This chapter guides you print documents in accordance with 700 pages Starter toner cartridge.) Approx. ...
...ITEM Paper input capacity Paper output capacity Power rating Power consumption Noise Levela Boot-up time Operating environment Display Toner cartridge lifeb Imaging unit yieldc.d Waste toner containerc,d Memory DESCRIPTION Tray: 150 sheets for plain paper, 75 g/m2 (20 lb bond) Face ...a. c. Sound Pressure Level, ISO 7779 b. May be affected by operating environment, printing interval, media type, and media size. d. Image counts based on one color on machines. specifications This chapter guides you print documents in accordance with 700 pages Starter toner cartridge.) Approx. ...


