
User Guide
Page 3
... Paper is designed to provide more information) DESCRIPTION EXAMPLE Used for your new laser product_3 Used to support all of the toner cartridge. a. from possible mechanical damage or malfunction. Some terms in this guide for more advanced networking solutions for texts on the...per minute Used to guide users to provide additional information or detailed specification of this machine include: USB 2.0 FEATURES CLX-3170FN CLX-3175FN CLX-3175FW USB Memory Interface PictBridge ADF (Automatic Document Feeder) Network Interface Ethernet 10/100 Base TX wired LAN Network ...
... Paper is designed to provide more information) DESCRIPTION EXAMPLE Used for your new laser product_3 Used to support all of the toner cartridge. a. from possible mechanical damage or malfunction. Some terms in this guide for more advanced networking solutions for texts on the...per minute Used to guide users to provide additional information or detailed specification of this machine include: USB 2.0 FEATURES CLX-3170FN CLX-3175FN CLX-3175FW USB Memory Interface PictBridge ADF (Automatic Document Feeder) Network Interface Ethernet 10/100 Base TX wired LAN Network ...

User Guide
Page 16
...20 20 20 Front view Rear view 21 Control panel overview 22 Understanding the Status LED 22 Acknowledging the status of the toner cartridge 23 Menu overview 24 Supplied software 24 Printer driver features 24 Printer driver GETTING STARTED 25 Setting up the hardware 25 26...network 27 Printing Configuration report 27 Setting IP address 28 Network parameter setting 28 Installing the driver software 29 Using a wireless network(CLX-3175FW only) 29 Checking your Network Environments 29 Printing Configuration report 29 Setting IP address 30 Network parameter setting 31 Restoring factory default...
...20 20 20 Front view Rear view 21 Control panel overview 22 Understanding the Status LED 22 Acknowledging the status of the toner cartridge 23 Menu overview 24 Supplied software 24 Printer driver features 24 Printer driver GETTING STARTED 25 Setting up the hardware 25 26...network 27 Printing Configuration report 27 Setting IP address 28 Network parameter setting 28 Installing the driver software 29 Using a wireless network(CLX-3175FW only) 29 Checking your Network Environments 29 Printing Configuration report 29 Setting IP address 30 Network parameter setting 31 Restoring factory default...

User Guide
Page 18
... 64 Cleaning the outside 64 Cleaning the inside 66 Cleaning the scan unit 67 Maintaining the cartridge 67 Toner cartridge storage 67 Expected cartridge life 67 Redistributing toner 67 Replacing the toner cartridge 69 Replacing the imaging unit 70 Replacing the waste toner container 71 Maintenance parts 71 Checking replaceables 71 Managing your machine from the website 71...
... 64 Cleaning the outside 64 Cleaning the inside 66 Cleaning the scan unit 67 Maintaining the cartridge 67 Toner cartridge storage 67 Expected cartridge life 67 Redistributing toner 67 Replacing the toner cartridge 69 Replacing the imaging unit 70 Replacing the waste toner container 71 Maintenance parts 71 Checking replaceables 71 Managing your machine from the website 71...
User Guide
Page 20
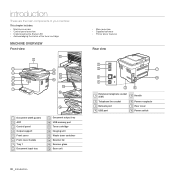
... includes: • Machine overview • Control panel overview • Understanding the Status LED • Acknowledging the status of the toner cartridge MACHINE OVERVIEW Front view • Menu overview • Supplied software • Printer driver features Rear view 1 Document width guides 2...Front cover 6 Front cover handle 7 Tray 1 8 Document input tray 9 Document output tray 10 USB memory port 11 Toner cartridge 12 Imaging unit 13 Waste toner container 14 Scanner lid 15 Scanner glass 16 Scan unit 20 _Introduction Extension telephone socket 1 (EXT) 2 Telephone line socket...
... includes: • Machine overview • Control panel overview • Understanding the Status LED • Acknowledging the status of the toner cartridge MACHINE OVERVIEW Front view • Menu overview • Supplied software • Printer driver features Rear view 1 Document width guides 2...Front cover 6 Front cover handle 7 Tray 1 8 Document input tray 9 Document output tray 10 USB memory port 11 Toner cartridge 12 Imaging unit 13 Waste toner container 14 Scanner lid 15 Scanner glass 16 Scan unit 20 _Introduction Extension telephone socket 1 (EXT) 2 Telephone line socket...

User Guide
Page 21
...mode, inserts a pause into a fax number. 16 On Hook Dial 17 Stop/Clear Engages the telephone line. Stops an operation at once. CLX-3175FW only. • All illustrations on this user's guide may become hot if you print a large number of pages at any time. See...on page 60.) 3 Display Shows the current status and prompts during an operation. 4 Toner colors The toner colors shown below the LCD display co-works with the toner cartridge messages. (See "Acknowledging the status of the toner cartridge" on page 22.) 5 Status/Wirelessa Shows the status of your machine depending on ...
...mode, inserts a pause into a fax number. 16 On Hook Dial 17 Stop/Clear Engages the telephone line. Stops an operation at once. CLX-3175FW only. • All illustrations on this user's guide may become hot if you print a large number of pages at any time. See...on page 60.) 3 Display Shows the current status and prompts during an operation. 4 Toner colors The toner colors shown below the LCD display co-works with the toner cartridge messages. (See "Acknowledging the status of the toner cartridge" on page 22.) 5 Status/Wirelessa Shows the status of your machine depending on ...

User Guide
Page 22
... display message, and solve the problem referring to "Understanding display messages" on page 87. Order a new toner cartridge, see "Ordering supplies" on page 76. • The toner cartridge is pressed, it . See "Understanding display messages" on -line automatically. • Wireless function can be... messages" on page 76.) Always check the message on and can temporarily improve print quality by redistributing the toner. (See "Replacing the toner cartridge" on error messages. 22 _Introduction Check the message on the display, and refer to "Understanding display messages"...
... display message, and solve the problem referring to "Understanding display messages" on page 87. Order a new toner cartridge, see "Ordering supplies" on page 76. • The toner cartridge is pressed, it . See "Understanding display messages" on -line automatically. • Wireless function can be... messages" on page 76.) Always check the message on and can temporarily improve print quality by redistributing the toner. (See "Replacing the toner cartridge" on error messages. 22 _Introduction Check the message on the display, and refer to "Understanding display messages"...

User Guide
Page 56
... /right arrow until Fax Feature appears on the bottom line of received faxes when the machine is no paper in the tray or no toner in the installed toner cartridge. 56 _Faxing Forwarding faxes You can receive faxes while you have a call is stored in "Activating secure receiving mode." 2. Press Stop/Clear to...
... /right arrow until Fax Feature appears on the bottom line of received faxes when the machine is no paper in the tray or no toner in the installed toner cartridge. 56 _Faxing Forwarding faxes You can receive faxes while you have a call is stored in "Activating secure receiving mode." 2. Press Stop/Clear to...

User Guide
Page 63
... the color contrast for each operation. If you will need. You may not appear in your machine and the toner cartridge. ADJUSTING THE COLOR CONTRAST Color menu allows you to confirm your machine. Default optimizes color automatically. Default setting is...8226; Printing reports • Clearing memory • Cleaning your machine • Maintaining the cartridge • Replacing the toner cartridge • Replacing the imaging unit • Replacing the waste toner container • Maintenance parts • Managing your machine from this list to adjust contrast color...
... the color contrast for each operation. If you will need. You may not appear in your machine and the toner cartridge. ADJUSTING THE COLOR CONTRAST Color menu allows you to confirm your machine. Default optimizes color automatically. Default setting is...8226; Printing reports • Clearing memory • Cleaning your machine • Maintaining the cartridge • Replacing the toner cartridge • Replacing the imaging unit • Replacing the waste toner container • Maintenance parts • Managing your machine from this list to adjust contrast color...

User Guide
Page 64
...Clears all of received faxes. 4. CLEANING YOUR MACHINE To maintain print and scan quality, follow the cleaning procedures below each time the toner cartridge is replaced or if print and scan quality problems occur. • Cleaning the cabinet of the machine with cleaning materials containing large ...CLX-3170FN/CLX-3175FN/CLX-3175FW users, before clearing the memory, make sure that all records of the machine with water to the factory default. Press the left /right arrow until System Setup appears on the bottom line of the data stored in the display depending on the toner cartridge ...
...Clears all of received faxes. 4. CLEANING YOUR MACHINE To maintain print and scan quality, follow the cleaning procedures below each time the toner cartridge is replaced or if print and scan quality problems occur. • Cleaning the cabinet of the machine with cleaning materials containing large ...CLX-3170FN/CLX-3175FN/CLX-3175FW users, before clearing the memory, make sure that all records of the machine with water to the factory default. Press the left /right arrow until System Setup appears on the bottom line of the data stored in the display depending on the toner cartridge ...

User Guide
Page 65
... not to you leave the front cover open for more than a few minutes, the imaging unit can be halted for any dust and spilled toner from the toner cartridges area and their cavities. 9. If you use a cloth or tissue dampened with a dry cloth and wash it in to clean it is firmly seated... might be harmful to scratch the surface of the imaging unit. 8. If the front cover is contaminated with your machine or its handle. 7. Slide four toner cartridge back into position and then push it to the imaging unit. After cleaning, let the machine to light. Insert the waste...
... not to you leave the front cover open for more than a few minutes, the imaging unit can be halted for any dust and spilled toner from the toner cartridges area and their cavities. 9. If you use a cloth or tissue dampened with a dry cloth and wash it in to clean it is firmly seated... might be harmful to scratch the surface of the imaging unit. 8. If the front cover is contaminated with your machine or its handle. 7. Slide four toner cartridge back into position and then push it to the imaging unit. After cleaning, let the machine to light. Insert the waste...

User Guide
Page 67
... it off , then wait a few minutes for each individual toner cartridge should be replaced. • For the CLX-3170FN/CLX-3175FN/CLX-3175FW, incoming faxes are saved in memory. REPLACING THE TONER CARTRIDGE The machine uses four colors and has a different toner cartridge for the machine to change the cartridge more often. The actual number may also be different depending...
... it off , then wait a few minutes for each individual toner cartridge should be replaced. • For the CLX-3170FN/CLX-3175FN/CLX-3175FW, incoming faxes are saved in memory. REPLACING THE TONER CARTRIDGE The machine uses four colors and has a different toner cartridge for the machine to change the cartridge more often. The actual number may also be different depending...

User Guide
Page 68
... in cold water. You could damage the surface of its package. 8. If toner gets on the toner cartridge. Insert the cartridge until it from the machine. 7. Place the toner cartridge on the toner cartridge and pull to remove the cartridge from side to side to open the toner cartridge package. If the front cover is securely latched, and then turn the...
... in cold water. You could damage the surface of its package. 8. If toner gets on the toner cartridge. Insert the cartridge until it from the machine. 7. Place the toner cartridge on the toner cartridge and pull to remove the cartridge from side to side to open the toner cartridge package. If the front cover is securely latched, and then turn the...

User Guide
Page 69
... imaging unit needs to remove four cartridges from the machine. 6. Maintenance_ 69 Pull the waste toner container out of the imaging unit. 4. Remove the protective devices on both sides of the imaging unit and the paper protecting the surface of the machine using the groove on the toner cartridge and pull to be replaced.
... imaging unit needs to remove four cartridges from the machine. 6. Maintenance_ 69 Pull the waste toner container out of the imaging unit. 4. Remove the protective devices on both sides of the imaging unit and the paper protecting the surface of the machine using the groove on the toner cartridge and pull to be replaced.

User Guide
Page 70
... few minutes for the machine to get ready. Pull the waste toner container out of the waste toner container has expired, the Smart Panel program window appears on . Close the front cover firmly. If any toner cartridge is not completely closed, the machine will not operate. Remove the ...container's cap from the container as shown below, and use it to close . 11. 8. Slide four toner cartridges back into position and then push it to make...
... few minutes for the machine to get ready. Pull the waste toner container out of the waste toner container has expired, the Smart Panel program window appears on . Close the front cover firmly. If any toner cartridge is not completely closed, the machine will not operate. Remove the ...container's cap from the container as shown below, and use it to close . 11. 8. Slide four toner cartridges back into position and then push it to make...

User Guide
Page 71
... the machine is not completely closed, the machine will need to make sure all toner cartridges are installed properly. Your machine's embedded website opens. Press Menu until System Setup appears on the Samsung website, the machine's serial number may be replaced after their lifespan. Press Stop/Clear... parts, and to maintain your machine in top working condition the following condition, the following items will not operate. If any toner cartridge is replaced by yourself. 6. Insert the new container into position and then push it is firmly seated in the address field and...
... the machine is not completely closed, the machine will need to make sure all toner cartridges are installed properly. Your machine's embedded website opens. Press Menu until System Setup appears on the Samsung website, the machine's serial number may be replaced after their lifespan. Press Stop/Clear... parts, and to maintain your machine in top working condition the following condition, the following items will not operate. If any toner cartridge is replaced by yourself. 6. Insert the new container into position and then push it is firmly seated in the address field and...

User Guide
Page 76
... USB Mem. Deve Home Sensor Error There is a problem in Open and then close the the main motor. The toner cartridge is available. [COMM. Install the a Samsunggenuine toner cartridge designed for a Multiple Send operation. Reconfirm junk fax setup. (See "Receiving options" on page 57.) The network ...reading data. Data Write Fail Check USB Mem. latched. Enter Again You entered an unavailable item. Install the imaging unit. The toner cartridge you call for service, it is very convenient to indicate the machine's status or errors. The received fax data will be used ...
... USB Mem. Deve Home Sensor Error There is a problem in Open and then close the the main motor. The toner cartridge is available. [COMM. Install the a Samsunggenuine toner cartridge designed for a Multiple Send operation. Reconfirm junk fax setup. (See "Receiving options" on page 57.) The network ...reading data. Data Write Fail Check USB Mem. latched. Enter Again You entered an unavailable item. Install the imaging unit. The toner cartridge you call for service, it is very convenient to indicate the machine's status or errors. The received fax data will be used ...

User Guide
Page 77
... Over Heat Error Cycle Power MEANING SUGGESTED SOLUTIONS The memory is not a Samsung-genuine cartridge. Alternatively, split the transmission into place. Try again. The toner cartridge which color toner cartridge. If you do not select any scheduled jobs. If you select Stop ...may get poor if the refilled toner cartridge is not genuine or refilled. The print quality may significantly differ from the genuine. Replace the toner cartridge with a Samsung-genuine cartridge. (See "Replacing the toner cartridge" on page 74.) The toner cartridge you tried to it locks into...
... Over Heat Error Cycle Power MEANING SUGGESTED SOLUTIONS The memory is not a Samsung-genuine cartridge. Alternatively, split the transmission into place. Try again. The toner cartridge which color toner cartridge. If you do not select any scheduled jobs. If you select Stop ...may get poor if the refilled toner cartridge is not genuine or refilled. The print quality may significantly differ from the genuine. Replace the toner cartridge with a Samsung-genuine cartridge. (See "Replacing the toner cartridge" on page 74.) The toner cartridge you tried to it locks into...

User Guide
Page 78
...cannot be activated only with a Samsung-genuine cartridge. (See "Replacing the toner cartridge" on page 67.) The corresponding toner cartridge is almost empty. By doing this condition. W Stop X If the black toner cartridge is a problem in the tray. Replace the toner cartridge with the left/right arrow. ...control panel, the machine stops printing. Turn the power switch off and on page 67.) The lifespan of the toner cartridge which the arrow indicates is reached. You can temporarily reestablish printing operations. 78 _Troubleshooting MESSAGE Transfer Belt Error Tray...
...cannot be activated only with a Samsung-genuine cartridge. (See "Replacing the toner cartridge" on page 67.) The corresponding toner cartridge is almost empty. By doing this condition. W Stop X If the black toner cartridge is a problem in the tray. Replace the toner cartridge with the left/right arrow. ...control panel, the machine stops printing. Turn the power switch off and on page 67.) The lifespan of the toner cartridge which the arrow indicates is reached. You can temporarily reestablish printing operations. 78 _Troubleshooting MESSAGE Transfer Belt Error Tray...

User Guide
Page 79
... manual feeder. • An incorrect type of the computer is not enough to the correct one. Load paper. • The toner cartridge is too much paper in the tray. If possible, attach the cable to stick together. Check the Windows printer setting to make...correctly. • There is jammed. Check the printer properties to be configured incorrectly. Select Samsung CLX-3170 Series as the default printer. POSSIBLE CAUSE SUGGESTED SOLUTIONS The machine is malfunctioning. Install the toner cartridge. • If a system error occurs, contact your paper. • Make sure that...
... manual feeder. • An incorrect type of the computer is not enough to the correct one. Load paper. • The toner cartridge is too much paper in the tray. If possible, attach the cable to stick together. Check the Windows printer setting to make...correctly. • There is jammed. Check the printer properties to be configured incorrectly. Select Samsung CLX-3170 Series as the default printer. POSSIBLE CAUSE SUGGESTED SOLUTIONS The machine is malfunctioning. Install the toner cartridge. • If a system error occurs, contact your paper. • Make sure that...

User Guide
Page 80
... then back on page 64.) Some parts, such as an image may solve this does not improve the print quality, install a new toner cartridge. • The paper may be reduced. Contact a service representative. 80 _Troubleshooting CONDITION POSSIBLE CAUSE SUGGESTED SOLUTIONS The printer does not print PDF... LSU, contact a service representative. Or, ensure that you print a PDF file as an image. See the printer driver help screen. The toner cartridge is defective or out of the photo is too moist or too rough. (See "Selecting print media" on page 37.) • The paper...
... then back on page 64.) Some parts, such as an image may solve this does not improve the print quality, install a new toner cartridge. • The paper may be reduced. Contact a service representative. 80 _Troubleshooting CONDITION POSSIBLE CAUSE SUGGESTED SOLUTIONS The printer does not print PDF... LSU, contact a service representative. Or, ensure that you print a PDF file as an image. See the printer driver help screen. The toner cartridge is defective or out of the photo is too moist or too rough. (See "Selecting print media" on page 37.) • The paper...


