
User Manual (user Manual) (ver.1.0) (English)
Page 3
... 11 Antennas with 300-ohm Flat Twin Leads 11 Antennas with 75-ohm Round Leads 12 Separate VHF and UHF Antennas 12 Connecting Cable TV 13 Cable without a Cable Box 13 Connecting to a Cable Box that Descrambles All Channels ...........13 Connecting to a Cable Box that Descrambles... Some Channels .......14 Connecting a VCR 15 Connecting a Second VCR to Record from the TV 15 Connecting a DVD Player 16 Connecting to Y, PB, PR 16 Connecting to Regular Audio and Video Jacks 16 Connecting a Camcorder 17 Connecting to...
... 11 Antennas with 300-ohm Flat Twin Leads 11 Antennas with 75-ohm Round Leads 12 Separate VHF and UHF Antennas 12 Connecting Cable TV 13 Cable without a Cable Box 13 Connecting to a Cable Box that Descrambles All Channels ...........13 Connecting to a Cable Box that Descrambles... Some Channels .......14 Connecting a VCR 15 Connecting a Second VCR to Record from the TV 15 Connecting a DVD Player 16 Connecting to Y, PB, PR 16 Connecting to Regular Audio and Video Jacks 16 Connecting a Camcorder 17 Connecting to...
User Manual (user Manual) (ver.1.0) (English)
Page 4
... Screen Mode 54 Setting the On/Off Melody 55 Viewing the Demonstration 56 Chapter 5: Troubleshooting 57 Identifying Problems 57 Appendix 58 Cleaning and Maintaining Your TV 58 Using Your TV in Another Country 58 Specifications 58 English - 4
... Screen Mode 54 Setting the On/Off Melody 55 Viewing the Demonstration 56 Chapter 5: Troubleshooting 57 Identifying Problems 57 Appendix 58 Cleaning and Maintaining Your TV 58 Using Your TV in Another Country 58 Specifications 58 English - 4
User Manual (user Manual) (ver.1.0) (English)
Page 5
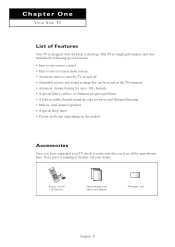
...designed with the latest technology. Remote Control/ AAA Batteries Owner's Instructions/ Safety Guide Manual Warranty Card English - 5 Chapter One YOUR NEW TV List of Features Your TV is a high-performance unit that includes the following special features: • Easy-to-use remote control • Easy-to-use on-screen... menu system • Automatic timer to turn the TV on and off • Adjustable picture and sound settings that you have unpacked your dealer. If any piece is missing or broken, call your...
...designed with the latest technology. Remote Control/ AAA Batteries Owner's Instructions/ Safety Guide Manual Warranty Card English - 5 Chapter One YOUR NEW TV List of Features Your TV is a high-performance unit that includes the following special features: • Easy-to-use remote control • Easy-to-use on-screen... menu system • Automatic timer to turn the TV on and off • Adjustable picture and sound settings that you have unpacked your dealer. If any piece is missing or broken, call your...

User Manual (user Manual) (ver.1.0) (English)
Page 6
..."On" position after setting the clock and either the On timer or Off timer, with the TV Control Buttons You can control your TV's features. ´ - Also used to select items on the on the TV. Power Off ; Red - This indicator illuminates when the TIMER mode is turned on and off...control towards this indicator stays lit. (Clock must use the more advanced features, you turn the TV on , the TIMER indicator blinks five times. Power On ; Off • TIMER ; YOUR NEW TV Familiarizing Yourself with the remote control. To use the remote control. CL21M6 CL29M16 CL21M2/CL25M2/CL29M2/...
..."On" position after setting the clock and either the On timer or Off timer, with the TV Control Buttons You can control your TV's features. ´ - Also used to select items on the on the TV. Power Off ; Red - This indicator illuminates when the TIMER mode is turned on and off...control towards this indicator stays lit. (Clock must use the more advanced features, you turn the TV on , the TIMER indicator blinks five times. Power On ; Off • TIMER ; YOUR NEW TV Familiarizing Yourself with the remote control. To use the remote control. CL21M6 CL29M16 CL21M2/CL25M2/CL29M2/...
User Manual (user Manual) (ver.1.0) (English)
Page 7
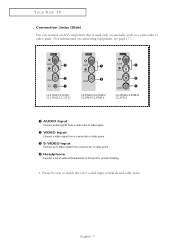
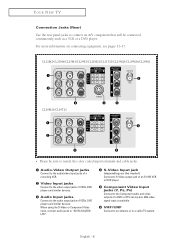
English - 7 YOUR NEW TV Connection Jacks (Side) You can connect an A/V component that is used only occasionally, such as a camcorder or video game. (For information on connecting equipment, see ...
English - 7 YOUR NEW TV Connection Jacks (Side) You can connect an A/V component that is used only occasionally, such as a camcorder or video game. (For information on connecting equipment, see ...
User Manual (user Manual) (ver.1.0) (English)
Page 8
...~17. CL21M2/CL21M6/CL25M2/CL29K5/CL21M21/CL21T21/CL25M21/CL29M16/CL29M2 CL29M21/CL29T21 • Please be connected continuously, such as a VCR or a DVD player. YOUR NEW TV Connection Jacks (Rear) Use the rear panel jacks to connect an A/V component that will be sure to match the color coded input terminals and cable... output jacks of a DVD or DTV set-top box. 480i video signal input is available. Ø VHF/UHF Connect to an antenna or to a cable TV system.
...~17. CL21M2/CL21M6/CL25M2/CL29K5/CL21M21/CL21T21/CL25M21/CL29M16/CL29M2 CL29M21/CL29T21 • Please be connected continuously, such as a VCR or a DVD player. YOUR NEW TV Connection Jacks (Rear) Use the rear panel jacks to connect an A/V component that will be sure to match the color coded input terminals and cable... output jacks of a DVD or DTV set-top box. 480i video signal input is available. Ø VHF/UHF Connect to an antenna or to a cable TV system.
User Manual (user Manual) (ver.1.0) (English)
Page 9
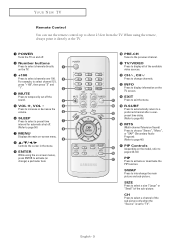
... Press to display all of the available video sources. CH , CH Press to change channels. Ò INFO Press to display information on the TV screen. Ú EXIT Press to exit the menu. Æ R.SURF Press to automatically return to a preferred channel after a userpreset time delay. (Refer to page 45)... MUTE Press to interchange the main picture and sub-picture. SWAP Press to temporarily cut off . (Refer to about 23 feet from the TV. English - 9 YOUR NEW TV Remote Control You can use the remote control up to page 50) ∏ MENU Displays the main on-screen menu. Press to increase ...
... Press to display all of the available video sources. CH , CH Press to change channels. Ò INFO Press to display information on the TV screen. Ú EXIT Press to exit the menu. Æ R.SURF Press to automatically return to a preferred channel after a userpreset time delay. (Refer to page 45)... MUTE Press to interchange the main picture and sub-picture. SWAP Press to temporarily cut off . (Refer to about 23 feet from the TV. English - 9 YOUR NEW TV Remote Control You can use the remote control up to page 50) ∏ MENU Displays the main on-screen menu. Press to increase ...
User Manual (user Manual) (ver.1.0) (English)
Page 10
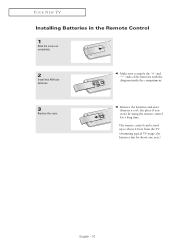
YOUR NEW TV Installing Batteries in the Remote Control 1 Slide the cover out completely. 2 Install two AAA size batteries. œ Make sure to match the "+" and "-" ends of the batteries with the diagram inside the compartment. 3 Replace the cover. œ Remove the batteries and store them in a cool, dry place if you won't be used up to about one year.) English - 10 The remote control can be using the remote control for about 23 feet from the TV. (Assuming typical TV usage, the batteries last for a long time.
YOUR NEW TV Installing Batteries in the Remote Control 1 Slide the cover out completely. 2 Install two AAA size batteries. œ Make sure to match the "+" and "-" ends of the batteries with the diagram inside the compartment. 3 Replace the cover. œ Remove the batteries and store them in a cool, dry place if you won't be used up to about one year.) English - 10 The remote control can be using the remote control for about 23 feet from the TV. (Assuming typical TV usage, the batteries last for a long time.
User Manual (user Manual) (ver.1.0) (English)
Page 12
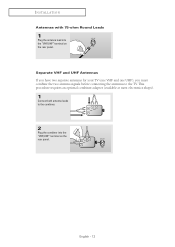
INSTALLATION Antennas with 75-ohm Round Leads 1 Plug the antenna lead into the "VHF/UHF" terminal on the rear panel. Separate VHF and UHF Antennas If you have two separate antennas for your TV (one VHF and one UHF), you must combine the two antenna signals before connecting the antennas to the combiner. 2 Plug the combiner into the "VHF/UHF" terminal on the rear panel. This procedure requires an optional combiner-adaptor (available at most electronics shops). 1 Connect both antenna leads to the TV. English - 12
INSTALLATION Antennas with 75-ohm Round Leads 1 Plug the antenna lead into the "VHF/UHF" terminal on the rear panel. Separate VHF and UHF Antennas If you have two separate antennas for your TV (one VHF and one UHF), you must combine the two antenna signals before connecting the antennas to the combiner. 2 Plug the combiner into the "VHF/UHF" terminal on the rear panel. This procedure requires an optional combiner-adaptor (available at most electronics shops). 1 Connect both antenna leads to the TV. English - 12

User Manual (user Manual) (ver.1.0) (English)
Page 13
English - 13 INSTALLATION Connecting Cable TV To connect to the "VHF/UHF" terminal on the rear panel. Connecting to a Cable Box that Descrambles All Channels 1 Find the cable that is connected to the ANTENNA OUT terminal on the rear panel. Cable without a Cable Box 1 Plug the incoming cable into the "VHF/UHF" terminal on your cable box. œ This terminal might be labelled "ANT OUT", "VHF OUT" or simply, "OUT". 2 Connect the other end of this cable to a cable TV system, follow the instructions below.
English - 13 INSTALLATION Connecting Cable TV To connect to the "VHF/UHF" terminal on the rear panel. Connecting to a Cable Box that Descrambles All Channels 1 Find the cable that is connected to the ANTENNA OUT terminal on the rear panel. Cable without a Cable Box 1 Plug the incoming cable into the "VHF/UHF" terminal on your cable box. œ This terminal might be labelled "ANT OUT", "VHF OUT" or simply, "OUT". 2 Connect the other end of this cable to a cable TV system, follow the instructions below.

User Manual (user Manual) (ver.1.0) (English)
Page 14
...; This terminal might be labelled "ANT IN", "VHF IN" or simply, "IN". 2 Connect this connection, set the A/B switch to "B", you will need to tune your TV to the cable box's output channel, which is usually channel 3 or 4.) English - 14 Connect a coaxial cable between the ANTENNA OUT terminal on the cable box... Some Channels If your cable box descrambles only some channels (such as premium channels), follow the instructions below. Incoming Cable Splitter Cable Box RF (A/B) Switch TV Rear After you've made this cable to a twoway splitter.
...; This terminal might be labelled "ANT IN", "VHF IN" or simply, "IN". 2 Connect this connection, set the A/B switch to "B", you will need to tune your TV to the cable box's output channel, which is usually channel 3 or 4.) English - 14 Connect a coaxial cable between the ANTENNA OUT terminal on the cable box... Some Channels If your cable box descrambles only some channels (such as premium channels), follow the instructions below. Incoming Cable Splitter Cable Box RF (A/B) Switch TV Rear After you've made this cable to a twoway splitter.
User Manual (user Manual) (ver.1.0) (English)
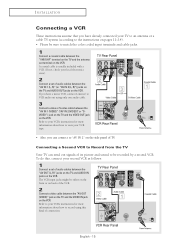
Page 15
...• Please be sure to match the color coded input terminals and cable jacks. 1 Connect a coaxial cable between the "AV OUT 2 (VIDEO)" jack on the TV and the VIDEO IN jack 1 on the VCR. Refer to your second VCR as follows: 1 Connect a set of connection. To do this kind of audio... cables between the "AV IN 1 (L, R)" (or "AV IN 2 (L, R)") jacks on the TV and AUDIO OUT jacks on the VCR. 3 1 If you have a mono VCR, connect L(mono) to VCR audio out using this , connect your VCR's instructions for...
...• Please be sure to match the color coded input terminals and cable jacks. 1 Connect a coaxial cable between the "AV OUT 2 (VIDEO)" jack on the TV and the VIDEO IN jack 1 on the VCR. Refer to your second VCR as follows: 1 Connect a set of connection. To do this kind of audio... cables between the "AV IN 1 (L, R)" (or "AV IN 2 (L, R)") jacks on the TV and AUDIO OUT jacks on the VCR. 3 1 If you have a mono VCR, connect L(mono) to VCR audio out using this , connect your VCR's instructions for...

User Manual (user Manual) (ver.1.0) (English)
Page 16
... the AUDIO OUT jacks on the DVD player. 2 Connect a video cable between the "AV IN 1 (VIDEO)" (or "AV IN 2 (VIDEO)") jack on the TV and the VIDEO OUT jack on the DVD player. 1 2 • Also, you can connect to Y, PB, PR 1 Connect a set of audio cables between the "AV ...IN 2 (L, R)" jacks on the TV and the AUDIO OUT jacks on the DVD player. 2 Connect a set of video cables between the "COMPONENT IN (Y, PB, PR)" jacks on the...
... the AUDIO OUT jacks on the DVD player. 2 Connect a video cable between the "AV IN 1 (VIDEO)" (or "AV IN 2 (VIDEO)") jack on the TV and the VIDEO OUT jack on the DVD player. 1 2 • Also, you can connect to Y, PB, PR 1 Connect a set of audio cables between the "AV ...IN 2 (L, R)" jacks on the TV and the AUDIO OUT jacks on the DVD player. 2 Connect a set of video cables between the "COMPONENT IN (Y, PB, PR)" jacks on the...

User Manual (user Manual) (ver.1.0) (English)
Page 17
... found on the side or rear of the Camcorder. 2 Connect a set of audio cables between the "AV IN 2 (VIDEO)"or "S-VIEDO" jack on the TV and the VIDEO OUT jacks on the Camcorder. 2 3 The audio-video cables shown here are usually included with the Amplifier's volume control. Connecting to an... sure to view the Camcorder tapes without using only one audio cable. 3 Connect a video or S-video cable between the "AV IN 2 (L, R)" jacks on the TV and the AUDIO OUT jacks on the Camcorder. When an audio amplifier is stereo, you to match the color coded input terminals and cable jacks...
... found on the side or rear of the Camcorder. 2 Connect a set of audio cables between the "AV IN 2 (VIDEO)"or "S-VIEDO" jack on the TV and the VIDEO OUT jacks on the Camcorder. 2 3 The audio-video cables shown here are usually included with the Amplifier's volume control. Connecting to an... sure to view the Camcorder tapes without using only one audio cable. 3 Connect a video or S-video cable between the "AV IN 2 (L, R)" jacks on the TV and the AUDIO OUT jacks on the Camcorder. When an audio amplifier is stereo, you to match the color coded input terminals and cable jacks...

User Manual (user Manual) (ver.1.0) (English)
Page 18
... ... Press the ENTER button, then the "Language" is displayed. is displayed. OK Enter Skip English - 18 Plug & Play Feature When the TV is displayed. Press the ENTER button, then the "Auto Program" is initially powered On, basic customer settings proceed automatically and subsequently: Setting the language... & Play function operates after plugging in the AV mode. œ Even if ENTER button is displayed. or † button to the TV. Plug & Play Language English Español Português Français Move Enter Skip 3 Make sure that the antenna is connected to...
... ... Press the ENTER button, then the "Language" is displayed. is displayed. OK Enter Skip English - 18 Plug & Play Feature When the TV is displayed. Press the ENTER button, then the "Auto Program" is initially powered On, basic customer settings proceed automatically and subsequently: Setting the language... & Play function operates after plugging in the AV mode. œ Even if ENTER button is displayed. or † button to the TV. Plug & Play Language English Español Português Français Move Enter Skip 3 Make sure that the antenna is connected to...

User Manual (user Manual) (ver.1.0) (English)
Page 19
The TV begins memorizing all available channels are stored, the "Clock Set" is Move Enter Return selected. (3) Press the ENTER button. Press the œ or √ button ...
The TV begins memorizing all available channels are stored, the "Clock Set" is Move Enter Return selected. (3) Press the ENTER button. Press the œ or √ button ...
User Manual (user Manual) (ver.1.0) (English)
Page 20
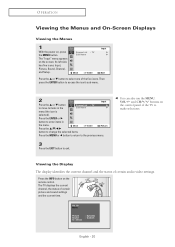
... the MENU button. Then press the ENTER button to access the icon's sub-menu. 2 Input Press the ▲ or ▼ button Source List : TV √ to move to enter items in the Edit Name √ menu (the icon is selected). Viewing the Display The display identifies the current channel... and the status of the TV to exit. œ You can also use the MENU, VOL+/- OPERATION Viewing the Menus and On-Screen Displays Viewing the Menus 1 With the...
... the MENU button. Then press the ENTER button to access the icon's sub-menu. 2 Input Press the ▲ or ▼ button Source List : TV √ to move to enter items in the Edit Name √ menu (the icon is selected). Viewing the Display The display identifies the current channel... and the status of the TV to exit. œ You can also use the MENU, VOL+/- OPERATION Viewing the Menus and On-Screen Displays Viewing the Menus 1 With the...
User Manual (user Manual) (ver.1.0) (English)
Page 22
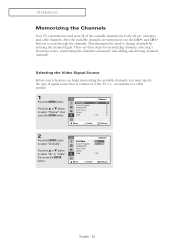
... the ENTER button. Selecting the Video Signal Source Before your television can memorize and store all of signal source that is connected to the TV (i.e., an antenna or a cable system). 1 Press the MENU button. Press the ▲ or ▼ button to change channels by... - 22 After the available channels are three steps for both "off-air" (antenna) and cable channels. OPERATION Memorizing the Channels Your TV can begin memorizing the available channels, you must specify the type of the available channels for memorizing channels: selecting a broadcast source, memorizing ...
... the ENTER button. Selecting the Video Signal Source Before your television can memorize and store all of signal source that is connected to the TV (i.e., an antenna or a cable system). 1 Press the MENU button. Press the ▲ or ▼ button to change channels by... - 22 After the available channels are three steps for both "off-air" (antenna) and cable channels. OPERATION Memorizing the Channels Your TV can begin memorizing the available channels, you must specify the type of the available channels for memorizing channels: selecting a broadcast source, memorizing ...
User Manual (user Manual) (ver.1.0) (English)
Page 23
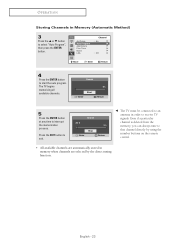
Search Enter Start 0% Return 5 Press the ENTER button at any time to receive TV signals. Search Air 3 3% Enter Stop Return œ The TV must be connected to an antenna in order to interrupt the memorization process. English - 23 Even if a particular channel is deleted from the memory, you ... to select "Auto Program", then press the ENTER button. OPERATION Storing Channels in Memory (Automatic Method) 3 Press the ▲ or ▼ button to exit. The TV begins memorizing all available channels.
Search Enter Start 0% Return 5 Press the ENTER button at any time to receive TV signals. Search Air 3 3% Enter Stop Return œ The TV must be connected to an antenna in order to interrupt the memorization process. English - 23 Even if a particular channel is deleted from the memory, you ... to select "Auto Program", then press the ENTER button. OPERATION Storing Channels in Memory (Automatic Method) 3 Press the ▲ or ▼ button to exit. The TV begins memorizing all available channels.
User Manual (user Manual) (ver.1.0) (English)
Page 25
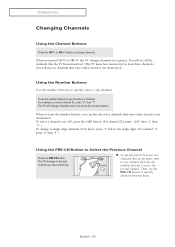
... to select the second channel. You will see channels that were either erased or not memorized. The TV will not see all the channels that the TV has memorized. (The TV must have memorized at least three channels.) You will change channels when you can directly select channels that... that were either erased or not memorized. When you were watching. œ To quickly switch between them. The TV changes to the last channel you press CH or CH , the TV changes channels in sequence. For example, to select channel 27, press "2" then "7". OPERATION Changing Channels Using the...
... to select the second channel. You will see channels that were either erased or not memorized. The TV will not see all the channels that the TV has memorized. (The TV must have memorized at least three channels.) You will change channels when you can directly select channels that... that were either erased or not memorized. When you were watching. œ To quickly switch between them. The TV changes to the last channel you press CH or CH , the TV changes channels in sequence. For example, to select channel 27, press "2" then "7". OPERATION Changing Channels Using the...


