

Open Source Guide (ENGLISH)
Page 1
... of this service if you wish), that you cannot distribute so as separate works. It is made by offering access to copy from a designated place, then offering equivalent access to copy the source code from time to time. BECAUSE THE PROGRAM IS LICENSED FREE OF CHARGE, THERE IS NO WARRANTY FOR THE PROGRAM, TO THE EXTENT PERMITTED BY APPLICABLE LAW. GPL software: Linux...
... of this service if you wish), that you cannot distribute so as separate works. It is made by offering access to copy from a designated place, then offering equivalent access to copy the source code from time to time. BECAUSE THE PROGRAM IS LICENSED FREE OF CHARGE, THERE IS NO WARRANTY FOR THE PROGRAM, TO THE EXTENT PERMITTED BY APPLICABLE LAW. GPL software: Linux...

Open Source Guide (ENGLISH)
Page 2
...a new library, and you want it to be of the greatest possible use to the public, we recommend making it free software that everyone can do so by permitting redistribution under these terms, attach the... the terms of warranty; and each file should have at least the "copyright" line and a pointer to where the full notice is safest to attach them to the start of each source file to the ...A FAILURE OF THE LIBRARY TO OPERATE WITH ANY OTHER SOFTWARE), EVEN IF SUCH HOLDER OR OTHER PARTY HAS BEEN ADVISED OF THE POSSIBILITY OF SUCH DAMAGES. It is found. You can redistribute and change. 16.
...a new library, and you want it to be of the greatest possible use to the public, we recommend making it free software that everyone can do so by permitting redistribution under these terms, attach the... the terms of warranty; and each file should have at least the "copyright" line and a pointer to where the full notice is safest to attach them to the start of each source file to the ...A FAILURE OF THE LIBRARY TO OPERATE WITH ANY OTHER SOFTWARE), EVEN IF SUCH HOLDER OR OTHER PARTY HAS BEEN ADVISED OF THE POSSIBILITY OF SUCH DAMAGES. It is found. You can redistribute and change. 16.
User Manual (user Manual) (ver.1.0) (English)
Page 3
...-Screen Displays 20 Viewing the Menus 20 Viewing the Display 20 Selecting a Menu Language 21 Memorizing the Channels 22 Selecting the Video Signal Source 22 Storing Channels in Memory (Automatic Method 23 Adding and Erasing Channels 24 Changing Channels 25 Using the Channel Buttons 25 Using the Number Buttons 25 Using the PRE-CH Button to Select the Previous Channel 25 Labelling the Channels 26 Picture Control 27 Using Automatic Picture Settings 27 Customizing the Picture 28 Resetting the Picture Settings to the Factory Defaults...
...-Screen Displays 20 Viewing the Menus 20 Viewing the Display 20 Selecting a Menu Language 21 Memorizing the Channels 22 Selecting the Video Signal Source 22 Storing Channels in Memory (Automatic Method 23 Adding and Erasing Channels 24 Changing Channels 25 Using the Channel Buttons 25 Using the Number Buttons 25 Using the PRE-CH Button to Select the Previous Channel 25 Labelling the Channels 26 Picture Control 27 Using Automatic Picture Settings 27 Customizing the Picture 28 Resetting the Picture Settings to the Factory Defaults...
User Manual (user Manual) (ver.1.0) (English)
Page 4
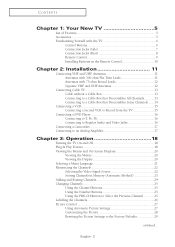
CONTENTS Chapter 3: Operation 30 Sound Control 30 Adjusting the Volume 30 Using the MUTE Button 30 Using Automatic Sound Settings 31 Customizing the Sound 32 Setting the Clock 33 Viewing an External Signal Source 34 Setting the Signal Source 34 Assigning Names to External Input Mode 35 Chapter 4: Special Features 36 Fine Tuning Channels 36 Changing the Screen Size 37 LNA (Low Noise Amplifier) (depending on the model 38 Digital Noise Reduction 39 Tilt (depending on the model 40 DNIe...
CONTENTS Chapter 3: Operation 30 Sound Control 30 Adjusting the Volume 30 Using the MUTE Button 30 Using Automatic Sound Settings 31 Customizing the Sound 32 Setting the Clock 33 Viewing an External Signal Source 34 Setting the Signal Source 34 Assigning Names to External Input Mode 35 Chapter 4: Special Features 36 Fine Tuning Channels 36 Changing the Screen Size 37 LNA (Low Noise Amplifier) (depending on the model 38 Digital Noise Reduction 39 Tilt (depending on the model 40 DNIe...

User Manual (user Manual) (ver.1.0) (English)
Page 6
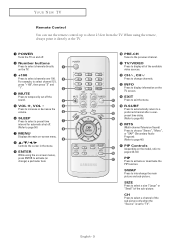
...; TIMER ; Red - Power On ; Also used to change channels. Green When the TV is set before using this spot on -screen menu. ¨ Remote Control Sensor Aim the remote control towards this function.) Ø POWER Press to see an on-screen menu of your TV's basic features, including the on , the TIMER indicator blinks five times. CL21M6 CL29M16 CL21M2/CL25M2/CL29M2/CL21M21/CL25M21/CL29M21 CL21T21/CL29T21 CL29K5 Œ MENU Press to turn the power off . Red Lights...
...; TIMER ; Red - Power On ; Also used to change channels. Green When the TV is set before using this spot on -screen menu. ¨ Remote Control Sensor Aim the remote control towards this function.) Ø POWER Press to see an on-screen menu of your TV's basic features, including the on , the TIMER indicator blinks five times. CL21M6 CL29M16 CL21M2/CL25M2/CL29M2/CL21M21/CL25M21/CL29M21 CL21T21/CL29T21 CL29K5 Œ MENU Press to turn the power off . Red Lights...
User Manual (user Manual) (ver.1.0) (English)
Page 9
... the volume. Ø SLEEP Press to select a preset time interval for automatic shut off . ´ Number buttons Press to select channels directly on the TV. ˇ +100 Press to page 46) ˜ PIP Controls (depending on -screen menu. When using the on-screen menus, press ENTER to activate (or change) a particular item. ˝ PRE-CH Tunes to the previous channel. Ô TV/VIDEO Press to display...
... the volume. Ø SLEEP Press to select a preset time interval for automatic shut off . ´ Number buttons Press to select channels directly on the TV. ˇ +100 Press to page 46) ˜ PIP Controls (depending on -screen menu. When using the on-screen menus, press ENTER to activate (or change) a particular item. ˝ PRE-CH Tunes to the previous channel. Ô TV/VIDEO Press to display...

User Manual (user Manual) (ver.1.0) (English)
Page 13
English - 13 Connecting to a Cable Box that Descrambles All Channels 1 Find the cable that is connected to the ANTENNA OUT terminal on your cable box. œ This terminal might be labelled "ANT OUT", "VHF OUT" or simply, "OUT". 2 Connect the other end of this cable to a cable TV system, follow the instructions below. Cable without a Cable Box 1 Plug the incoming cable into the "VHF/UHF" terminal on the rear panel. INSTALLATION Connecting Cable TV To connect to the "VHF/UHF" terminal on the rear panel.
English - 13 Connecting to a Cable Box that Descrambles All Channels 1 Find the cable that is connected to the ANTENNA OUT terminal on your cable box. œ This terminal might be labelled "ANT OUT", "VHF OUT" or simply, "OUT". 2 Connect the other end of this cable to a cable TV system, follow the instructions below. Cable without a Cable Box 1 Plug the incoming cable into the "VHF/UHF" terminal on the rear panel. INSTALLATION Connecting Cable TV To connect to the "VHF/UHF" terminal on the rear panel.

User Manual (user Manual) (ver.1.0) (English)
Page 14
... TV to the cable box's output channel, which is connected to the ANTENNA IN terminal on the cable box. Connect a coaxial cable between the OUT terminal on the RF (A/B) switch and the "VHF/UHF" terminal on the RF (A/B) switch. Incoming Cable Splitter Cable Box RF (A/B) Switch TV Rear After you will need to tune your cable box descrambles only some channels (such as premium channels), follow the instructions below. INSTALLATION Connecting to a Cable Box that is usually...
... TV to the cable box's output channel, which is connected to the ANTENNA IN terminal on the cable box. Connect a coaxial cable between the OUT terminal on the RF (A/B) switch and the "VHF/UHF" terminal on the RF (A/B) switch. Incoming Cable Splitter Cable Box RF (A/B) Switch TV Rear After you will need to tune your cable box descrambles only some channels (such as premium channels), follow the instructions below. INSTALLATION Connecting to a Cable Box that is usually...
User Manual (user Manual) (ver.1.0) (English)
Page 15
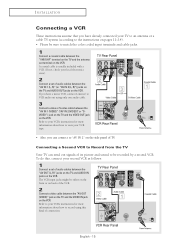
... local electronics store). 2 2 Connect a set of TV. Refer to your VCR's instructions for more information about how to record using only one audio cable. 3 Connect a video or S-video cable between the "AV OUT (L, R)" jacks on the TV and AUDIO IN jacks on the VCR. The VCR input jacks might be sure to match the color coded input terminals and cable jacks. 1 Connect a coaxial cable between the "AV OUT...
... local electronics store). 2 2 Connect a set of TV. Refer to your VCR's instructions for more information about how to record using only one audio cable. 3 Connect a video or S-video cable between the "AV OUT (L, R)" jacks on the TV and AUDIO IN jacks on the VCR. The VCR input jacks might be sure to match the color coded input terminals and cable jacks. 1 Connect a coaxial cable between the "AV OUT...

User Manual (user Manual) (ver.1.0) (English)
Page 16
... DVD player. 2 Connect a video cable between the "COMPONENT IN (Y, PB, PR)" jacks on the TV and the COMPONENT VIDEO OUT (Y, PB, PR) jacks on the DVD 1 2 player. English - 16 Connecting to match the color coded input terminals and cable jacks. INSTALLATION Connecting a DVD Player The rear panel jacks on your TV make it easy to connect a DVD player to your DVD player's owner's instruction. For an explanation of Component video, see your TV. • Please be sure to Y, PB, PR 1 Connect a set...
... DVD player. 2 Connect a video cable between the "COMPONENT IN (Y, PB, PR)" jacks on the TV and the COMPONENT VIDEO OUT (Y, PB, PR) jacks on the DVD 1 2 player. English - 16 Connecting to match the color coded input terminals and cable jacks. INSTALLATION Connecting a DVD Player The rear panel jacks on your TV make it easy to connect a DVD player to your DVD player's owner's instruction. For an explanation of Component video, see your TV. • Please be sure to Y, PB, PR 1 Connect a set...

User Manual (user Manual) (ver.1.0) (English)
Page 17
... audio out using a VCR. • Please be sure to match the color coded input terminals and cable jacks. 1 Locate the A/V output jacks on the Camcorder. You must hook them up to match the color coded input terminals and cable jacks. English - 17 Connecting to an Analog Amplifier • Please be used for external speakers. When an audio amplifier is stereo, you to view the Camcorder tapes without using only one audio cable. 3 Connect a video or S-video cable...
... audio out using a VCR. • Please be sure to match the color coded input terminals and cable jacks. 1 Locate the A/V output jacks on the Camcorder. You must hook them up to match the color coded input terminals and cable jacks. English - 17 Connecting to an Analog Amplifier • Please be used for external speakers. When an audio amplifier is stereo, you to view the Camcorder tapes without using only one audio cable. 3 Connect a video or S-video cable...

User Manual (user Manual) (ver.1.0) (English)
Page 18
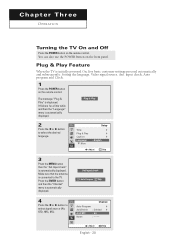
... the ENTER button, then the "Auto Program" is connected to select the desired language, then press the ENTER button. The "Start Plug & Play" is displayed. Plug & Play Start Plug & Play OK Enter Exit œ Plug & Play feature doesn't work in the TV for the first time. 1 Press the POWER button on the remote control. Plug & Play Check antenna input. Chapter Three OPERATION Turning the TV On and Off Press the POWER button on the front panel. is displayed. Press the...
... the ENTER button, then the "Auto Program" is connected to select the desired language, then press the ENTER button. The "Start Plug & Play" is displayed. Plug & Play Start Plug & Play OK Enter Exit œ Plug & Play feature doesn't work in the TV for the first time. 1 Press the POWER button on the remote control. Plug & Play Check antenna input. Chapter Three OPERATION Turning the TV On and Off Press the POWER button on the front panel. is displayed. Press the...
User Manual (user Manual) (ver.1.0) (English)
Page 20
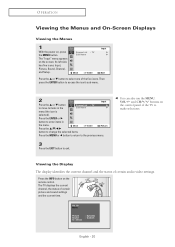
...; Exit Press the ▲ or ▼ button to exit. œ You can also use the MENU, VOL+/- and CH / buttons on , press the MENU button. The TV displays the current channel, the status of certain audio-video settings. Its left side has five icons: Input, Picture, Sound, Channel, and Setup. OPERATION Viewing the Menus and On-Screen Displays Viewing the Menus 1 With the power on the control panel of the TV to make selections.
...; Exit Press the ▲ or ▼ button to exit. œ You can also use the MENU, VOL+/- and CH / buttons on , press the MENU button. The TV displays the current channel, the status of certain audio-video settings. Its left side has five icons: Input, Picture, Sound, Channel, and Setup. OPERATION Viewing the Menus and On-Screen Displays Viewing the Menus 1 With the power on the control panel of the TV to make selections.

User Manual (user Manual) (ver.1.0) (English)
Page 53
...; button to the "Channel" and "Child Lock" menu by using the control buttons on the model) This feature allows you can not access to select "Setup", then press the ENTER button. Child Lock Channel Lock Child Lock : OOnff : 11 On :? You can release the Child Lock setting, so keep the remote control away from watching unsuitable programmes by using front (or side) panel buttons. Only remote control can access by muting out video and audio. or † button...
...; button to the "Channel" and "Child Lock" menu by using the control buttons on the model) This feature allows you can not access to select "Setup", then press the ENTER button. Child Lock Channel Lock Child Lock : OOnff : 11 On :? You can release the Child Lock setting, so keep the remote control away from watching unsuitable programmes by using front (or side) panel buttons. Only remote control can access by muting out video and audio. or † button...

User Manual (user Manual) (ver.1.0) (English)
Page 3
... 16 Connecting a DVD Player 17 Connecting a Camcorder 18 Installing Batteries in the Remote Control 19 Chapter 3: Operation 20 Turning the TV On and Off 20 Plug & Play Feature 20 Viewing the Menus and On-Screen Displays 22 Viewing the Menus 22 Viewing the Display 22 Selecting a Menu Language 23 Memorizing the Channels 24 Selecting the Video Signal-source 24 Storing Channels in Memory (Automatic Method 25 Adding and Erasing Channels (Manual Method 26 Changing Channels 27 Using the Channel Buttons...
... 16 Connecting a DVD Player 17 Connecting a Camcorder 18 Installing Batteries in the Remote Control 19 Chapter 3: Operation 20 Turning the TV On and Off 20 Plug & Play Feature 20 Viewing the Menus and On-Screen Displays 22 Viewing the Menus 22 Viewing the Display 22 Selecting a Menu Language 23 Memorizing the Channels 24 Selecting the Video Signal-source 24 Storing Channels in Memory (Automatic Method 25 Adding and Erasing Channels (Manual Method 26 Changing Channels 27 Using the Channel Buttons...
User Manual (user Manual) (ver.1.0) (English)
Page 8
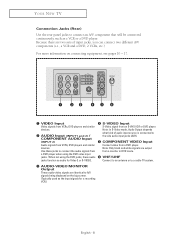
... black and white signals are two sets of audio input source is connected to the side audio input jacks (AV2). Note: In S-Video mode, Audio Output depends ´ AUDIO Input (INPUT1 and 2) / what kind of input jacks, you can connect two different A/V components (i.e., a VCR and a DVD, 2 VCRs, etc.) For more information on the big screen. (Typically used as a VCR or a DVD player. When not using the DVD video input jacks. devices. Connect to an antenna or to a cable TV system. ˇ AUDIO-VIDEO MONITOR Output...
... black and white signals are two sets of audio input source is connected to the side audio input jacks (AV2). Note: In S-Video mode, Audio Output depends ´ AUDIO Input (INPUT1 and 2) / what kind of input jacks, you can connect two different A/V components (i.e., a VCR and a DVD, 2 VCRs, etc.) For more information on the big screen. (Typically used as a VCR or a DVD player. When not using the DVD video input jacks. devices. Connect to an antenna or to a cable TV system. ˇ AUDIO-VIDEO MONITOR Output...

User Manual (user Manual) (ver.1.0) (English)
Page 14
... Rear Panel TV Rear Panel Audio Cable 5 Connect a video cable between the AUDIO OUT jacks on the VCR and the AUDIO jacks on the TV. VCR Rear Panel TV Rear Panel Coaxial Cable A coaxial cable is usually included with a VCR. (If not, check your local electronics store). 4 Connect a set of audio cables between the VIDEO OUT jack on the VCR and the VIDEO jack on the TV. VCR Rear Panel Video Cable TV Rear Panel Follow the instructions in "Viewing an External Signal Source...
... Rear Panel TV Rear Panel Audio Cable 5 Connect a video cable between the AUDIO OUT jacks on the VCR and the AUDIO jacks on the TV. VCR Rear Panel TV Rear Panel Coaxial Cable A coaxial cable is usually included with a VCR. (If not, check your local electronics store). 4 Connect a set of audio cables between the VIDEO OUT jack on the VCR and the VIDEO jack on the TV. VCR Rear Panel Video Cable TV Rear Panel Follow the instructions in "Viewing an External Signal Source...

User Manual (user Manual) (ver.1.0) (English)
Page 17
DVD Player Rear Panel Video Cable TV Rear Panel Note: For an explanation of Component video, see your TV. 1 Connect a set of audio cables between the COMPONENT INPUT (Y, Pb, Pr) jacks on the TV and the COMPONENT VIDEO OUT (Y, PB, PR) jacks on the DVD player. English - 17 INSTALLATION Connecting a DVD Player The rear panel jacks on your TV make it easy to connect a DVD player to your DVD player's owner's manual. DVD Player Rear Panel Audio Cable TV Rear Panel 2 Connect a video cable between the AUDIO INPUT 2 jacks on the TV and the AUDIO OUT jacks on the DVD player.
DVD Player Rear Panel Video Cable TV Rear Panel Note: For an explanation of Component video, see your TV. 1 Connect a set of audio cables between the COMPONENT INPUT (Y, Pb, Pr) jacks on the TV and the COMPONENT VIDEO OUT (Y, PB, PR) jacks on the DVD player. English - 17 INSTALLATION Connecting a DVD Player The rear panel jacks on your TV make it easy to connect a DVD player to your DVD player's owner's manual. DVD Player Rear Panel Audio Cable TV Rear Panel 2 Connect a video cable between the AUDIO INPUT 2 jacks on the TV and the AUDIO OUT jacks on the DVD player.
User Manual (user Manual) (ver.1.0) (English)
Page 20
.... Time Plug & Play Caption Language ▼ More Setup English Adjust Skip 3 Press the MENU button then the "Ant Input check" is automatically displayed. Make sure that the antenna is initially powered On, five basic customer settings proceed automatically and subsequently: Setting the language, Video signal source, Ant. Adjust Skip English - 20 C h a pOtPEeRArTIOTN h r e e OPERATION Turning the TV On and Off Press the POWER button on the remote control. You can also use the POWER button on the front panel. Plug & Play...
.... Time Plug & Play Caption Language ▼ More Setup English Adjust Skip 3 Press the MENU button then the "Ant Input check" is automatically displayed. Make sure that the antenna is initially powered On, five basic customer settings proceed automatically and subsequently: Setting the language, Video signal source, Ant. Adjust Skip English - 20 C h a pOtPEeRArTIOTN h r e e OPERATION Turning the TV On and Off Press the POWER button on the remote control. You can also use the POWER button on the front panel. Plug & Play...

User Manual (user Manual) (ver.1.0) (English)
Page 22
... disappear from the screen after ten seconds. You can also use the MENU, CH and VOL buttons on , press the MENU button. Air 10 Signal : Mono Picture : Dynamic Sound : Custom MTS : Stereo 12 : 00 am ▼ The on the screen. OPERATION Viewing the Menus and On-Screen Displays Viewing the Menus 1 With the power on the control panel of the following: Active channel, the channel label, signal, picture mode, sound mode, MTS and the current...
... disappear from the screen after ten seconds. You can also use the MENU, CH and VOL buttons on , press the MENU button. Air 10 Signal : Mono Picture : Dynamic Sound : Custom MTS : Stereo 12 : 00 am ▼ The on the screen. OPERATION Viewing the Menus and On-Screen Displays Viewing the Menus 1 With the power on the control panel of the following: Active channel, the channel label, signal, picture mode, sound mode, MTS and the current...


