

Open Source Guide (ENGLISH)
Page 1
... to Apply These Terms to Your New Programs If you develop a new program, and you want it to all of any portion of warranty; It is to be on the terms of derivative or collective works based on it free software which gives you receive source code or can redistribute and change . This product uses some software programs which are referring to the wide...
... to Apply These Terms to Your New Programs If you develop a new program, and you want it to all of any portion of warranty; It is to be on the terms of derivative or collective works based on it free software which gives you receive source code or can redistribute and change . This product uses some software programs which are referring to the wide...

Open Source Guide (ENGLISH)
Page 2
... If you develop a new library, and you want it free software that everyone can do so by permitting redistribution under these terms, attach the following notices to the public, we recommend making it to be of warranty; It is found. IN NO EVENT UNLESS REQUIRED BY APPLICABLE...OPERATE WITH ANY OTHER SOFTWARE), EVEN IF SUCH HOLDER OR OTHER PARTY HAS BEEN ADVISED OF THE POSSIBILITY OF SUCH DAMAGES. You can redistribute and change. and each file should have at least the "copyright" line and a pointer to where the full notice is safest to attach them to the start of each source...
... If you develop a new library, and you want it free software that everyone can do so by permitting redistribution under these terms, attach the following notices to the public, we recommend making it to be of warranty; It is found. IN NO EVENT UNLESS REQUIRED BY APPLICABLE...OPERATE WITH ANY OTHER SOFTWARE), EVEN IF SUCH HOLDER OR OTHER PARTY HAS BEEN ADVISED OF THE POSSIBILITY OF SUCH DAMAGES. You can redistribute and change. and each file should have at least the "copyright" line and a pointer to where the full notice is safest to attach them to the start of each source...
User Manual (user Manual) (ver.1.0) (English)
Page 3
...-Screen Displays 20 Viewing the Menus 20 Viewing the Display 20 Selecting a Menu Language 21 Memorizing the Channels 22 Selecting the Video Signal Source 22 Storing Channels in Memory (Automatic Method 23 Adding and Erasing Channels 24 Changing Channels 25 Using the Channel Buttons 25 Using the Number Buttons 25 Using the PRE-CH Button to Select the Previous Channel 25 Labelling the Channels 26 Picture Control 27 Using Automatic Picture Settings 27 Customizing the Picture 28 Resetting the Picture Settings to the Factory Defaults...
...-Screen Displays 20 Viewing the Menus 20 Viewing the Display 20 Selecting a Menu Language 21 Memorizing the Channels 22 Selecting the Video Signal Source 22 Storing Channels in Memory (Automatic Method 23 Adding and Erasing Channels 24 Changing Channels 25 Using the Channel Buttons 25 Using the Number Buttons 25 Using the PRE-CH Button to Select the Previous Channel 25 Labelling the Channels 26 Picture Control 27 Using Automatic Picture Settings 27 Customizing the Picture 28 Resetting the Picture Settings to the Factory Defaults...
User Manual (user Manual) (ver.1.0) (English)
Page 4
CONTENTS Chapter 3: Operation 30 Sound Control 30 Adjusting the Volume 30 Using the MUTE Button 30 Using Automatic Sound Settings 31 Customizing the Sound 32 Setting the Clock 33 Viewing an External Signal Source 34 Setting the Signal Source 34 Assigning Names to External Input Mode 35 Chapter 4: Special Features 36 Fine Tuning Channels 36 Changing the Screen Size 37 Digital Noise Reduction 38 DNIe JrTM (Digital Natural Image engine) (depending on the model) ...39 Viewing Picture-In-Picture (depending on the model 40...
CONTENTS Chapter 3: Operation 30 Sound Control 30 Adjusting the Volume 30 Using the MUTE Button 30 Using Automatic Sound Settings 31 Customizing the Sound 32 Setting the Clock 33 Viewing an External Signal Source 34 Setting the Signal Source 34 Assigning Names to External Input Mode 35 Chapter 4: Special Features 36 Fine Tuning Channels 36 Changing the Screen Size 37 Digital Noise Reduction 38 DNIe JrTM (Digital Natural Image engine) (depending on the model) ...39 Viewing Picture-In-Picture (depending on the model 40...
User Manual (user Manual) (ver.1.0) (English)
Page 5
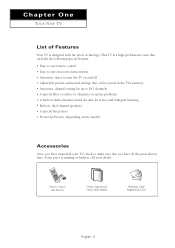
...; Easy-to-use remote control • Easy-to-use on-screen menu system • Automatic timer to turn the TV on and off • Adjustable picture and sound settings that can be stored in the TV's memory • Automatic channel tuning for up to 181 channels • A special filter to make sure that you have unpacked your dealer. Remote Control/ AAA Batteries Owner's Instructions/ Safety Guide Manual Warranty Card/ Registration Card...
...; Easy-to-use remote control • Easy-to-use on-screen menu system • Automatic timer to turn the TV on and off • Adjustable picture and sound settings that can be stored in the TV's memory • Automatic channel tuning for up to 181 channels • A special filter to make sure that you have unpacked your dealer. Remote Control/ AAA Batteries Owner's Instructions/ Safety Guide Manual Warranty Card/ Registration Card...
User Manual (user Manual) (ver.1.0) (English)
Page 6
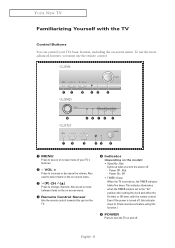
... TV Control Buttons You can control your TV's basic features, including the on -screen menu of your TV's features. ´ - Red Lights up when you must be set to see an on -screen menu. This indicator illuminates when the TIMER mode is turned off . VOL + Press to turn the power off. - YOUR NEW TV Familiarizing Yourself with the remote control. To use the remote control. Also used to change channels. Power Off ; Power On ; Green When...
... TV Control Buttons You can control your TV's basic features, including the on -screen menu of your TV's features. ´ - Red Lights up when you must be set to see an on -screen menu. This indicator illuminates when the TIMER mode is turned off . VOL + Press to turn the power off. - YOUR NEW TV Familiarizing Yourself with the remote control. To use the remote control. Also used to change channels. Power Off ; Power On ; Green When...
User Manual (user Manual) (ver.1.0) (English)
Page 7
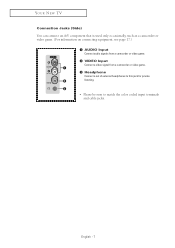
English - 7 YOUR NEW TV Connection Jacks (Side) You can connect an A/V component that is used only occasionally, such as a camcorder or video game. (For information on connecting equipment, see page 17.) Œ AUDIO Input Connect audio signals from a camcorder or video game. ´ VIDEO Input Connect a video signal from a camcorder or video game. ˇ Headphone Connect a set of external headphones to this jack for private listening. • Please be sure to match the color coded input terminals and cable jacks.
English - 7 YOUR NEW TV Connection Jacks (Side) You can connect an A/V component that is used only occasionally, such as a camcorder or video game. (For information on connecting equipment, see page 17.) Œ AUDIO Input Connect audio signals from a camcorder or video game. ´ VIDEO Input Connect a video signal from a camcorder or video game. ˇ Headphone Connect a set of external headphones to this jack for private listening. • Please be sure to match the color coded input terminals and cable jacks.
User Manual (user Manual) (ver.1.0) (English)
Page 8
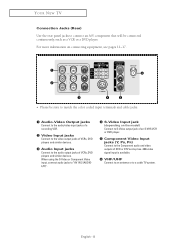
... Connection Jacks (Rear) Use the rear panel jacks to connect an A/V component that will be sure to match the color coded input terminals and cable jacks. Œ Audio-Video Output jacks Connect to the audio/video input jacks of a recording VCR. ´ Video Input jacks Connect to the video output jacks of VCRs, DVD players and similar devices. ˇ Audio Input jacks Connect to the audio output jacks of DVD or DTV set-top box. 480i video signal input is available. Ø VHF/UHF Connect to an antenna...
... Connection Jacks (Rear) Use the rear panel jacks to connect an A/V component that will be sure to match the color coded input terminals and cable jacks. Œ Audio-Video Output jacks Connect to the audio/video input jacks of a recording VCR. ´ Video Input jacks Connect to the video output jacks of VCRs, DVD players and similar devices. ˇ Audio Input jacks Connect to the audio output jacks of DVD or DTV set-top box. 480i video signal input is available. Ø VHF/UHF Connect to an antenna...
User Manual (user Manual) (ver.1.0) (English)
Page 9
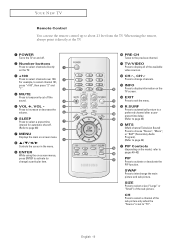
... (Multi-channel Television Sound) Press to choose "Stereo", "Mono", or "SAP" (Secondary Audio Program). (Refer to page 44) ˜ PIP Controls (depending on and off . (Refer to "TV". Press to increase or decrease the volume. Ø SLEEP Press to select a preset time interval for automatic shut off . ´ Number buttons Press to select channels directly on -screen menu. Controls the cursor in the menu. ' ENTER While using the remote...
... (Multi-channel Television Sound) Press to choose "Stereo", "Mono", or "SAP" (Secondary Audio Program). (Refer to page 44) ˜ PIP Controls (depending on and off . (Refer to "TV". Press to increase or decrease the volume. Ø SLEEP Press to select a preset time interval for automatic shut off . ´ Number buttons Press to select channels directly on -screen menu. Controls the cursor in the menu. ' ENTER While using the remote...
User Manual (user Manual) (ver.1.0) (English)
Page 13
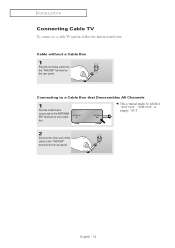
English - 13 Connecting to a Cable Box that Descrambles All Channels 1 Find the cable that is connected to the ANTENNA OUT terminal on your cable box. œ This terminal might be labelled "ANT OUT", "VHF OUT" or simply, "OUT". 2 Connect the other end of this cable to a cable TV system, follow the instructions below. Cable without a Cable Box 1 Plug the incoming cable into the "VHF/UHF" terminal on the rear panel. INSTALLATION Connecting Cable TV To connect to the "VHF/UHF" terminal on the rear panel.
English - 13 Connecting to a Cable Box that Descrambles All Channels 1 Find the cable that is connected to the ANTENNA OUT terminal on your cable box. œ This terminal might be labelled "ANT OUT", "VHF OUT" or simply, "OUT". 2 Connect the other end of this cable to a cable TV system, follow the instructions below. Cable without a Cable Box 1 Plug the incoming cable into the "VHF/UHF" terminal on the rear panel. INSTALLATION Connecting Cable TV To connect to the "VHF/UHF" terminal on the rear panel.
User Manual (user Manual) (ver.1.0) (English)
Page 14
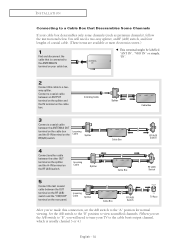
....) 1 Find and disconnect the cable that Descrambles Some Channels If your TV to the cable box's output channel, which is connected to the ANTENNA IN terminal on the rear panel. Set the A/B switch to the "B" position to view scrambled channels. (When you set the A/B switch to the "A" position for normal viewing. INSTALLATION Connecting to a Cable Box that is usually channel 3 or 4.) English - 14 Incoming Cable Splitter Cable Box RF (A/B) Switch 4 Connect another cable between the OUT terminal on...
....) 1 Find and disconnect the cable that Descrambles Some Channels If your TV to the cable box's output channel, which is connected to the ANTENNA IN terminal on the rear panel. Set the A/B switch to the "B" position to view scrambled channels. (When you set the A/B switch to the "A" position for normal viewing. INSTALLATION Connecting to a Cable Box that is usually channel 3 or 4.) English - 14 Incoming Cable Splitter Cable Box RF (A/B) Switch 4 Connect another cable between the OUT terminal on...
User Manual (user Manual) (ver.1.0) (English)
Page 15
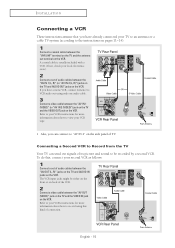
... signals of its picture and sound to be either on the front or on back of audio cables between the "AV IN 1 (L, R)" (or "AV IN 2 (L, R)") jacks on the TV and AUDIO OUT jacks on the VCR. Connecting a Second VCR to Record from the TV Your TV can connect to "AV IN 2" on the side panel of TV. The VCR input...
... signals of its picture and sound to be either on the front or on back of audio cables between the "AV IN 1 (L, R)" (or "AV IN 2 (L, R)") jacks on the TV and AUDIO OUT jacks on the VCR. Connecting a Second VCR to Record from the TV Your TV can connect to "AV IN 2" on the side panel of TV. The VCR input...
User Manual (user Manual) (ver.1.0) (English)
Page 16
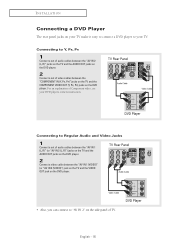
... the TV and the AUDIO OUT jacks on the DVD player. 2 Connect a set of video cables between the "COMPONENT IN (Y, PB, PR)" jacks on the TV and the COMPONENT VIDEO OUT (Y, PB, PR) jacks on the DVD player. For an explanation of Component video, see your TV. Connecting to "AV IN 2" on your TV make it easy to connect a DVD player to your DVD player's owner's instruction. INSTALLATION Connecting a DVD Player The rear panel jacks on the side...
... the TV and the AUDIO OUT jacks on the DVD player. 2 Connect a set of video cables between the "COMPONENT IN (Y, PB, PR)" jacks on the TV and the COMPONENT VIDEO OUT (Y, PB, PR) jacks on the DVD player. For an explanation of Component video, see your TV. Connecting to "AV IN 2" on your TV make it easy to connect a DVD player to your DVD player's owner's instruction. INSTALLATION Connecting a DVD Player The rear panel jacks on the side...

User Manual (user Manual) (ver.1.0) (English)
Page 17
.... You must hook them up to an Analog Amplifier The "AV OUT (L, R)" jacks cannot be used for external speakers. The audio-video cables shown here are usually found on the side or rear of the Camcorder. 2 Connect a set of two cables. They are usually included with the volume control on the TV. They allow you to view the Camcorder tapes without using only one audio cable. 3 Connect a video cable between the...
.... You must hook them up to an Analog Amplifier The "AV OUT (L, R)" jacks cannot be used for external speakers. The audio-video cables shown here are usually found on the side or rear of the Camcorder. 2 Connect a set of two cables. They are usually included with the volume control on the TV. They allow you to view the Camcorder tapes without using only one audio cable. 3 Connect a video cable between the...
User Manual (user Manual) (ver.1.0) (English)
Page 18
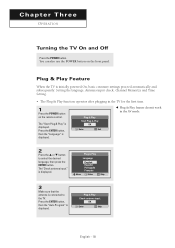
... the antenna is initially powered On, basic customer settings proceed automatically and subsequently: Setting the language, Antenna input check, Channel Memorize and Time Setting. • The Plug & Play function operates after plugging in the AV mode. 2 Press the ... or † button to the TV. OK Enter Skip English - 18 Chapter Three OPERATION Turning the TV On and Off Press the POWER button. You can also use the POWER button on the remote control. Plug & Play Check antenna input.
... the antenna is initially powered On, basic customer settings proceed automatically and subsequently: Setting the language, Antenna input check, Channel Memorize and Time Setting. • The Plug & Play function operates after plugging in the AV mode. 2 Press the ... or † button to the TV. OK Enter Skip English - 18 Chapter Three OPERATION Turning the TV On and Off Press the POWER button. You can also use the POWER button on the remote control. Plug & Play Check antenna input.

User Manual (user Manual) (ver.1.0) (English)
Page 20
... icons: Input, Picture, Sound, Channel, and Setup. and CH / buttons on the screen. Air 10 Mono Picture : Dynamic Sound : Custom 12 : 00 am English - 20 Press the Move Enter Return button to change the selected items. Press the MENU or œ button to return to the previous menu. 3 Press the EXIT button to items in the menu. The "Input" menu appears on the control panel of certain audio-video settings. Viewing the Display The display identifies...
... icons: Input, Picture, Sound, Channel, and Setup. and CH / buttons on the screen. Air 10 Mono Picture : Dynamic Sound : Custom 12 : 00 am English - 20 Press the Move Enter Return button to change the selected items. Press the MENU or œ button to return to the previous menu. 3 Press the EXIT button to items in the menu. The "Input" menu appears on the control panel of certain audio-video settings. Viewing the Display The display identifies...
User Manual (user Manual) (ver.1.0) (English)
Page 40
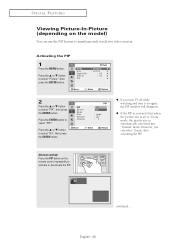
... watching and turn it on again, the PIP window will disappear. œ If the PIP is activated (On) when the picture size is set to select "PIP". Press the ENTER button to "Zoom" mode, the picture size is automatically converted into "Normal" mode. Alternate method: Press the PIP button on the remote control repeatedly to simultaneously watch two video sources. SPECIAL FEATURES Viewing Picture-In-Picture (depending on the model) You can...
... watching and turn it on again, the PIP window will disappear. œ If the PIP is activated (On) when the picture size is set to select "PIP". Press the ENTER button to "Zoom" mode, the picture size is automatically converted into "Normal" mode. Alternate method: Press the PIP button on the remote control repeatedly to simultaneously watch two video sources. SPECIAL FEATURES Viewing Picture-In-Picture (depending on the model) You can...
User Manual (user Manual) (ver.1.0) (English)
Page 46
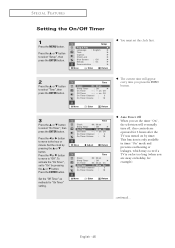
... Move Adjust Return Time Clock 09 : 30 am Sleep Timer : Off √ On Timer 06 : 30 am Off On Timer Channel : 3 On Timer Volume : 10 œ The current time will eventually turn off, if no controls are away on holiday, for "On Timer" setting. Press the ... am Off Off Timer -- : -- Set the "Off Timer" as methods for example). Setup Plug & Play √ Language : English √ Time √ Caption √ Child Lock √ Blue Screen...
... Move Adjust Return Time Clock 09 : 30 am Sleep Timer : Off √ On Timer 06 : 30 am Off On Timer Channel : 3 On Timer Volume : 10 œ The current time will eventually turn off, if no controls are away on holiday, for "On Timer" setting. Press the ... am Off Off Timer -- : -- Set the "Off Timer" as methods for example). Setup Plug & Play √ Language : English √ Time √ Caption √ Child Lock √ Blue Screen...
User Manual (user Manual) (ver.1.0) (English)
Page 51
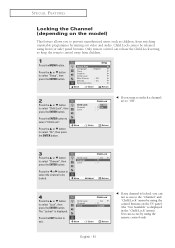
... † button to "Off". 3 Press the ... Setup Plug & Play √ Language : English √ Time √ Caption √ Child Lock √ Blue Screen : Off √ Melody : On √ Demonstration √ Move Enter Return 2 Press the ... Move Enter Return œ If you want to unlock a channel, set to select "Lock", then press the ENTER button. Child Lock Channel Lock Child Lock : On √ : 11 :? Only remote control can access by using the remote control only...
... † button to "Off". 3 Press the ... Setup Plug & Play √ Language : English √ Time √ Caption √ Child Lock √ Blue Screen : Off √ Melody : On √ Demonstration √ Move Enter Return 2 Press the ... Move Enter Return œ If you want to unlock a channel, set to select "Lock", then press the ENTER button. Child Lock Channel Lock Child Lock : On √ : 11 :? Only remote control can access by using the remote control only...
User Manual (user Manual) (ver.1.0) (English)
Page 55
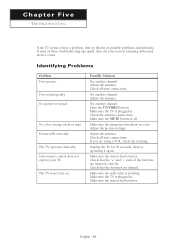
... TV operates erratically. Check all wire connections. Make sure the TV is working. Adjust the antenna. Make sure the wall outlet is plugged in. Adjust the antenna. Adjust the antenna. Make sure the program is plugged in color. Adjust the picture settings. Make sure the TV is broadcast in . English - 55 If none of possible problems and solutions. The TV won't turn on. Try another channel. Press the TV/VIDEO button. Check...
... TV operates erratically. Check all wire connections. Make sure the TV is working. Adjust the antenna. Make sure the wall outlet is plugged in. Adjust the antenna. Adjust the antenna. Make sure the program is plugged in color. Adjust the picture settings. Make sure the TV is broadcast in . English - 55 If none of possible problems and solutions. The TV won't turn on. Try another channel. Press the TV/VIDEO button. Check...


