
User Manual
Page 16
...down , do not put pressure on it , as shown in the image. - While holding the monitor, push in the stand neck in 2 the direction of the arrow and adjust it . There is curved. Caution Do not press down on a flat surface may damage the product. Installation Attaching the Stand ...――Before assembling the product, place the product down on a flat and stable surface so that came with the monitor. When the product is on ...
...down , do not put pressure on it , as shown in the image. - While holding the monitor, push in the stand neck in 2 the direction of the arrow and adjust it . There is curved. Caution Do not press down on a flat surface may damage the product. Installation Attaching the Stand ...――Before assembling the product, place the product down on a flat and stable surface so that came with the monitor. When the product is on ...
User Manual
Page 17
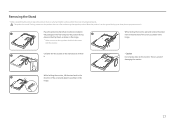
... to remove 2 it. - There is a risk of the arrow, as shown in the image. 17 When the product is curved. Place the protective Styrofoam (cushion) included in While holding the monitor, lift the stand neck in the 3 direction of the arrow and adjust it . Unfasten the two screws on the Styrofoam...the styrofoam (cushion) that the screen is facing downwards. : The product is on the ground facing up or down, do not put pressure on the monitor. Caution Do not press down on it , as shown in the image. Placing pressure on the product when on a flat and stable surface so ...
... to remove 2 it. - There is a risk of the arrow, as shown in the image. 17 When the product is curved. Place the protective Styrofoam (cushion) included in While holding the monitor, lift the stand neck in the 3 direction of the arrow and adjust it . Unfasten the two screws on the Styrofoam...the styrofoam (cushion) that the screen is facing downwards. : The product is on the ground facing up or down, do not put pressure on the monitor. Caution Do not press down on it , as shown in the image. Placing pressure on the product when on a flat and stable surface so ...


