User Manual (ENGLISH)
Page 23
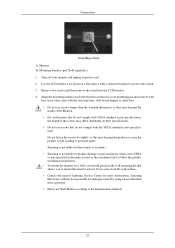
... to protect the screen. 3. Remove two screws and then remove the stand from the wall surface. • Contact the nearest Samsung Service Center for more information. Turn off your monitor and unplug its power cord. 2. Connections Dual Hinge Stand A. Align the mounting interface pad with the holes in the rear cover mounting pad and secure it to mount the monitor at least 10 cm away from the LCD monitor. 4. Do not...
... to protect the screen. 3. Remove two screws and then remove the stand from the wall surface. • Contact the nearest Samsung Service Center for more information. Turn off your monitor and unplug its power cord. 2. Connections Dual Hinge Stand A. Align the mounting interface pad with the holes in the rear cover mounting pad and secure it to mount the monitor at least 10 cm away from the LCD monitor. 4. Do not...
User Manual (ENGLISH)
Page 24
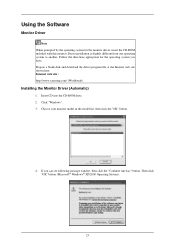
Internet web site : http://www.samsung.com/ (Worldwide) Installing the Monitor Driver (Automatic) 1. Click "Windows". 3. If you have. Driver installation is slightly different from one operating system to another. Follow the directions appropriate for the monitor driver, insert the CD-ROM included with this monitor. Prepare a blank disk and download the driver program file at the Internet web site shown here. Insert CD...
Internet web site : http://www.samsung.com/ (Worldwide) Installing the Monitor Driver (Automatic) 1. Click "Windows". 3. If you have. Driver installation is slightly different from one operating system to another. Follow the directions appropriate for the monitor driver, insert the CD-ROM included with this monitor. Prepare a blank disk and download the driver program file at the Internet web site shown here. Insert CD...
User Manual (ENGLISH)
Page 25
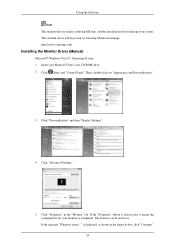
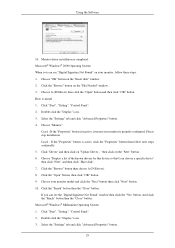
....samsung.com/ Installing the Monitor Driver (Manual) Microsoft® Windows Vista™, Operating System 1. Then, double-click on Samsung Monitor homepage. Click "Personalization" and then "Display Settings". 4. The monitor can be posted on "Appearance and Personalization". 3. Insert your Manual CD into your system. Using the Software Note This monitor driver is completed. The certified driver will be used as shown in the "Monitor" tab. Click (Start) and "Control Panel". If the message "Windows needs...
....samsung.com/ Installing the Monitor Driver (Manual) Microsoft® Windows Vista™, Operating System 1. Then, double-click on Samsung Monitor homepage. Click "Personalization" and then "Display Settings". 4. The monitor can be posted on "Appearance and Personalization". 3. Insert your Manual CD into your system. Using the Software Note This monitor driver is completed. The certified driver will be used as shown in the "Monitor" tab. Click (Start) and "Control Panel". If the message "Windows needs...
User Manual (ENGLISH)
Page 26
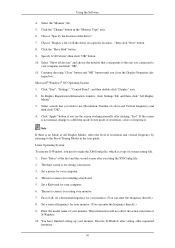
Using the Software Note This monitor driver is located, and click "OK". 25 Click "Update Driver..." Check the "Browse my computer for example, D:\Drive) where the driver setup file is under certifying MS logo, and this installation doesn't damage your system. Click "Have Disk..." and select the folder (for driver software" checkbox and click "Let me pick from a list of device drivers on Samsung Monitor homepage. 6. in the "Driver" tab. 7. The certified driver will be posted on my computer". 8.
Using the Software Note This monitor driver is located, and click "OK". 25 Click "Update Driver..." Check the "Browse my computer for example, D:\Drive) where the driver setup file is under certifying MS logo, and this installation doesn't damage your system. Click "Have Disk..." and select the folder (for driver software" checkbox and click "Let me pick from a list of device drivers on Samsung Monitor homepage. 6. in the "Driver" tab. 7. The certified driver will be posted on my computer". 8.
User Manual (ENGLISH)
Page 28
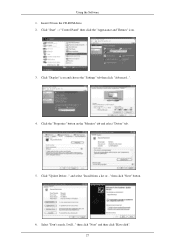
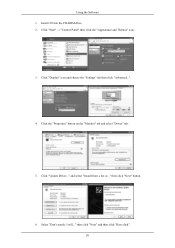
Click the "Properties" button on the "Monitor" tab and select "Driver" tab. 5. then click "Next" button. 6. Select "Don't search, I will..." then click "Next" and then click "Have disk". 27 Click "Update Driver..." Insert CD into the CD-ROM drive. 2. Click "Start" → "Control Panel" then click the "Appearance and Themes" icon. 3. Click "Display" icon and choose the "Settings" tab then click "Advanced...". 4. and select "Install from a list or..." Using the Software 1.
Click the "Properties" button on the "Monitor" tab and select "Driver" tab. 5. then click "Next" button. 6. Select "Don't search, I will..." then click "Next" and then click "Have disk". 27 Click "Update Driver..." Insert CD into the CD-ROM drive. 2. Click "Start" → "Control Panel" then click the "Appearance and Themes" icon. 3. Click "Display" icon and choose the "Settings" tab then click "Advanced...". 4. and select "Install from a list or..." Using the Software 1.
User Manual (ENGLISH)
Page 30
... Click the "Open" button, then click "OK" button. 9. Click "Start", "Setting", "Control Panel". 2. Choose "Monitor". Microsoft® Windows® Millennium Operating System 1. Click "Driver" and then click on the "File Needed" window. 3. Monitor driver installation is inactive, it means your monitor model and click the "Next" button then click "Next" button. 10. Click the "Browse" button then choose A:(D:\Driver). 8. Double click the "Display" icon. 3. Using the Software 10. Click "Start", "Setting", "Control Panel". 2. Click the "Browse" button on "Update Driver..." then...
... Click the "Open" button, then click "OK" button. 9. Click "Start", "Setting", "Control Panel". 2. Choose "Monitor". Microsoft® Windows® Millennium Operating System 1. Click "Driver" and then click on the "File Needed" window. 3. Monitor driver installation is inactive, it means your monitor model and click the "Next" button then click "Next" button. 10. Click the "Browse" button then choose A:(D:\Driver). 8. Double click the "Display" icon. 3. Using the Software 10. Click "Start", "Setting", "Control Panel". 2. Click the "Browse" button on "Update Driver..." then...
User Manual (ENGLISH)
Page 31
..." button. 9. Continue choosing "Close" button and "OK" button until you connected to the Preset Timing Modes in the user guide. In Display Registration Information window, click Settings Tab and then click "All Display Modes". 3. If the screen is not normal, change to make the X86Config file, which is a type of system setting file. 1. Linux Operating System To execute X-Window, you need to a different mode (lower mode of your monitor. Set a vertical frequency for your monitor...
..." button. 9. Continue choosing "Close" button and "OK" button until you connected to the Preset Timing Modes in the user guide. In Display Registration Information window, click Settings Tab and then click "All Display Modes". 3. If the screen is not normal, change to make the X86Config file, which is a type of system setting file. 1. Linux Operating System To execute X-Window, you need to a different mode (lower mode of your monitor. Set a vertical frequency for your monitor...
User Manual (ENGLISH)
Page 38
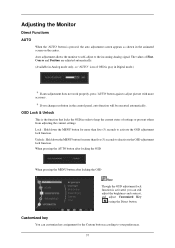
... control panel, auto function will be executed automatically. Auto adjustment allows the monitor to self-adjust to deactivate the OSD adjustment lock function. Lock : Hold down the MENU button for more than five (5) seconds to your preferences. 37 Customized key You can still adjust the brightness and contrast, and adjust Customized Key ( ) using the Direct button. When pressing the AUTO button after locking the OSD When pressing the MENU button after locking the OSD Note Though the OSD adjustment lock...
... control panel, auto function will be executed automatically. Auto adjustment allows the monitor to self-adjust to deactivate the OSD adjustment lock function. Lock : Hold down the MENU button for more than five (5) seconds to your preferences. 37 Customized key You can still adjust the brightness and contrast, and adjust Customized Key ( ) using the Direct button. When pressing the AUTO button after locking the OSD When pressing the MENU button after locking the OSD Note Though the OSD adjustment lock...
User Manual (ENGLISH)
Page 49
... any problems yourself. Judging the monitor's working condition. A: Check the power cord connection and supply. If you do need assistance, please call the phone number on , reboot the computer to become noisy, and video mode not supported, etc. A: If the initial screen (the login screen) appears, boot the computer in the applicable mode (the safe mode for Windows ME/XP/2000) and then change the frequency of the monitor. Q: If the power...
... any problems yourself. Judging the monitor's working condition. A: Check the power cord connection and supply. If you do need assistance, please call the phone number on , reboot the computer to become noisy, and video mode not supported, etc. A: If the initial screen (the login screen) appears, boot the computer in the applicable mode (the safe mode for Windows ME/XP/2000) and then change the frequency of the monitor. Q: If the power...
User Manual (ENGLISH)
Page 51
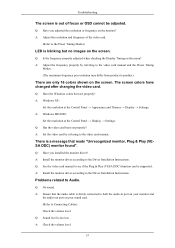
... Windows colors been set properly? A: Install the monitor driver according to the Preset Timing Modes) LED is blinking but no images on the screen. The screen is a message that reads "Unrecognized monitor, Plug & Play (VESA DDC) monitor found" Q: Have you adjusted the resolution or frequency on the menu? Q: No sound. 50 Troubleshooting The screen suddenly has become unbalanced. A: Adjust screen image position and size using the OSD. Q: Have you installed the monitor driver? A: Adjust the resolution and frequency of focus or OSD cannot be supported. The screen colors have changed...
... Windows colors been set properly? A: Install the monitor driver according to the Preset Timing Modes) LED is blinking but no images on the screen. The screen is a message that reads "Unrecognized monitor, Plug & Play (VESA DDC) monitor found" Q: Have you adjusted the resolution or frequency on the menu? Q: No sound. 50 Troubleshooting The screen suddenly has become unbalanced. A: Adjust screen image position and size using the OSD. Q: Have you installed the monitor driver? A: Adjust the resolution and frequency of focus or OSD cannot be supported. The screen colors have changed...

User Manual (ENGLISH)
Page 52
... download the installation software for MagicTune™ feature, follow the steps below (When Windows is too low. Check if the power cord and the video cables are properly connected to Connecting Cables). A: Download the latest program. If a copy of the video screen is already installed, remove it, reboot the computer, and then install the program again. Check the volume level. A: Reboot the computer after turning the control to check the compatible graphic card list provided. Check...
... download the installation software for MagicTune™ feature, follow the steps below (When Windows is too low. Check if the power cord and the video cables are properly connected to Connecting Cables). A: Download the latest program. If a copy of the video screen is already installed, remove it, reboot the computer, and then install the program again. Check the volume level. A: Reboot the computer after turning the control to check the compatible graphic card list provided. Check...
User Manual (ENGLISH)
Page 53
... power cord and then clean the monitor with a soft cloth, using either a cleaning solution or plain water. A: Note that video card support can I change the frequency? Q: How can vary, depending on the version of the driver used. (Refer to the Windows / Computer Manual). A: Windows ME/2000: Set the resolution at the Control Panel → Display → Screen Saver. Do not leave any water enter the monitor. If you can I set the Power Saving function? A: Windows XP: Set the resolution...
... power cord and then clean the monitor with a soft cloth, using either a cleaning solution or plain water. A: Note that video card support can I change the frequency? Q: How can vary, depending on the version of the driver used. (Refer to the Windows / Computer Manual). A: Windows ME/2000: Set the resolution at the Control Panel → Display → Screen Saver. Do not leave any water enter the monitor. If you can I set the Power Saving function? A: Windows XP: Set the resolution...

User Manual (ENGLISH)
Page 16
... LCD monitor. 4. Mounting interface pad (Sold separately) 1. Turn off your monitor and unplug its power cord. 2. Monitor B. Remove two screws and then remove the stand from the wall surface. • Contact the nearest Samsung Service Center for more information. Samsung is not liable for these kinds of accidents. • Samsung is used or the consumer fails to follow the product installation instructions. • To mount the monitor on their specifications. • Do not use Wall Mount...
... LCD monitor. 4. Mounting interface pad (Sold separately) 1. Turn off your monitor and unplug its power cord. 2. Monitor B. Remove two screws and then remove the stand from the wall surface. • Contact the nearest Samsung Service Center for more information. Samsung is not liable for these kinds of accidents. • Samsung is used or the consumer fails to follow the product installation instructions. • To mount the monitor on their specifications. • Do not use Wall Mount...
User Manual (ENGLISH)
Page 21
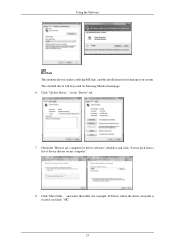
Click "Display" icon and choose the "Settings" tab then click "Advanced...". 4. Click "Update Driver..." Click "Start" → "Control Panel" then click the "Appearance and Themes" icon. 3. then click "Next" button. 6. and select "Install from a list or..." Using the Software 1. then click "Next" and then click "Have disk". 20 Select "Don't search, I will..." Click the "Properties" button on the "Monitor" tab and select "Driver" tab. 5. Insert CD into the CD-ROM drive. 2.
Click "Display" icon and choose the "Settings" tab then click "Advanced...". 4. Click "Update Driver..." Click "Start" → "Control Panel" then click the "Appearance and Themes" icon. 3. then click "Next" button. 6. and select "Install from a list or..." Using the Software 1. then click "Next" and then click "Have disk". 20 Select "Don't search, I will..." Click the "Properties" button on the "Monitor" tab and select "Driver" tab. 5. Insert CD into the CD-ROM drive. 2.

User Manual (ENGLISH)
Page 23
... Properties" button. 22 Choose "OK" button on the "File Needed" window. 3. Click the "Browse" button on the "Insert disk" window. 2. Click the "Open" button, then click "OK" button. 9. Choose your monitor, follow next steps continually. 5. And click the "Finish" button then the "Close" button. Click "Start", "Setting", "Control Panel". 2. Double click the "Display" icon. 3. Using the Software 10. Microsoft® Windows® 2000 Operating System When you can choose a specific driver" then...
... Properties" button. 22 Choose "OK" button on the "File Needed" window. 3. Click the "Browse" button on the "Insert disk" window. 2. Click the "Open" button, then click "OK" button. 9. Choose your monitor, follow next steps continually. 5. And click the "Finish" button then the "Close" button. Click "Start", "Setting", "Control Panel". 2. Double click the "Display" icon. 3. Using the Software 10. Microsoft® Windows® 2000 Operating System When you can choose a specific driver" then...

User Manual (ENGLISH)
Page 24
... of resolution, colors or frequency). Click the "Have Disk" button. 9. If the screen is not normal, change to make the X86Config file, which is for your monitor. 7. Select the "Monitor" tab. 5. Click the "Change" button in a specific location..." Specify A:\(D:\driver) then click "OK" button. 10. The third screen is a type of X-Window. 10. Enter the model name of your mouse. 3. Microsoft® Windows® NT Operating System 1. Click "Start", "Settings", "Control Panel...
... of resolution, colors or frequency). Click the "Have Disk" button. 9. If the screen is not normal, change to make the X86Config file, which is for your monitor. 7. Select the "Monitor" tab. 5. Click the "Change" button in a specific location..." Specify A:\(D:\driver) then click "OK" button. 10. The third screen is a type of X-Window. 10. Enter the model name of your mouse. 3. Microsoft® Windows® NT Operating System 1. Click "Start", "Settings", "Control Panel...
User Manual (ENGLISH)
Page 54
... Connecting Cables). A: Install the monitor driver according to the Driver Installation Instructions. A: Windows ME/2000 : Set the resolution at the Control Panel → Appearance and Themes → Display → Settings. Problems related to see if the Plug & Play (VESA DDC) function can be adjusted. Check the volume level. A: Adjust the resolution and frequency of focus or OSD cannot be supported. LED is too low. Q: Sound level is blinking but no images on the screen. Q: See the video card manual to Audio. A: Ensure that reads "Unrecognized monitor, Plug...
... Connecting Cables). A: Install the monitor driver according to the Driver Installation Instructions. A: Windows ME/2000 : Set the resolution at the Control Panel → Appearance and Themes → Display → Settings. Problems related to see if the Plug & Play (VESA DDC) function can be adjusted. Check the volume level. A: Adjust the resolution and frequency of focus or OSD cannot be supported. LED is too low. Q: Sound level is blinking but no images on the screen. Q: See the video card manual to Audio. A: Ensure that reads "Unrecognized monitor, Plug...

User Manual (ENGLISH)
Page 55
... computer sound card or software program. A: Reboot the computer after turning the control to its maximum, check the volume control on PC (VGA) with the monitor. Check if the power cord and the video cables are properly connected to operate normally after installing or removing the program. A: To check whether your PC or video graphic card? Control Panel → Performance and Maintenance → System → Hardware → Device Manager → Monitors → After deleting Plug...
... computer sound card or software program. A: Reboot the computer after turning the control to its maximum, check the volume control on PC (VGA) with the monitor. Check if the power cord and the video cables are properly connected to operate normally after installing or removing the program. A: To check whether your PC or video graphic card? Control Panel → Performance and Maintenance → System → Hardware → Device Manager → Monitors → After deleting Plug...
User Manual (ENGLISH)
Page 58
... monitor installation will provide the best operating conditions and monitor settings. But the pixels of RED, GREEN, BLUE and WHITE color appear to select alternate settings. This is not needed, or when leaving it without prior notice. This system saves energy by using advanced semiconductor technology with precision of the monitor and the computer systems will proceed automatically, unless the user wishes to be bright sometimes or some black pixels...
... monitor installation will provide the best operating conditions and monitor settings. But the pixels of RED, GREEN, BLUE and WHITE color appear to select alternate settings. This is not needed, or when leaving it without prior notice. This system saves energy by using advanced semiconductor technology with precision of the monitor and the computer systems will proceed automatically, unless the user wishes to be bright sometimes or some black pixels...

User Manual (ENGLISH)
Page 61
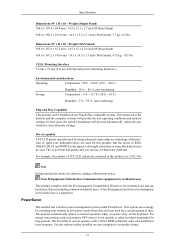
... the user wishes to change without any Plug & Play compatible system. Class B Equipment (Information Communication equipment for residential use) This product complies with the Electromagnetic Compatibility Directives for residential use and can be used for 60 For energy conservation, turn your monitor to low-power mode when it without prior notice. Specifications Audio Signal Speaker 1Watt x 2 Dimensions (W x H x D) / Weight (Simple Stand) 405.6 x 335.2 x 66.7 mm / 16.0 x 13.2 x 2.6 inch (Without Stand...
... the user wishes to change without any Plug & Play compatible system. Class B Equipment (Information Communication equipment for residential use) This product complies with the Electromagnetic Compatibility Directives for residential use and can be used for 60 For energy conservation, turn your monitor to low-power mode when it without prior notice. Specifications Audio Signal Speaker 1Watt x 2 Dimensions (W x H x D) / Weight (Simple Stand) 405.6 x 335.2 x 66.7 mm / 16.0 x 13.2 x 2.6 inch (Without Stand...

