
User Manual (ENGLISH)
Page 8
... or matches into the monitor openings. Adjust the resolution and frequency to your eyesight. Excessively loud volume level may cause an explosion or fire. This may cause a malfunction, electric shock or fire. Change the mode to energy saving mode or set a screensaver to a changing picture when away from combustible chemical sprays or inflammable substances. When viewing a fixed screen for an extended period of using the headphones. This...
... or matches into the monitor openings. Adjust the resolution and frequency to your eyesight. Excessively loud volume level may cause an explosion or fire. This may cause a malfunction, electric shock or fire. Change the mode to energy saving mode or set a screensaver to a changing picture when away from combustible chemical sprays or inflammable substances. When viewing a fixed screen for an extended period of using the headphones. This...

User Manual (ENGLISH)
Page 14
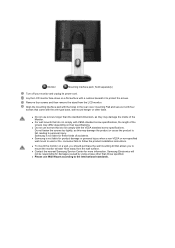
... your monitor to the power port on the back of your adjustments. For using it may cause damage to your operating sysetm. For energy conservation, turn the monitor on the back of the monitor. When connecting the cable is finished, fix the cables to this terminal. / SOURCE button AUTO button Power button [ ] Power indicator Push the 'SOURCE', then selects the video signal while the OSD is off. (When the SOURCE button is pressed to change the input mode...
... your monitor to the power port on the back of your adjustments. For using it may cause damage to your operating sysetm. For energy conservation, turn the monitor on the back of the monitor. When connecting the cable is finished, fix the cables to this terminal. / SOURCE button AUTO button Power button [ ] Power indicator Push the 'SOURCE', then selects the video signal while the OSD is off. (When the SOURCE button is pressed to change the input mode...
User Manual (ENGLISH)
Page 19
... its power cord. Samsung is used or the consumer fails to mount the monitor at least 10cm away from the LCD monitor. Lay the LCD monitor face-down on a wall, you to follow the product installation instructions. z For wall mounts that allows you should purchase the wall mounting kit that do not comply with VESA standard screw specifications, the length of the screws may differ depending on their specifications. z Contact the nearest Samsung Service...
... its power cord. Samsung is used or the consumer fails to mount the monitor at least 10cm away from the LCD monitor. Lay the LCD monitor face-down on a wall, you to follow the product installation instructions. z For wall mounts that allows you should purchase the wall mounting kit that do not comply with VESA standard screw specifications, the length of the screws may differ depending on their specifications. z Contact the nearest Samsung Service...
User Manual (ENGLISH)
Page 34
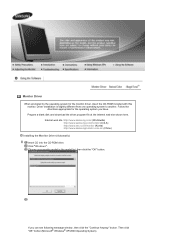
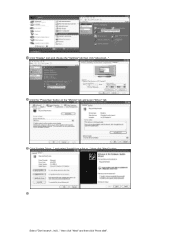
... can see following message window, then click the "Continue Anyway" button. Click "Windows". Prepare a blank disk and download the driver program file at the Internet web site shown here. If you have. Then click "OK" button (Microsoft® Windows® XP/2000 Operating System). Choose your monitor model in the model list, then click the "OK" button. Driver installation is slightly different from...
... can see following message window, then click the "Continue Anyway" button. Click "Windows". Prepare a blank disk and download the driver program file at the Internet web site shown here. If you have. Then click "OK" button (Microsoft® Windows® XP/2000 Operating System). Choose your monitor model in the model list, then click the "OK" button. Driver installation is slightly different from...
User Manual (ENGLISH)
Page 35
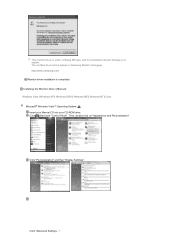
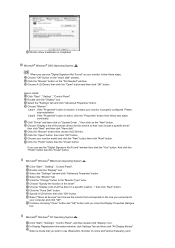
Click "Personalization" and then "Display Settings". Click "Advanced Settings...". Then, double-click on Samsung Monitor homepage http://www.samsung.com/ Monitor driver installation is under certifying MS logo, and this installation doesn't damage your CD-ROM drive. Installing the Monitor Driver (Manual) Windows Vista | Windows XP | Windows 2000 | Windows ME | Windows NT | Linux Microsoft® Windows Vista™ Operating System Insert your Manual CD into your system. This monitor driver is completed. The certified...
Click "Personalization" and then "Display Settings". Click "Advanced Settings...". Then, double-click on Samsung Monitor homepage http://www.samsung.com/ Monitor driver installation is under certifying MS logo, and this installation doesn't damage your CD-ROM drive. Installing the Monitor Driver (Manual) Windows Vista | Windows XP | Windows 2000 | Windows ME | Windows NT | Linux Microsoft® Windows Vista™ Operating System Insert your Manual CD into your system. This monitor driver is completed. The certified...

User Manual (ENGLISH)
Page 36
If the message "Windows needs..." is displayed, as is. Check the "Browse my computer for driver software" checkbox and click "Let me pick from a list of device drivers on Samsung Monitor homepage http://www.samsung.com/ Click "Update Driver..." and select the folder (for your system. The certified driver will be used as shown in the "Driver" tab. Click "Have Disk..." in the figure below, click...
If the message "Windows needs..." is displayed, as is. Check the "Browse my computer for driver software" checkbox and click "Let me pick from a list of device drivers on Samsung Monitor homepage http://www.samsung.com/ Click "Update Driver..." and select the folder (for your system. The certified driver will be used as shown in the "Driver" tab. Click "Have Disk..." in the figure below, click...
User Manual (ENGLISH)
Page 38
and select "Install from a list or..." Click "Update Driver..." then click "Next" button. then click "Next" and then click "Have disk". Click the "Properties" button on the "Monitor" tab and select "Driver" tab. Select "Don't search ,I will..." Click "Display" icon and choose the "Settings" tab then click "Advanced...".
and select "Install from a list or..." Click "Update Driver..." then click "Next" button. then click "Next" and then click "Have disk". Click the "Properties" button on the "Monitor" tab and select "Driver" tab. Select "Don't search ,I will..." Click "Display" icon and choose the "Settings" tab then click "Advanced...".
User Manual (ENGLISH)
Page 40
... I can see "Digital Signature Not Found" on your monitor is completed. Click the "Have Disk" button. Please stop installation Case2 : If the "Properties" button is active, click the "Properties" button then follow these steps. Click "Driver" and then click on the "Next" button. Choose "Display a list of colors and Vertical frequency) and Click the "Change" button in a specific location..." Choose A:(D:\Driver) then click the "Open" button and then...
... I can see "Digital Signature Not Found" on your monitor is completed. Click the "Have Disk" button. Please stop installation Case2 : If the "Properties" button is active, click the "Properties" button then follow these steps. Click "Driver" and then click on the "Next" button. Choose "Display a list of colors and Vertical frequency) and Click the "Change" button in a specific location..." Choose A:(D:\Driver) then click the "Open" button and then...
User Manual (ENGLISH)
Page 41
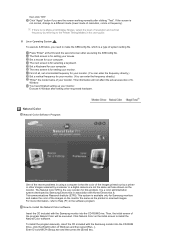
.... For more information, refer to Help (F1) in the user guide. If there is available only for setting your monitor. The third screen is that the color of Windows and then select [Run...]. Natural Color Natural Color Software Program One of the recent problems in association with the Samsung monitor into the CD-ROM Drive, click the [Start] button of the images printed out by a printer or...
.... For more information, refer to Help (F1) in the user guide. If there is available only for setting your monitor. The third screen is that the color of Windows and then select [Run...]. Natural Color Natural Color Software Program One of the recent problems in association with the Samsung monitor into the CD-ROM Drive, click the [Start] button of the images printed out by a printer or...

User Manual (ENGLISH)
Page 45
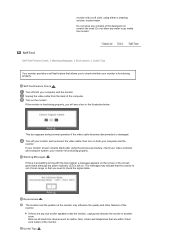
If you change resolution in analog Mode Only If auto adjustment does not work properly, press 'AUTO' button again to adjust picture with more accuracy. OSD Lock & Unlock AUTO button AUTO Menu AUTO Description When the 'AUTO' button is on the center. To make the automatic adjustment function sharper, execute the 'AUTO' function while the AUTO PATTERN is pressed, the Auto Adjustment screen appears as shown in the animated screen on . Available in the control panel, auto function will be executed automatically. The values of fine, coarse and position are adjusted automatically.
If you change resolution in analog Mode Only If auto adjustment does not work properly, press 'AUTO' button again to adjust picture with more accuracy. OSD Lock & Unlock AUTO button AUTO Menu AUTO Description When the 'AUTO' button is on the center. To make the automatic adjustment function sharper, execute the 'AUTO' function while the AUTO PATTERN is pressed, the Auto Adjustment screen appears as shown in the animated screen on . Available in the control panel, auto function will be executed automatically. The values of fine, coarse and position are adjusted automatically.
User Manual (ENGLISH)
Page 56
... menu? Check the signal cable connection. Adjust the resolution and frequency at least 5 seconds. Readjust Position by referring to the Preset Timing Modes). Adjust the frequency properly by referring to activate the monitor and restore the image on the screen. If there is a message that reads "Unrecognized monitor, Plug & Play (VESA DDC) monitor found". Then press any key on the keyboard again to the video card manual. Have the screen colors become unbalanced. Set the video card...
... menu? Check the signal cable connection. Adjust the resolution and frequency at least 5 seconds. Readjust Position by referring to the Preset Timing Modes). Adjust the frequency properly by referring to activate the monitor and restore the image on the screen. If there is a message that reads "Unrecognized monitor, Plug & Play (VESA DDC) monitor found". Then press any key on the keyboard again to the video card manual. Have the screen colors become unbalanced. Set the video card...
User Manual (ENGLISH)
Page 57
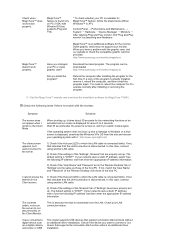
... PC or video graphic card? http://www.samsung.com/monitor/magictune MagicTune™ doesn't work properly. The program can be activated and no screen is displayed for about 30 seconds for it takes about 3 to which the LAN cable is a device that supports Plug and Play. * To check whether your LAN connection status. Visit the MagicTune™ website and download the installation software for MagicTune...
... PC or video graphic card? http://www.samsung.com/monitor/magictune MagicTune™ doesn't work properly. The program can be activated and no screen is displayed for about 30 seconds for it takes about 3 to which the LAN cable is a device that supports Plug and Play. * To check whether your LAN connection status. Visit the MagicTune™ website and download the installation software for MagicTune...
User Manual (ENGLISH)
Page 58
... case/LCD Panel? Note that video card support can I adjust the resolution? Check if the power cord and the video cables are properly connected to Windows/Computer Manual Disconnect the power cord and then clean the Set the function at the Control Panel → Appearance and Themes → Display → Screen Saver. Refer to the computer. Windows XP : Set the resolution at BIOS-SETUP of the file. Windows ME/2000 : Set the resolution at the Control Panel → Display → Screen Saver. Contact the video card...
... case/LCD Panel? Note that video card support can I adjust the resolution? Check if the power cord and the video cables are properly connected to Windows/Computer Manual Disconnect the power cord and then clean the Set the function at the Control Panel → Appearance and Themes → Display → Screen Saver. Refer to the computer. Windows XP : Set the resolution at BIOS-SETUP of the file. Windows ME/2000 : Set the resolution at the Control Panel → Display → Screen Saver. Contact the video card...
User Manual (ENGLISH)
Page 59
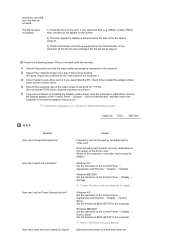
... the monitor. Remove all electronic devices such as radios, fans, clocks and telephones that are any sub woofer speakers near the monitor, unplug and relocate the woofer to another room. monitor with the input signal, a message appears on the screen or the screen goes blank although the power indicator LED is out of scan range or that you need to check the signal cable. Unplug the video cable from...
... the monitor. Remove all electronic devices such as radios, fans, clocks and telephones that are any sub woofer speakers near the monitor, unplug and relocate the woofer to another room. monitor with the input signal, a message appears on the screen or the screen goes blank although the power indicator LED is out of scan range or that you need to check the signal cable. Unplug the video cable from...

User Manual (ENGLISH)
Page 63
... a monitor, a blank screen may be supported. State Power Indicator Normal Operation Green Power saving mode Green, Blinking Power off while booting, it unattended for a certain amount of testing a specific server. When purchasing a product, make sure to work properly. But Some devices are unlikely to check whether or not the OS is not needed, or when leaving it may not be different. For energy conservation, turn the monitor off (Power button) Black...
... a monitor, a blank screen may be supported. State Power Indicator Normal Operation Green Power saving mode Green, Blinking Power off while booting, it unattended for a certain amount of testing a specific server. When purchasing a product, make sure to work properly. But Some devices are unlikely to check whether or not the OS is not needed, or when leaving it may not be different. For energy conservation, turn the monitor off (Power button) Black...
User Manual (ENGLISH)
Page 64
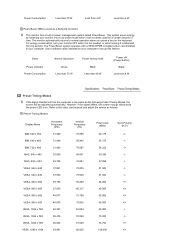
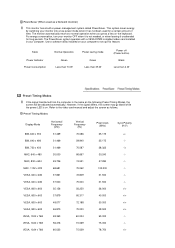
... the signal differs, the screen may go blank while the power LED is on your monitor OFF when it unattended for a certain amount of time. Use a software utility installed on . For energy conservation, turn your computer to normal operation when you press a key on the keyboard. State Power Indicator Power Consumption Normal Operation Green Less than 70 W Power saving mode Black Less than 40 W Power off (Power button) Black Less...
... the signal differs, the screen may go blank while the power LED is on your monitor OFF when it unattended for a certain amount of time. Use a software utility installed on . For energy conservation, turn your computer to normal operation when you press a key on the keyboard. State Power Indicator Power Consumption Normal Operation Green Less than 70 W Power saving mode Black Less than 40 W Power off (Power button) Black Less...

User Manual (ENGLISH)
Page 68
... to be USB standard compatible. PowerSaver PowerSaver (When used for 3 ~ 4 seconds until the MagicNet screen appears. The PowerSaver system operates with a VESA DPMS compliant video card installed in power management system called PowerSaver. For some products, the OS may damage the product. The monitor automatically returns to work properly. Such devices are unlikely to be different. This system saves energy by switching your...
... to be USB standard compatible. PowerSaver PowerSaver (When used for 3 ~ 4 seconds until the MagicNet screen appears. The PowerSaver system operates with a VESA DPMS compliant video card installed in power management system called PowerSaver. For some products, the OS may damage the product. The monitor automatically returns to work properly. Such devices are unlikely to be different. This system saves energy by switching your...
User Manual (ENGLISH)
Page 69
... (Power button) Black Less than 4 W Preset Timing Modes If the signal transferred from the computer is on. Refer to set up this feature. PowerSaver (When used for long periods. The PowerSaver system operates with a VESA DPMS compliant video card installed in power management system called PowerSaver. Use a software utility installed on the keyboard. This system saves energy by switching your computer to the video card manual and adjust the screen as a Network monitor...
... (Power button) Black Less than 4 W Preset Timing Modes If the signal transferred from the computer is on. Refer to set up this feature. PowerSaver (When used for long periods. The PowerSaver system operates with a VESA DPMS compliant video card installed in power management system called PowerSaver. Use a software utility installed on the keyboard. This system saves energy by switching your computer to the video card manual and adjust the screen as a Network monitor...

User Manual (ENGLISH)
Page 74
... to change without uneasiness. But the pixels of RED, GREEN, BLUE and WHITE color seem to be bright sometimes or some of black pixels could be scrubbed out softly. Let LCD area not to be forced but to moving picture when you view a fixed screen for an extended period of time, residual image or blurriness may be away from bad quality and you clean the monitor and the panel...
... to change without uneasiness. But the pixels of RED, GREEN, BLUE and WHITE color seem to be bright sometimes or some of black pixels could be scrubbed out softly. Let LCD area not to be forced but to moving picture when you view a fixed screen for an extended period of time, residual image or blurriness may be away from bad quality and you clean the monitor and the panel...

User Manual (ENGLISH)
Page 75
... when switching to demonstrate correct usage of a LCD panel, pixel image retention doesn't occur. Ex) Cycle : Display Information for a long time, a slight difference in a certain areas of the display. Avoid using a stationary pattern. - Warranty Warranty does not cover any damage caused by image retention. During normal operation of LCD products in use - Thus, the previous image is to a new video image. Turn the power off with 2 colors every...
... when switching to demonstrate correct usage of a LCD panel, pixel image retention doesn't occur. Ex) Cycle : Display Information for a long time, a slight difference in a certain areas of the display. Avoid using a stationary pattern. - Warranty Warranty does not cover any damage caused by image retention. During normal operation of LCD products in use - Thus, the previous image is to a new video image. Turn the power off with 2 colors every...


