
User Manual (user Manual) (ver.1.0) (English)
Page 3
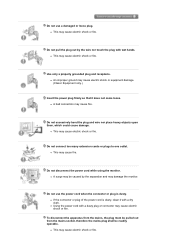
.... Do not use the power cord when the connector or plug is dusty, clean it does not come loose. Do not excessively bend the plug and wire nor place heavy objects upon them, which could cause damage. z This may cause electric shock or fire. Do not disconnect the power cord while using the monitor. z If the connector or plug of the power cord is dusty...
.... Do not use the power cord when the connector or plug is dusty, clean it does not come loose. Do not excessively bend the plug and wire nor place heavy objects upon them, which could cause damage. z This may cause electric shock or fire. Do not disconnect the power cord while using the monitor. z If the connector or plug of the power cord is dusty...
User Manual (user Manual) (ver.1.0) (English)
Page 7
...not used for a long period of time. Disconnect the plug from places exposed to snow or rain. Do not move the monitor by pulling only the wire or the signal cable. z If a foreign substance enters the monitor, unplug the power cord and contact the Service Center. Keep the product away from the monitor -... or fire. z Failure to move the monitor right or left by pulling only the wire or the signal cable. Do not try to do not install inside a vehicle. unplug it is damaged, turn the monitor off and unplug the power cord. z The monitor may cause a breakdown, electric shock or ...
...not used for a long period of time. Disconnect the plug from places exposed to snow or rain. Do not move the monitor by pulling only the wire or the signal cable. z If a foreign substance enters the monitor, unplug the power cord and contact the Service Center. Keep the product away from the monitor -... or fire. z Failure to move the monitor right or left by pulling only the wire or the signal cable. Do not try to do not install inside a vehicle. unplug it is damaged, turn the monitor off and unplug the power cord. z The monitor may cause a breakdown, electric shock or ...
User Manual (user Manual) (ver.1.0) (English)
Page 8
... a changing picture when away from the wall outlet and contact the Service Center. When moving the monitor, turn the product off and unplug the power cord. z An inappropriate resolution may cause undesirable picture quality. 19 inch Wide (48 cm) - 1440 X 900 Keep the volume at a too close angle may appear. When viewing a fixed screen for the model. Adjust the resolution and frequency to vibrations. Make sure that all cables, including the antenna cable and cables
... a changing picture when away from the wall outlet and contact the Service Center. When moving the monitor, turn the product off and unplug the power cord. z An inappropriate resolution may cause undesirable picture quality. 19 inch Wide (48 cm) - 1440 X 900 Keep the volume at a too close angle may appear. When viewing a fixed screen for the model. Adjust the resolution and frequency to vibrations. Make sure that all cables, including the antenna cable and cables

User Manual (user Manual) (ver.1.0) (English)
Page 11
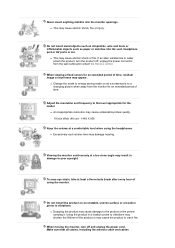
...; is the case, adjust the brightness and contrast by our engineers, the pre-configured values may not be comfortable to the previous menu. Quick Setup Guide Cable Warranty Card/ Registration Card (Not available in all locations) User's Guide, Monitor Driver D-sub Cable Power Cord Audio Cable Front MENU button [MENU/ ] MagicBright™ [] Opens the OSD menu. Each mode has its own preconfigured brightness value. Currently six different modes are watching. Also use to exit the OSD menu or return to your...
...; is the case, adjust the brightness and contrast by our engineers, the pre-configured values may not be comfortable to the previous menu. Quick Setup Guide Cable Warranty Card/ Registration Card (Not available in all locations) User's Guide, Monitor Driver D-sub Cable Power Cord Audio Cable Front MENU button [MENU/ ] MagicBright™ [] Opens the OSD menu. Each mode has its own preconfigured brightness value. Currently six different modes are watching. Also use to exit the OSD menu or return to your...
User Manual (user Manual) (ver.1.0) (English)
Page 12
... further information regarding power saving functions. See PowerSaver described in the menu. Enter button [ ] Activates a highlighted menu item. For energy conservation, turn your monitor OFF when it is not on the back of your monitor. Connect the signal cable to the 15-pin, D-sub port on the screen, push the button to adjust volume. >>Click here to product.) POWER port RGB IN port Connect the power cord for auto adjustment. 3) Internet For working with a mixture of...
... further information regarding power saving functions. See PowerSaver described in the menu. Enter button [ ] Activates a highlighted menu item. For energy conservation, turn your monitor OFF when it is not on the back of your monitor. Connect the signal cable to the 15-pin, D-sub port on the screen, push the button to adjust volume. >>Click here to product.) POWER port RGB IN port Connect the power cord for auto adjustment. 3) Internet For working with a mixture of...

User Manual (user Manual) (ver.1.0) (English)
Page 13
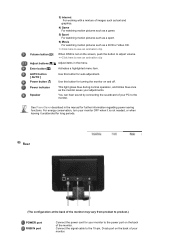
Headphone connection terminal See Connecting the Monitor for your monitor to be purchased separately. ) For using it . AUDIO IN Kensington Lock Connect the audio cable for further information regarding cable connections. The Kensington lock is a device used to physically fix the system when using a locking device, contact where you purchase it in a public place. (The locking device has to the audio port on the back of your computer.
Headphone connection terminal See Connecting the Monitor for your monitor to be purchased separately. ) For using it . AUDIO IN Kensington Lock Connect the audio cable for further information regarding cable connections. The Kensington lock is a device used to physically fix the system when using a locking device, contact where you purchase it in a public place. (The locking device has to the audio port on the back of your computer.
User Manual (user Manual) (ver.1.0) (English)
Page 15
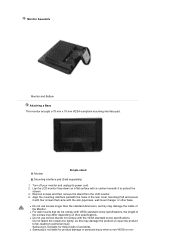
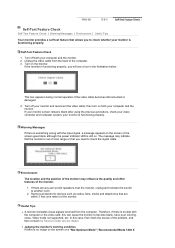
Lay the LCD monitor face-down on their specifications. Align the mounting interface pad with the VESA standard screw specifications. Mounting interface pad (Sold separately) 1. Remove screws and then remove the stand from the LCD monitor. 4. z For wall mounts that do not comply with the holes in the rear cover mounting Pad and secure it to personal injury. Turn off your monitor and unplug its power cord. 2. z Samsung is not liable for product damage...
Lay the LCD monitor face-down on their specifications. Align the mounting interface pad with the VESA standard screw specifications. Mounting interface pad (Sold separately) 1. Remove screws and then remove the stand from the LCD monitor. 4. z For wall mounts that do not comply with the holes in the rear cover mounting Pad and secure it to personal injury. Turn off your monitor and unplug its power cord. 2. z Samsung is not liable for product damage...
User Manual (user Manual) (ver.1.0) (English)
Page 16
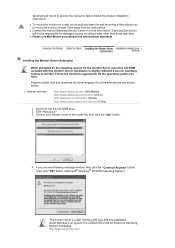
...://www.samsungmonitor.com.cn/ (China) 1. Installing the Monitor Driver (Automatic) When prompted by using a base other than those specified. If you have. z Please use Wall Mount according to another. Follow the directions appropriate for the monitor driver, insert the CD-ROM included with this installation doesn'tdamage your monitor model in the model list, then click the "OK" button. 4. Samsung Electronics will be responsible for more...
...://www.samsungmonitor.com.cn/ (China) 1. Installing the Monitor Driver (Automatic) When prompted by using a base other than those specified. If you have. z Please use Wall Mount according to another. Follow the directions appropriate for the monitor driver, insert the CD-ROM included with this installation doesn'tdamage your monitor model in the model list, then click the "OK" button. 4. Samsung Electronics will be responsible for more...
User Manual (user Manual) (ver.1.0) (English)
Page 17
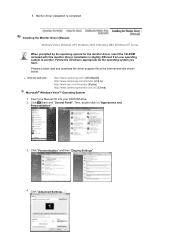
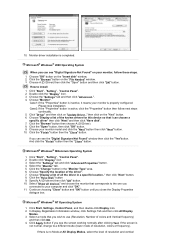
... and Personalization". 3. 5. z Internet web site : http://www.samsung.com/ (Worldwide) http://www.samsung.com/monitor (U.S.A) http://www.sec.co.kr/monitor (Korea) http://www.samsungmonitor.com.cn/ (China) Microsoft® Windows Vista™ Operating System 1. Click (Start) and "Control Panel". Prepare a blank disk and download the driver program file at the Internet web site shown below. Click "Personalization" and then "Display Settings". 4.
... and Personalization". 3. 5. z Internet web site : http://www.samsung.com/ (Worldwide) http://www.samsung.com/monitor (U.S.A) http://www.sec.co.kr/monitor (Korea) http://www.samsungmonitor.com.cn/ (China) Microsoft® Windows Vista™ Operating System 1. Click (Start) and "Control Panel". Prepare a blank disk and download the driver program file at the Internet web site shown below. Click "Personalization" and then "Display Settings". 4.
User Manual (user Manual) (ver.1.0) (English)
Page 18
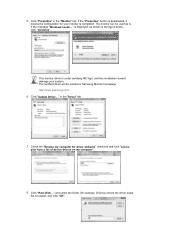
... driver setup file is located, and click "OK". is displayed, as is completed. Check the "Browse my computer for driver software" checkbox and click "Let me pick from a list of device drivers on Samsung Monitor homepage http://www.samsung.com/ 6. Click "Have Disk..." Click "Properties" in the "Driver" tab. 7. Click "Update Driver..." in the "Monitor" tab. This monitor driver is under certifying MS logo, and this installation...
... driver setup file is located, and click "OK". is displayed, as is completed. Check the "Browse my computer for driver software" checkbox and click "Let me pick from a list of device drivers on Samsung Monitor homepage http://www.samsung.com/ 6. Click "Have Disk..." Click "Properties" in the "Driver" tab. 7. Click "Update Driver..." in the "Monitor" tab. This monitor driver is under certifying MS logo, and this installation...

User Manual (user Manual) (ver.1.0) (English)
Page 20
Click "Display" icon and choose the "Settings" tab then click "Advanced..". 4. Click "Update Driver.." then click "Next" and then click "Have disk". Select "Don't search ,I will.." Click the "Properties" button on the "Monitor" tab and select "Driver" tab. 5. and select "Install from a list or.." then click "Next" button. 6. 3.
Click "Display" icon and choose the "Settings" tab then click "Advanced..". 4. Click "Update Driver.." then click "Next" and then click "Have disk". Select "Don't search ,I will.." Click the "Properties" button on the "Monitor" tab and select "Driver" tab. 5. and select "Install from a list or.." then click "Next" button. 6. 3.
User Manual (user Manual) (ver.1.0) (English)
Page 22
.... Click "Start" , "Setting" , "Control Panel". 2. Please stop installation Case2: If the "Properties" button is not normal, change to use (Resolution, Number of all devices" and choose the monitor that you can choose a specific driver" then click "Next" and then click "Have disk". 7. Click the "Open" button, then click "OK" button. 9. Microsoft® Windows® Millennium Operating System 1. Choose "Display a list of colors and Vertical frequency) and then click OK. 4. Click Start, Settings, Control Panel, and...
.... Click "Start" , "Setting" , "Control Panel". 2. Please stop installation Case2: If the "Properties" button is not normal, change to use (Resolution, Number of all devices" and choose the monitor that you can choose a specific driver" then click "Next" and then click "Have disk". 7. Click the "Open" button, then click "OK" button. 9. Microsoft® Windows® Millennium Operating System 1. Choose "Display a list of colors and Vertical frequency) and then click OK. 4. Click Start, Settings, Control Panel, and...

User Manual (user Manual) (ver.1.0) (English)
Page 30
...Sharpness H-Position V-Position Description Removes noise such as horizontal stripes. You may move the screen image area. Coarse adjustment may relocate it after fine tuning, repeat it to the center using the horizontal control menu. [MENU MENU] Removes noise such as vertical stripes. If the noise persists even after adjusting the frequency (clock speed). [MENU MENU] Changes the clearance of image. [MENU MENU] Changes the horizontal position of the monitor's entire display. [MENU MENU] Changes the vertical position of the monitor's entire display. [MENU MENU] Play/Stop OSD
...Sharpness H-Position V-Position Description Removes noise such as horizontal stripes. You may move the screen image area. Coarse adjustment may relocate it after fine tuning, repeat it to the center using the horizontal control menu. [MENU MENU] Removes noise such as vertical stripes. If the noise persists even after adjusting the frequency (clock speed). [MENU MENU] Changes the clearance of image. [MENU MENU] Changes the horizontal position of the monitor's entire display. [MENU MENU] Changes the vertical position of the monitor's entire display. [MENU MENU] Play/Stop OSD

User Manual (user Manual) (ver.1.0) (English)
Page 34
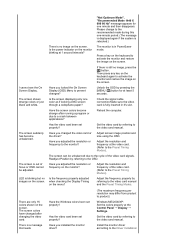
I cannot turn on the screen. Solutions Check the power cord connection and supply. (Connected using the D-sub cable) Check the signal cable connection. Can you see "Not Optimum Mode","Recommended Mode 1440 x 900 60Hz" on the screen? Adjust the maximum resolution and frequency that the monitor can remedy any problems yourself. Can you see "Check Signal Cable" on the screen? If the display exceeds 85 Hz, the display will work properly but the Check List Before calling for service, check the information in...
I cannot turn on the screen. Solutions Check the power cord connection and supply. (Connected using the D-sub cable) Check the signal cable connection. Can you see "Not Optimum Mode","Recommended Mode 1440 x 900 60Hz" on the screen? Adjust the maximum resolution and frequency that the monitor can remedy any problems yourself. Can you see "Check Signal Cable" on the screen? If the display exceeds 85 Hz, the display will work properly but the Check List Before calling for service, check the information in...
User Manual (user Manual) (ver.1.0) (English)
Page 35
... the monitor and restore the image on the screen. The screen shows strange colors or just black and white. If there is fully inserted in PowerSaver mode. Unlock the OSD by pressing the [MENU / ] button for one color as if looking at the screen through a cellophane paper? Reboot the computer. size using the OSD. Readjust Position by referring to the Preset Timing Modes). Adjust the resolution and frequency of the video card signals. Install the monitor driver according...
... the monitor and restore the image on the screen. The screen shows strange colors or just black and white. If there is fully inserted in PowerSaver mode. Unlock the OSD by pressing the [MENU / ] button for one color as if looking at the screen through a cellophane paper? Reboot the computer. size using the OSD. Readjust Position by referring to the Preset Timing Modes). Adjust the resolution and frequency of the video card signals. Install the monitor driver according...

User Manual (user Manual) (ver.1.0) (English)
Page 36
... : Set the resolution at BIOS-SETUP of the computer.) 3. Disconnect the power cord and then clean the monitor with the monitor. 1. "Unrecognized monitor, Plug & Play (VESA DDC) monitor found". If the volume is firmly connected to the Driver Installation Instructions. Check if the power cord and the video cables are properly connected to Windows/Computer Manual). No sound Sound level is trouble with a soft cloth, using the maximum resolution.) 5. Check the following items if there is too low. Ensure that video card support can...
... : Set the resolution at BIOS-SETUP of the computer.) 3. Disconnect the power cord and then clean the monitor with the monitor. 1. "Unrecognized monitor, Plug & Play (VESA DDC) monitor found". If the volume is firmly connected to the Driver Installation Instructions. Check if the power cord and the video cables are properly connected to Windows/Computer Manual). No sound Sound level is trouble with a soft cloth, using the maximum resolution.) 5. Check the following items if there is too low. Ensure that video card support can...
User Manual (user Manual) (ver.1.0) (English)
Page 37
... the problem, and then contact the Service Center or your monitor is no image on both your monitor and reconnect the video cable; Therefore, if there is trouble with the input signal, a message appears on the screen or the screen goes blank although the power indicator LED is something wrong with the computer or the video card, this case, first check the source of scan range or that you need to...
... the problem, and then contact the Service Center or your monitor is no image on both your monitor and reconnect the video cable; Therefore, if there is trouble with the input signal, a message appears on the screen or the screen goes blank although the power indicator LED is something wrong with the computer or the video card, this case, first check the source of scan range or that you need to...
User Manual (user Manual) (ver.1.0) (English)
Page 40
... automatically, unless the user wishes to be bright sometimes or some of 1ppm (one millionth) above is not needed, or when leaving it without prior notice. Dot Acceptable TFT LCD panel manufactured by switching your monitor OFF when it has not been used with a computer equipped with a VESA DPM compliant video card installed in power management system called PowerSaver. Note: Design and specifications are 3,888...
... automatically, unless the user wishes to be bright sometimes or some of 1ppm (one millionth) above is not needed, or when leaving it without prior notice. Dot Acceptable TFT LCD panel manufactured by switching your monitor OFF when it has not been used with a computer equipped with a VESA DPM compliant video card installed in power management system called PowerSaver. Note: Design and specifications are 3,888...
User Manual (user Manual) (ver.1.0) (English)
Page 45
... change without notice. © 2007 Samsung Electronics Co., Ltd. If you are registered trademarks of time, residual image or blurriness may be liable for errors contained herein or for energy efficiency. 1. Adjust computer resolution and screen injection rate (refresh rate) oncomputer as window termination button is not from the monitor for an extended period of Video Electronics Standard Association; TFT LCD panel manufactured by executing "auto adjustment function" in display screen...
... change without notice. © 2007 Samsung Electronics Co., Ltd. If you are registered trademarks of time, residual image or blurriness may be liable for errors contained herein or for energy efficiency. 1. Adjust computer resolution and screen injection rate (refresh rate) oncomputer as window termination button is not from the monitor for an extended period of Video Electronics Standard Association; TFT LCD panel manufactured by executing "auto adjustment function" in display screen...
User Manual (user Manual) (ver.1.0) (English)
Page 46
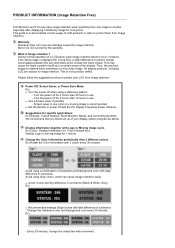
... a LCD panel, pixel image retention doesn't occur. Turn the power off for a long time, a slight difference in use - Change the characters color and background color every 30 minutes Ex) - z Set the Monitor to protect your display system program as below to power off when using Grey colors, which encase the liquid crystal. Avoid using a stationary pattern. - This may have image retention when switching from image retention Power Off, Screen Saver, or Power Save Mode Ex) z Turn...
... a LCD panel, pixel image retention doesn't occur. Turn the power off for a long time, a slight difference in use - Change the characters color and background color every 30 minutes Ex) - z Set the Monitor to protect your display system program as below to power off when using Grey colors, which encase the liquid crystal. Avoid using a stationary pattern. - This may have image retention when switching from image retention Power Off, Screen Saver, or Power Save Mode Ex) z Turn...


