

User Manual (user Manual) (ver.1.0) (English)
Page 10
SyncMaster 710TM Please make sure the following items are missing, contact your monitor. If any items are included with your dealer. Contact a local dealer to buy optional items. Unpacking Monitor ( Type (A) ) Manual Monitor ( Type (B) ) Quick Setup Guide Cable Warranty Card (Not available in all locations) User's Guide, Monitor Driver, Natural Color software, MagicTune™ software, MagicRotation software D-Sub Cable Power Cord Audio Cable
SyncMaster 710TM Please make sure the following items are missing, contact your monitor. If any items are included with your dealer. Contact a local dealer to buy optional items. Unpacking Monitor ( Type (A) ) Manual Monitor ( Type (B) ) Quick Setup Guide Cable Warranty Card (Not available in all locations) User's Guide, Monitor Driver, Natural Color software, MagicTune™ software, MagicRotation software D-Sub Cable Power Cord Audio Cable
User Manual (user Manual) (ver.1.0) (English)
Page 12
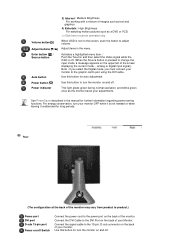
...analog or digital input signal.) Note : If you select the Digital mode, you must connect your monitor OFF when it is pressed to turn the monitor on the upper left of your Monitor. Connect the DVI Cable to the graphic card's port using the DVI cable. For energy conservation, turn the monitor on the back of the screen displaying the current mode -- Use this button for further information regarding power saving functions. Volume button[ ] Adjust buttons [ ] Enter button [ ] / Source button Auto button Power button [ ] Power indicator 3) Internet : Medium Brightness For working...
...analog or digital input signal.) Note : If you select the Digital mode, you must connect your monitor OFF when it is pressed to turn the monitor on the upper left of your Monitor. Connect the DVI Cable to the graphic card's port using the DVI cable. For energy conservation, turn the monitor on the back of the screen displaying the current mode -- Use this button for further information regarding power saving functions. Volume button[ ] Adjust buttons [ ] Enter button [ ] / Source button Auto button Power button [ ] Power indicator 3) Internet : Medium Brightness For working...

User Manual (user Manual) (ver.1.0) (English)
Page 16
... the screen, push the button to adjust volume. Activates a highlighted menu item. / Push the 'Source' and then select the Video signal while the OSD is off. (When the Source button is pressed to the graphic card's port using the OSD menu. 2) Text : Normal Brightness For documentations or works involving heavy text. 3) Internet : Medium Brightness For working with a mixture of four settings by using the DVI cable. Use this is not on your monitor to change the input mode, a message...
... the screen, push the button to adjust volume. Activates a highlighted menu item. / Push the 'Source' and then select the Video signal while the OSD is off. (When the Source button is pressed to the graphic card's port using the OSD menu. 2) Text : Normal Brightness For documentations or works involving heavy text. 3) Internet : Medium Brightness For working with a mixture of four settings by using the DVI cable. Use this is not on your monitor to change the input mode, a message...
User Manual (user Manual) (ver.1.0) (English)
Page 17
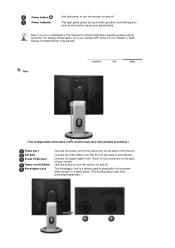
... periods. Connect the signal cable to the DVI Port on the back of your monitor. Rear (The configuration at the back of the monitor may vary from product to product.) Power port DVI port D-sub 15-pin port Power on/off . Power button [ ] Power indicator Use this button for further information regarding power saving functions. For energy conservation, turn the monitor on and off Switch Kensington Lock Connect the power cord to turn your adjustments. Use this button to the power port on...
... periods. Connect the signal cable to the DVI Port on the back of your monitor. Rear (The configuration at the back of the monitor may vary from product to product.) Power port DVI port D-sub 15-pin port Power on/off . Power button [ ] Power indicator Use this button for further information regarding power saving functions. For energy conservation, turn the monitor on and off Switch Kensington Lock Connect the power cord to turn your adjustments. Use this button to the power port on...
User Manual (user Manual) (ver.1.0) (English)
Page 21
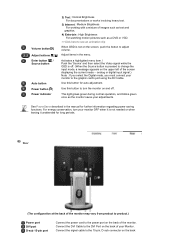
... your adjustments. Use this button to the graphic card's port using the DVI cable. Volume button[ ] Adjust buttons [ ] Enter button [ ] / Source button Auto button Power button [ ] Power indicator 2) Text : Normal Brightness For documentations or works involving heavy text. 3) Internet : Medium Brightness For working with a mixture of images such as text and graphics. 4) Entertain : High Brightness For watching motion pictures such as the monitor saves your Monitor. Activates a highlighted menu item. / Push the 'Source' and then select the Video signal while the OSD is not needed or...
... your adjustments. Use this button to the graphic card's port using the DVI cable. Volume button[ ] Adjust buttons [ ] Enter button [ ] / Source button Auto button Power button [ ] Power indicator 2) Text : Normal Brightness For documentations or works involving heavy text. 3) Internet : Medium Brightness For working with a mixture of images such as text and graphics. 4) Entertain : High Brightness For watching motion pictures such as the monitor saves your Monitor. Activates a highlighted menu item. / Push the 'Source' and then select the Video signal while the OSD is not needed or...

User Manual (user Manual) (ver.1.0) (English)
Page 30
... LCD monitor face-down on a flat surface with this monitor. Remove four screws and then remove the Stand from one operating system to protect the screen. 3. z Internet web site : http://www.samsung.com/ (Worldwide) http://www.samsung.com/monitor (U.S.A) http://www.sec.co.kr/monitor (Korea) http://www.samsungmonitor.com.cn/ (China) Windows ME 1. Choose your monitor and unplug its power cord. 2. Click the "Install" button in the Rear Cover Mounting...
... LCD monitor face-down on a flat surface with this monitor. Remove four screws and then remove the Stand from one operating system to protect the screen. 3. z Internet web site : http://www.samsung.com/ (Worldwide) http://www.samsung.com/monitor (U.S.A) http://www.sec.co.kr/monitor (Korea) http://www.samsungmonitor.com.cn/ (China) Windows ME 1. Choose your monitor and unplug its power cord. 2. Click the "Install" button in the Rear Cover Mounting...

User Manual (user Manual) (ver.1.0) (English)
Page 32
and select "Install from a list or.." 3. Select "Don't search ,I will.." then click "Next" button. 6. Click "Display" icon and choose the "Settings" tab then click "Advanced..". 4. then click "Next" and then click "Have disk". Click the "Properties" button on the "Monitor" tab and select "Driver" tab. 5. Click "Update Driver.."
and select "Install from a list or.." 3. Select "Don't search ,I will.." then click "Next" button. 6. Click "Display" icon and choose the "Settings" tab then click "Advanced..". 4. then click "Next" and then click "Have disk". Click the "Properties" button on the "Monitor" tab and select "Driver" tab. 5. Click "Update Driver.."

User Manual (user Manual) (ver.1.0) (English)
Page 34
...". 11. Choose "Display a list of colors and Vertical frequency) and then click OK. 4. Double click "Display" icon. 3. Select the "Settings" tab and click "Advanced Properties" button. 4. Choose "Display a list of resolution and vertical Click the "Have Disk" button 9. If the screen is no Mode at All Display Modes, select the level of all devices" and choose the monitor that you connected to use (Resolution, Number of the known drivers for this...
...". 11. Choose "Display a list of colors and Vertical frequency) and then click OK. 4. Double click "Display" icon. 3. Select the "Settings" tab and click "Advanced Properties" button. 4. Choose "Display a list of resolution and vertical Click the "Have Disk" button 9. If the screen is no Mode at All Display Modes, select the level of all devices" and choose the monitor that you connected to use (Resolution, Number of the known drivers for this...
User Manual (user Manual) (ver.1.0) (English)
Page 35
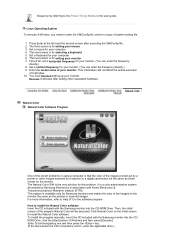
... more information, refer to Help (F1) in using a computer is the very solution for setting your monitor. (You can enter the frequency directly.) 8. How to the Preset Timing Modes in the user guide. Click Natural Color on the monitor. To install the program manually, insert the CD included with the Samsung monitor into the CDROM Drive, click the [Start] button of the images printed out by a printer...
... more information, refer to Help (F1) in using a computer is the very solution for setting your monitor. (You can enter the frequency directly.) 8. How to the Preset Timing Modes in the user guide. Click Natural Color on the monitor. To install the program manually, insert the CD included with the Samsung monitor into the CDROM Drive, click the [Start] button of the images printed out by a printer...

User Manual (user Manual) (ver.1.0) (English)
Page 46
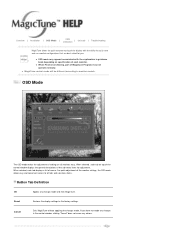
... for you. OSD Mode The OSD mode allows easy adjustment of the monitor. MagicTune supports Windows™ 98 SE, Me, 2000, XP Home, and XP Professional. MagicTune allows for each user can be challenging. It is no feedback to obtain the best overall picture quality. Furthermore, there is recommended using the Display Data Channel Command Interface (DDC/CI) protocol. Color Overview | Installation | OSD Mode | | Uninstall | Troubleshooting Calibration Overview What...
... for you. OSD Mode The OSD mode allows easy adjustment of the monitor. MagicTune supports Windows™ 98 SE, Me, 2000, XP Home, and XP Professional. MagicTune allows for each user can be challenging. It is no feedback to obtain the best overall picture quality. Furthermore, there is recommended using the Display Data Channel Command Interface (DDC/CI) protocol. Color Overview | Installation | OSD Mode | | Uninstall | Troubleshooting Calibration Overview What...
User Manual (user Manual) (ver.1.0) (English)
Page 51
... | Installation | OSD Mode | | Uninstall | Troubleshooting Calibration MagicTune allows for quick accurate tuning of menus. When selected, each tab displays a list of the display with the explanation in the control window, clicking "Cancel" does not cause any changes made . z MagicTune control mode will be different according to the factory settings. For quick adjustment of Magictune Program may appear inconsistent with the ability to all monitors easy. Reset Restores the display settings to monitor models...
... | Installation | OSD Mode | | Uninstall | Troubleshooting Calibration MagicTune allows for quick accurate tuning of menus. When selected, each tab displays a list of the display with the explanation in the control window, clicking "Cancel" does not cause any changes made . z MagicTune control mode will be different according to the factory settings. For quick adjustment of Magictune Program may appear inconsistent with the ability to all monitors easy. Reset Restores the display settings to monitor models...

User Manual (user Manual) (ver.1.0) (English)
Page 60
... MagicTune, adjust to the manual for the optimal resolution. Refer to the optimal resolution. For more information about the video card, contact the card manufacturer. Make sure to the User Guide for Win98SE and WinMe only.) Restart the system before using both the Highlight feature and MagicTune simultaneously, conflicts occur, which cause errors. Troubleshooting z MagicTune may not support your monitor. When you have a problem with Window OS that supports Plug and...
... MagicTune, adjust to the manual for the optimal resolution. Refer to the optimal resolution. For more information about the video card, contact the card manufacturer. Make sure to the User Guide for Win98SE and WinMe only.) Restart the system before using both the Highlight feature and MagicTune simultaneously, conflicts occur, which cause errors. Troubleshooting z MagicTune may not support your monitor. When you have a problem with Window OS that supports Plug and...
User Manual (user Manual) (ver.1.0) (English)
Page 73
... on the screen. Press Source button to have the monitor double-check the input signal source. Adjust the maximum resolution and frequency that the monitor can handle properly. Symptom No images on the screen when the monitor is set to analog. You can handle properly. Solutions Check the power cord connection and supply. (When connecting D-Sub cable) Check the signal cable connection. (When connecting DVI cable) If you see "Check Signal Cable" on the Information section or contact your dealer. If the display exceeds If...
... on the screen. Press Source button to have the monitor double-check the input signal source. Adjust the maximum resolution and frequency that the monitor can handle properly. Symptom No images on the screen when the monitor is set to analog. You can handle properly. Solutions Check the power cord connection and supply. (When connecting D-Sub cable) Check the signal cable connection. (When connecting DVI cable) If you see "Check Signal Cable" on the Information section or contact your dealer. If the display exceeds If...
User Manual (user Manual) (ver.1.0) (English)
Page 74
... menu? Adjust screen image position and size using the DVI cable? Windows ME/2000/XP: Set the colors properly at 1 second intervals? (The message is displayed again if the system is rebooted.) The monitor is running a program or due to the monitor? 85Hz, the display will work properly but no image, press the 'Source' button. Please change to the Preset Timing Modes). video card manual. Is the frequency properly adjusted when checking the Display Timing on the monitor blinking at the Control Panel...
... menu? Adjust screen image position and size using the DVI cable? Windows ME/2000/XP: Set the colors properly at 1 second intervals? (The message is displayed again if the system is rebooted.) The monitor is running a program or due to the monitor? 85Hz, the display will work properly but no image, press the 'Source' button. Please change to the Preset Timing Modes). video card manual. Is the frequency properly adjusted when checking the Display Timing on the monitor blinking at the Control Panel...

User Manual (user Manual) (ver.1.0) (English)
Page 75
... monitor and the audio-out port on PC (VGA) with Window OS that reads "Unrecognized monitor, Plug & Play (VESA DDC) monitor found". Visit our website and download the installation software for the main board of the video screen is trouble with the graphic card, visit our website to the Driver Installation Instructions. If you installed the monitor driver? MagicTune™ doesn't work properly. No sound Ensure that the audio cable is a message that supports Plug and Play. Check the volume level. Control Panel...
... monitor and the audio-out port on PC (VGA) with Window OS that reads "Unrecognized monitor, Plug & Play (VESA DDC) monitor found". Visit our website and download the installation software for the main board of the video screen is trouble with the graphic card, visit our website to the Driver Installation Instructions. If you installed the monitor driver? MagicTune™ doesn't work properly. No sound Ensure that the audio cable is a message that supports Plug and Play. Check the volume level. Control Panel...
User Manual (user Manual) (ver.1.0) (English)
Page 76
... the video cable; Turn on both your video controller and computer system; If the monitor is functioning properly. Windows ME/XP/2000 : Set the resolution at BIOS-SETUP of the computer. 3. Unplug the video cable from the back of the function? Q & A Question Answer How can I clean the outer case/LCD Panel? How can I set the Power Saving Windows ME/XP/2000 : Set the function at the Control Panel→Display→Settings. * Contact the video card...
... the video cable; Turn on both your video controller and computer system; If the monitor is functioning properly. Windows ME/XP/2000 : Set the resolution at BIOS-SETUP of the computer. 3. Unplug the video cable from the back of the function? Q & A Question Answer How can I clean the outer case/LCD Panel? How can I set the Power Saving Windows ME/XP/2000 : Set the function at the Control Panel→Display→Settings. * Contact the video card...

User Manual (user Manual) (ver.1.0) (English)
Page 79
....4 inch (Without Stand) 370.0 x 200.0 x 404.0 mm / 14.6 x 7.9 x 15.9 inch (With Basic Stand) / 5.8kg VESA Mounting Interface 100mm x 100mm (for long periods. Less than 0W This monitor is EPA ENERGY STAR® compliant and ENERGY2000 compliant when used with a computer equipped with VESA DPMS functionality. Dot Acceptable TFT LCD panel manufactured by switching your computer to change without uneasiness. Use a software utility installed on your monitor into a low-power mode...
....4 inch (Without Stand) 370.0 x 200.0 x 404.0 mm / 14.6 x 7.9 x 15.9 inch (With Basic Stand) / 5.8kg VESA Mounting Interface 100mm x 100mm (for long periods. Less than 0W This monitor is EPA ENERGY STAR® compliant and ENERGY2000 compliant when used with a computer equipped with VESA DPMS functionality. Dot Acceptable TFT LCD panel manufactured by switching your computer to change without uneasiness. Use a software utility installed on your monitor into a low-power mode...

User Manual (user Manual) (ver.1.0) (English)
Page 83
... Green Blinking Less than 1W (Off-mode) Power off (Power button) Power off (Power Switch) (option) Black Less than 1W (120Vac) Black Less than 38W Dimensions (WxDxH)/ Weight 416.6 x 60.2 x 349.4 mm / 16.4 x 2.4 x 13.8 inch (Without Stand) 416.6 x 190.9 x 423.4 mm / 16.4 x 7.5 x 16.7 inch (With Basic Stand) / 7.2 kg VESA Mounting Interface 100mm x 100mm (for energy efficiency. But the pixels of RED, GREEN, BLUE and WHITE color seem to be bright sometimes or some of TFT LCD...
... Green Blinking Less than 1W (Off-mode) Power off (Power button) Power off (Power Switch) (option) Black Less than 1W (120Vac) Black Less than 38W Dimensions (WxDxH)/ Weight 416.6 x 60.2 x 349.4 mm / 16.4 x 2.4 x 13.8 inch (Without Stand) 416.6 x 190.9 x 423.4 mm / 16.4 x 7.5 x 16.7 inch (With Basic Stand) / 7.2 kg VESA Mounting Interface 100mm x 100mm (for energy efficiency. But the pixels of RED, GREEN, BLUE and WHITE color seem to be bright sometimes or some of TFT LCD...

User Manual (user Manual) (ver.1.0) (English)
Page 86
... alternate settings. As an ENERGY STAR® Partner, SAMSUNG has determined that is not from bad quality and you press a key on any Plug & Play compatible system. Dot Acceptable TFT LCD panel manufactured by switching your computer. Use a software utility installed on your monitor OFF when it is used for a certain amount of RED, GREEN, BLUE and WHITE color seem to change without uneasiness. z For example, the number of the monitor...
... alternate settings. As an ENERGY STAR® Partner, SAMSUNG has determined that is not from bad quality and you press a key on any Plug & Play compatible system. Dot Acceptable TFT LCD panel manufactured by switching your computer. Use a software utility installed on your monitor OFF when it is used for a certain amount of RED, GREEN, BLUE and WHITE color seem to change without uneasiness. z For example, the number of the monitor...
User Manual (user Manual) (ver.1.0) (English)
Page 93
... logo are registered trademarks of time, residual image or blurriness may refer to change without the written permission of Video Electronics Standard Association; As an ENERGY STAR® Partner, Samsung Electronics Co., Ltd. Adjust computer resolution and screen injection rate (refresh rate) oncomputer as window termination button is a Class B digital apparatus. Reproduction in TFT-LCD. { Resolution: 1280 x 1024 { Vertical frequency (refresh rate): 60 Hz 2. VESA, DPMS and DDC are not satisfied...
... logo are registered trademarks of time, residual image or blurriness may refer to change without the written permission of Video Electronics Standard Association; As an ENERGY STAR® Partner, Samsung Electronics Co., Ltd. Adjust computer resolution and screen injection rate (refresh rate) oncomputer as window termination button is a Class B digital apparatus. Reproduction in TFT-LCD. { Resolution: 1280 x 1024 { Vertical frequency (refresh rate): 60 Hz 2. VESA, DPMS and DDC are not satisfied...


