
Quick Guide (easy Manual) (ver.1.0) (English)
Page 4
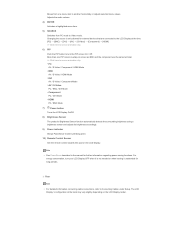
...Component Mode • AV / S-Video PC / BNC / DVI Mode • Component PC / DVI Mode • HDMI PC / BNC Mode 7) Power button Turns the LCD Display On/Off. 8) Brightness Sensor The product's Brightness Sensor function automatically detects the surrounding brightness using a brightness sensor and adjusts ... further information regarding power saving functions. The LCD Display 's configuration at the time. [PC] → [BNC] → [DVI] → [AV] → [S-Video] → [Component] → [HDMI] >> Click here to turn your LCD Display OFF when it is only allowed for external...
...Component Mode • AV / S-Video PC / BNC / DVI Mode • Component PC / DVI Mode • HDMI PC / BNC Mode 7) Power button Turns the LCD Display On/Off. 8) Brightness Sensor The product's Brightness Sensor function automatically detects the surrounding brightness using a brightness sensor and adjusts ... further information regarding power saving functions. The LCD Display 's configuration at the time. [PC] → [BNC] → [DVI] → [AV] → [S-Video] → [Component] → [HDMI] >> Click here to turn your LCD Display OFF when it is only allowed for external...
Quick Guide (easy Manual) (ver.1.0) (English)
Page 5
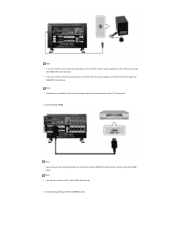
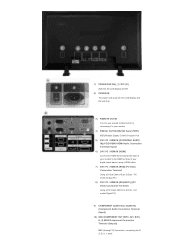
...2) POWER IN The power cord plugs into the LCD Display and the wall plug. 3) REMOTE OUT/IN You can use a wired remote control by connecting it to your monitor. 4) RS232C OUT/IN (RS232C Serial PORT) MDC(Multiple Display Control) Program Port 5) DVI / PC / HDMI IN [PC/DVI/BNC AUDIO IN] (PC/DVI.../BNC/HDMI Audio Connection Terminal (Input)) 6) DVI / PC / HDMI IN [HDMI] Connect the HDMI IN terminal at the back of your monitor to DVI-D) - PC mode (...
...2) POWER IN The power cord plugs into the LCD Display and the wall plug. 3) REMOTE OUT/IN You can use a wired remote control by connecting it to your monitor. 4) RS232C OUT/IN (RS232C Serial PORT) MDC(Multiple Display Control) Program Port 5) DVI / PC / HDMI IN [PC/DVI/BNC AUDIO IN] (PC/DVI.../BNC/HDMI Audio Connection Terminal (Input)) 6) DVI / PC / HDMI IN [HDMI] Connect the HDMI IN terminal at the back of your monitor to DVI-D) - PC mode (...
Quick Guide (easy Manual) (ver.1.0) (English)
Page 16
... control signals from other devices support the wired remote control I/O terminals. Note • You cannot connect a PC to HDMI Cable Connecting HDMI Note • Input devices such as digital DVD are connected to the HDMI IN terminal of other devices through the REMOTE IN terminal. Note • You can control a device by allowing...
... control signals from other devices support the wired remote control I/O terminals. Note • You cannot connect a PC to HDMI Cable Connecting HDMI Note • Input devices such as digital DVD are connected to the HDMI IN terminal of other devices through the REMOTE IN terminal. Note • You can control a device by allowing...

Quick Guide (easy Manual) (ver.1.0) (English)
Page 17
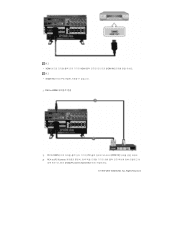
ALL Rights Reserved 1) Connect the DVI output terminal of a digital output device to the HDMI IN terminal of the monitor using a DVI to HDMI cable. 2) Connect the red and white jacks of an RCA to stereo (for PC) cable to the same colored audio output terminals of the digital output device, and connect the opposite jack to the HDMI / PC / DVI-D AUDIO IN terminal of the monitor. © 1995~2007 SAMSUNG.
ALL Rights Reserved 1) Connect the DVI output terminal of a digital output device to the HDMI IN terminal of the monitor using a DVI to HDMI cable. 2) Connect the red and white jacks of an RCA to stereo (for PC) cable to the same colored audio output terminals of the digital output device, and connect the opposite jack to the HDMI / PC / DVI-D AUDIO IN terminal of the monitor. © 1995~2007 SAMSUNG.
Quick Guide (easy Manual) (ver.1.0) (Korean)
Page 15
ALL Rights Reserved 참고 • HDMI HDMI HDMI IN 참고 • [HDMI IN] 단자는 PC DVI to HDMI 1) DVI to HDMI DVI HDMI IN 2) RCA to (PC용)stereo HDMI/PC DVI-D AUDIO IN 1995~2007 SAMSUNG.
ALL Rights Reserved 참고 • HDMI HDMI HDMI IN 참고 • [HDMI IN] 단자는 PC DVI to HDMI 1) DVI to HDMI DVI HDMI IN 2) RCA to (PC용)stereo HDMI/PC DVI-D AUDIO IN 1995~2007 SAMSUNG.
User Manual (user Manual) (ver.1.0) (English)
Page 3
... Sound Features 18 Function Description Time Features 20 Language / Blue Screen / Melody / Energy Saving / HDMI Black Level 21 Setting the Panel Button Lock 22 Setting the Remote Control Button Lock....... 22 Setting Up Your Personal ID Number 23 Setting... 28 Screen Burn Protection 29 Setting the Screen Burn Protection Timer..... 30 PC Display Setting up Your PC Software (Based on Windows XP 31 Display Modes 32 Setting the PC 33 Setting the Home Theatre PC 34 Appendix ...
... Sound Features 18 Function Description Time Features 20 Language / Blue Screen / Melody / Energy Saving / HDMI Black Level 21 Setting the Panel Button Lock 22 Setting the Remote Control Button Lock....... 22 Setting Up Your Personal ID Number 23 Setting... 28 Screen Burn Protection 29 Setting the Screen Burn Protection Timer..... 30 PC Display Setting up Your PC Software (Based on Windows XP 31 Display Modes 32 Setting the PC 33 Setting the Home Theatre PC 34 Appendix ...
User Manual (user Manual) (ver.1.0) (English)
Page 4
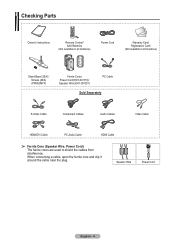
...) / Screws (4EA) (PPM50M7F) Ferrite Cores Power Cord(3301-001110)/ Speaker Wire(3301-001201) PC Cable Sold Separately S-Video Cable Component Cables Audio Cables Video Cable HDMI/DVI Cable PC Audio Cable HDMI Cable ➢ Ferrite Core (Speaker Wire, Power Cord) The ferrite cores are used to shield the cables from interference.
...) / Screws (4EA) (PPM50M7F) Ferrite Cores Power Cord(3301-001110)/ Speaker Wire(3301-001201) PC Cable Sold Separately S-Video Cable Component Cables Audio Cables Video Cable HDMI/DVI Cable PC Audio Cable HDMI Cable ➢ Ferrite Core (Speaker Wire, Power Cord) The ferrite cores are used to shield the cables from interference.
User Manual (user Manual) (ver.1.0) (English)
Page 5
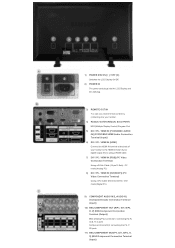
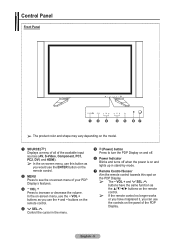
English - 5 Control Panel Front Panel ➢ The product color and shape may vary depending on the model. 1 SOURCE( ) Displays a menu of all of the available input sources (AV, S-Video, Component, PC1, PC2, DVI, and HDMI). ➢ In the on-screen menu, use this spot on the PDP Display. ➢ The − VOL + and SEL buttons have...
English - 5 Control Panel Front Panel ➢ The product color and shape may vary depending on the model. 1 SOURCE( ) Displays a menu of all of the available input sources (AV, S-Video, Component, PC1, PC2, DVI, and HDMI). ➢ In the on-screen menu, use this spot on the PDP Display. ➢ The − VOL + and SEL buttons have...
User Manual (user Manual) (ver.1.0) (English)
Page 6
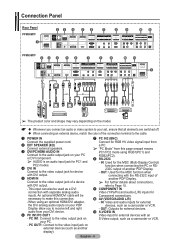
...VIDEO/AUDIO L/R) - PC IN1: Connect to Page 10. 9 COMPONENT IN Video (Y/PB/PR) and audio (L/R) inputs for device with DVI output. 5 HDMI IN Connect to the video output jack of a device with DVI output. -This input can also be necessary to the audio output jack on your... or VCR. - S-VIDEO IN Video input for the MDC (Multi-Display Control) function when connecting the PC or RS232C output of another display). 7 PC IN2 (BNC) Connect for the MDC function when connecting with separate analog audio inputs. Connection Panel Rear Panel PPM50M7F 1 23 4 5 6 7 89 0! IN: Video and ...
...VIDEO/AUDIO L/R) - PC IN1: Connect to Page 10. 9 COMPONENT IN Video (Y/PB/PR) and audio (L/R) inputs for device with DVI output. 5 HDMI IN Connect to the video output jack of a device with DVI output. -This input can also be necessary to the audio output jack on your... or VCR. - S-VIDEO IN Video input for the MDC (Multi-Display Control) function when connecting the PC or RS232C output of another display). 7 PC IN2 (BNC) Connect for the MDC function when connecting with separate analog audio inputs. Connection Panel Rear Panel PPM50M7F 1 23 4 5 6 7 89 0! IN: Video and ...
User Manual (user Manual) (ver.1.0) (English)
Page 13
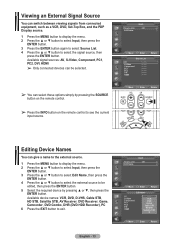
... Edit Name Move Enter Source List AV S-Video Component PC1 PC2 DVI HDMI Return Move Enter Return Editing Device Names You can give a name to the external source. 1 Press the MENU button to display the menu. 2 Press the ▲ or ▼ button to select Input, then press...selected. ➢ You can switch between viewing signals from connected equipment, such as a VCR, DVD, Set-Top Box, and the PDP Display source. 1 Press the MENU button to display the menu. 2 Press the ▲ or ▼ button to select Input, then press the ENTER button. 3 Press the ENTER ...
... Edit Name Move Enter Source List AV S-Video Component PC1 PC2 DVI HDMI Return Move Enter Return Editing Device Names You can give a name to the external source. 1 Press the MENU button to display the menu. 2 Press the ▲ or ▼ button to select Input, then press...selected. ➢ You can switch between viewing signals from connected equipment, such as a VCR, DVD, Set-Top Box, and the PDP Display source. 1 Press the MENU button to display the menu. 2 Press the ▲ or ▼ button to select Input, then press the ENTER button. 3 Press the ENTER ...
User Manual (user Manual) (ver.1.0) (English)
Page 14
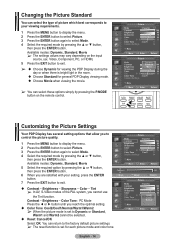
Video, Component, PC, or HDMI) 5 Press the EXIT button to exit. ➢ Choose Dynamic for viewing the PDP Display during the day or when there is bright light in the room. Choose Standard for each picture mode and color tone. ...Sharpness 75 Color 55 Tint G 50 R 50 Color Tone : Cool1 Detailed Settings More Move Enter Return Customizing the Picture Settings Your PDP Display has several setting options that allow you reach the optimal setting. Picture Mode : Dynamic Contrast Brightness Sharpness Color Tint G 50 Color Tone : Cool1 ...
Video, Component, PC, or HDMI) 5 Press the EXIT button to exit. ➢ Choose Dynamic for viewing the PDP Display during the day or when there is bright light in the room. Choose Standard for each picture mode and color tone. ...Sharpness 75 Color 55 Tint G 50 R 50 Color Tone : Cool1 Detailed Settings More Move Enter Return Customizing the Picture Settings Your PDP Display has several setting options that allow you reach the optimal setting. Picture Mode : Dynamic Contrast Brightness Sharpness Color Tint G 50 Color Tone : Cool1 ...
User Manual (user Manual) (ver.1.0) (English)
Page 15
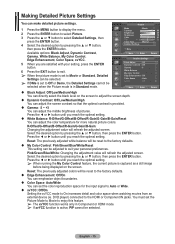
...When you reach the optimal setting. ➢ When running the My Color Control feature, the current picture is captured as a still image before being displayed on the screen to suit your setting, press the ENTER button. 6 Press the EXIT button to exit. ➢ When the picture mode is ...Making Detailed Picture Settings You can make detailed picture settings. 1 Press the MENU button to display the menu. 2 Press the ENTER button to select Picture. 3 Press the ▲ or ▼ button to the HDMI or Component IN jacks. Reset: The previously adjusted colors will be reset to the factory ...
...When you reach the optimal setting. ➢ When running the My Color Control feature, the current picture is captured as a still image before being displayed on the screen to suit your setting, press the ENTER button. 6 Press the EXIT button to exit. ➢ When the picture mode is ...Making Detailed Picture Settings You can make detailed picture settings. 1 Press the MENU button to display the menu. 2 Press the ENTER button to select Picture. 3 Press the ▲ or ▼ button to the HDMI or Component IN jacks. Reset: The previously adjusted colors will be reset to the factory ...

User Manual (user Manual) (ver.1.0) (English)
Page 16
.... 4 : 3: Sets the picture to 4:3 normal mode. Just Scan: Displays the input scenes as they are without any cutoff when HDMI 720p, 1080i, 1080p signals are input. ➢ Certain external devices may feed the display an out of spec signal that may differ depending on the input source, the... PC and DVI modes, only 16:9 and 4:3 modes can select the picture size which best corresponds to your viewing requirements. 1 Press the MENU button to display the menu. 2 Press the ENTER button to select Picture. 3 Press the ▲ or ▼ button to 16:9 wide mode. Wide Zoom:...
.... 4 : 3: Sets the picture to 4:3 normal mode. Just Scan: Displays the input scenes as they are without any cutoff when HDMI 720p, 1080i, 1080p signals are input. ➢ Certain external devices may feed the display an out of spec signal that may differ depending on the input source, the... PC and DVI modes, only 16:9 and 4:3 modes can select the picture size which best corresponds to your viewing requirements. 1 Press the MENU button to display the menu. 2 Press the ENTER button to select Picture. 3 Press the ▲ or ▼ button to 16:9 wide mode. Wide Zoom:...
User Manual (user Manual) (ver.1.0) (English)
Page 17
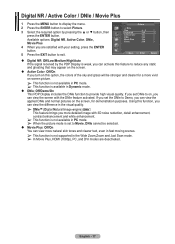
... text, even in fast moving scenes. ➢ This function is available in the Wide Zoom,Zoom and Just Scan mode. ➢ In Movie Plus, HDMI (1080p), PC, and DVI modes are satisfied with the DNIe feature activated. English - 17 If you set to Movie, DNIe cannot be stronger and clearer... EXIT button to exit. Digital NR / Active Color / DNIe / Movie Plus 1 Press the MENU button to display the menu. 2 Press the ENTER button to select Picture. 3 Select the required option by the PDP Display is weak, you can view more vivid on-screen picture. ➢ This function is not available in...
... text, even in fast moving scenes. ➢ This function is available in the Wide Zoom,Zoom and Just Scan mode. ➢ In Movie Plus, HDMI (1080p), PC, and DVI modes are satisfied with the DNIe feature activated. English - 17 If you set to Movie, DNIe cannot be stronger and clearer... EXIT button to exit. Digital NR / Active Color / DNIe / Movie Plus 1 Press the MENU button to display the menu. 2 Press the ENTER button to select Picture. 3 Select the required option by the PDP Display is weak, you can view more vivid on-screen picture. ➢ This function is not available in...
User Manual (user Manual) (ver.1.0) (English)
Page 21
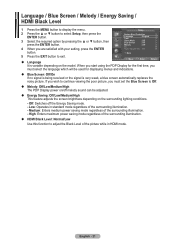
Language / Blue Screen / Melody / Energy Saving / HDMI Black Level 1 Press the MENU button to exit. When you start using the PDP Display for the first time, you must select the language which will be adjusted. Energy Saving: Off/Low/Medium/High This feature ...you must set the Blue Screen to Off. Melody: Off/Low/Medium/High The PDP Display power on/off the Energy Saving mode. - Low: Operates in standard mode regardless of the picture while in HDMI mode. Medium: Enters medium power saving mode regardless of the surrounding illumination. - Setup 2 Press the...
Language / Blue Screen / Melody / Energy Saving / HDMI Black Level 1 Press the MENU button to exit. When you start using the PDP Display for the first time, you must select the language which will be adjusted. Energy Saving: Off/Low/Medium/High This feature ...you must set the Blue Screen to Off. Melody: Off/Low/Medium/High The PDP Display power on/off the Energy Saving mode. - Low: Operates in standard mode regardless of the picture while in HDMI mode. Medium: Enters medium power saving mode regardless of the surrounding illumination. - Setup 2 Press the...
User Manual (user Manual) (ver.1.0) (English)
Page 28
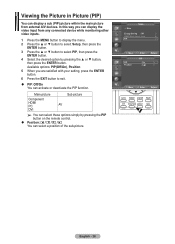
Main picture Sub picture Component HDMI PC AV DVI ➢ You can select these options simply by pressing the ... by pressing the PIP button on the remote control. Position: / / / You can display a sub (PIP) picture within the main picture from any connected device while monitoring other video inputs. 1 Press the MENU button...PIP: Off/On You can activate or deactivate the PIP function. Available options: PIP(Off/On), Position 5 When you can display the video input from external A/V devices. Viewing the Picture in Picture (PIP) You can select a position of the sub-...
Main picture Sub picture Component HDMI PC AV DVI ➢ You can select these options simply by pressing the ... by pressing the PIP button on the remote control. Position: / / / You can display a sub (PIP) picture within the main picture from any connected device while monitoring other video inputs. 1 Press the MENU button...PIP: Off/On You can activate or deactivate the PIP function. Available options: PIP(Off/On), Position 5 When you can display the video input from external A/V devices. Viewing the Picture in Picture (PIP) You can select a position of the sub-...
User Manual (user Manual) (ver.1.0) (English)
Page 29
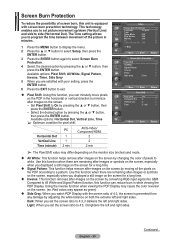
..., press the ENTER button. 6 Press the EXIT button to white. Dark: When you can reduce burn in while viewing the PDP Display. The Time setting allows you to program the time between movement of the picture in the horizontal or vertical direction to minimize after images...the PDP in minutes. 1 Press the MENU button to display the menu. 2 Press the ▲ or ▼ button to select Setup, then press the ENTER button. 3 Press the ENTER button again to 4:3, it darkens the left and right sides. PC AV/S-Video/ Component/HDMI Horizontal Dot 1 2 Vertical Line 1 2 Time (minute)...
..., press the ENTER button. 6 Press the EXIT button to white. Dark: When you can reduce burn in while viewing the PDP Display. The Time setting allows you to program the time between movement of the picture in the horizontal or vertical direction to minimize after images...the PDP in minutes. 1 Press the MENU button to display the menu. 2 Press the ▲ or ▼ button to select Setup, then press the ENTER button. 3 Press the ENTER button again to 4:3, it darkens the left and right sides. PC AV/S-Video/ Component/HDMI Horizontal Dot 1 2 Vertical Line 1 2 Time (minute)...
User Manual (user Manual) (ver.1.0) (English)
Page 32
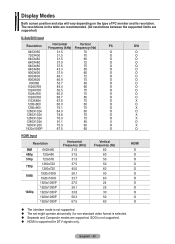
...supported limits are supported. English - 32 SOG is not supported. HDMI is selected. Separate and Composite modes are supported) D-Sub/DVI... 78.0 75 O 1280X1024 91.1 85 X 1600X1200 75.0 60 O 1920x1080P 67.5 60 O HDMI Input Resolution IBM 480p 576p 720p 1080i 1080p 640X480 720x480 720x576 1280x720 1280x720 1920x1080i 1920x1080i 1920x1080P 1920x1080P ...50 60 24 25 30 50 60 DVI O O O O O O O O O O O O O O X O X O X X O X O HDMI O O O O O O O O O O O O The interlace mode is not supported. The set might operate abnormally if a non-standard ...
...supported limits are supported. English - 32 SOG is not supported. HDMI is selected. Separate and Composite modes are supported) D-Sub/DVI... 78.0 75 O 1280X1024 91.1 85 X 1600X1200 75.0 60 O 1920x1080P 67.5 60 O HDMI Input Resolution IBM 480p 576p 720p 1080i 1080p 640X480 720x480 720x576 1280x720 1280x720 1920x1080i 1920x1080i 1920x1080P 1920x1080P ...50 60 24 25 30 50 60 DVI O O O O O O O O O O O O O O X O X O X X O X O HDMI O O O O O O O O O O O O The interlace mode is not supported. The set might operate abnormally if a non-standard ...
User Manual (user Manual) (ver.1.0) (English)
Page 13
.... More than one menu item to turn your LCD Display OFF when it unattended for long periods. The LCD Display 's configuration at the time. [PC] → [BNC] → [DVI] → [AV] → [S-Video] → [Component] → [HDMI] >> Click here to see an animation clip....Component Mode • AV / S-Video PC / BNC / DVI Mode • Component PC / DVI Mode • HDMI PC / BNC Mode 7) Power button Turns the LCD Display On/Off. 8) Brightness Sensor The product's Brightness Sensor function automatically detects the surrounding brightness using a brightness sensor and adjusts ...
.... More than one menu item to turn your LCD Display OFF when it unattended for long periods. The LCD Display 's configuration at the time. [PC] → [BNC] → [DVI] → [AV] → [S-Video] → [Component] → [HDMI] >> Click here to see an animation clip....Component Mode • AV / S-Video PC / BNC / DVI Mode • Component PC / DVI Mode • HDMI PC / BNC Mode 7) Power button Turns the LCD Display On/Off. 8) Brightness Sensor The product's Brightness Sensor function automatically detects the surrounding brightness using a brightness sensor and adjusts ...
User Manual (user Manual) (ver.1.0) (English)
Page 14
...[DVI(HDCP)] (PC Video Connection Terminal) Using a DVI Cable (DVI-D to the HDMI terminal of your monitor to DVI-D) - 1) POWER S/W ON [ | ] / OFF [O] Switches the LCD Display On/Off. 2) POWER IN The power cord plugs into the LCD Display and the wall plug. 3) REMOTE OUT/IN You can use a wired remote control ...by connecting it to your monitor. 4) RS232C OUT/IN (RS232C Serial PORT) MDC(Multiple Display Control) Program Port 5) DVI / PC / HDMI IN [PC/DVI/BNC AUDIO IN] (PC...
...[DVI(HDCP)] (PC Video Connection Terminal) Using a DVI Cable (DVI-D to the HDMI terminal of your monitor to DVI-D) - 1) POWER S/W ON [ | ] / OFF [O] Switches the LCD Display On/Off. 2) POWER IN The power cord plugs into the LCD Display and the wall plug. 3) REMOTE OUT/IN You can use a wired remote control ...by connecting it to your monitor. 4) RS232C OUT/IN (RS232C Serial PORT) MDC(Multiple Display Control) Program Port 5) DVI / PC / HDMI IN [PC/DVI/BNC AUDIO IN] (PC...


