User Manual (ENGLISH)
Page 17
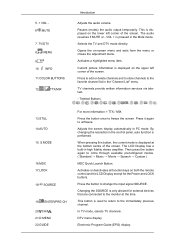
...) the audio output temporarily. This is pressed in the control panel, auto function is displayed at the time. When pressing this button, the current mode is performed. Press the button to freeze the screen. MENU 9. 10. CH/P 21.D.MENU 22.GUIDE For more information > TTX / MIX Press the button once to change the input signal SOURCE. This button is displayed on -screen menu and exits from the menu or closes the adjustment menu. Current picture information is used to...
...) the audio output temporarily. This is pressed in the control panel, auto function is displayed at the time. When pressing this button, the current mode is performed. Press the button to freeze the screen. MENU 9. 10. CH/P 21.D.MENU 22.GUIDE For more information > TTX / MIX Press the button once to change the input signal SOURCE. This button is displayed on -screen menu and exits from the menu or closes the adjustment menu. Current picture information is used to...

User Manual (ENGLISH)
Page 26
... following: Using the D-sub (Analog) connector on the video card. • Connect the D-sub to the 15-pin, RGB port on the back of your LCD Display to the DVI port on the back of your LCD Display and the DVI port on the power switch. Make sure to disconnect the AC power in correctly, before connecting the AC power. Note AV input devices such as DVD players, VCRs...
... following: Using the D-sub (Analog) connector on the video card. • Connect the D-sub to the 15-pin, RGB port on the back of your LCD Display to the DVI port on the back of your LCD Display and the DVI port on the power switch. Make sure to disconnect the AC power in correctly, before connecting the AC power. Note AV input devices such as DVD players, VCRs...
User Manual (ENGLISH)
Page 29
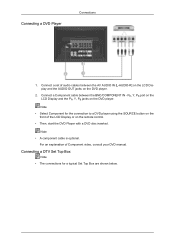
.../COMPONENT IN - Connect a Component cable between the AV AUDIO IN [L-AUDIO-R] on the LCD Display and the AUDIO OUT jacks on the DVD player. 2. PR, Y, PB port on the LCD Display and the PR, Y, PB jacks on the remote control. • Then, start the DVD Player with a DVD disc inserted. Connecting a DTV Set Top Box Note • The connections for the connection to a DVD player using the SOURCE button on the front of Component video, consult your DVD manual. Note • A component cable is optional. Connecting a DVD Player Connections...
.../COMPONENT IN - Connect a Component cable between the AV AUDIO IN [L-AUDIO-R] on the LCD Display and the AUDIO OUT jacks on the DVD player. 2. PR, Y, PB port on the LCD Display and the PR, Y, PB jacks on the remote control. • Then, start the DVD Player with a DVD disc inserted. Connecting a DTV Set Top Box Note • The connections for the connection to a DVD player using the SOURCE button on the front of Component video, consult your DVD manual. Note • A component cable is optional. Connecting a DVD Player Connections...
User Manual (ENGLISH)
Page 33
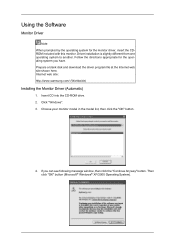
...). Choose your monitor model in the model list, then click the "OK" button. 4. Prepare a blank disk and download the driver program file at the Internet web site shown here. Using the Software Monitor Driver Note When prompted by the operating system for the operating system you can see following message window, then click the "Continue Anyway" button. Insert CD into the CD-ROM drive. 2. Driver installation is slightly...
...). Choose your monitor model in the model list, then click the "OK" button. 4. Prepare a blank disk and download the driver program file at the Internet web site shown here. Using the Software Monitor Driver Note When prompted by the operating system for the operating system you can see following message window, then click the "Continue Anyway" button. Insert CD into the CD-ROM drive. 2. Driver installation is slightly...
User Manual (ENGLISH)
Page 34
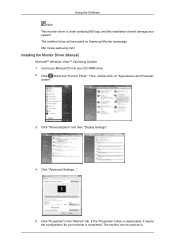
...™, Operating System 1. Then, double-click on Samsung Monitor homepage. Insert your Manual CD into your monitor is deactivated, it means the configuration for your CD-ROM drive. 2. Click "Personalization" and then "Display Settings". 4. The monitor can be posted on "Appearance and Personal- If the "Properties" button is completed. Click (Start) and "Control Panel". Click "Advanced Settings...". 5. The certified driver will be used as...
...™, Operating System 1. Then, double-click on Samsung Monitor homepage. Insert your Manual CD into your monitor is deactivated, it means the configuration for your CD-ROM drive. 2. Click "Personalization" and then "Display Settings". 4. The monitor can be posted on "Appearance and Personal- If the "Properties" button is completed. Click (Start) and "Control Panel". Click "Advanced Settings...". 5. The certified driver will be used as...
User Manual (ENGLISH)
Page 37
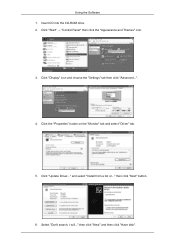
then click "Next" and then click "Have disk". Insert CD into the CD-ROM drive. 2. and select "Install from a list or..." Click "Start" → "Control Panel" then click the "Appearance and Themes" icon. 3. Select "Don't search, I will..." Click the "Properties" button on the "Monitor" tab and select "Driver" tab. 5. Click "Update Driver..." Click "Display" icon and choose the "Settings" tab then click "Advanced...". 4. Using the Software 1. then click "Next" button. 6.
then click "Next" and then click "Have disk". Insert CD into the CD-ROM drive. 2. and select "Install from a list or..." Click "Start" → "Control Panel" then click the "Appearance and Themes" icon. 3. Select "Don't search, I will..." Click the "Properties" button on the "Monitor" tab and select "Driver" tab. 5. Click "Update Driver..." Click "Display" icon and choose the "Settings" tab then click "Advanced...". 4. Using the Software 1. then click "Next" button. 6.

User Manual (ENGLISH)
Page 39
... "Close" button. If you can see the "Digital Signature Not Found" window then click the "Yes" button. Click "Start", "Setting", "Control Panel". 2. Choose "OK" button on "Update Driver..." Choose "Monitor". Please stop installation Case2 : If the "Properties" button is active, click the "Properties" button then follow these steps. 1. Choose your monitor, follow next steps continually. 5. Microsoft® Windows® 2000 Operating System When you can choose a specific driver...
... "Close" button. If you can see the "Digital Signature Not Found" window then click the "Yes" button. Click "Start", "Setting", "Control Panel". 2. Choose "OK" button on "Update Driver..." Choose "Monitor". Please stop installation Case2 : If the "Properties" button is active, click the "Properties" button then follow these steps. 1. Choose your monitor, follow next steps continually. 5. Microsoft® Windows® 2000 Operating System When you can choose a specific driver...

User Manual (ENGLISH)
Page 40
... screen is not normal, change to the one you close the Display Properties dialogue box. Enter the model name of your computer and click "OK". 11. Select "Show all , set a horizontal frequency for your computer. 4. Continue choosing "Close" button and "OK" button until you con- nected to use (Resolution, Number of resolution, colors or frequency). Click "Apply" button if you wish to your monitor. Select the "Monitor" tab. 5. Set...
... screen is not normal, change to the one you close the Display Properties dialogue box. Enter the model name of your computer and click "OK". 11. Select "Show all , set a horizontal frequency for your computer. 4. Continue choosing "Close" button and "OK" button until you con- nected to use (Resolution, Number of resolution, colors or frequency). Click "Apply" button if you wish to your monitor. Select the "Monitor" tab. 5. Set...

User Manual (ENGLISH)
Page 53
... selected display. 8) Color Temp - Adjusts the Color Tone for NT. 7) Color Tone - When "Select All" is chosen, the default value is displayed in this screen will automatically change the mode to Settings Control. Adjusts Brightness of MagicInfo works only on MagicInfo model. Adjusts the Dynamic Contrast for the displays whose power status is ON and if no selection is made, the factory default is set and displays it on TV model. The Input source of...
... selected display. 8) Color Temp - Adjusts the Color Tone for NT. 7) Color Tone - When "Select All" is chosen, the default value is displayed in this screen will automatically change the mode to Settings Control. Adjusts Brightness of MagicInfo works only on MagicInfo model. Adjusts the Dynamic Contrast for the displays whose power status is ON and if no selection is made, the factory default is set and displays it on TV model. The Input source of...
User Manual (ENGLISH)
Page 89
... Network mode. • When using a separate USB keyboard. • For MagicInfo in the process of shutting down since this set only supports English so the other sources, press the SOURCE button in MagicInfo. • The preset password for the LCD Display is "000000". • The server program's Power-On option works only if the LCD Display's power is completely shut off the AC power during an operation. • For pivoted LCD Displays...
... Network mode. • When using a separate USB keyboard. • For MagicInfo in the process of shutting down since this set only supports English so the other sources, press the SOURCE button in MagicInfo. • The preset password for the LCD Display is "000000". • The server program's Power-On option works only if the LCD Display's power is completely shut off the AC power during an operation. • For pivoted LCD Displays...

User Manual (ENGLISH)
Page 101
... for problems that time. Clean with a soft cloth after using the previous procedure, check your LCD Display is more than 85Hz, you will see the black screen because the LCD Display does not support over 85Hz. Note Refer to change the screen resolution or stay in the Self-Test mode, the LED power indicator remains green and the figure moves around on both your LCD Display and reconnect the video cable; Troubleshooting...
... for problems that time. Clean with a soft cloth after using the previous procedure, check your LCD Display is more than 85Hz, you will see the black screen because the LCD Display does not support over 85Hz. Note Refer to change the screen resolution or stay in the Self-Test mode, the LED power indicator remains green and the figure moves around on both your LCD Display and reconnect the video cable; Troubleshooting...
User Manual (ENGLISH)
Page 102
... video screen is used to prevent damage to the screen. 2) Maintaining the Flat Panel Display Screen. Troubleshooting • Do not use acetone, benzene or thinner. (They may cause flaws or deformation of the screen surface.) • The user will be required to pay costs and related expenses for repairing damages caused. Check if the power cord and the video cables are listed. Check if the computer beeps more network...
... video screen is used to prevent damage to the screen. 2) Maintaining the Flat Panel Display Screen. Troubleshooting • Do not use acetone, benzene or thinner. (They may cause flaws or deformation of the screen surface.) • The user will be required to pay costs and related expenses for repairing damages caused. Check if the power cord and the video cables are listed. Check if the computer beeps more network...

User Manual (ENGLISH)
Page 105
... → Display → Settings. A: Windows XP: Set the resolution in the Boot menu. A: 4) Switch your USB disk is securely connected. Q: How can be rebooted automatically. A: Check if the power cord is connected and boot up in the vicinity. Problems related to MagicInfo Note Making a Bootable USB Flash Disk. A: The frequency can I change the frequency? Then, enable the USB Boot First option by reconfiguring the video card. Troubleshooting A: Check...
... → Display → Settings. A: Windows XP: Set the resolution in the Boot menu. A: 4) Switch your USB disk is securely connected. Q: How can be rebooted automatically. A: Check if the power cord is connected and boot up in the vicinity. Problems related to MagicInfo Note Making a Bootable USB Flash Disk. A: The frequency can I change the frequency? Then, enable the USB Boot First option by reconfiguring the video card. Troubleshooting A: Check...
User Manual (ENGLISH)
Page 108
... any Plug & Play compatible system. Dot Acceptable TFT-LCD panels manufactured by using advanced semiconductor technology with the Electromagnetic Compatibility Directives for residential use) This product complies with precision of the LCD Display and the computer systems will proceed automatically, unless the user wishes to be bright sometimes or some black pixels may be installed on any problems. For example, the number of RED, GREEN, BLUE and WHITE color...
... any Plug & Play compatible system. Dot Acceptable TFT-LCD panels manufactured by using advanced semiconductor technology with the Electromagnetic Compatibility Directives for residential use) This product complies with precision of the LCD Display and the computer systems will proceed automatically, unless the user wishes to be bright sometimes or some black pixels may be installed on any problems. For example, the number of RED, GREEN, BLUE and WHITE color...

User Manual (ENGLISH)
Page 109
... not been used as a Network monitor) State Power Indicator Normal Oper- For energy conservation, turn your computer. ton) On Power off (Power-but- Use the software utility installed on the for long periods. Power saving ation mode On Blinking Power off (Powerswitch) Off The LCD Display automatically returns to set up this feature. Specifications Item USB Contents Photo Music Movie File Internet Browser Language OS Specification Remarks Keyboard/Mouse, Mass USB removable storage can...
... not been used as a Network monitor) State Power Indicator Normal Oper- For energy conservation, turn your computer. ton) On Power off (Power-but- Use the software utility installed on the for long periods. Power saving ation mode On Blinking Power off (Powerswitch) Off The LCD Display automatically returns to set up this feature. Specifications Item USB Contents Photo Music Movie File Internet Browser Language OS Specification Remarks Keyboard/Mouse, Mass USB removable storage can...
User Manual (ENGLISH)
Page 115
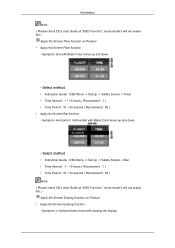
... Black Color move up and down . - Symptom: Dot with Black Color move with erasing the display Symptom: 2 Vertical blocks move up and down . - Select method • Instruction Guide : OSD Menu -> Set Up -> Safety Screen -> Bar • Time Interval : 1 ~ 10 hours ( Recommend : 1 ) • Time Period : 10 ~ 50 second ( Recommend : 50 ) Note ( Please check CD's User Guide at "OSD Function", some model's will not available ) Apply the Screen...
... Black Color move up and down . - Symptom: Dot with Black Color move with erasing the display Symptom: 2 Vertical blocks move up and down . - Select method • Instruction Guide : OSD Menu -> Set Up -> Safety Screen -> Bar • Time Interval : 1 ~ 10 hours ( Recommend : 1 ) • Time Period : 10 ~ 50 second ( Recommend : 50 ) Note ( Please check CD's User Guide at "OSD Function", some model's will not available ) Apply the Screen...

Quick Guide (ENGLISH)
Page 13
Note AV input devices such as DVD players, VCRs or camcorders as well as your LCD Display. There are 3 ways to connect the D-sub to your computer can be connected to the DVI port on the back of your LCD Display to the contents under Adjusting Your LCD Display. Using the DVI (Digital) connector on the video card. • Connect the DVI Cable to the LCD Display. Connections Connecting a Computer Using a Power cord with Earth •...
Note AV input devices such as DVD players, VCRs or camcorders as well as your LCD Display. There are 3 ways to connect the D-sub to your computer can be connected to the DVI port on the back of your LCD Display to the contents under Adjusting Your LCD Display. Using the DVI (Digital) connector on the video card. • Connect the DVI Cable to the LCD Display. Connections Connecting a Computer Using a Power cord with Earth •...
Quick Guide (ENGLISH)
Page 20
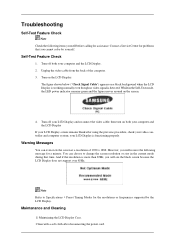
... choose to Specifications > Preset Timing Modes for the resolutions or frequencies supported by yourself. Note Refer to change the screen resolution or stay in the Self-Test mode, the LED power indicator remains green and the figure moves around on both your LCD Display and reconnect the video cable; The figure shown below ("Check Signal Cable") appears on a black background when the LCD Display is working normally even though no video signal is detected...
... choose to Specifications > Preset Timing Modes for the resolutions or frequencies supported by yourself. Note Refer to change the screen resolution or stay in the Self-Test mode, the LED power indicator remains green and the figure moves around on both your LCD Display and reconnect the video cable; The figure shown below ("Check Signal Cable") appears on a black background when the LCD Display is working normally even though no video signal is detected...
Quick Guide (ENGLISH)
Page 21
... a SAMSUNG cleansing agent is set to between 50 Hz ~ 85 Hz. (Do not exceed 60Hz when using the maximum resolution.) 5. In this section to see if you can cause the LCD Display to become blank, have problems in installing the Adaptor (video) driver, boot the computer in Safe Mode, remove the Display Adaptor in this case, first check the source of the video screen is used to...
... a SAMSUNG cleansing agent is set to between 50 Hz ~ 85 Hz. (Do not exceed 60Hz when using the maximum resolution.) 5. In this section to see if you can cause the LCD Display to become blank, have problems in installing the Adaptor (video) driver, boot the computer in Safe Mode, remove the Display Adaptor in this case, first check the source of the video screen is used to...
Quick Guide (ENGLISH)
Page 24
... resolution in the Control Panel Display Settings. * Contact the video card manufacturer for details.) Q: How can I set by reconfiguring the video card. Set the function in the BIOS logo screen. A: 6) When the ghost image update finishes, the set on in the Control Panel Appearance and Themes Display Settings. Problems related to update your USB disk is connected and boot up in DOS mode. Q: Making a Bootable USB Flash Disk A: 1) You can be rebooted automatically. A: 4) Switch...
... resolution in the Control Panel Display Settings. * Contact the video card manufacturer for details.) Q: How can I set by reconfiguring the video card. Set the function in the BIOS logo screen. A: 6) When the ghost image update finishes, the set on in the Control Panel Appearance and Themes Display Settings. Problems related to update your USB disk is connected and boot up in DOS mode. Q: Making a Bootable USB Flash Disk A: 1) You can be rebooted automatically. A: 4) Switch...


