
User Manual
Page 10
tions) BNC to RCA Adaptor Jack Sold separately HDD Cover DVI Cable Wall Mount KIT LAN Cable (Applicable to the DXn model only) TV tuner box NetWork Box (Applicable to their respective user manuals. • You can purchase and connect a separate network box or TV tuner box. For information on how to use these, refer to the DX model only) Semi Stand KIT Note • You can only connect one external box. Others Remote Control Introduction Batteries (AAA X 2) (Not available in all loca-
tions) BNC to RCA Adaptor Jack Sold separately HDD Cover DVI Cable Wall Mount KIT LAN Cable (Applicable to the DXn model only) TV tuner box NetWork Box (Applicable to their respective user manuals. • You can purchase and connect a separate network box or TV tuner box. For information on how to use these, refer to the DX model only) Semi Stand KIT Note • You can only connect one external box. Others Remote Control Introduction Batteries (AAA X 2) (Not available in all loca-
User Manual
Page 11
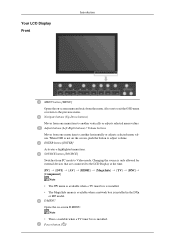
...Power button [ ] SOURCE button [SOURCE] Switches from one menu item to the LCD Display at the time. [PC] [DVI] [Component] Note [AV] [HDMI] [MagicInfo] [TV] [BNC] • The TV menu is available when a TV tuner box is installed. • The MagicInfo menu is available when a network... box is installed in the DXn or MP model. Your LCD Display Front Introduction MENU button [MENU] Opens the on -screen...
...Power button [ ] SOURCE button [SOURCE] Switches from one menu item to the LCD Display at the time. [PC] [DVI] [Component] Note [AV] [HDMI] [MagicInfo] [TV] [BNC] • The TV menu is available when a TV tuner box is installed. • The MagicInfo menu is available when a network... box is installed in the DXn or MP model. Your LCD Display Front Introduction MENU button [MENU] Opens the on -screen...
User Manual
Page 13
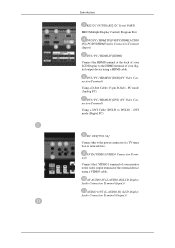
...Connection Terminal) Connect the [ VIDEO ] terminal of your digital output device using a VIDEO cable. AV AUDIO IN [L-AUDIO-R](LCD Display Audio Connection Terminal (Input)) AUDIO OUT [L-AUDIO-R] (LCD Display Audio Connection Terminal (Output)) DVI mode (Digital PC) DC OUT[5V/1.5A] Connect this to DVI-D) - PC mode ...(Analog PC) DVI / PC / HDMI IN [DVI] (PC Video Connection Terminal) Using a DVI Cable (DVI-D to the power connector of a TV tuner box ...
...Connection Terminal) Connect the [ VIDEO ] terminal of your digital output device using a VIDEO cable. AV AUDIO IN [L-AUDIO-R](LCD Display Audio Connection Terminal (Input)) AUDIO OUT [L-AUDIO-R] (LCD Display Audio Connection Terminal (Output)) DVI mode (Digital PC) DC OUT[5V/1.5A] Connect this to DVI-D) - PC mode ...(Analog PC) DVI / PC / HDMI IN [DVI] (PC Video Connection Terminal) Using a DVI Cable (DVI-D to the power connector of a TV tuner box ...

User Manual
Page 15
... Kensington Lock may differ from the illustration depending on its model. Note The location of the remote control may be affected by a TV or other electronic device operating near the LCD Display , causing a malfunction due to be different depending on the manufacturer. Using the Anti-Theft Kensington Lock 1. Connect the Kensington Lock cable...
... Kensington Lock may differ from the illustration depending on its model. Note The location of the remote control may be affected by a TV or other electronic device operating near the LCD Display , causing a malfunction due to be different depending on the manufacturer. Using the Anti-Theft Kensington Lock 1. Connect the Kensington Lock cable...

User Manual
Page 16
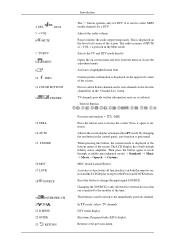
MUTE TV/DTV MENU INFO COLOR BUTTONS TTX/MIX STILL AUTO S.MODE MDC LOCK SOURCE ENTER/PRE-CH CH/P D.MENU GUIDE RETURN Up-Down Left-Right buttons EXIT SRS MagicInfo P.MODE DUAL/MTS PIP SWAP Turns the product On. Number Buttons Introduction POWER OFF Number Buttons DEL button + VOL - POWER 2. Turns the product Off. Press to change the channel. 1. Off 3.
MUTE TV/DTV MENU INFO COLOR BUTTONS TTX/MIX STILL AUTO S.MODE MDC LOCK SOURCE ENTER/PRE-CH CH/P D.MENU GUIDE RETURN Up-Down Left-Right buttons EXIT SRS MagicInfo P.MODE DUAL/MTS PIP SWAP Turns the product On. Number Buttons Introduction POWER OFF Number Buttons DEL button + VOL - POWER 2. Turns the product Off. Press to change the channel. 1. Off 3.
User Manual
Page 17
...By changing the resolution in the "Channel List" menu. This button is displayed on both the remote control and the LCD Display except for DTV. CH/P 21.D.MENU 22.GUIDE 23. In TV mode, selects TV channels. Current picture information is used to unfreeze. Press the button to ...the immediately previous channel. 4. Press to add or delete channels and to store channels to the favorite channel list in the control panel...
...By changing the resolution in the "Channel List" menu. This button is displayed on both the remote control and the LCD Display except for DTV. CH/P 21.D.MENU 22.GUIDE 23. In TV mode, selects TV channels. Current picture information is used to unfreeze. Press the button to ...the immediately previous channel. 4. Press to add or delete channels and to store channels to the favorite channel list in the control panel...
User Manual
Page 18
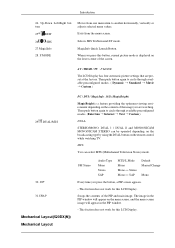
...preset at the factory. SRS Selects SRS TruSurround XT mode. 27.MagicInfo MagicInfo Quick Launch Button. 28. AV / HDMI / TV : P.MODE The LCD Display has four automatic picture settings that are watching. The image in the PIP window will appear in the PIP window. - PIP... 31.SWAP Mechanical Layout(520DX(N)) Mechanical Layout FM Stereo Audio Type Mono Stereo SAP MTS/S_Mode Mono Mono ↔ Stereo Mono ↔ SAP Default Manual Change Mono Every time you press this LCD Display. This fuction does not work for this LCD Display. Introduction 24. DUAL/MTS PC /...
...preset at the factory. SRS Selects SRS TruSurround XT mode. 27.MagicInfo MagicInfo Quick Launch Button. 28. AV / HDMI / TV : P.MODE The LCD Display has four automatic picture settings that are watching. The image in the PIP window will appear in the PIP window. - PIP... 31.SWAP Mechanical Layout(520DX(N)) Mechanical Layout FM Stereo Audio Type Mono Stereo SAP MTS/S_Mode Mono Mono ↔ Stereo Mono ↔ SAP Default Manual Change Mono Every time you press this LCD Display. This fuction does not work for this LCD Display. Introduction 24. DUAL/MTS PC /...

User Manual
Page 55
... the default value 10) 3) (Mute On/Off) - The Volume Control and Mute features are available only for the displays whose power status is disabled automatically when you adjust the volume level. (The values return to the default settings when you cancel the selection or ...choose Select All, the value returns to control. • TV Mode • PC Mode It receives the volume value of the selected display from the sets and displays it in the slider. (When you undo the selections or choose "Select All".) The Power Control feature...
... the default value 10) 3) (Mute On/Off) - The Volume Control and Mute features are available only for the displays whose power status is disabled automatically when you adjust the volume level. (The values return to the default settings when you cancel the selection or ...choose Select All, the value returns to control. • TV Mode • PC Mode It receives the volume value of the selected display from the sets and displays it in the slider. (When you undo the selections or choose "Select All".) The Power Control feature...

User Manual
Page 56
.... 7) S-Video - The Input Source Control feature is available only for the displays whose power status is TV. Info Grid shows some basic information necessary to TV. 5) DTV - Changes the Input Source of the selected display to DVI. 4) TV - Changes the Input Source of the selected display to HDMI. 11) Channel - Click Image Size of the selected...
.... 7) S-Video - The Input Source Control feature is available only for the displays whose power status is TV. Info Grid shows some basic information necessary to TV. 5) DTV - Changes the Input Source of the selected display to DVI. 4) TV - Changes the Input Source of the selected display to HDMI. 11) Channel - Click Image Size of the selected...

User Manual
Page 57
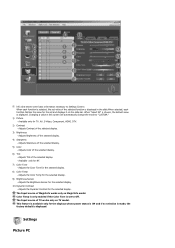
... Status) - When you click Image Size, the PC Source tab first appear. - The Input source of the current display. 2) Image Size - Shows the power status of MagicInfo works only on TV model. Image Size TV, AV, S-Video, Component, DVI(HDCP), HDMI, DTV 1. Info Grid shows some basic information necessary to control Image Size...
... Status) - When you click Image Size, the PC Source tab first appear. - The Input source of the current display. 2) Image Size - Shows the power status of MagicInfo works only on TV model. Image Size TV, AV, S-Video, Component, DVI(HDCP), HDMI, DTV 1. Info Grid shows some basic information necessary to control Image Size...

User Manual
Page 58
...Video Source tab to control. 2) Info Grid displays only the display having TV, AV, S-Video, Component or DVI(HDCP) as input source. 3) Switch Image Size of the selected display randomly. Click Select All or use Check Box to select a display to adjust Image Size for TV, AV, S-Video, Component, DVI(HDCP), HDMI..., DTV. Time 1. Click Time of MagicInfo works only on TV model. Note: Auto Wide, Zoom1 and Zoom2...
...Video Source tab to control. 2) Info Grid displays only the display having TV, AV, S-Video, Component or DVI(HDCP) as input source. 3) Switch Image Size of the selected display randomly. Click Select All or use Check Box to select a display to adjust Image Size for TV, AV, S-Video, Component, DVI(HDCP), HDMI..., DTV. Time 1. Click Time of MagicInfo works only on TV model. Note: Auto Wide, Zoom1 and Zoom2...

User Manual
Page 59
...MagicInfo works only on TV model. At On Time Setup, TV Source functions only for the selected display (PC Time). - Click Select All or use Check Box to select a display to Time Control. 1) Current Time - Set the current time for TV Model. The Input source of the selected display. 3) Off Time ... MagicInfo Model. Click PIP of the selected display. 4) Shows the On Time settings. 5) Shows the Off Time settings. Time Control is ON. The Input source of TV works only on MagicInfo model. Info Grid shows some basic information necessary to control. To change the current time, first...
...MagicInfo works only on TV model. At On Time Setup, TV Source functions only for the selected display (PC Time). - Click Select All or use Check Box to select a display to Time Control. 1) Current Time - Set the current time for TV Model. The Input source of the selected display. 3) Off Time ... MagicInfo Model. Click PIP of the selected display. 4) Shows the On Time settings. 5) Shows the Off Time settings. Time Control is ON. The Input source of TV works only on MagicInfo model. Info Grid shows some basic information necessary to control. To change the current time, first...

User Manual
Page 60
... 1 - PIP Size can be controlled with turning on TV model. Click PIP of the selected display. 3) Large - The Input source of the selected display and changes the size to Large. 4) Small - Turns on the PIP of TV works only on the LCD Display power. PIP PIP Source 1. Turns on the PIP of... the selected display and changes the size to Double 2. 7) Double 3 (Picture By Picture) - Turns on the PIP of the selected display and changes the size to Double 1. 6) Double ...
... 1 - PIP Size can be controlled with turning on TV model. Click PIP of the selected display. 3) Large - The Input source of the selected display and changes the size to Large. 4) Small - Turns on the PIP of TV works only on the LCD Display power. PIP PIP Source 1. Turns on the PIP of... the selected display and changes the size to Double 2. 7) Double 3 (Picture By Picture) - Turns on the PIP of the selected display and changes the size to Double 1. 6) Double ...
User Manual
Page 62
... on MagicInfo model. Adjusts the Brightness Sensor for the selected display. 9) Brightness Sensor - The Input source of the selected display. 4) Sharpness - The Input source of the selected display. 5) Color - Adjusts Sharpness of TV works only on the slide bar. Color Temp is only...Off. Available only for NT. 7) Color Tone - Available only for TV, AV, S-Video, Component, HDMI, DTV. 2) Contrast - Adjusts Color of the selected display. 3) Brightness - This feature is displayed in this screen will automatically change the mode to Settings Control. Settings Picture...
... on MagicInfo model. Adjusts the Brightness Sensor for the selected display. 9) Brightness Sensor - The Input source of the selected display. 4) Sharpness - The Input source of the selected display. 5) Color - Adjusts Sharpness of TV works only on the slide bar. Color Temp is only...Off. Available only for NT. 7) Color Tone - Available only for TV, AV, S-Video, Component, HDMI, DTV. 2) Contrast - Adjusts Color of the selected display. 3) Brightness - This feature is displayed in this screen will automatically change the mode to Settings Control. Settings Picture...

User Manual
Page 63
... "CUSTOM." 1) Picture PC - 1. Click Settings of the selected display. 3) Brightness - When "Select All" is chosen, the default value is displayed. Available only for the selected display. Adjusts the Brightness Sensor for NT. 5) Green - The Input source of the selected display. - Settings Adjusts red Color of TV works only on MagicInfo model. Adjusts green Color of...
... "CUSTOM." 1) Picture PC - 1. Click Settings of the selected display. 3) Brightness - When "Select All" is chosen, the default value is displayed. Available only for the selected display. Adjusts the Brightness Sensor for NT. 5) Green - The Input source of the selected display. - Settings Adjusts red Color of TV works only on MagicInfo model. Adjusts green Color of...

User Manual
Page 64
... in the slide. Adjusts Bass of the selected display. 5) SRS TS XT - The Input source of MagicInfo works only on TV model. The Input source of the selected function is displayed. When selected, each function is selected, the set and displays it on the slide bar. Adjusts Balance of ... value for all input sources. 2) Bass - Select either Main or Sub when PIP is displayed. Click Settings of the selected display. 4) Balance - Controls audio settings for the set value of TV works only on MagicInfo model. Adjusts Treble of the main icons and the Settings Control screen appears...
... in the slide. Adjusts Bass of the selected display. 5) SRS TS XT - The Input source of MagicInfo works only on TV model. The Input source of the selected function is displayed. When selected, each function is selected, the set and displays it on the slide bar. Adjusts Balance of ... value for all input sources. 2) Bass - Select either Main or Sub when PIP is displayed. Click Settings of the selected display. 4) Balance - Controls audio settings for the set value of TV works only on MagicInfo model. Adjusts Treble of the main icons and the Settings Control screen appears...

User Manual
Page 65
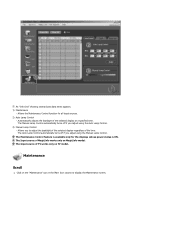
... Maintenance screen. Settings Control is ON. Maintenance Lamp Control 1. The Input source of TV works only on MagicInfo model. Adjusts Coarse of the selected display. 5) Auto Adjustment - Adjusts Position of the selected display. 3) Fine - The Input source of the selected display. 4) Position - Click on the "Maintenance" icon in the Main Icon column to the...
... Maintenance screen. Settings Control is ON. Maintenance Lamp Control 1. The Input source of TV works only on MagicInfo model. Adjusts Coarse of the selected display. 5) Auto Adjustment - Adjusts Position of the selected display. 3) Fine - The Input source of the selected display. 4) Position - Click on the "Maintenance" icon in the Main Icon column to the...
User Manual
Page 66
... ON. Maintenance Scroll 1. Click on the "Maintenance" icon in the Main Icon column to adjust the backlight of the selected display regardless of TV works only on MagicInfo model. The Manual Lamp Control automatically turns off if you adjust using the Manual Lamp Control. Allows the... - An "Info Grid" showing several basic data items appears. 1) Maintenance - Automatically adjusts the backlight of MagicInfo works only on TV model. The Input source of the selected display at a specified time. Allows you to display the Maintenance screen. The Input source of the time.
... ON. Maintenance Scroll 1. Click on the "Maintenance" icon in the Main Icon column to adjust the backlight of the selected display regardless of TV works only on MagicInfo model. The Manual Lamp Control automatically turns off if you adjust using the Manual Lamp Control. Allows the... - An "Info Grid" showing several basic data items appears. 1) Maintenance - Automatically adjusts the backlight of MagicInfo works only on TV model. The Input source of the selected display at a specified time. Allows you to display the Maintenance screen. The Input source of the time.

User Manual
Page 67
...the "Interval" by hour and "Second" by Screen Type. The Input source of MagicInfo works only on MagicInfo model. The Input source of TV works only on the "Maintenance" icon in Pause mode for an extended period of time. The Maintenance Control feature is available only for Pixel,... Bar, and Eraser Type. 1) Safety Screen - Setting Second, you can result when the selected display stays in the Main Icon column to display the Maintenance screen. Click on TV model. You can be set to 1, 2, 3, 4, 5 for Scroll Type and to Scroll, Pixel, Bar and Eraser by...
...the "Interval" by hour and "Second" by Screen Type. The Input source of MagicInfo works only on MagicInfo model. The Input source of TV works only on the "Maintenance" icon in Pause mode for an extended period of time. The Maintenance Control feature is available only for Pixel,... Bar, and Eraser Type. 1) Safety Screen - Setting Second, you can result when the selected display stays in the Main Icon column to display the Maintenance screen. Click on TV model. You can be set to 1, 2, 3, 4, 5 for Scroll Type and to Scroll, Pixel, Bar and Eraser by...

User Manual
Page 68
...screen. The Input source of TV works only on /off the Video Wall function of the whole picture or so that the same picture is a set up by Samsung supports up to control does not appear on each screen shows a part of the selected display. 4) Format - Check ...the connection of screens with a different layout when dividing. z The MDC program supplied by pressing a number in MagicInfo. 1) Video Wall - Troubleshooting 1. The screen can select a number of RS232C. (Check if it is ON. The display you wish to 5x5 LCD Displayes. 3) On / Off...
...screen. The Input source of TV works only on /off the Video Wall function of the whole picture or so that the same picture is a set up by Samsung supports up to control does not appear on each screen shows a part of the selected display. 4) Format - Check ...the connection of screens with a different layout when dividing. z The MDC program supplied by pressing a number in MagicInfo. 1) Video Wall - Troubleshooting 1. The screen can select a number of RS232C. (Check if it is ON. The display you wish to 5x5 LCD Displayes. 3) On / Off...


