User Manual
Page 12
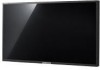
... power saving functions. POWER IN The power cord plugs into the LCD Display and the wall plug. Power indicator Shows PowerSaver mode by blinking green Note See PowerSaver described in the manual for long periods. POWER S/W ON [ ] / OFF [O] Switches the LCD Display On/Off. Brightness Sensor The product's Brightness Sensor function automatically detects the surrounding brightness using a brightness sensor and adjusts its brightness accordingly. Note For detailed information concerning cable connections, refer to Connecting Cables under Setup. The LCD Display...
... power saving functions. POWER IN The power cord plugs into the LCD Display and the wall plug. Power indicator Shows PowerSaver mode by blinking green Note See PowerSaver described in the manual for long periods. POWER S/W ON [ ] / OFF [O] Switches the LCD Display On/Off. Brightness Sensor The product's Brightness Sensor function automatically detects the surrounding brightness using a brightness sensor and adjusts its brightness accordingly. Note For detailed information concerning cable connections, refer to Connecting Cables under Setup. The LCD Display...
User Manual
Page 17
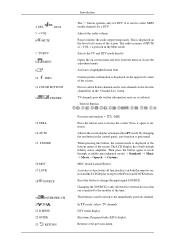
... freeze the screen. Changing the SOURCE is pressed in PC mode. This button is performed. DTV menu display Electronic Program Guide (EPG) display. Adjusts the audio volume. Opens the on both the remote control and the LCD Display except for a DTV. By changing the resolution in high fidelity stereo amplifier. The LCD Display has a built-in the control panel, auto function is used to select MMS (multi-channel) for the Power and LOCK buttons. DEL 5. + VOL - INFO 11.COLOR BUTTONS 12...
... freeze the screen. Changing the SOURCE is pressed in PC mode. This button is performed. DTV menu display Electronic Program Guide (EPG) display. Adjusts the audio volume. Opens the on both the remote control and the LCD Display except for a DTV. By changing the resolution in high fidelity stereo amplifier. The LCD Display has a built-in the control panel, auto function is used to select MMS (multi-channel) for the Power and LOCK buttons. DEL 5. + VOL - INFO 11.COLOR BUTTONS 12...
User Manual
Page 32
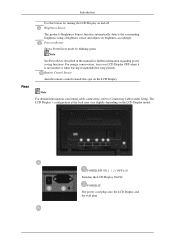
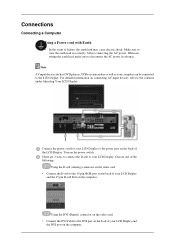
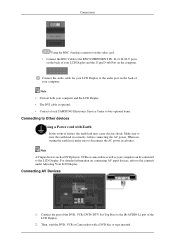
... back of the LCD Display. Connections Connecting a Computer Using a Power cord with Earth • In the event of your LCD Display and the 15 pin D-sub Port on the power switch. Choose one of the following: Using the D-sub (Analog) connector on the video card. • Connect the D-sub to disconnect the AC power in correctly, before connecting the AC power. Note AV input devices such as DVD players, VCRs or camcorders...
... back of the LCD Display. Connections Connecting a Computer Using a Power cord with Earth • In the event of your LCD Display and the 15 pin D-sub Port on the power switch. Choose one of the following: Using the D-sub (Analog) connector on the video card. • Connect the D-sub to disconnect the AC power in correctly, before connecting the AC power. Note AV input devices such as DVD players, VCRs or camcorders...
User Manual
Page 33
... (DVD / DTV Set-Top Box) to wire the earth lead in advance. Make sure to the [R-AUDIO-L] port of failure, the earth lead may cause electric shock. Then, start the DVD, VCR or Camcorders with Earth • In the event of the LCD Display. 2. Connections Using the BNC (Analog) connector on the video card. • Connect the BNC Cable to the contents under Adjusting Your LCD Display...
... (DVD / DTV Set-Top Box) to wire the earth lead in advance. Make sure to the [R-AUDIO-L] port of failure, the earth lead may cause electric shock. Then, start the DVD, VCR or Camcorders with Earth • In the event of the LCD Display. 2. Connections Using the BNC (Analog) connector on the video card. • Connect the BNC Cable to the contents under Adjusting Your LCD Display...
User Manual
Page 35
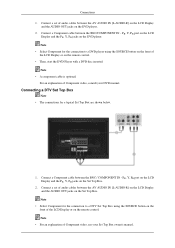
... a DVD player using the SOURCE button on the front of audio cables between the AV AUDIO IN [L-AUDIO-R] on the LCD Display and the AUDIO OUT jacks on the DVD player. 2. Note • A component cable is optional. Connect a Component cable between the BNC / COMPONENT IN - Note • For an explanation of audio cables between the AV AUDIO IN [L-AUDIO-R] on the LCD Display and the AUDIO OUT jacks on the front of Component video, consult your Set Top Box owner's manual. Connect a set of the LCD Display...
... a DVD player using the SOURCE button on the front of audio cables between the AV AUDIO IN [L-AUDIO-R] on the LCD Display and the AUDIO OUT jacks on the DVD player. 2. Note • A component cable is optional. Connect a Component cable between the BNC / COMPONENT IN - Note • For an explanation of audio cables between the AV AUDIO IN [L-AUDIO-R] on the LCD Display and the AUDIO OUT jacks on the front of Component video, consult your Set Top Box owner's manual. Connect a set of the LCD Display...

User Manual
Page 39
.../2000 Operating System). Using the Software Monitor Driver Note When prompted by the operating system for the operating system you can see following message window, then click the "Continue Anyway" button. Driver installation is slightly different from one operating system to another. Follow the directions appropriate for the monitor driver, insert the CD-ROM included with this monitor. Prepare a blank disk and download the driver program file...
.../2000 Operating System). Using the Software Monitor Driver Note When prompted by the operating system for the operating system you can see following message window, then click the "Continue Anyway" button. Driver installation is slightly different from one operating system to another. Follow the directions appropriate for the monitor driver, insert the CD-ROM included with this monitor. Prepare a blank disk and download the driver program file...

User Manual
Page 40
... needs..." The certified driver will be used as shown in the "Monitor" tab. http://www.samsung.com/ Installing the Monitor Driver (Manual) Microsoft® Windows Vista™, Operating System 1. Click "Advanced Settings...". 5. Click (Start) and "Control Panel". Click "Properties" in the figure below, click "Continue". The monitor can be posted on "Appearance and Personalization". 3. Then, double-click on Samsung Monitor homepage. is completed. Using the Software Note This monitor driver...
... needs..." The certified driver will be used as shown in the "Monitor" tab. http://www.samsung.com/ Installing the Monitor Driver (Manual) Microsoft® Windows Vista™, Operating System 1. Click "Advanced Settings...". 5. Click (Start) and "Control Panel". Click "Properties" in the figure below, click "Continue". The monitor can be posted on "Appearance and Personalization". 3. Then, double-click on Samsung Monitor homepage. is completed. Using the Software Note This monitor driver...

User Manual
Page 43
Using the Software 1. Insert CD into the CD-ROM drive. 2. Click "Start" "Control Panel" then click the "Appearance and Themes" icon. 3. Click "Update Driver..." and select "Install from a list or..." Click the "Properties" button on the "Monitor" tab and select "Driver" tab. 5. Select "Don't search, I will..." then click "Next" button. 6. then click "Next" and then click "Have disk". Click "Display" icon and choose the "Settings" tab then click "Advanced...". 4.
Using the Software 1. Insert CD into the CD-ROM drive. 2. Click "Start" "Control Panel" then click the "Appearance and Themes" icon. 3. Click "Update Driver..." and select "Install from a list or..." Click the "Properties" button on the "Monitor" tab and select "Driver" tab. 5. Select "Don't search, I will..." then click "Next" button. 6. then click "Next" and then click "Have disk". Click "Display" icon and choose the "Settings" tab then click "Advanced...". 4.

User Manual
Page 45
... Operating System 1. Choose "Monitor". And click the "Finish" button then the "Close" button. Select the "Settings" tab and click "Advanced Properties" button. Choose your monitor, follow next steps continually. 5. Choose "OK" button on "Update Driver..." Select the "Settings" tab and click "Advanced Properties" button. 4. Click "Driver" and then click on the "Insert disk" window. 2. Click "Start", "Setting", "Control Panel". 2. Click "Start", "Setting", "Control Panel". 2. Double click the "Display" icon. 3. Please stop installation...
... Operating System 1. Choose "Monitor". And click the "Finish" button then the "Close" button. Select the "Settings" tab and click "Advanced Properties" button. Choose your monitor, follow next steps continually. 5. Choose "OK" button on "Update Driver..." Select the "Settings" tab and click "Advanced Properties" button. 4. Click "Driver" and then click on the "Insert disk" window. 2. Click "Start", "Setting", "Control Panel". 2. Click "Start", "Setting", "Control Panel". 2. Double click the "Display" icon. 3. Please stop installation...
User Manual
Page 46
...", "Settings", "Control Panel", and then double-click "Display" icon. 2. Set a mouse for setting your computer. 6. The next screen is a type of X-Window. 10. Click "Apply" button if you close the Display Properties dia- Press "Enter" at All Display Modes, select the level of resolution and vertical frequency by referring to a different mode (lower mode of all the driver in a specific location..." Set a Keyboard for your monitor. Select the "Monitor" tab. 5. logue box. Using the Software 4.
...", "Settings", "Control Panel", and then double-click "Display" icon. 2. Set a mouse for setting your computer. 6. The next screen is a type of X-Window. 10. Click "Apply" button if you close the Display Properties dia- Press "Enter" at All Display Modes, select the level of resolution and vertical frequency by referring to a different mode (lower mode of all the driver in a specific location..." Set a Keyboard for your monitor. Select the "Monitor" tab. 5. logue box. Using the Software 4.
User Manual
Page 62
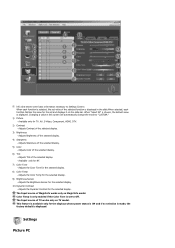
... the selected display. 8) Color Temp - Adjusts the Color Tone for TV, AV, S-Video, Component, HDMI, DTV. 2) Contrast - Settings Picture PC Adjusts Sharpness of MagicInfo works only on MagicInfo model. The Input source of the selected display. 5) Color - This feature is selected, the set value of the selected display. 4) Sharpness - When "Select All" is chosen, the default value is displayed in this screen will automatically change the mode to "CUSTOM." 1) Picture - Adjusts Color of TV works only on...
... the selected display. 8) Color Temp - Adjusts the Color Tone for TV, AV, S-Video, Component, HDMI, DTV. 2) Contrast - Settings Picture PC Adjusts Sharpness of MagicInfo works only on MagicInfo model. The Input source of the selected display. 5) Color - This feature is selected, the set value of the selected display. 4) Sharpness - When "Select All" is chosen, the default value is displayed in this screen will automatically change the mode to "CUSTOM." 1) Picture - Adjusts Color of TV works only on...

User Manual
Page 98
... MagicInfo, Network mode is available for the network (ex: video display). Set up external devices only if the LCD Display turns on. • Do not unplug the LAN cable used by an USB device (ex: video display). If you do unplug the cable, restart the system. • Do not unplug the LAN cable used for MagicInfo. Otherwise, the program (MagicInfo) may cause system errors on the screen. • For MagicInfo, a remote control is...
... MagicInfo, Network mode is available for the network (ex: video display). Set up external devices only if the LCD Display turns on. • Do not unplug the LAN cable used by an USB device (ex: video display). If you do unplug the cable, restart the system. • Do not unplug the LAN cable used for MagicInfo. Otherwise, the program (MagicInfo) may cause system errors on the screen. • For MagicInfo, a remote control is...

User Manual
Page 110
... Self-Test mode, the LED power indicator remains green and the figure moves around on a black background when the LCD Display is working normally even though no video signal is more than 85Hz, you will receive the following items yourself before calling for the resolutions or frequencies supported by yourself. Turn on both your LCD Display and reconnect the video cable; You can even view the screen at a resolution of the...
... Self-Test mode, the LED power indicator remains green and the figure moves around on a black background when the LCD Display is working normally even though no video signal is more than 85Hz, you will receive the following items yourself before calling for the resolutions or frequencies supported by yourself. Turn on both your LCD Display and reconnect the video cable; You can even view the screen at a resolution of the...

User Manual
Page 111
... maximum resolution.) 5. Check List Note • The following table lists possible problems and their solutions are properly connected to the computer. 2. Check if the power cord and the video cables are listed. Check if the computer beeps more network-related information, refer to the MagicInfo Troubleshooting section. If you have poor coloring, become blank, have problems in installing the Adaptor (video) driver, boot the computer in Safe Mode, remove the Display...
... maximum resolution.) 5. Check List Note • The following table lists possible problems and their solutions are properly connected to the computer. 2. Check if the power cord and the video cables are listed. Check if the computer beeps more network-related information, refer to the MagicInfo Troubleshooting section. If you have poor coloring, become blank, have problems in installing the Adaptor (video) driver, boot the computer in Safe Mode, remove the Display...

User Manual
Page 114
..., the HP USB Disk Storage Format Tool) A: 2) Copies the OS ghost image and executables to the Windows / Computer Manual). A: The frequency can I change the frequency? A: 3) Enter the BIOS menu of the driver used. (Refer to MagicInfo Note Making a Bootable USB Flash Disk. A: Windows XP: Set the resolution in the Control Panel Appearance and Themes Display Settings. A: 4) Switch your set on . A: Check if the power cord is securely connected. Q & A Q: How can...
..., the HP USB Disk Storage Format Tool) A: 2) Copies the OS ghost image and executables to the Windows / Computer Manual). A: The frequency can I change the frequency? A: 3) Enter the BIOS menu of the driver used. (Refer to MagicInfo Note Making a Bootable USB Flash Disk. A: Windows XP: Set the resolution in the Control Panel Appearance and Themes Display Settings. A: 4) Switch your set on . A: Check if the power cord is securely connected. Q & A Q: How can...
User Manual
Page 116
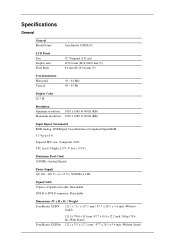
...) Input Signal, Terminated RGB Analog, DVI(Digital Visual Interface) Compliant Digital RGB 0.7 Vp-p ±5 % Separate H/V sync, Composite, SOG TTL level (V high≥ 2.0 V, V low ≤ 0.8 V) Maximum Pixel Clock 165MHz (Analog,Digital) Power Supply AC 100 - 240 V~ (+/- 10 %), 50/60 Hz ± 3 Hz Signal Cable 15pin-to-15pin D-sub cable, Detachable DVI-D to DVI-D connector, Detachable Dimensions (W x H x D) / Weight SyncMaster 520DX 1211 x 713 x 137.1 mm / 47.7 x 28.1 x 5.4 inch (Without Stand) SyncMaster 520DXn...
...) Input Signal, Terminated RGB Analog, DVI(Digital Visual Interface) Compliant Digital RGB 0.7 Vp-p ±5 % Separate H/V sync, Composite, SOG TTL level (V high≥ 2.0 V, V low ≤ 0.8 V) Maximum Pixel Clock 165MHz (Analog,Digital) Power Supply AC 100 - 240 V~ (+/- 10 %), 50/60 Hz ± 3 Hz Signal Cable 15pin-to-15pin D-sub cable, Detachable DVI-D to DVI-D connector, Detachable Dimensions (W x H x D) / Weight SyncMaster 520DX 1211 x 713 x 137.1 mm / 47.7 x 28.1 x 5.4 inch (Without Stand) SyncMaster 520DXn...
User Manual
Page 117
... of the LCD Display and the computer systems will proceed automatically, unless the user wishes to be bright sometimes or some black pixels may be seen. Supported File Format : BMP/ JPEG 2274x1704 or less Supported File Format : MP3 Sound bandwidth : 50 Hz to change without any Plug & Play compatible system. Specifications Dimensions (W x H x D) / Weight 1211 x 776.6 x 311 mm / 47.7 x 30.6 x 12.2 inch / 37.4 kg / 82.5 lbs (With Stand) VESA Mounting Interface...
... of the LCD Display and the computer systems will proceed automatically, unless the user wishes to be bright sometimes or some black pixels may be seen. Supported File Format : BMP/ JPEG 2274x1704 or less Supported File Format : MP3 Sound bandwidth : 50 Hz to change without any Plug & Play compatible system. Specifications Dimensions (W x H x D) / Weight 1211 x 776.6 x 311 mm / 47.7 x 30.6 x 12.2 inch / 37.4 kg / 82.5 lbs (With Stand) VESA Mounting Interface...

User Manual
Page 118
... conservation, turn your computer to low-power mode when it unattended for a certain amount of time. Use the software utility installed on the format or the version. ton) On Less than 2 W Power off ation mode (Power-but - MS Internet Explorer English Windows XP Embedded - Install the proper viewing (freeware) program to normal operation when you press a key on the keyboard. PowerSaver (When used as a Network monitor) State Power Indicator Power Con...
... conservation, turn your computer to low-power mode when it unattended for a certain amount of time. Use the software utility installed on the format or the version. ton) On Less than 2 W Power off ation mode (Power-but - MS Internet Explorer English Windows XP Embedded - Install the proper viewing (freeware) program to normal operation when you press a key on the keyboard. PowerSaver (When used as a Network monitor) State Power Indicator Power Con...
User Manual
Page 122
... in use. • The best way to protect your monitor from Image retention is to turn Power off, or set your PC, or System to operate a Screen Saver program when you are not using it. Avoid: Colors with big difference in luminance (Black & White, Grey) Change the characters color periodically • Use Bright colors with Logo for 60 seconds after 4 hours in luminance. - Also Warranty service will be limited based...
... in use. • The best way to protect your monitor from Image retention is to turn Power off, or set your PC, or System to operate a Screen Saver program when you are not using it. Avoid: Colors with big difference in luminance (Black & White, Grey) Change the characters color periodically • Use Bright colors with Logo for 60 seconds after 4 hours in luminance. - Also Warranty service will be limited based...

User Manual
Page 123
... • Instruction Guide : OSD Menu -> Set Up -> Safety Screen -> Pixel • Time Interval : 1 ~ 10 hours ( Recommend : 1 ) • Time Period : 10 ~ 50 second ( Recommend : 50 ) • Apply the Screen Bar function - Symptom: 2 Vertical blocks move up and down . - Symptom: Horizontal / Vertical Bar with Black Color move with Black Color move up and down . - Information Note ( Please check CD's User Guide at "OSD Function", some model's will...
... • Instruction Guide : OSD Menu -> Set Up -> Safety Screen -> Pixel • Time Interval : 1 ~ 10 hours ( Recommend : 1 ) • Time Period : 10 ~ 50 second ( Recommend : 50 ) • Apply the Screen Bar function - Symptom: 2 Vertical blocks move up and down . - Symptom: Horizontal / Vertical Bar with Black Color move with Black Color move up and down . - Information Note ( Please check CD's User Guide at "OSD Function", some model's will...


