User Manual (ENGLISH)
Page 40
... then click the "Yes" button. And click the "Finish" button then the "Close" button. Microsoft® Windows® 2000 Operating System When you can choose a specific driver" then click "Next" and then click "Have disk". 7. Click "Start", "Setting", "Control Panel". 2. Please stop installation Case2 : If the "Properties" button is properly configured...
... then click the "Yes" button. And click the "Finish" button then the "Close" button. Microsoft® Windows® 2000 Operating System When you can choose a specific driver" then click "Next" and then click "Have disk". 7. Click "Start", "Setting", "Control Panel". 2. Please stop installation Case2 : If the "Properties" button is properly configured...
User Manual (ENGLISH)
Page 41
..., Number of colors and Vertical frequency) and then click "OK". 4. Select a mode that corresponds to the one you need to the Preset Timing Modes in a specific location..." The third screen is for setting your computer and click "OK". 11. Set a Keyboard for your monitor. Set a vertical frequency for selecting a keyboard. 5. This...
..., Number of colors and Vertical frequency) and then click "OK". 4. Select a mode that corresponds to the one you need to the Preset Timing Modes in a specific location..." The third screen is for setting your computer and click "OK". 11. Set a Keyboard for your monitor. Set a vertical frequency for selecting a keyboard. 5. This...

User Manual (ENGLISH)
Page 43
... the program. Installation Problems The installation of MDC can be affected by using the MDC executable file on your desktop. Select "Setting/Control Panel" on specification of the figure above. When the installation is not displayed, proceed with the installation using the "Add or Remove Programs" option of use. 5. Select MDC...
... the program. Installation Problems The installation of MDC can be affected by using the MDC executable file on your desktop. Select "Setting/Control Panel" on specification of the figure above. When the installation is not displayed, proceed with the installation using the "Add or Remove Programs" option of use. 5. Select MDC...
User Manual (ENGLISH)
Page 97
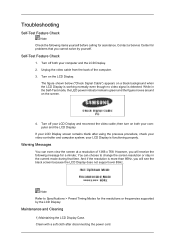
Turn off your LCD Display and reconnect the video cable; Warning Messages You can choose to Specifications > Preset Timing Modes for the resolutions or frequencies supported by yourself. Note Refer to change the screen resolution or stay in the Self-Test mode, ...
Turn off your LCD Display and reconnect the video cable; Warning Messages You can choose to Specifications > Preset Timing Modes for the resolutions or frequencies supported by yourself. Note Refer to change the screen resolution or stay in the Self-Test mode, ...

User Manual (ENGLISH)
Page 103
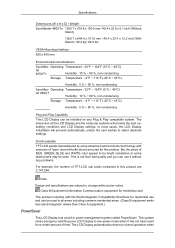
Specifications General General Model Name SyncMaster 460UT SyncMaster 460UTn LCD Panel Size Display area Pixel Pitch 46" Diagonal (116 cm) 1018.353 mm (H) x 572.544 mm (V) 0.2485 mm (H) x 0.7455 mm (V) Synchronization Horizontal ... AC 100 - 240 V~ (+/- 10 %), 50/60 Hz ± 3 Hz Signal Cable 15pin-to-15pin D-sub cable, Detachable DVI-D to DVI-D connector, Detachable Dimensions (W x H x D) / Weight SyncMaster 460UT 1025.7 x 579.8 x 130.0 mm / 40.4 x 22.8 x 5.1 inch (Without Stand) 1025.7 x 644.0 x 311.0 mm / 40.4 x 25.4 x 12.2 inch (With Stand) / 27.9 kg / 61.5 lbs
Specifications General General Model Name SyncMaster 460UT SyncMaster 460UTn LCD Panel Size Display area Pixel Pitch 46" Diagonal (116 cm) 1018.353 mm (H) x 572.544 mm (V) 0.2485 mm (H) x 0.7455 mm (V) Synchronization Horizontal ... AC 100 - 240 V~ (+/- 10 %), 50/60 Hz ± 3 Hz Signal Cable 15pin-to-15pin D-sub cable, Detachable DVI-D to DVI-D connector, Detachable Dimensions (W x H x D) / Weight SyncMaster 460UT 1025.7 x 579.8 x 130.0 mm / 40.4 x 22.8 x 5.1 inch (Without Stand) 1025.7 x 644.0 x 311.0 mm / 40.4 x 25.4 x 12.2 inch (With Stand) / 27.9 kg / 61.5 lbs
User Manual (ENGLISH)
Page 104
... system called PowerSaver. In most cases, the LCD Display installation will proceed automatically, unless the user wishes to change without any Plug & Play compatible system. Specifications Dimensions (W x H x D) / Weight SyncMaster 460UTn 1025.7 x 579.8 x 130.0 mm / 40.4 x 22.8 x 5.1 inch (Without Stand) ... lbs VESA Mounting Interface 600 x 400 mm Environmental considerations SyncMas- Operating Temperature : 32°F ~ 104°F (0°C ~ 40°C) ter 460UT Humidity : 10 % ~ 80 %, non-condensing Storage Temperature : -4°F ~ 113°F (-20°C ~ 45°C) Humidity : 5...
... system called PowerSaver. In most cases, the LCD Display installation will proceed automatically, unless the user wishes to change without any Plug & Play compatible system. Specifications Dimensions (W x H x D) / Weight SyncMaster 460UTn 1025.7 x 579.8 x 130.0 mm / 40.4 x 22.8 x 5.1 inch (Without Stand) ... lbs VESA Mounting Interface 600 x 400 mm Environmental considerations SyncMas- Operating Temperature : 32°F ~ 104°F (0°C ~ 40°C) ter 460UT Humidity : 10 % ~ 80 %, non-condensing Storage Temperature : -4°F ~ 113°F (-20°C ~ 45°C) Humidity : 5...
User Manual (ENGLISH)
Page 105
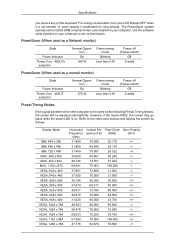
... 340 W Power saving mode Blinking Less than 5 W Power off (Power-switch) Off 0 watts PowerSaver (When used as a normal monitor) State Power Indicator Power Con- 460UT sumption Normal Operation On 270 W Power saving mode Blinking Less than 2 W Power off (Power-switch) Off 0 watts Preset Timing Modes If the signal transferred from...75.000 78.750 108.000 79.500 Sync Polarity (H/V) For energy conservation, turn your computer. Use the software utility installed on the keyboard. Specifications you press a key on your computer to the video card manual and adjusts the screen as follows.
... 340 W Power saving mode Blinking Less than 5 W Power off (Power-switch) Off 0 watts PowerSaver (When used as a normal monitor) State Power Indicator Power Con- 460UT sumption Normal Operation On 270 W Power saving mode Blinking Less than 2 W Power off (Power-switch) Off 0 watts Preset Timing Modes If the signal transferred from...75.000 78.750 108.000 79.500 Sync Polarity (H/V) For energy conservation, turn your computer. Use the software utility installed on the keyboard. Specifications you press a key on your computer to the video card manual and adjusts the screen as follows.

User Manual (ENGLISH)
Page 106
... edge of the screen horizontally is called the Horizontal Cycle and the inverse number of this repetition is called the Vertical Frequency or Refresh Rate. Specifications Display Mode VESA, 1280 X 960 VESA, 1280 X 1024 VESA, 1280 X 1024 VESA, 1360 x 768 VESA, 1366 x 768 VESA, 1600 x 1200 VESA, 1920 x 1080 Horizontal Frequency...
... edge of the screen horizontally is called the Horizontal Cycle and the inverse number of this repetition is called the Vertical Frequency or Refresh Rate. Specifications Display Mode VESA, 1280 X 960 VESA, 1280 X 1024 VESA, 1280 X 1024 VESA, 1360 x 768 VESA, 1366 x 768 VESA, 1600 x 1200 VESA, 1920 x 1080 Horizontal Frequency...
