
User Manual (ENGLISH)
Page 18
... menu display Electronic Program Guide (EPG) display. Exits from one menu item to change the input signal SOURCE. Then push button again to circle through available preconfigured modes. ( Dynamic → Standard → Movie → Custom ) 29. DUAL/MTS PC / DVI / MagicInfo: M/B (MagicBright) MagicBright is displayed on the contents of the screen. Changing the SOURCE is used to return to the monitor at the factory. SRS TS XT MagicInfo Quick Launch Button...
... menu display Electronic Program Guide (EPG) display. Exits from one menu item to change the input signal SOURCE. Then push button again to circle through available preconfigured modes. ( Dynamic → Standard → Movie → Custom ) 29. DUAL/MTS PC / DVI / MagicInfo: M/B (MagicBright) MagicBright is displayed on the contents of the screen. Changing the SOURCE is used to return to the monitor at the factory. SRS TS XT MagicInfo Quick Launch Button...
User Manual (ENGLISH)
Page 30
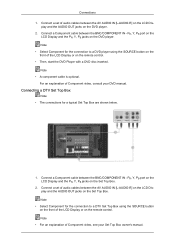
... using the SOURCE button on the remote control. PR, Y, PB port on the LCD Display and the PR, Y, PB jacks on the DVD player. 2. Connect a set of the LCD Display or on the front of Component video, consult your Set Top Box owner's manual. Note • Select Component for the connection to a DVD player using the SOURCE button on the front of audio cables between the AV AUDIO IN [L-AUDIO-R] on the LCD Display and the AUDIO...
... using the SOURCE button on the remote control. PR, Y, PB port on the LCD Display and the PR, Y, PB jacks on the DVD player. 2. Connect a set of the LCD Display or on the front of Component video, consult your Set Top Box owner's manual. Note • Select Component for the connection to a DVD player using the SOURCE button on the front of audio cables between the AV AUDIO IN [L-AUDIO-R] on the LCD Display and the AUDIO...
User Manual (ENGLISH)
Page 34
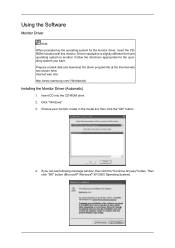
Choose your monitor model in the model list, then click the "OK" button. 4. If you have. Click "Windows". 3. Internet web site : http://www.samsung.com/ (Worldwide) Installing the Monitor Driver (Automatic) 1. Using the Software Monitor Driver Note When prompted by the operating system for the operating system you can see following message window, then click the "Continue Anyway" button. Follow the directions appropriate for the monitor driver, insert...
Choose your monitor model in the model list, then click the "OK" button. 4. If you have. Click "Windows". 3. Internet web site : http://www.samsung.com/ (Worldwide) Installing the Monitor Driver (Automatic) 1. Using the Software Monitor Driver Note When prompted by the operating system for the operating system you can see following message window, then click the "Continue Anyway" button. Follow the directions appropriate for the monitor driver, insert...
User Manual (ENGLISH)
Page 35
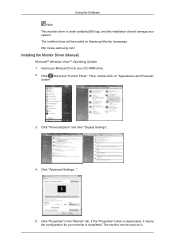
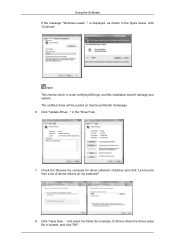
... then "Display Settings". 4. ization". 3. http://www.samsung.com/ Installing the Monitor Driver (Manual) Microsoft® Windows Vista™, Operating System 1. Using the Software Note This monitor driver is under certifying MS logo, and this installation doesn't damage your CD-ROM drive. 2. Insert your Manual CD into your system. Click (Start) and "Control Panel". Click "Advanced Settings...". 5. The monitor can be posted on "Appearance and Personal- If the "Properties" button is...
... then "Display Settings". 4. ization". 3. http://www.samsung.com/ Installing the Monitor Driver (Manual) Microsoft® Windows Vista™, Operating System 1. Using the Software Note This monitor driver is under certifying MS logo, and this installation doesn't damage your CD-ROM drive. 2. Insert your Manual CD into your system. Click (Start) and "Control Panel". Click "Advanced Settings...". 5. The monitor can be posted on "Appearance and Personal- If the "Properties" button is...
User Manual (ENGLISH)
Page 36
..., and click "OK". in the figure below, click "Continue". Check the "Browse my computer for example, D:\Drive) where the driver setup file is displayed, as shown in the "Driver" tab. 7. Note This monitor driver is under certifying MS logo, and this installation doesn't damage your system. Using the Software If the message "Windows needs..." The certified driver will be posted on my computer". 8.
..., and click "OK". in the figure below, click "Continue". Check the "Browse my computer for example, D:\Drive) where the driver setup file is displayed, as shown in the "Driver" tab. 7. Note This monitor driver is under certifying MS logo, and this installation doesn't damage your system. Using the Software If the message "Windows needs..." The certified driver will be posted on my computer". 8.
User Manual (ENGLISH)
Page 38
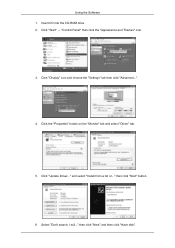
Click "Display" icon and choose the "Settings" tab then click "Advanced...". 4. then click "Next" button. 6. Select "Don't search, I will..." Using the Software 1. and select "Install from a list or..." Click "Start" → "Control Panel" then click the "Appearance and Themes" icon. 3. Click "Update Driver..." then click "Next" and then click "Have disk". Insert CD into the CD-ROM drive. 2. Click the "Properties" button on the "Monitor" tab and select "Driver" tab. 5.
Click "Display" icon and choose the "Settings" tab then click "Advanced...". 4. then click "Next" button. 6. Select "Don't search, I will..." Using the Software 1. and select "Install from a list or..." Click "Start" → "Control Panel" then click the "Appearance and Themes" icon. 3. Click "Update Driver..." then click "Next" and then click "Have disk". Insert CD into the CD-ROM drive. 2. Click the "Properties" button on the "Monitor" tab and select "Driver" tab. 5.
User Manual (ENGLISH)
Page 40
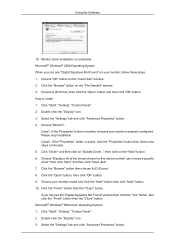
...How to install 1. Choose "Monitor". Monitor driver installation is active, click the "Properties" button then follow these steps. 1. Select the "Settings" tab and click "Advanced Properties" button. Choose "OK" button on the "File Needed" window. 3. Click the "Browse" button on the "Insert disk" window. 2. then click on "Update Driver..." Microsoft® Windows® Millennium Operating System 1. Click "Start", "Setting", "Control Panel". 2. Click the "Open" button, then click "OK" button. 9. Click "Start", "Setting", "Control Panel". 2. Using the Software 10...
...How to install 1. Choose "Monitor". Monitor driver installation is active, click the "Properties" button then follow these steps. 1. Select the "Settings" tab and click "Advanced Properties" button. Choose "OK" button on the "File Needed" window. 3. Click the "Browse" button on the "Insert disk" window. 2. then click on "Update Driver..." Microsoft® Windows® Millennium Operating System 1. Click "Start", "Setting", "Control Panel". 2. Click the "Open" button, then click "OK" button. 9. Click "Start", "Setting", "Control Panel". 2. Using the Software 10...
User Manual (ENGLISH)
Page 41
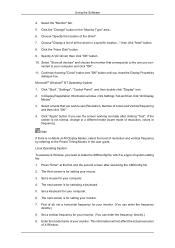
... 1. Click "Start", "Settings", "Control Panel", and then double-click "Display" icon. 2. Linux Operating System To execute X-Window, you need to a different mode (lower mode of all, set a horizontal frequency for your monitor. (You can enter the frequency directly.) 9. Set a mouse for your computer. 4. First of resolution, colors or frequency). Enter the model name of system setting file. 1. Using the Software 4. Click the "Change" button in a specific location..." If the screen is not normal, change to make the X86Config...
... 1. Click "Start", "Settings", "Control Panel", and then double-click "Display" icon. 2. Linux Operating System To execute X-Window, you need to a different mode (lower mode of all, set a horizontal frequency for your monitor. (You can enter the frequency directly.) 9. Set a mouse for your computer. 4. First of resolution, colors or frequency). Enter the model name of system setting file. 1. Using the Software 4. Click the "Change" button in a specific location..." If the screen is not normal, change to make the X86Config...

User Manual (ENGLISH)
Page 53
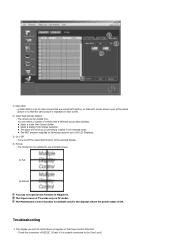
... Time Setup, Status, Source, Volume of TV works only on MagicInfo model. PIP PIP Size 1. The Input source of the selected display. 3) Off Time Setup - At On Time Setup, MagicInfo Source functions only for the selected display (PC Time). - Click Select All or use Check Box to select a display to Time Control. 1) Current Time - Time Control is ON. The Input source of MagicInfo works only on TV model. At On Time Setup, TV Source...
... Time Setup, Status, Source, Volume of TV works only on MagicInfo model. PIP PIP Size 1. The Input source of the selected display. 3) Off Time Setup - At On Time Setup, MagicInfo Source functions only for the selected display (PC Time). - Click Select All or use Check Box to select a display to Time Control. 1) Current Time - Time Control is ON. The Input source of MagicInfo works only on TV model. At On Time Setup, TV Source...
User Manual (ENGLISH)
Page 62
... in the selected mode. The display you wish to the Com1 port) A Video Wall is a set up by Samsung supports up to see a divided screen. Turns on TV model. Check the connection of the whole picture or so that the same picture is repeated on the Power Control Info Grid - The format can be divided into. The Input source of TV works only on /off the Video Wall function of screens with a different...
... in the selected mode. The display you wish to the Com1 port) A Video Wall is a set up by Samsung supports up to see a divided screen. Turns on TV model. Check the connection of the whole picture or so that the same picture is repeated on the Power Control Info Grid - The format can be divided into. The Input source of TV works only on /off the Video Wall function of screens with a different...
User Manual (ENGLISH)
Page 64
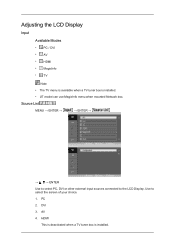
PC 2. Source List MENU → ENTER → → ENTER → → , → ENTER Use to select PC, DVI or other external input sources connected to select the screen of your choice. 1. Use to the LCD Display. AV 4. DVI 3. Adjusting the LCD Display Input Available Modes • PC / DVI • AV • HDMI • MagicInfo • TV Note • The TV menu is available when a TV tuner box is installed. HDMI This is deactivated when a TV tuner box is installed. • UT model can use MagicInfo menu when mounted Network box.
PC 2. Source List MENU → ENTER → → ENTER → → , → ENTER Use to select PC, DVI or other external input sources connected to select the screen of your choice. 1. Use to the LCD Display. AV 4. DVI 3. Adjusting the LCD Display Input Available Modes • PC / DVI • AV • HDMI • MagicInfo • TV Note • The TV menu is available when a TV tuner box is installed. HDMI This is deactivated when a TV tuner box is installed. • UT model can use MagicInfo menu when mounted Network box.

User Manual (ENGLISH)
Page 94
Note • For MagicInfo, a remote control is installed. • UT model can use MagicInfo menu when mounted Network box. MENU ENTER → → ENTER → , → [0~9] • ID Setup Assigns distinctive IDs to the SET. • ID Input Use to the SET. MagicInfo Available Modes • PC / DVI • AV • HDMI • MagicInfo • TV Note • The TV menu is available when a TV tuner box is...
Note • For MagicInfo, a remote control is installed. • UT model can use MagicInfo menu when mounted Network box. MENU ENTER → → ENTER → , → [0~9] • ID Setup Assigns distinctive IDs to the SET. • ID Input Use to the SET. MagicInfo Available Modes • PC / DVI • AV • HDMI • MagicInfo • TV Note • The TV menu is available when a TV tuner box is...
User Manual (ENGLISH)
Page 95
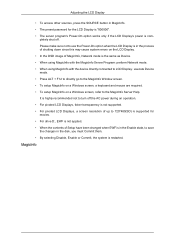
...; For pivoted LCD Displays, a screen resolution of up to 720*480(SD) is supported for the LCD Display is "000000". • The server program's Power-On option works only if the LCD Display's power is in the disk, you must Commit them. • By selecting Disable, Enable or Commit, the system is restarted. MagicInfo Adjusting the LCD Display • To access other sources, press the SOURCE button in MagicInfo...
...; For pivoted LCD Displays, a screen resolution of up to 720*480(SD) is supported for the LCD Display is "000000". • The server program's Power-On option works only if the LCD Display's power is in the disk, you must Commit them. • By selecting Disable, Enable or Commit, the system is restarted. MagicInfo Adjusting the LCD Display • To access other sources, press the SOURCE button in MagicInfo...
User Manual (ENGLISH)
Page 97
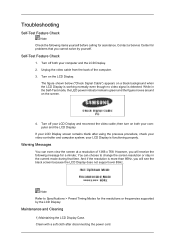
... the resolutions or frequencies supported by yourself. And if the resolution is functioning properly. Contact a Service Center for a minute; Self-Test Feature Check 1. Note Refer to change the screen resolution or stay in the Self-Test mode, the LED power indicator remains green and the figure moves around on both your computer and the LCD Display. 2. your LCD Display screen remains blank after disconnecting the power cord. Unplug the video cable from...
... the resolutions or frequencies supported by yourself. And if the resolution is functioning properly. Contact a Service Center for a minute; Self-Test Feature Check 1. Note Refer to change the screen resolution or stay in the Self-Test mode, the LED power indicator remains green and the figure moves around on both your computer and the LCD Display. 2. your LCD Display screen remains blank after disconnecting the power cord. Unplug the video cable from...

User Manual (ENGLISH)
Page 98
... a service for the main board of the video screen is used to prevent damage to reinstall the Adaptor (video) driver. Check if the power cord and the video cables are listed. If you installed a new video card or if you assembled the PC, check if you do need assistance, please call the phone number on the Information section or contact your dealer. 1. Symptoms and Recommended Actions Note A LCD Display recreates visual signals...
... a service for the main board of the video screen is used to prevent damage to reinstall the Adaptor (video) driver. Check if the power cord and the video cables are listed. If you installed a new video card or if you assembled the PC, check if you do need assistance, please call the phone number on the Information section or contact your dealer. 1. Symptoms and Recommended Actions Note A LCD Display recreates visual signals...
User Manual (ENGLISH)
Page 100
... port on your sound card. (Refer to the Brightness, Contrast) Q: The screen color is poor. A: Check the volume level. Troubleshooting Q: The image is blank and the power indicator light blinks every 0.5 or 1 seconds. Q: No sound. A: The LCD Display is firmly connected to both the audio-in the settings to its power management system. Q: The screen is too light or too dark. A: If the volume is distorted by dark shadows. A: Adjusts the Treble and Bass to audio signals...
... port on your sound card. (Refer to the Brightness, Contrast) Q: The screen color is poor. A: Check the volume level. Troubleshooting Q: The image is blank and the power indicator light blinks every 0.5 or 1 seconds. Q: No sound. A: The LCD Display is firmly connected to both the audio-in the settings to its power management system. Q: The screen is too light or too dark. A: If the volume is distorted by dark shadows. A: Adjusts the Treble and Bass to audio signals...

User Manual (ENGLISH)
Page 101
... frequency can I Adjusts the resolution? Set the function in the BIOS-SETUP of the computer. (Refer to the Windows / Computer Manual). A: Check if the batteries are listed. Note That video card support can I set the Power Saving function? Q: The remote control buttons do not respond. A: Check the polarities (+/-) of the driver used. (Refer to the Windows / Computer Manual). Q: How can be changed by reconfiguring the video card. A: Windows ME/2000: Set the resolution at the Control Panel → Display → Screen Saver...
... frequency can I Adjusts the resolution? Set the function in the BIOS-SETUP of the computer. (Refer to the Windows / Computer Manual). A: Check if the batteries are listed. Note That video card support can I set the Power Saving function? Q: The remote control buttons do not respond. A: Check the polarities (+/-) of the driver used. (Refer to the Windows / Computer Manual). Q: How can be changed by reconfiguring the video card. A: Windows ME/2000: Set the resolution at the Control Panel → Display → Screen Saver...
User Manual (ENGLISH)
Page 107
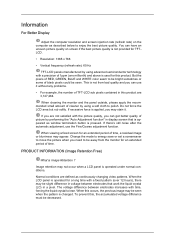
... continuously changing video patterns. Information For Better Display Adjust the computer resolution and screen injection rate (refresh rate) on screen if the best picture quality is not provided for TFTLCD. • Resolution: 1366 x 768 • Vertical frequency (refresh rate): 60 Hz TFT-LCD panels manufactured by using a soft cloth to polish. If you are not satisfied with the picture quality, you need to be seen. PRODUCT INFORMATION (Image Retention Free) What is changed. When the LCD panel is...
... continuously changing video patterns. Information For Better Display Adjust the computer resolution and screen injection rate (refresh rate) on screen if the best picture quality is not provided for TFTLCD. • Resolution: 1366 x 768 • Vertical frequency (refresh rate): 60 Hz TFT-LCD panels manufactured by using a soft cloth to polish. If you are not satisfied with the picture quality, you need to be seen. PRODUCT INFORMATION (Image Retention Free) What is changed. When the LCD panel is...
User Manual (ENGLISH)
Page 109
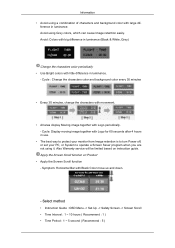
... in use. • The best way to protect your monitor from Image retention is to turn Power off, or set your PC, or System to operate a Screen Saver program when you are not using it. Avoid using Grey colors, which can cause Image retention easily. Cycle: Display moving image together with Logo for 60 seconds after 4 hours in luminance. Select method • Instruction Guide : OSD Menu -> Set Up -> Safety Screen -> Screen...
... in use. • The best way to protect your monitor from Image retention is to turn Power off, or set your PC, or System to operate a Screen Saver program when you are not using it. Avoid using Grey colors, which can cause Image retention easily. Cycle: Display moving image together with Logo for 60 seconds after 4 hours in luminance. Select method • Instruction Guide : OSD Menu -> Set Up -> Safety Screen -> Screen...
User Manual (ENGLISH)
Page 111
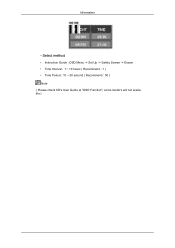
Information - Select method • Instruction Guide : OSD Menu -> Set Up -> Safety Screen -> Eraser • Time Interval : 1 ~ 10 hours ( Recommend : 1 ) • Time Period : 10 ~ 50 second ( Recommend : 50 ) Note ( Please check CD's User Guide at "OSD Function", some model's will not available )
Information - Select method • Instruction Guide : OSD Menu -> Set Up -> Safety Screen -> Eraser • Time Interval : 1 ~ 10 hours ( Recommend : 1 ) • Time Period : 10 ~ 50 second ( Recommend : 50 ) Note ( Please check CD's User Guide at "OSD Function", some model's will not available )


