User Manual (ENGLISH)
Page 10
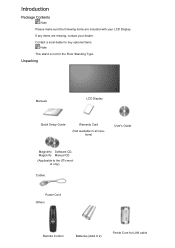
If any items are included with your dealer. Unpacking Manuals LCD Display Quick Setup Guide Warranty Card (Not available in all locations) User's Guide MagicInfo Software CD, MagicInfo Manual CD (Applicable to buy optional items. Note This stand is not for LAN cable Introduction Package Contents Note Please make sure the following items are missing, contact your LCD Display. el only) Cables Power Cord Others Remote Control Batteries (AAA X 2) Ferrite Core for the Floor Standing Type. Contact a local dealer to the UT mod-
If any items are included with your dealer. Unpacking Manuals LCD Display Quick Setup Guide Warranty Card (Not available in all locations) User's Guide MagicInfo Software CD, MagicInfo Manual CD (Applicable to buy optional items. Note This stand is not for LAN cable Introduction Package Contents Note Please make sure the following items are missing, contact your LCD Display. el only) Cables Power Cord Others Remote Control Batteries (AAA X 2) Ferrite Core for the Floor Standing Type. Contact a local dealer to the UT mod-
User Manual (ENGLISH)
Page 34
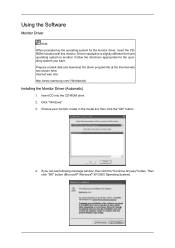
... with this monitor. Click "Windows". 3. Then click "OK" button (Microsoft® Windows® XP/2000 Operating System). Using the Software Monitor Driver Note When prompted by the operating system for the operating system you can see following message window, then click the "Continue Anyway..." button. Internet web site : http://www.samsung.com/ (Worldwide) Installing the Monitor Driver (Automatic) 1. Prepare a blank disk and download the driver program file at the Internet web site...
... with this monitor. Click "Windows". 3. Then click "OK" button (Microsoft® Windows® XP/2000 Operating System). Using the Software Monitor Driver Note When prompted by the operating system for the operating system you can see following message window, then click the "Continue Anyway..." button. Internet web site : http://www.samsung.com/ (Worldwide) Installing the Monitor Driver (Automatic) 1. Prepare a blank disk and download the driver program file at the Internet web site...
User Manual (ENGLISH)
Page 35
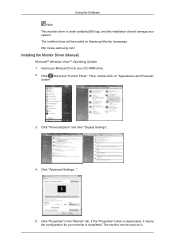
...ROM drive. 2. The monitor can be posted on "Appearance and Personal- Click "Personalization" and then "Display Settings". 4. http://www.samsung.com/ Installing the Monitor Driver (Manual) Microsoft® Windows Vista™, Operating System 1. Click "Advanced Settings...". 5. If the "...Properties" button is completed. Then, double-click on Samsung Monitor homepage. ization". 3. The certified driver will be used as is under certifying MS logo, and this installation doesn't damage your system. Using the Software Note This monitor driver is . Click (Start) and ...
...ROM drive. 2. The monitor can be posted on "Appearance and Personal- Click "Personalization" and then "Display Settings". 4. http://www.samsung.com/ Installing the Monitor Driver (Manual) Microsoft® Windows Vista™, Operating System 1. Click "Advanced Settings...". 5. If the "...Properties" button is completed. Then, double-click on Samsung Monitor homepage. ization". 3. The certified driver will be used as is under certifying MS logo, and this installation doesn't damage your system. Using the Software Note This monitor driver is . Click (Start) and ...
User Manual (ENGLISH)
Page 36
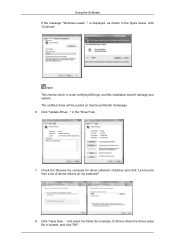
... doesn't damage your system. in the figure below, click "Continue". Click "Update Driver..." and select the folder (for driver software" checkbox and click "Let me pick from a list of device drivers on Samsung Monitor homepage. 6. Note This monitor driver is located, and click "OK". is displayed, as shown in the "Driver" tab...
... doesn't damage your system. in the figure below, click "Continue". Click "Update Driver..." and select the folder (for driver software" checkbox and click "Let me pick from a list of device drivers on Samsung Monitor homepage. 6. Note This monitor driver is located, and click "OK". is displayed, as shown in the "Driver" tab...

User Manual (ENGLISH)
Page 37
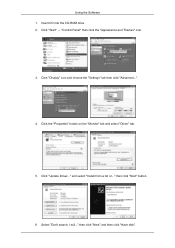
Using the Software 9. Select the model that matches your monitor from the list of monitor models on the following screens displayed in sequence. Click "Close" → "Close" → "OK" → "OK" on the screen, and click "Next". 10. Microsoft® Windows® XP Operating System
Using the Software 9. Select the model that matches your monitor from the list of monitor models on the following screens displayed in sequence. Click "Close" → "Close" → "OK" → "OK" on the screen, and click "Next". 10. Microsoft® Windows® XP Operating System
User Manual (ENGLISH)
Page 38
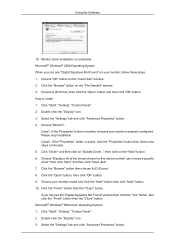
Click "Start" → "Control Panel" then click the "Appearance and Themes" icon. 3. Click "Display" icon and choose the "Settings" tab then click "Advanced...". 4. Select "Don't search, I will..." Insert CD into the CD-ROM drive. 2. then click "Next" button. 6. Click the "Properties" button on the "Monitor" tab and select "Driver" tab. 5. and select "Install from a list or..." then click "Next" and then click "Have disk". Using the Software 1. Click "Update Driver..."
Click "Start" → "Control Panel" then click the "Appearance and Themes" icon. 3. Click "Display" icon and choose the "Settings" tab then click "Advanced...". 4. Select "Don't search, I will..." Insert CD into the CD-ROM drive. 2. then click "Next" button. 6. Click the "Properties" button on the "Monitor" tab and select "Driver" tab. 5. and select "Install from a list or..." then click "Next" and then click "Have disk". Using the Software 1. Click "Update Driver..."

User Manual (ENGLISH)
Page 39
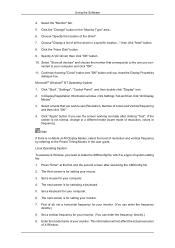
Using the Software 7. Then click "OK" button. The certified driver will be posted on Samsung Monitor homepage. Click the "Close" button then click "OK" button continually. Click the "Browse" button then choose A:(D:\Driver) and choose your system. Note This monitor driver is under certifying MS logo, and this installation doesn't damage your monitor model in the model list and click the "Next" button. 8. If you can see following message window, then click the "Continue Anyway" button. http://www.samsung.com/ 9.
Using the Software 7. Then click "OK" button. The certified driver will be posted on Samsung Monitor homepage. Click the "Close" button then click "OK" button continually. Click the "Browse" button then choose A:(D:\Driver) and choose your system. Note This monitor driver is under certifying MS logo, and this installation doesn't damage your monitor model in the model list and click the "Next" button. 8. If you can see following message window, then click the "Continue Anyway" button. http://www.samsung.com/ 9.
User Manual (ENGLISH)
Page 40
... "Update Driver..." Click the "Open" button, then click "OK" button. 9. Monitor driver installation is active, click the "Properties" button then follow these steps. 1. Using the Software 10. Please stop installation Case2 : If the "Properties" button is completed. Select the "Settings" tab and click "Advanced Properties" button. 4. Click "Start", "Setting", "Control Panel...
... "Update Driver..." Click the "Open" button, then click "OK" button. 9. Monitor driver installation is active, click the "Properties" button then follow these steps. 1. Using the Software 10. Please stop installation Case2 : If the "Properties" button is completed. Select the "Settings" tab and click "Advanced Properties" button. 4. Click "Start", "Setting", "Control Panel...
User Manual (ENGLISH)
Page 41
Using the Software 4. Continue choosing "Close" button and "OK" button until you con- If the screen is for setting your computer. 4. Linux Operating System To execute X-Window, you ...
Using the Software 4. Continue choosing "Close" button and "OK" button until you con- If the screen is for setting your computer. 4. Linux Operating System To execute X-Window, you ...
User Manual (ENGLISH)
Page 42
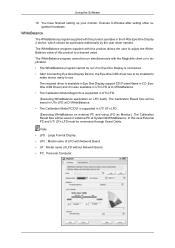
... UTn LFD. (Executing WhiteBalance application on external PC and using LFD as Monitor.) The Calibration Result files will be connected through Serial Cable. Using the Software 10. The WhiteBalance program supplied with this case External PC and UT/ UTn LFD must be saved in UTn LFD at System32\WhiteBalance. Execute X-Window...
... UTn LFD. (Executing WhiteBalance application on external PC and using LFD as Monitor.) The Calibration Result files will be connected through Serial Cable. Using the Software 10. The WhiteBalance program supplied with this case External PC and UT/ UTn LFD must be saved in UTn LFD at System32\WhiteBalance. Execute X-Window...

User Manual (ENGLISH)
Page 43
... Shield Wizard window appears, click "Next". 4. Click "Finish". 8. Double-click the icon to accept the terms of use. 5. Using the Software MDC For detailed instructions, install the Eye-One Display and run the WhiteBalance program, and then press the Help bar at the bottom of computer...that happens, press F5 Key. Click "Install". 6. Select "Setting/Control Panel" on your desktop. Note If the popup window to install the software for the main screen is complete, the MDC executable icon appears on the "Start" menu and then double-click "Add/Delete a program". Installation ...
... Shield Wizard window appears, click "Next". 4. Click "Finish". 8. Double-click the icon to accept the terms of use. 5. Using the Software MDC For detailed instructions, install the Eye-One Display and run the WhiteBalance program, and then press the Help bar at the bottom of computer...that happens, press F5 Key. Click "Install". 6. Select "Setting/Control Panel" on your desktop. Note If the popup window to install the software for the main screen is complete, the MDC executable icon appears on the "Start" menu and then double-click "Add/Delete a program". Installation ...

User Manual (ENGLISH)
Page 44
Using MDC Using the Software
Using MDC Using the Software
User Manual (ENGLISH)
Page 81
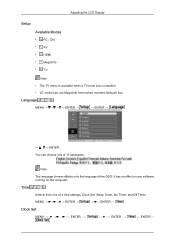
... The language chosen affects only the language of 4 time settings, Clock Set, Sleep Timer, On Timer, and Off Timer. It has no effect on any software running on the computer. Language MENU ENTER → → ENTER → → , → ENTER You can use MagicInfo menu when mounted Network box. Adjusting the...
... The language chosen affects only the language of 4 time settings, Clock Set, Sleep Timer, On Timer, and Off Timer. It has no effect on any software running on the computer. Language MENU ENTER → → ENTER → → , → ENTER You can use MagicInfo menu when mounted Network box. Adjusting the...
User Manual (ENGLISH)
Page 100
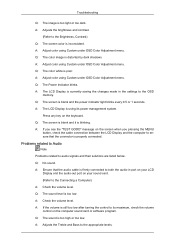
... screen is firmly connected to both the audio-in the settings to its power management system. Press any key on the computer sound card or software program. A: If the volume is distorted by dark shadows. A: Adjust color using Custom under OSD Color Adjustment menu. Q: The color image is still too low...
... screen is firmly connected to both the audio-in the settings to its power management system. Press any key on the computer sound card or software program. A: If the volume is distorted by dark shadows. A: Adjust color using Custom under OSD Color Adjustment menu. Q: The color image is still too low...
User Manual (ENGLISH)
Page 105
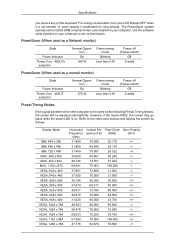
...Less than 5 W Power off (Power-switch) Off 0 watts PowerSaver (When used as the following Preset Timing Modes, the screen will be adjusted automatically. Use the software utility installed on the keyboard. Display Mode IBM, 640 x 350 IBM, 640 x 480 IBM, 720 x 400 MAC, 640 x 480 MAC, 832 x 624 MAC..., if the signal differs, the screen may go blank while the power LED is the same as a normal monitor) State Power Indicator Power Con- 460UT sumption Normal Operation On 270 W Power saving mode Blinking Less than 2 W Power off (Power-switch) Off 0 watts Preset Timing Modes If the ...
...Less than 5 W Power off (Power-switch) Off 0 watts PowerSaver (When used as the following Preset Timing Modes, the screen will be adjusted automatically. Use the software utility installed on the keyboard. Display Mode IBM, 640 x 350 IBM, 640 x 480 IBM, 720 x 400 MAC, 640 x 480 MAC, 832 x 624 MAC..., if the signal differs, the screen may go blank while the power LED is the same as a normal monitor) State Power Indicator Power Con- 460UT sumption Normal Operation On 270 W Power saving mode Blinking Less than 2 W Power off (Power-switch) Off 0 watts Preset Timing Modes If the ...


