User Guide
Page 2
Main Page Safety Instructions Notational Power Installation Cleaning Other Introduction Unpacking Front Rear Remote Control Mechanical Lay-out Setup Connecting Your Monitor Multiple Display Control (MDC) English > Main > Index Adjusting Your LCD Monitor User Controls User control buttons Direct-Access Features On-Screen Display OSD Functions Screen Adjustment Animation Clips Troubleshooting Check before Calling for Service Problems and Solutions Q & A Specifications General Specifications PowerSaver Preset Timing Modes Information Service Center Terms Regulatory Natural Color Authority
Main Page Safety Instructions Notational Power Installation Cleaning Other Introduction Unpacking Front Rear Remote Control Mechanical Lay-out Setup Connecting Your Monitor Multiple Display Control (MDC) English > Main > Index Adjusting Your LCD Monitor User Controls User control buttons Direct-Access Features On-Screen Display OSD Functions Screen Adjustment Animation Clips Troubleshooting Check before Calling for Service Problems and Solutions Q & A Specifications General Specifications PowerSaver Preset Timing Modes Information Service Center Terms Regulatory Natural Color Authority
User Guide
Page 5
Notational Power Installation Cleaning Other English > Main > Safety Instructions > Installation Do not cover the vents on a flat and stable surface. z An electric shock or fire could be damaged. z This may cause a breakdown or fire. Place the monitor on the monitor cabinet. Put your monitor in a location with low humidity and a minimum of dust. Do not drop the monitor when moving it. z Bad ventilation...
Notational Power Installation Cleaning Other English > Main > Safety Instructions > Installation Do not cover the vents on a flat and stable surface. z An electric shock or fire could be damaged. z This may cause a breakdown or fire. Place the monitor on the monitor cabinet. Put your monitor in a location with low humidity and a minimum of dust. Do not drop the monitor when moving it. z Bad ventilation...
User Guide
Page 7
Notational Power Installation Cleaning Other English > Main > Safety Instructions > Ohter Do not remove cover(or back). z This may cause a breakdown, electric shock or a fire due to damage to the cable. For each hour of looking at the monitor, you should let your monitor does not operate normally - No user serviceable parts inside. If your eyes rest for 5 minutes. z This may cause an electric shock...
Notational Power Installation Cleaning Other English > Main > Safety Instructions > Ohter Do not remove cover(or back). z This may cause a breakdown, electric shock or a fire due to damage to the cable. For each hour of looking at the monitor, you should let your monitor does not operate normally - No user serviceable parts inside. If your eyes rest for 5 minutes. z This may cause an electric shock...
User Guide
Page 11
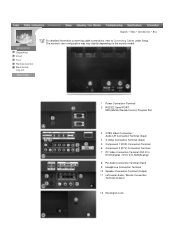
... the monitor model. 1 Power Connection Terminal 2 RS232C Serial PORT : MDC(Multiful Devide Control) Program Port 3 CVBS Video Connection / Audio L/R Connection Terminal (Input) 4 S-Video Connection Terminal (Input) 5 Component 1 (DVD) Connection Terminal 6 Component 2 (DTV) Connection Terminal 7 PC Video Connection Terminal (DVI-D to DVI-D(Digital) / DVI-I to Connecting Cables under Setup. Unpacking Front Rear Remote Control Mechanical Lay-out English > Main > Introduction > Rear For detailed information concerning cable connections, refer to D-SUB(Analog)) 8 PC Audio Connection Terminal...
... the monitor model. 1 Power Connection Terminal 2 RS232C Serial PORT : MDC(Multiful Devide Control) Program Port 3 CVBS Video Connection / Audio L/R Connection Terminal (Input) 4 S-Video Connection Terminal (Input) 5 Component 1 (DVD) Connection Terminal 6 Component 2 (DTV) Connection Terminal 7 PC Video Connection Terminal (DVI-D to DVI-D(Digital) / DVI-I to Connecting Cables under Setup. Unpacking Front Rear Remote Control Mechanical Lay-out English > Main > Introduction > Rear For detailed information concerning cable connections, refer to D-SUB(Analog)) 8 PC Audio Connection Terminal...
User Guide
Page 12
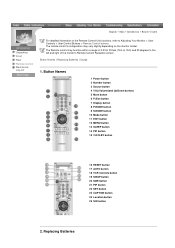
... vary slightly depending on the monitor model. Button Names 1 Power button 2 Number button 3 Source button 4 VOL(Volume)and Up/Down buttons 5 Mute button 6 P.Size button 7 Display button 8 P.MODE button 9 S.MODE button 10 Mode button 11 EXIT button 12 MENU button 13 SLEEP button 14 PIP button 15 V.DOLBY button 16 RESET button 17 AUTO button 18 VCR Controls button 19 SWAP button 20 SIZE button 21 PIP button 22 SET button 23 CAPTION button 24 Location button 25 Still button 2. English > Main > Introduction > Remote Control Unpacking Front Rear Remote Control Mechanical Lay-out For detailed...
... vary slightly depending on the monitor model. Button Names 1 Power button 2 Number button 3 Source button 4 VOL(Volume)and Up/Down buttons 5 Mute button 6 P.Size button 7 Display button 8 P.MODE button 9 S.MODE button 10 Mode button 11 EXIT button 12 MENU button 13 SLEEP button 14 PIP button 15 V.DOLBY button 16 RESET button 17 AUTO button 18 VCR Controls button 19 SWAP button 20 SIZE button 21 PIP button 22 SET button 23 CAPTION button 24 Location button 25 Still button 2. English > Main > Introduction > Remote Control Unpacking Front Rear Remote Control Mechanical Lay-out For detailed...
User Guide
Page 16
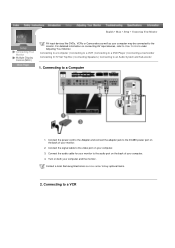
.... 4. Connect the signal cable to the DC28V power port on your computer. 3. Connect the audio cable for your monitor to the audio port on connecting AV input devices, refer to the monitor. Contact a local Samsung Electronics service center to an Audio System and Sub-woofer 1. For detailed information on the back of your monitor. 2. Connecting to a VCR Connecting to a Computer 1. Turn on both your computer and the monitor. English > Main > Setup > Connecting Your Monitor Connecting Your Monitor Multiple Display Control...
.... 4. Connect the signal cable to the DC28V power port on your computer. 3. Connect the audio cable for your monitor to the audio port on connecting AV input devices, refer to the monitor. Contact a local Samsung Electronics service center to an Audio System and Sub-woofer 1. For detailed information on the back of your monitor. 2. Connecting to a VCR Connecting to a Computer 1. Turn on both your computer and the monitor. English > Main > Setup > Connecting Your Monitor Connecting Your Monitor Multiple Display Control...
User Guide
Page 17
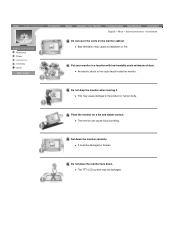
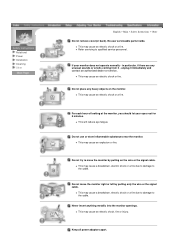
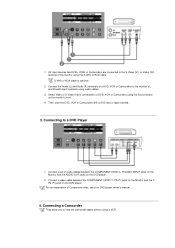
..., VCR or Camcorders using audio cables. 3. Select Video or S-Video that is optional. 2. Connect a video cable between the COMPONENT1(DVD) L, R AUDIO INPUT jacks on the Monitor and the AUDIO OUT jacks on the DVD player. 2. 1. Connect the Audio (L) and Audio (R) terminals of the monitor using a VCR. Then, start the DVD, VCR or Camcorders with a DVD disc or tape inserted. 3. Connect a set of Component video, see your DVD player owner's manual. 4. Connecting a Camcorder They allow...
..., VCR or Camcorders using audio cables. 3. Select Video or S-Video that is optional. 2. Connect a video cable between the COMPONENT1(DVD) L, R AUDIO INPUT jacks on the Monitor and the AUDIO OUT jacks on the DVD player. 2. 1. Connect the Audio (L) and Audio (R) terminals of the monitor using a VCR. Then, start the DVD, VCR or Camcorders with a DVD disc or tape inserted. 3. Connect a set of Component video, see your DVD player owner's manual. 4. Connecting a Camcorder They allow...
User Guide
Page 21
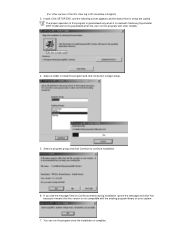
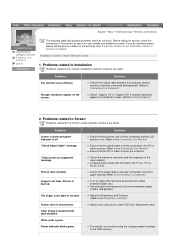
...Continue to begin setup. 5. If you see the message Version Conflict as below during installation, ignore the message and click Yes because it is used with Samsung Syncmaster 400T model and is complete. You can run the program once the installation is not guaranteed when the user run this ...is not compatible with other version of this program with the existing program library on your system. 7. The proper operation of the OS, User log in ID should be in English) 3. (For other models. 4. Select a folder to install the program and click the button to continue installation. 6....
...Continue to begin setup. 5. If you see the message Version Conflict as below during installation, ignore the message and click Yes because it is used with Samsung Syncmaster 400T model and is complete. You can run the program once the installation is not guaranteed when the user run this ...is not compatible with other version of this program with the existing program library on your system. 7. The proper operation of the OS, User log in ID should be in English) 3. (For other models. 4. Select a folder to install the program and click the button to continue installation. 6....

User Guide
Page 27
... change the current time, first change the PC Time. 2) On Time Setup - Info Grid shows some basic information necessary to Aspect Ratio Control. 1) Click the PC tab to Time Control. 1) Current Time - Info Grid shows some basic information necessary to adjust Aspect Ratio for PC Analog and PC Digital. 2) Info Grid displays only the display having PC Analog and PC Digital as input source. 3) Adjust...
... change the current time, first change the PC Time. 2) On Time Setup - Info Grid shows some basic information necessary to Aspect Ratio Control. 1) Click the PC tab to Time Control. 1) Current Time - Info Grid shows some basic information necessary to adjust Aspect Ratio for PC Analog and PC Digital. 2) Info Grid displays only the display having PC Analog and PC Digital as input source. 3) Adjust...

User Guide
Page 30
... display. 5) Auto Adjustment - Settings Control is available only for the displays for which the power status is displayed in the Grid. 1) Image Lock - Controls the Image Lock setting only for all input sources. 2) Treble - Check the connection of the other displays connected have the same ID, those displays are made. 8. Check if the Display Set ID is selected, the default value (50) returns. Adjusts Position of the selected display. 3) Bass - Troubleshooting 1. When Select All is a number between 1 and 6. (Adjust using the Display menu) Note : A Display Set...
... display. 5) Auto Adjustment - Settings Control is available only for the displays for which the power status is displayed in the Grid. 1) Image Lock - Controls the Image Lock setting only for all input sources. 2) Treble - Check the connection of the other displays connected have the same ID, those displays are made. 8. Check if the Display Set ID is selected, the default value (50) returns. Adjusts Position of the selected display. 3) Bass - Troubleshooting 1. When Select All is a number between 1 and 6. (Adjust using the Display menu) Note : A Display Set...
User Guide
Page 36
... time. Sleep Function Use to control the volume level at preset time. Sound balance ==> Allows you to adjust the sound balance between the main screeen • Size: Resizing the PIP Screen 3) Language: You can choose one of 3 languages. (English, Spanish, French) PC PC Display Controls Only the SET whose ID corresponds to control the various aspects of the individual SET. English > Main > Adjusting Your Monitor > On-Screen Display > OSD Functions User Controls On-Screen Display Characters and...
... time. Sleep Function Use to control the volume level at preset time. Sound balance ==> Allows you to adjust the sound balance between the main screeen • Size: Resizing the PIP Screen 3) Language: You can choose one of 3 languages. (English, Spanish, French) PC PC Display Controls Only the SET whose ID corresponds to control the various aspects of the individual SET. English > Main > Adjusting Your Monitor > On-Screen Display > OSD Functions User Controls On-Screen Display Characters and...

User Guide
Page 38
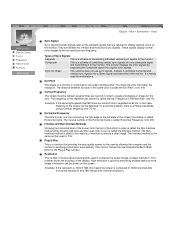
... Setting Use to set the TV to control the volume level at the time the TV turns on automatically at preset time. Picture Adjusting display quality sound.) 3) Sub woofer: Sub-Woofer On/Off ID For explanations on screen adjustment functions, refer to the explanations under Video Screen. DVD / DTV Screen For detailed information on the PC Digital control menu, refer to DVD / DTV Screen Adjustment Animation Clips. Emphasize high frequency audio. Use to set...
... Setting Use to set the TV to control the volume level at the time the TV turns on automatically at preset time. Picture Adjusting display quality sound.) 3) Sub woofer: Sub-Woofer On/Off ID For explanations on screen adjustment functions, refer to the explanations under Video Screen. DVD / DTV Screen For detailed information on the PC Digital control menu, refer to DVD / DTV Screen Adjustment Animation Clips. Emphasize high frequency audio. Use to set...
User Guide
Page 40
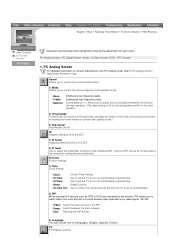
...; Video mode not supported This indicates the display resolution or refresh rate is not properly set on the monitor. Refer to Specifications > Preset Timing Modes for the resolutions or frequencies that allows you cannot solve by the monitor. Selecting Resolution and Color If the monitor resolution or color is not properly set for a frequency out of range or the PowerSaver mode is functioning properly. 1. General Specifications | PowerSaver | Preset Timing Modes English > Main > Troubleshooting > Check before calling for service Check the...
...; Video mode not supported This indicates the display resolution or refresh rate is not properly set on the monitor. Refer to Specifications > Preset Timing Modes for the resolutions or frequencies that allows you cannot solve by the monitor. Selecting Resolution and Color If the monitor resolution or color is not properly set for a frequency out of range or the PowerSaver mode is functioning properly. 1. General Specifications | PowerSaver | Preset Timing Modes English > Main > Troubleshooting > Check before calling for service Check the...
User Guide
Page 41
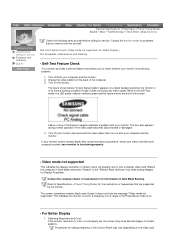
... the Flat Panel Display Screen Clean with precision of damages caused by him/her. Setting Refresh Rate >> Click Start --> Settings --> Control Panel --> Display --> Settings --> Advanced --> Refresh Rate --> Apply --> Yes --> OK --> Yes. 3. If you click Windows System End button. But the pixels of RED, GREEN, BLUE and WHITE color seem to get the best image quality by using FINE/COARSE tuning buttons. 4. Maintenance and Cleaning 1. You can enjoy the best screen image when the refresh rate is used to prevent damage to energy save or set , the screen image may...
... the Flat Panel Display Screen Clean with precision of damages caused by him/her. Setting Refresh Rate >> Click Start --> Settings --> Control Panel --> Display --> Settings --> Advanced --> Refresh Rate --> Apply --> Yes --> OK --> Yes. 3. If you click Windows System End button. But the pixels of RED, GREEN, BLUE and WHITE color seem to get the best image quality by using FINE/COARSE tuning buttons. 4. Maintenance and Cleaning 1. You can enjoy the best screen image when the refresh rate is used to prevent damage to energy save or set , the screen image may...
User Guide
Page 42
.... Color image is currently saving the changes made in settings to the Brightness, Contrast) z Adjust color using Mode under OSD Color Adjustment menu. Power Indicator blinks green. z Check the maximum resolution and the frequency of the video adaptor. z The monitor is distorted with the data in the Preset Timing Modes Chart. Picture is off "Check Signal Cable" message "Video mode not supported" message Picture rolls vertically. Problems Screen is blank and power indicator is blurred. z Check if the signal cable is not clear. Installation | Screen | Audio | Remote Control...
.... Color image is currently saving the changes made in settings to the Brightness, Contrast) z Adjust color using Mode under OSD Color Adjustment menu. Power Indicator blinks green. z Check the maximum resolution and the frequency of the video adaptor. z The monitor is distorted with the data in the Preset Timing Modes Chart. Picture is off "Check Signal Cable" message "Video mode not supported" message Picture rolls vertically. Problems Screen is blank and power indicator is blurred. z Check if the signal cable is not clear. Installation | Screen | Audio | Remote Control...
User Guide
Page 44
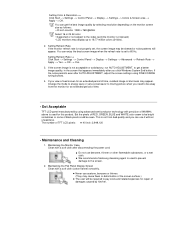
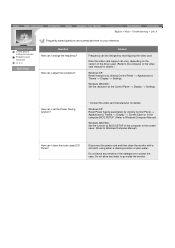
... Control Panel --> Appearance & Theme --> Display --> Settings. How can I set the Power Saving function? * Contact the video card manufacturer for details. How can I clean the outer case/LCD Panel? Do not allow any remains of the driver used. (Refer to Windows/Computer Manual). Windows ME/2000: Set the resolution at BIOS-SETUP of the computer or the screen saver. (Refer to the computer or the video card manual for your reference. English > Main > Troubleshooting > Q & A Check before calling for service Problems...
... Control Panel --> Appearance & Theme --> Display --> Settings. How can I set the Power Saving function? * Contact the video card manufacturer for details. How can I clean the outer case/LCD Panel? Do not allow any remains of the driver used. (Refer to Windows/Computer Manual). Windows ME/2000: Set the resolution at BIOS-SETUP of the computer or the screen saver. (Refer to the computer or the video card manual for your reference. English > Main > Troubleshooting > Q & A Check before calling for service Problems...
User Guide
Page 45
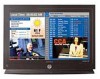
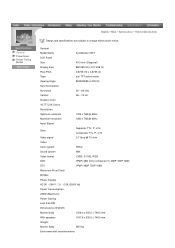
... Model Name SyncMaster 400T LCD Panel Size 40.0 inch (Diagonal) Display area 862.080 (H) x 517.248 (V) Pixel Pitch 0.6735 (H) x 0.6735 (V) Type a-si TFT active matrix Viewing Angle 85/85/85/85 (L/R/U/D) Synchronization Horizontal 30 ~ 60 kHz Vertical 56 ~ 75 Hz Display Color 16,777,216 Colors Resolution Optimum resolution 1024 x 768 @ 60Hz Maximum resolution 1280 x 768 @ 60Hz Input Signal Sync. Composite: TTL, P. Separate: TTL, P. General PowerSaver Preset Timing Modes English > Main > Specifications > General Specifications Design and specifications...
... Model Name SyncMaster 400T LCD Panel Size 40.0 inch (Diagonal) Display area 862.080 (H) x 517.248 (V) Pixel Pitch 0.6735 (H) x 0.6735 (V) Type a-si TFT active matrix Viewing Angle 85/85/85/85 (L/R/U/D) Synchronization Horizontal 30 ~ 60 kHz Vertical 56 ~ 75 Hz Display Color 16,777,216 Colors Resolution Optimum resolution 1024 x 768 @ 60Hz Maximum resolution 1280 x 768 @ 60Hz Input Signal Sync. Composite: TTL, P. Separate: TTL, P. General PowerSaver Preset Timing Modes English > Main > Specifications > General Specifications Design and specifications...

User Guide
Page 47
... set up this product meets the ENERGY STAR® guidelines for long periods. Use a software utility installed on the keyboard. This system saves energy by switching your monitor into a low-power mode when it has not been used with a computer equipped with a VESA DPMS compliant video card installed in power management system called PowerSaver. General PowerSaver Preset Timing Modes English > Main > Specifications > PowerSaver This monitor has a built-in your monitor...
... set up this product meets the ENERGY STAR® guidelines for long periods. Use a software utility installed on the keyboard. This system saves energy by switching your monitor into a low-power mode when it has not been used with a computer equipped with a VESA DPMS compliant video card installed in power management system called PowerSaver. General PowerSaver Preset Timing Modes English > Main > Specifications > PowerSaver This monitor has a built-in your monitor...
User Guide
Page 52
... automatically. Resolution The number of transmitting individual vertical sync signals to the monitor. High resolution is used for the user. These signals display normal color images by separating the composite signal into a Green signal and transmits to the monitor. The monitor displays the color signals by the set resolution and frequency. Plug & Play This is called 'resolution'. Types of Sync Signals Separate This is a scheme of horizontal and vertical dots used to compose the screen image is a function that provides the best quality screen for...
... automatically. Resolution The number of transmitting individual vertical sync signals to the monitor. High resolution is used for the user. These signals display normal color images by separating the composite signal into a Green signal and transmits to the monitor. The monitor displays the color signals by the set resolution and frequency. Plug & Play This is called 'resolution'. Types of Sync Signals Separate This is a scheme of horizontal and vertical dots used to compose the screen image is a function that provides the best quality screen for...
User Guide
Page 53
... and Resolve Radio/TV Interference Problems helpful. It is a detachable power supply cord with the instructions, may find the booklet called How to which can radiate radio frequency energy and, if not installed and used in a particular installation. For 240 Volt applications use only UL Listed detachable power cord with NEMA configuration 6-15P type (tandem blades) plug cap. User Information Changes or modifications not expressly approved...
... and Resolve Radio/TV Interference Problems helpful. It is a detachable power supply cord with the instructions, may find the booklet called How to which can radiate radio frequency energy and, if not installed and used in a particular installation. For 240 Volt applications use only UL Listed detachable power cord with NEMA configuration 6-15P type (tandem blades) plug cap. User Information Changes or modifications not expressly approved...


