Quick Guide (ENGLISH)
Page 3
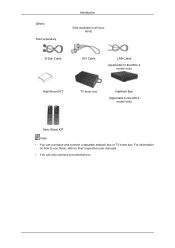
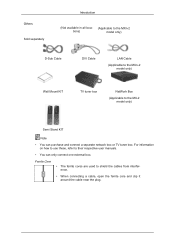
For information on how to use these, refer to the MX-2 model only) Semi Stand KIT Note • You can only connect one external box. Others Sold separately Introduction (Not available in all locations) D-Sub Cable DVI Cable LAN Cable (Applicable to the MXn-2 model only) Wall Mount KIT TV tuner box NetWork Box (Applicable to their respective user manuals. • You can purchase and connect a separate network box or TV tuner box.
For information on how to use these, refer to the MX-2 model only) Semi Stand KIT Note • You can only connect one external box. Others Sold separately Introduction (Not available in all locations) D-Sub Cable DVI Cable LAN Cable (Applicable to the MXn-2 model only) Wall Mount KIT TV tuner box NetWork Box (Applicable to their respective user manuals. • You can purchase and connect a separate network box or TV tuner box.
Quick Guide (ENGLISH)
Page 4
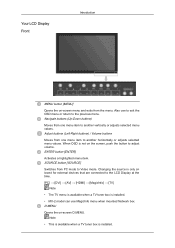
... [SOURCE] Switches from one menu item to the previous menu. Note • This is available when a TV tuner box is installed. • MX-2 model can use to exit the OSD menu or return to another vertically or adjusts selected menu values. Navigate buttons (Up-Down buttons) Moves from PC... mode to adjust volume. Changing the source is only allowed for external devices that are connected to the LCD Display at the time. [PC] → [DVI] → [AV] → [HDMI] → [MagicInfo] → [TV] Note • The TV menu is available when a ...
... [SOURCE] Switches from one menu item to the previous menu. Note • This is available when a TV tuner box is installed. • MX-2 model can use to exit the OSD menu or return to another vertically or adjusts selected menu values. Navigate buttons (Up-Down buttons) Moves from PC... mode to adjust volume. Changing the source is only allowed for external devices that are connected to the LCD Display at the time. [PC] → [DVI] → [AV] → [HDMI] → [MagicInfo] → [TV] Note • The TV menu is available when a ...
Quick Guide (ENGLISH)
Page 5
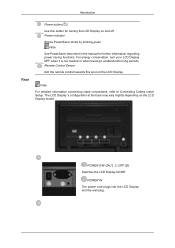
...button for long periods. POWER IN The power cord plugs into the LCD Display and the wall plug. Introduction Rear Power button [ ] Use this spot on the LCD Display model. For energy conservation, turn your LCD Display OFF when it is not needed or when leaving it unattended for ...turning the LCD Display on and off. Note For detailed information concerning cable connections, refer to ...
...button for long periods. POWER IN The power cord plugs into the LCD Display and the wall plug. Introduction Rear Power button [ ] Use this spot on the LCD Display model. For energy conservation, turn your LCD Display OFF when it is not needed or when leaving it unattended for ...turning the LCD Display on and off. Note For detailed information concerning cable connections, refer to ...
Quick Guide (ENGLISH)
Page 7
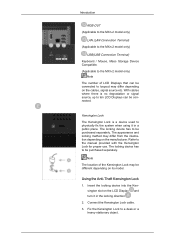
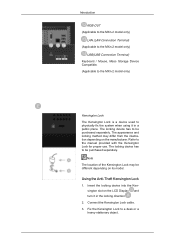
... public place. Introduction RGB OUT (Applicable to the MXn-2 model only) LAN (LAN Connection Terminal) (Applicable to the MXn-2 model only) USB(USB Connection Terminal) Keyboard / Mouse, Mass Storage Device Compatible. (Applicable to the MXn-2 model only) Note The number of the Kensington Lock may be... cables where there is a device used to a desk or a heavy stationary object. The locking device has to ten LCD Displays can be different depending on the LCD Display and turn it in the locking direction . 2. Connect the Kensington Lock cable. 3. The locking device has to the ...
... public place. Introduction RGB OUT (Applicable to the MXn-2 model only) LAN (LAN Connection Terminal) (Applicable to the MXn-2 model only) USB(USB Connection Terminal) Keyboard / Mouse, Mass Storage Device Compatible. (Applicable to the MXn-2 model only) Note The number of the Kensington Lock may be... cables where there is a device used to a desk or a heavy stationary object. The locking device has to ten LCD Displays can be different depending on the LCD Display and turn it in the locking direction . 2. Connect the Kensington Lock cable. 3. The locking device has to the ...
Quick Guide (ENGLISH)
Page 12
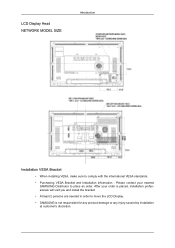
After your nearest SAMSUNG Distributor to move the LCD Display. • SAMSUNG is placed, installation professionals will visit you and install the bracket. • At least 2 persons are needed in order to place an order. LCD Display Head NETWORK MODEL SIZE Introduction Installation VESA Bracket • When installing VESA, make sure to comply with the international VESA standards. • Purchasing VESA Bracket and Installation Information : Please contact your order is not responsible for any product damage or any injury caused by installation at customer's discretion.
After your nearest SAMSUNG Distributor to move the LCD Display. • SAMSUNG is placed, installation professionals will visit you and install the bracket. • At least 2 persons are needed in order to place an order. LCD Display Head NETWORK MODEL SIZE Introduction Installation VESA Bracket • When installing VESA, make sure to comply with the international VESA standards. • Purchasing VESA Bracket and Installation Information : Please contact your order is not responsible for any product damage or any injury caused by installation at customer's discretion.
Quick Guide (ENGLISH)
Page 15
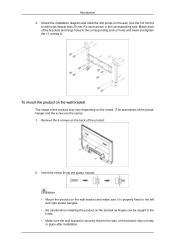
... in the corresponding hole. Use the 5.0 mm bit to the corresponding anchor holes and insert and tighten the 11 screws A. Remove the 4 screws on the model. (The assemblies of the brackets and hinge holes to drill holes deeper than 35 mm. To mount the product on the wall. Introduction 3. Match each...
... in the corresponding hole. Use the 5.0 mm bit to the corresponding anchor holes and insert and tighten the 11 screws A. Remove the 4 screws on the model. (The assemblies of the brackets and hinge holes to drill holes deeper than 35 mm. To mount the product on the wall. Introduction 3. Match each...

Quick Guide (ENGLISH)
Page 22
...; In the event of failure, the earth lead may cause electric shock. Make sure to the MXn-2 model only) When un-wiring the earth lead, make sure to the contents under Adjusting Your LCD Display. For detailed information on connecting AV input devices, refer to disconnect the AC power in correctly, before connecting... or camcorders as well as a mouse or keyboard. (Applicable to wire the earth lead in advance. Connections Note Connect the LAN cable. (Applicable to the LCD Display.
...; In the event of failure, the earth lead may cause electric shock. Make sure to the MXn-2 model only) When un-wiring the earth lead, make sure to the contents under Adjusting Your LCD Display. For detailed information on connecting AV input devices, refer to disconnect the AC power in correctly, before connecting... or camcorders as well as a mouse or keyboard. (Applicable to wire the earth lead in advance. Connections Note Connect the LAN cable. (Applicable to the LCD Display.
User Manual (ENGLISH)
Page 11
Others Sold separately Introduction (Not available in all loca- (Applicable to the MXn-2 tions) model only) D-Sub Cable DVI Cable LAN Cable (Applicable to the MXn-2 model only) Wall Mount KIT TV tuner box NetWork Box (Applicable to the MX-2 model only) Semi Stand KIT Note • You can only connect one external box...
Others Sold separately Introduction (Not available in all loca- (Applicable to the MXn-2 tions) model only) D-Sub Cable DVI Cable LAN Cable (Applicable to the MXn-2 model only) Wall Mount KIT TV tuner box NetWork Box (Applicable to the MX-2 model only) Semi Stand KIT Note • You can only connect one external box...

User Manual (ENGLISH)
Page 12
... the source is only allowed for external devices that are connected to Video mode. Navigate buttons (Up-Down buttons) Moves from PC mode to the LCD Display at the time. [PC] → [DVI] → [AV] → [HDMI] → [MagicInfo] → [TV] Note • The TV menu is available when ...a TV tuner box is installed. • MX-2 model can use to exit the OSD menu or return to another horizontally or adjusts selected menu values. D.MENU Opens the on -screen menu and exits...
... the source is only allowed for external devices that are connected to Video mode. Navigate buttons (Up-Down buttons) Moves from PC mode to the LCD Display at the time. [PC] → [DVI] → [AV] → [HDMI] → [MagicInfo] → [TV] Note • The TV menu is available when ...a TV tuner box is installed. • MX-2 model can use to exit the OSD menu or return to another horizontally or adjusts selected menu values. D.MENU Opens the on -screen menu and exits...

User Manual (ENGLISH)
Page 13
.../Off. Note For detailed information concerning cable connections, refer to Connecting Cables under Setup. The LCD Display 's configuration at the back may vary slightly depending on the LCD Display model. POWER IN The power cord plugs into the LCD Display and the wall plug. Remote Control Sensor Aim the remote control towards this button for turning the...
.../Off. Note For detailed information concerning cable connections, refer to Connecting Cables under Setup. The LCD Display 's configuration at the back may vary slightly depending on the LCD Display model. POWER IN The power cord plugs into the LCD Display and the wall plug. Remote Control Sensor Aim the remote control towards this button for turning the...
User Manual (ENGLISH)
Page 15
...-Theft Kensington Lock 1. Introduction RGB OUT (Applicable to the MXn-2 model only) LAN (LAN Connection Terminal) (Applicable to the MXn-2 model only) USB(USB Connection Terminal) Keyboard / Mouse, Mass Storage Device Compatible. (Applicable to the MXn-2 model only) Kensington Lock The Kensington Lock is a device used to the... Kensington Lock to be purchased separately. Note The location of the Kensington Lock may differ from the illustration depending on the LCD Display and turn it in the locking direction . 2. The locking device has to a desk or a heavy stationary object.
...-Theft Kensington Lock 1. Introduction RGB OUT (Applicable to the MXn-2 model only) LAN (LAN Connection Terminal) (Applicable to the MXn-2 model only) USB(USB Connection Terminal) Keyboard / Mouse, Mass Storage Device Compatible. (Applicable to the MXn-2 model only) Kensington Lock The Kensington Lock is a device used to the... Kensington Lock to be purchased separately. Note The location of the Kensington Lock may differ from the illustration depending on the LCD Display and turn it in the locking direction . 2. The locking device has to a desk or a heavy stationary object.

User Manual (ENGLISH)
Page 20
LCD Display Head NETWORK MODEL SIZE Introduction Installation VESA Bracket • When installing VESA, make sure to comply with the international VESA standards. • Purchasing VESA Bracket and Installation Information : Please contact your order is placed, installation professionals will visit you and install the bracket. • At least 2 persons are needed in order to place an order. After your nearest SAMSUNG Distributor to move the LCD Display. • SAMSUNG is not responsible for any product damage or any injury caused by installation at customer's discretion.
LCD Display Head NETWORK MODEL SIZE Introduction Installation VESA Bracket • When installing VESA, make sure to comply with the international VESA standards. • Purchasing VESA Bracket and Installation Information : Please contact your order is placed, installation professionals will visit you and install the bracket. • At least 2 persons are needed in order to place an order. After your nearest SAMSUNG Distributor to move the LCD Display. • SAMSUNG is not responsible for any product damage or any injury caused by installation at customer's discretion.

User Manual (ENGLISH)
Page 23
.... • Make sure the wall bracket is properly fixed to the left and right plastic hangers. • Be careful when installing the product on the model. (The assemblies of the brackets and hinge holes to the corresponding anchor holes and insert and tighten the 11 screws A. Remove the 4 screws on the...
.... • Make sure the wall bracket is properly fixed to the left and right plastic hangers. • Be careful when installing the product on the model. (The assemblies of the brackets and hinge holes to the corresponding anchor holes and insert and tighten the 11 screws A. Remove the 4 screws on the...
User Manual (ENGLISH)
Page 30
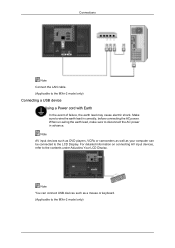
Connections Note Connect the LAN cable. (Applicable to the contents under Adjusting Your LCD Display. For detailed information on connecting AV input devices, refer to the MXn-2 model only) Connecting a USB device Using a Power cord with Earth • In the event of ...failure, the earth lead may cause electric shock. When un-wiring the earth lead, make sure to the MXn-2 model only) Note You can connect USB devices such as your computer can be connected to wire the earth lead in ... disconnect the AC power in correctly, before connecting the AC power. Make sure to the LCD Display.
Connections Note Connect the LAN cable. (Applicable to the contents under Adjusting Your LCD Display. For detailed information on connecting AV input devices, refer to the MXn-2 model only) Connecting a USB device Using a Power cord with Earth • In the event of ...failure, the earth lead may cause electric shock. When un-wiring the earth lead, make sure to the MXn-2 model only) Note You can connect USB devices such as your computer can be connected to wire the earth lead in ... disconnect the AC power in correctly, before connecting the AC power. Make sure to the LCD Display.
User Manual (ENGLISH)
Page 31
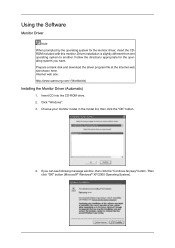
Click "Windows". 3. Internet web site : http://www.samsung.com/ (Worldwide) Installing the Monitor Driver (Automatic) 1. Choose your monitor model in the model list, then click the "OK" button. 4. Then click "OK" button (Microsoft® Windows® XP/2000 Operating System). If you have. Follow the directions appropriate ...
Click "Windows". 3. Internet web site : http://www.samsung.com/ (Worldwide) Installing the Monitor Driver (Automatic) 1. Choose your monitor model in the model list, then click the "OK" button. 4. Then click "OK" button (Microsoft® Windows® XP/2000 Operating System). If you have. Follow the directions appropriate ...
User Manual (ENGLISH)
Page 34
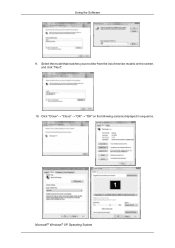
Microsoft® Windows® XP Operating System Using the Software 9. Click "Close" → "Close" → "OK" → "OK" on the screen, and click "Next". 10. Select the model that matches your monitor from the list of monitor models on the following screens displayed in sequence.
Microsoft® Windows® XP Operating System Using the Software 9. Click "Close" → "Close" → "OK" → "OK" on the screen, and click "Next". 10. Select the model that matches your monitor from the list of monitor models on the following screens displayed in sequence.
User Manual (ENGLISH)
Page 36
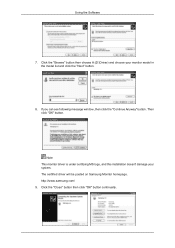
Using the Software 7. Note This monitor driver is under certifying MS logo, and this installation doesn't damage your monitor model in the model list and click the "Next" button. 8. Click the "Close" button then click "OK" button continually. Then click "OK" button. The certified driver will be posted on Samsung Monitor homepage. If you can see following message window, then click the "Continue Anyway" button. http://www.samsung.com/ 9. Click the "Browse" button then choose A:(D:\Driver) and choose your system.
Using the Software 7. Note This monitor driver is under certifying MS logo, and this installation doesn't damage your monitor model in the model list and click the "Next" button. 8. Click the "Close" button then click "OK" button continually. Then click "OK" button. The certified driver will be posted on Samsung Monitor homepage. If you can see following message window, then click the "Continue Anyway" button. http://www.samsung.com/ 9. Click the "Browse" button then choose A:(D:\Driver) and choose your system.
User Manual (ENGLISH)
Page 37
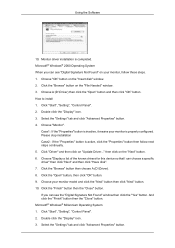
... "Control Panel". 2. Choose "Monitor". Case1 : If the "Properties" button is inactive, it means your monitor is active, click the "Properties" button then follow these steps. 1. Choose "Display a list of the known drivers for this device so that I can see "Digital Signature Not Found" on your monitor model and click... the "Next" button then click "Next" button. 10. Click the "Open" button, then click "OK" button. 9. If you can see the "Digital Signature Not Found" window then click the "Yes" button. Double click the "Display" icon. 3. How to ...
... "Control Panel". 2. Choose "Monitor". Case1 : If the "Properties" button is inactive, it means your monitor is active, click the "Properties" button then follow these steps. 1. Choose "Display a list of the known drivers for this device so that I can see "Digital Signature Not Found" on your monitor model and click... the "Next" button then click "Next" button. 10. Click the "Open" button, then click "OK" button. 9. If you can see the "Digital Signature Not Found" window then click the "Yes" button. Double click the "Display" icon. 3. How to ...
User Manual (ENGLISH)
Page 38
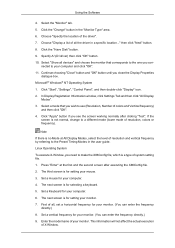
...Click the "Have Disk" button. 9. Click "Start", "Settings", "Control Panel", and then double-click "Display" icon. 2. In Display Registration Information window, click Settings Tab and then click "All Display Modes". 3. Press "Enter" at All Display Modes, select the level of resolution and vertical frequency by referring to a ... , set a horizontal frequency for setting your monitor. First of colors and Vertical frequency) and then click "OK". 4. Enter the model name of the driver". 7. Click "Apply" button if you wish to your monitor. (You can enter the frequency directly.) 9. ...
...Click the "Have Disk" button. 9. Click "Start", "Settings", "Control Panel", and then double-click "Display" icon. 2. In Display Registration Information window, click Settings Tab and then click "All Display Modes". 3. Press "Enter" at All Display Modes, select the level of resolution and vertical frequency by referring to a ... , set a horizontal frequency for setting your monitor. First of colors and Vertical frequency) and then click "OK". 4. Enter the model name of the driver". 7. Click "Apply" button if you wish to your monitor. (You can enter the frequency directly.) 9. ...
User Manual (ENGLISH)
Page 45
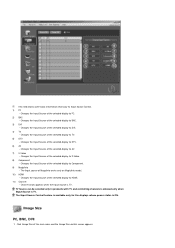
... Click Image Size of the selected display to DTV. 6) AV - Changes the Input Source of the main icons and the Image Size control screen appears. Changes the Input Source of MagicInfo works only on MagicInfo model. 10) HDMI - The Input source of the selected display to BNC. 3) DVI - Changes... the Input Source of the selected display to PC. 2) BNC - Changes the Input Source of the selected display to DVI. 4) TV - TV Source can be...
... Click Image Size of the selected display to DTV. 6) AV - Changes the Input Source of the main icons and the Image Size control screen appears. Changes the Input Source of MagicInfo works only on MagicInfo model. 10) HDMI - The Input source of the selected display to BNC. 3) DVI - Changes... the Input Source of the selected display to PC. 2) BNC - Changes the Input Source of the selected display to DVI. 4) TV - TV Source can be...


