
Quick Guide (ENGLISH)
Page 9
Turn off your monitor and unplug its power cord. 2. Remove the stand from the wall surface. • Contact the nearest Samsung Service Center for damages caused by using a base other base. • Do not use screws longer than those specified. • Please use screws that allows you should ...purchase the wall mounting kit that do not comply with the arm-type base, wall mount hanger ...
Turn off your monitor and unplug its power cord. 2. Remove the stand from the wall surface. • Contact the nearest Samsung Service Center for damages caused by using a base other base. • Do not use screws longer than those specified. • Please use screws that allows you should ...purchase the wall mounting kit that do not comply with the arm-type base, wall mount hanger ...
User Manual (ENGLISH)
Page 16
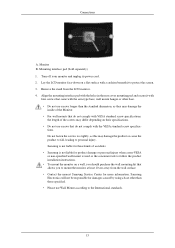
Turn off your monitor and unplug its power cord. 2. Samsung Electronics will not be responsible for damages caused by using a base other base. • Do not use screws longer than those specified. • Please use screws that do not comply with VESA standard screw specifications, the ...length of the screws may damage the product or cause the product to fall, leading to personal injury. Remove the stand from the wall surface. • Contact the nearest Samsung Service Center for product damage or personal injury when a non-VESA or non-specified wall mount is used or ...
Turn off your monitor and unplug its power cord. 2. Samsung Electronics will not be responsible for damages caused by using a base other base. • Do not use screws longer than those specified. • Please use screws that do not comply with VESA standard screw specifications, the ...length of the screws may damage the product or cause the product to fall, leading to personal injury. Remove the stand from the wall surface. • Contact the nearest Samsung Service Center for product damage or personal injury when a non-VESA or non-specified wall mount is used or ...

Quick Guide (easy Manual) (ver.1.0) (English)
Page 8
... accepts a 100 mm x 100 mm VESA-compliant mounting interface pad. Monitor B. Align the mounting interface pad with the arm-type base, wall mount hanger or other base. • Do not use screws longer than the standard dimension, as they may damage the inside of -1° to protect the... screen. 3. Mounting interface pad (Sold separately) 1. A. Remove four screws and then remove the stand from the LCD monitor. 4. Turn off your monitor...
... accepts a 100 mm x 100 mm VESA-compliant mounting interface pad. Monitor B. Align the mounting interface pad with the arm-type base, wall mount hanger or other base. • Do not use screws longer than the standard dimension, as they may damage the inside of -1° to protect the... screen. 3. Mounting interface pad (Sold separately) 1. A. Remove four screws and then remove the stand from the LCD monitor. 4. Turn off your monitor...
User Manual (user Manual) (ver.1.0) (English)
Page 16
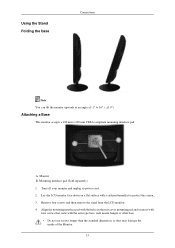
... the rear cover mounting pad and secure it to 16°. ( ±1.0°) Attaching a Base This monitor accepts a 100 mm x 100 mm VESA-compliant mounting interface pad. A. Using the Stand Folding the base Connections Note You can tilt the monitor upwards at an angle of the Monitor. 15 Monitor B. ...Align the mounting interface pad with the arm-type base, wall mount hanger or other base. • Do not use screws longer than the standard dimension, as they may damage the inside of -1° to protect the...
... the rear cover mounting pad and secure it to 16°. ( ±1.0°) Attaching a Base This monitor accepts a 100 mm x 100 mm VESA-compliant mounting interface pad. A. Using the Stand Folding the base Connections Note You can tilt the monitor upwards at an angle of the Monitor. 15 Monitor B. ...Align the mounting interface pad with the arm-type base, wall mount hanger or other base. • Do not use screws longer than the standard dimension, as they may damage the inside of -1° to protect the...


