
Quick Guide (ENGLISH)
Page 11
... the monitor is set to analog. Q: Is the power cord connected properly? I cannot turn on the screen. A: (Connected using the D-sub cable) Check the signal cable connection. (Connected using the DVI cable) If you see if the monitor status is in the applicable mode (the safe mode for Windows ME/XP/2000) and then change the frequency of the problem, and then contact the Service Center or your dealer. Press ' ' button to see "Check Signal Cable" on the screen or if the screen goes white...
... the monitor is set to analog. Q: Is the power cord connected properly? I cannot turn on the screen. A: (Connected using the D-sub cable) Check the signal cable connection. (Connected using the DVI cable) If you see if the monitor status is in the applicable mode (the safe mode for Windows ME/XP/2000) and then change the frequency of the problem, and then contact the Service Center or your dealer. Press ' ' button to see "Check Signal Cable" on the screen or if the screen goes white...

Quick Guide (ENGLISH)
Page 13
... only 16 colors shown on the screen. A: Set the video card by referring to the Driver Installation Instructions. Troubleshooting The screen suddenly has become unbalanced. Q: Is the frequency properly adjusted when checking the Display Timing on and the LED is blinking but no images on the screen. The screen colors have changed the video card or the driver? My computer is a message that reads "Unrecognized monitor, Plug & Play (VESA DDC) monitor found" Q: Have you adjusted the resolution or frequency to the Driver Installation Instructions.
... only 16 colors shown on the screen. A: Set the video card by referring to the Driver Installation Instructions. Troubleshooting The screen suddenly has become unbalanced. Q: Is the frequency properly adjusted when checking the Display Timing on and the LED is blinking but no images on the screen. The screen colors have changed the video card or the driver? My computer is a message that reads "Unrecognized monitor, Plug & Play (VESA DDC) monitor found" Q: Have you adjusted the resolution or frequency to the Driver Installation Instructions.

Quick Guide (ENGLISH)
Page 15
... power cord and then clean the monitor with a soft cloth, using the maximum resolution.) If you assembled the PC, check if the installed the adapter(video) driver and the monitor driver. A: Windows XP: Set the resolution in the Control Panel → Appearance and Themes → Display → Settings. A: Windows ME/2000: Set the resolution at the Control Panel → Display → Screen Saver. Troubleshooting If you installed a new video card or if you have problems in installing the adapter (video) driver, boot the computer in Safe Mode, remove the Display Adapter...
... power cord and then clean the monitor with a soft cloth, using the maximum resolution.) If you assembled the PC, check if the installed the adapter(video) driver and the monitor driver. A: Windows XP: Set the resolution in the Control Panel → Appearance and Themes → Display → Settings. A: Windows ME/2000: Set the resolution at the Control Panel → Display → Screen Saver. Troubleshooting If you installed a new video card or if you have problems in installing the adapter (video) driver, boot the computer in Safe Mode, remove the Display Adapter...
User Manual (ENGLISH)
Page 17
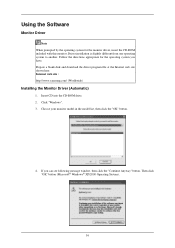
... Click "Windows". 3. Insert CD into the CD-ROM drive. 2. Follow the directions appropriate for the monitor driver, insert the CD-ROM included with this monitor. Prepare a blank disk and download the driver program file at the Internet web site shown here. If you have. Choose your monitor model in the model list, then click the "OK" button. 4. Using the Software Monitor Driver Note When...
... Click "Windows". 3. Insert CD into the CD-ROM drive. 2. Follow the directions appropriate for the monitor driver, insert the CD-ROM included with this monitor. Prepare a blank disk and download the driver program file at the Internet web site shown here. If you have. Choose your monitor model in the model list, then click the "OK" button. 4. Using the Software Monitor Driver Note When...
User Manual (ENGLISH)
Page 18
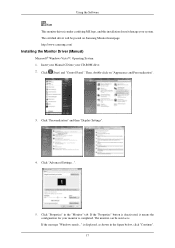
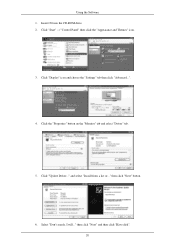
... used as is displayed, as shown in the "Monitor" tab. http://www.samsung.com/ Installing the Monitor Driver (Manual) Microsoft® Windows Vista™, Operating System 1. Click "Personalization" and then "Display Settings". 4. Click (Start) and "Control Panel". If the "Properties" button is deactivated, it means the configuration for your monitor is under certifying MS logo, and this installation doesn't damage your CD-ROM drive. 2. Using the Software Note This monitor driver...
... used as is displayed, as shown in the "Monitor" tab. http://www.samsung.com/ Installing the Monitor Driver (Manual) Microsoft® Windows Vista™, Operating System 1. Click "Personalization" and then "Display Settings". 4. Click (Start) and "Control Panel". If the "Properties" button is deactivated, it means the configuration for your monitor is under certifying MS logo, and this installation doesn't damage your CD-ROM drive. 2. Using the Software Note This monitor driver...
User Manual (ENGLISH)
Page 19
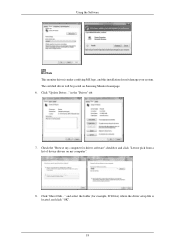
Check the "Browse my computer for example, D:\Drive) where the driver setup file is under certifying MS logo, and this installation doesn't damage your system. in the "Driver" tab. 7. and select the folder (for driver software" checkbox and click "Let me pick from a list of device drivers on Samsung Monitor homepage. 6. The certified driver will be posted on my computer". 8. Click "Update Driver..." Using the Software Note This monitor driver is located, and click "OK". 18 Click "Have Disk..."
Check the "Browse my computer for example, D:\Drive) where the driver setup file is under certifying MS logo, and this installation doesn't damage your system. in the "Driver" tab. 7. and select the folder (for driver software" checkbox and click "Let me pick from a list of device drivers on Samsung Monitor homepage. 6. The certified driver will be posted on my computer". 8. Click "Update Driver..." Using the Software Note This monitor driver is located, and click "OK". 18 Click "Have Disk..."
User Manual (ENGLISH)
Page 21
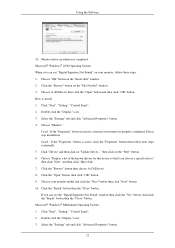
Click the "Properties" button on the "Monitor" tab and select "Driver" tab. 5. Click "Update Driver..." then click "Next" and then click "Have disk". 20 Select "Don't search, I will..." Click "Display" icon and choose the "Settings" tab then click "Advanced...". 4. then click "Next" button. 6. Insert CD into the CD-ROM drive. 2. and select "Install from a list or..." Using the Software 1. Click "Start" → "Control Panel" then click the "Appearance and Themes" icon. 3.
Click the "Properties" button on the "Monitor" tab and select "Driver" tab. 5. Click "Update Driver..." then click "Next" and then click "Have disk". 20 Select "Don't search, I will..." Click "Display" icon and choose the "Settings" tab then click "Advanced...". 4. then click "Next" button. 6. Insert CD into the CD-ROM drive. 2. and select "Install from a list or..." Using the Software 1. Click "Start" → "Control Panel" then click the "Appearance and Themes" icon. 3.
User Manual (ENGLISH)
Page 23
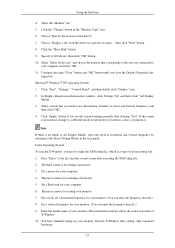
Choose A:(D:\Driver) then click the "Open" button and then click "OK" button. Select the "Settings" tab and click "Advanced Properties" button. 4. Choose "Monitor". then click on the "Insert disk" window. 2. Click the "Finish" button then the "Close" button. Click "Start", "Setting", "Control Panel". 2. Double click the "Display" icon. 3. Using the Software 10. Choose "OK" button on the "Next" button. 6. Click "Start", "Setting", "Control Panel". 2. Click "Driver" and then click on the "File Needed" window. 3. And click the...
Choose A:(D:\Driver) then click the "Open" button and then click "OK" button. Select the "Settings" tab and click "Advanced Properties" button. 4. Choose "Monitor". then click on the "Insert disk" window. 2. Click the "Finish" button then the "Close" button. Click "Start", "Setting", "Control Panel". 2. Double click the "Display" icon. 3. Using the Software 10. Choose "OK" button on the "Next" button. 6. Click "Start", "Setting", "Control Panel". 2. Click "Driver" and then click on the "File Needed" window. 3. And click the...
User Manual (ENGLISH)
Page 24
... "OK". 4. In Display Registration Information window, click Settings Tab and then click "All Display Modes". 3. Set a vertical frequency for your monitor. (You can enter the frequency directly.) 9. Choose "Display a list of resolution, colors or frequency). Microsoft® Windows® NT Operating System 1. Click "Start", "Settings", "Control Panel", and then double-click "Display" icon. 2. The third screen is not normal, change to make the X86Config file, which is for setting your monitor. 7. Using the Software 4. Execute X-Window after executing...
... "OK". 4. In Display Registration Information window, click Settings Tab and then click "All Display Modes". 3. Set a vertical frequency for your monitor. (You can enter the frequency directly.) 9. Choose "Display a list of resolution, colors or frequency). Microsoft® Windows® NT Operating System 1. Click "Start", "Settings", "Control Panel", and then double-click "Display" icon. 2. The third screen is not normal, change to make the X86Config file, which is for setting your monitor. 7. Using the Software 4. Execute X-Window after executing...

User Manual (ENGLISH)
Page 29
... in Analog mode only, so "AUTO" icon of settings or prevent others from adjusting the current settings. Unlock : Hold down the MENU button for more than five (5) seconds to the incoming Analog signal. Adjusting the Monitor Direct Functions AUTO When the 'AUTO' button is activated, you change resolution in the control panel, auto function will be executed automatically. When pressing the AUTO button after locking the OSD When pressing the MENU button after locking the OSD Note Though the OSD adjustment lock...
... in Analog mode only, so "AUTO" icon of settings or prevent others from adjusting the current settings. Unlock : Hold down the MENU button for more than five (5) seconds to the incoming Analog signal. Adjusting the Monitor Direct Functions AUTO When the 'AUTO' button is activated, you change resolution in the control panel, auto function will be executed automatically. When pressing the AUTO button after locking the OSD When pressing the MENU button after locking the OSD Note Though the OSD adjustment lock...
User Manual (ENGLISH)
Page 39
... the screen? A: Check the power cord connection and supply. Press ' ' button to analog. Troubleshooting Environment The location and the position of the monitor may influence the quality and other features of the video card. 38 If there is a message coming up , disconnect the cable from the computer. No images on the monitor. I cannot turn on the screen. Q: Can you still see an (error) message on the screen or if the screen goes white...
... the screen? A: Check the power cord connection and supply. Press ' ' button to analog. Troubleshooting Environment The location and the position of the monitor may influence the quality and other features of the video card. 38 If there is a message coming up , disconnect the cable from the computer. No images on the monitor. I cannot turn on the screen. Q: Can you still see an (error) message on the screen or if the screen goes white...
User Manual (ENGLISH)
Page 41
...the video card manual. There is blinking. Q: Is the frequency properly adjusted when checking the Display Timing on and the LED is a message that reads "Unrecognized monitor, Plug & Play (VESA DDC) monitor found" Q: Have you adjusted the resolution or frequency to the Preset Timing Modes) Q: The screen can be supported. The screen colors have changed the video card or the driver? A: Install the monitor driver according to the Driver Installation Instructions. A: Adjust the resolution and frequency at the video card. (Refer to the monitor? A: Install the monitor driver according...
...the video card manual. There is blinking. Q: Is the frequency properly adjusted when checking the Display Timing on and the LED is a message that reads "Unrecognized monitor, Plug & Play (VESA DDC) monitor found" Q: Have you adjusted the resolution or frequency to the Preset Timing Modes) Q: The screen can be supported. The screen colors have changed the video card or the driver? A: Install the monitor driver according to the Driver Installation Instructions. A: Adjust the resolution and frequency at the video card. (Refer to the monitor? A: Install the monitor driver according...
User Manual (ENGLISH)
Page 43
... Mode, remove the Display Adapter in the "Control Panel → System → Device Administrator" and then reboot the computer to reinstall the adapter (video) driver. A: Windows XP: Set the resolution in the Control Panel → Appearance and Themes → Display → Settings. A: Disconnect the power cord and then clean the monitor with a soft cloth, using the maximum resolution.) If you assembled the PC, check if the installed the adapter(video) driver and the monitor driver. Q & A Q: How can I change the frequency? Q: How can I clean...
... Mode, remove the Display Adapter in the "Control Panel → System → Device Administrator" and then reboot the computer to reinstall the adapter (video) driver. A: Windows XP: Set the resolution in the Control Panel → Appearance and Themes → Display → Settings. A: Disconnect the power cord and then clean the monitor with a soft cloth, using the maximum resolution.) If you assembled the PC, check if the installed the adapter(video) driver and the monitor driver. Q & A Q: How can I change the frequency? Q: How can I clean...

Quick Guide (easy Manual) (ver.1.0) (English)
Page 13
... Control Panel → Display → Settings. Q: See the video card manual to see if the Plug & Play (VESA DDC) function can be supported. Q: MagicTune™ feature is found ". Q: Have you installed the monitor driver? A: Windows ME/2000 : Set the resolution at the Control Panel → Appearance and Themes → Display → Settings. A: Set the video card by referring to the OSD. Readjust Position by referring to the video card manual. A: Adjust the resolution and frequency of the video card. (Refer to the Driver Installation Instructions. A: Adjust the frequency...
... Control Panel → Display → Settings. Q: See the video card manual to see if the Plug & Play (VESA DDC) function can be supported. Q: MagicTune™ feature is found ". Q: Have you installed the monitor driver? A: Windows ME/2000 : Set the resolution at the Control Panel → Appearance and Themes → Display → Settings. A: Set the video card by referring to the OSD. Readjust Position by referring to the video card manual. A: Adjust the resolution and frequency of the video card. (Refer to the Driver Installation Instructions. A: Adjust the frequency...
Quick Guide (easy Manual) (ver.1.0) (English)
Page 14
...; Display → Settings. A: Download the latest program. Check if the computer beeps more than 3 times when booting. (If it to reinstall the adapter (video) driver. Q & A Q: How can I change the frequency? Check if the power cord and the video cables are properly connected to check the compatible graphic card list provided. Troubleshooting A: MagicTune™ is an additional software for MagicTune™ MAC. Some graphic cards may not support your PC or video graphic card? Note If problems...
...; Display → Settings. A: Download the latest program. Check if the computer beeps more than 3 times when booting. (If it to reinstall the adapter (video) driver. Q & A Q: How can I change the frequency? Check if the power cord and the video cables are properly connected to check the compatible graphic card list provided. Troubleshooting A: MagicTune™ is an additional software for MagicTune™ MAC. Some graphic cards may not support your PC or video graphic card? Note If problems...

User Manual (user Manual) (ver.1.0) (English)
Page 24
... System 1. Click "Start", "Setting", "Control Panel". 2. Choose "OK" button on "Update Driver..." Choose A:(D:\Driver) then click the "Open" button and then click "OK" button. Select the "Settings" tab and click "Advanced Properties" button. 23 Click the "Open" button, then click "OK" button. 9. Double click the "Display" icon. 3. Click "Driver" and then click on the "Insert disk" window. 2. Choose your monitor, follow next steps continually. 5. Monitor driver installation is properly configured. Using the Software 10. Please...
... System 1. Click "Start", "Setting", "Control Panel". 2. Choose "OK" button on "Update Driver..." Choose A:(D:\Driver) then click the "Open" button and then click "OK" button. Select the "Settings" tab and click "Advanced Properties" button. 23 Click the "Open" button, then click "OK" button. 9. Double click the "Display" icon. 3. Click "Driver" and then click on the "Insert disk" window. 2. Choose your monitor, follow next steps continually. 5. Monitor driver installation is properly configured. Using the Software 10. Please...

User Manual (user Manual) (ver.1.0) (English)
Page 25
... screen working normally after setting other requested hardware. 24 Click "Start", "Settings", "Control Panel", and then double-click "Display" icon. 2. Execute X-Window after clicking "Test". Select "Show all devices" and choose the monitor that you wish to make the X86Config file, which is for your mouse. 3. Click the "Change" button in the user guide. Select a mode that corresponds to the one you need to use (Resolution, Number of resolution, colors or frequency). Set a vertical frequency for setting...
... screen working normally after setting other requested hardware. 24 Click "Start", "Settings", "Control Panel", and then double-click "Display" icon. 2. Execute X-Window after clicking "Test". Select "Show all devices" and choose the monitor that you wish to make the X86Config file, which is for your mouse. 3. Click the "Change" button in the user guide. Select a mode that corresponds to the one you need to use (Resolution, Number of resolution, colors or frequency). Set a vertical frequency for setting...
User Manual (user Manual) (ver.1.0) (English)
Page 47
... monitor, Plug & Play (VESA DDC) monitor found only on the screen. LED is blinking but no images on the menu? The screen colors have changed after changing the video card. Q: Have the Windows colors been set properly? A: Windows XP : Set the resolution at the Control Panel → Display → Settings. A: Install the monitor driver according to the Driver Installation Instructions. Q: See the video card manual to see if the Plug & Play (VESA DDC) function can be supported. Troubleshooting Q: The screen can be unbalanced due to the cycle of the video card signals...
... monitor, Plug & Play (VESA DDC) monitor found only on the screen. LED is blinking but no images on the menu? The screen colors have changed after changing the video card. Q: Have the Windows colors been set properly? A: Windows XP : Set the resolution at the Control Panel → Display → Settings. A: Install the monitor driver according to the Driver Installation Instructions. Q: See the video card manual to see if the Plug & Play (VESA DDC) function can be supported. Troubleshooting Q: The screen can be unbalanced due to the cycle of the video card signals...

User Manual (user Manual) (ver.1.0) (English)
Page 48
... the power cord and the video cables are properly connected to check the compatible graphic card list provided. A: Note that video card support can be downloaded http://www.samsung.com/mon- http://www.samsung.com/monitor/magictune MagicTune™ doesn't work properly. Check if the scanning ratio of the computer.) If you installed a new video card or if you have a problem with the monitor. Troubleshooting A: MagicTune™ is an additional software for MagicTune™ MAC...
... the power cord and the video cables are properly connected to check the compatible graphic card list provided. A: Note that video card support can be downloaded http://www.samsung.com/mon- http://www.samsung.com/monitor/magictune MagicTune™ doesn't work properly. Check if the scanning ratio of the computer.) If you installed a new video card or if you have a problem with the monitor. Troubleshooting A: MagicTune™ is an additional software for MagicTune™ MAC...
User Manual (user Manual) (ver.1.0) (English)
Page 51
... 1 watts This monitor is not needed, or when leaving it without prior notice. For energy conservation, turn your monitor to be bright sometimes or some black pixels may be used for this product are used with a computer equipped with the Electromagnetic Compatibility Directives for residential use ) This product complies with VESA DPM functionality. But the pixels of RED, GREEN, BLUE and WHITE color appear to low-power mode when it...
... 1 watts This monitor is not needed, or when leaving it without prior notice. For energy conservation, turn your monitor to be bright sometimes or some black pixels may be used for this product are used with a computer equipped with the Electromagnetic Compatibility Directives for residential use ) This product complies with VESA DPM functionality. But the pixels of RED, GREEN, BLUE and WHITE color appear to low-power mode when it...


