

Quick Guide (ENGLISH)
Page 3
Introduction Monitor & Dual Hinge Stand Type 4 Monitor & HAS stand 23 inches or larger Manuals Quick Setup Guide Cables Warranty Card (Not available in all locations) User's Guide D-Sub Cable Power Cord DVI Cable (option) USB Cable Audio Cable (Applicable to the stand mod- (Supplied for the models that els that have USB ports only.) have speakers only.) Others Cleaning Cloth(Option) Cable holding ring 9
Introduction Monitor & Dual Hinge Stand Type 4 Monitor & HAS stand 23 inches or larger Manuals Quick Setup Guide Cables Warranty Card (Not available in all locations) User's Guide D-Sub Cable Power Cord DVI Cable (option) USB Cable Audio Cable (Applicable to the stand mod- (Supplied for the models that els that have USB ports only.) have speakers only.) Others Cleaning Cloth(Option) Cable holding ring 9

Quick Guide (ENGLISH)
Page 5
Also use them. Note You can customize key assignment for a required function via Setup > Customized Key. Customized Key[ ] You can configure the customized key for the Custom button according to your fingers to use to exit the OSD menu or return to the previous menu. Brightness button [ ] When OSD is not on -screen menu and exits from the menu. MENU button [MENU/ ] Opens the on the screen, push the button to adjust brightness. 11 Adjust buttons [ ] These buttons allow you to adjust items in the menu. Front Introduction Note Touch them lightly with your preferences.
Also use them. Note You can customize key assignment for a required function via Setup > Customized Key. Customized Key[ ] You can configure the customized key for the Custom button according to your fingers to use to exit the OSD menu or return to the previous menu. Brightness button [ ] When OSD is not on -screen menu and exits from the menu. MENU button [MENU/ ] Opens the on the screen, push the button to adjust brightness. 11 Adjust buttons [ ] These buttons allow you to adjust items in the menu. Front Introduction Note Touch them lightly with your preferences.
Quick Guide (ENGLISH)
Page 22
...8594; Appearance and Themes → Display → Screen Saver. Q: How can I set the Power Saving function? Set the function in the BIOS-SETUP of the computer. (Refer to the Windows / Computer Manual). Do not leave any detergent or scratches on the Information section or contact your dealer. ...can be changed by reconfiguring the video card. Q & A Q: How can remedy any water enter the monitor. Set the function in the BIOS-SETUP of the driver used. (Refer to the computer or the video card manual for assistance, check the information in the Control Panel → Appearance and...
...8594; Appearance and Themes → Display → Screen Saver. Q: How can I set the Power Saving function? Set the function in the BIOS-SETUP of the computer. (Refer to the Windows / Computer Manual). Do not leave any detergent or scratches on the Information section or contact your dealer. ...can be changed by reconfiguring the video card. Q & A Q: How can remedy any water enter the monitor. Set the function in the BIOS-SETUP of the driver used. (Refer to the computer or the video card manual for assistance, check the information in the Control Panel → Appearance and...
User Manual (ENGLISH)
Page 10
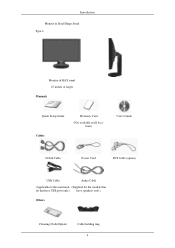
Introduction Monitor & Dual Hinge Stand Type 4 Monitor & HAS stand 23 inches or larger Manuals Quick Setup Guide Cables Warranty Card (Not available in all locations) User's Guide D-Sub Cable Power Cord DVI Cable (option) USB Cable Audio Cable (Applicable to the stand mod- (Supplied for the models that els that have USB ports only.) have speakers only.) Others Cleaning Cloth(Option) Cable holding ring 9
Introduction Monitor & Dual Hinge Stand Type 4 Monitor & HAS stand 23 inches or larger Manuals Quick Setup Guide Cables Warranty Card (Not available in all locations) User's Guide D-Sub Cable Power Cord DVI Cable (option) USB Cable Audio Cable (Applicable to the stand mod- (Supplied for the models that els that have USB ports only.) have speakers only.) Others Cleaning Cloth(Option) Cable holding ring 9

User Manual (ENGLISH)
Page 12
Customized Key[ ] You can configure the customized key for the Custom button according to your fingers to use to exit the OSD menu or return to the previous menu. Also use them lightly with your preferences. Brightness button [ ] When OSD is not on -screen menu and exits from the menu. Adjust buttons [ ] These buttons allow you to adjust brightness. 11 Front Introduction Note Touch them . MENU button [MENU/ ] Opens the on the screen, push the button to adjust items in the menu. Note You can customize key assignment for a required function via Setup > Customized Key.
Customized Key[ ] You can configure the customized key for the Custom button according to your fingers to use to exit the OSD menu or return to the previous menu. Also use them lightly with your preferences. Brightness button [ ] When OSD is not on -screen menu and exits from the menu. Adjust buttons [ ] These buttons allow you to adjust brightness. 11 Front Introduction Note Touch them . MENU button [MENU/ ] Opens the on the screen, push the button to adjust items in the menu. Note You can customize key assignment for a required function via Setup > Customized Key.
User Manual (ENGLISH)
Page 26
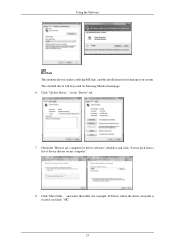
The certified driver will be posted on my computer". 8. Click "Update Driver..." in the "Driver" tab. 7. and select the folder (for driver software" checkbox and click "Let me pick from a list of device drivers on Samsung Monitor homepage. 6. Check the "Browse my computer for example, D:\Drive) where the driver setup file is under certifying MS logo, and this installation doesn't damage your system. Click "Have Disk..." Using the Software Note This monitor driver is located, and click "OK". 25
The certified driver will be posted on my computer". 8. Click "Update Driver..." in the "Driver" tab. 7. and select the folder (for driver software" checkbox and click "Let me pick from a list of device drivers on Samsung Monitor homepage. 6. Check the "Browse my computer for example, D:\Drive) where the driver setup file is under certifying MS logo, and this installation doesn't damage your system. Click "Have Disk..." Using the Software Note This monitor driver is located, and click "OK". 25
User Manual (ENGLISH)
Page 34
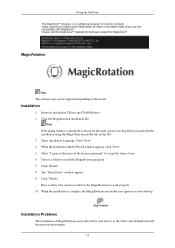
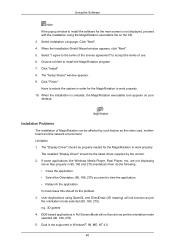
... reboot the system in order for the main screen is complete, the MagicRotation executable icon appears on the CD. 3. Select installation Language, Click "Next". 4. The "Setup Status" window appears. 9. Click the MagicRotation installation file. When the installation is not displayed, proceed with the installation using the MagicTune executable file on your...
... reboot the system in order for the main screen is complete, the MagicRotation executable icon appears on the CD. 3. Select installation Language, Click "Next". 4. The "Setup Status" window appears. 9. Click the MagicRotation installation file. When the installation is not displayed, proceed with the installation using the MagicTune executable file on your...
User Manual (ENGLISH)
Page 39
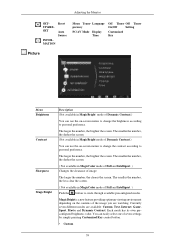
...)-or-digital (DVI)dedicated models. Contrast ness Fine COLOR Magic- MagicColor - Image Size) ] button after configuring the cus- ImageSize : Supplied for a required function via Setup > Customized Key. Red Color Color Ef- Menu V-Po- OSD Function Top Menus Sub Menus PICTURE Bright- Note You can configure the customized key for the...
...)-or-digital (DVI)dedicated models. Contrast ness Fine COLOR Magic- MagicColor - Image Size) ] button after configuring the cus- ImageSize : Supplied for a required function via Setup > Customized Key. Red Color Color Ef- Menu V-Po- OSD Function Top Menus Sub Menus PICTURE Bright- Note You can configure the customized key for the...
User Manual (ENGLISH)
Page 40
... the screen. ( Not available in MagicColor mode of the image you are available: Custom, Text, Internet, Game, Sport, Movie and Dynamic Contrast. Adjusting the Monitor SETUP&RESET Reset Auto Source INFORMATION Menu Trans- The larger the number, the brighter the screen. MagicBright is a new feature providing optimum viewing environment depending on...
... the screen. ( Not available in MagicColor mode of the image you are available: Custom, Text, Internet, Game, Sport, Movie and Dynamic Contrast. Adjusting the Monitor SETUP&RESET Reset Auto Source INFORMATION Menu Trans- The larger the number, the brighter the screen. MagicBright is a new feature providing optimum viewing environment depending on...

User Manual (ENGLISH)
Page 45
The smaller the number, the more it moves to the left. SETUP&RESET Menu Reset Description Reverts the product settings to display the menus. It has no effect on any software running on your monitor. The smaller ...
The smaller the number, the more it moves to the left. SETUP&RESET Menu Reset Description Reverts the product settings to display the menus. It has no effect on any software running on your monitor. The smaller ...

User Manual (ENGLISH)
Page 53
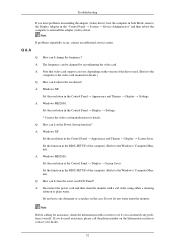
... computer. (Refer to the Windows / Computer Manual). Note If problems repeatedly occur, contact an authorized service center. Set the function in the BIOS-SETUP of the driver used. (Refer to see if you have problems in installing the adapter (video) driver, boot the computer in Safe Mode, remove... the Display Adapter in the BIOS-SETUP of the computer. (Refer to the Windows / Computer Manual). A: Disconnect the power cord and then clean the monitor with a soft cloth, using ...
... computer. (Refer to the Windows / Computer Manual). Note If problems repeatedly occur, contact an authorized service center. Set the function in the BIOS-SETUP of the driver used. (Refer to see if you have problems in installing the adapter (video) driver, boot the computer in Safe Mode, remove... the Display Adapter in the BIOS-SETUP of the computer. (Refer to the Windows / Computer Manual). A: Disconnect the power cord and then clean the monitor with a soft cloth, using ...

User Manual (user Manual) (ver.1.0) (English)
Page 10
Contact a local dealer to buy optional items. Unpacking Type 1 Monitor & Simple stand Note MagicRotation program can not be provided as Simple Stand does not support Pivot function. Introduction {943SN/943SNX/2243LNX} Package Contents Note Please make sure the following items are missing, contact your monitor. Type 2 Monitor & HAS stand Manuals Quick Setup Guide Warranty Card (Not available in all locations) User's Guide If any items are included with your dealer.
Contact a local dealer to buy optional items. Unpacking Type 1 Monitor & Simple stand Note MagicRotation program can not be provided as Simple Stand does not support Pivot function. Introduction {943SN/943SNX/2243LNX} Package Contents Note Please make sure the following items are missing, contact your monitor. Type 2 Monitor & HAS stand Manuals Quick Setup Guide Warranty Card (Not available in all locations) User's Guide If any items are included with your dealer.

User Manual (user Manual) (ver.1.0) (English)
Page 12
... assignment for the Custom button according to the previous menu. Enter button [ ] Activates a highlighted menu item. AUTO button Use this button for a required function via Setup > Customized Key. Brightness button [ ] When OSD is not on -screen menu and exits from the menu. Customized Key[ ] You can configure the customized key for...
... assignment for the Custom button according to the previous menu. Enter button [ ] Activates a highlighted menu item. AUTO button Use this button for a required function via Setup > Customized Key. Brightness button [ ] When OSD is not on -screen menu and exits from the menu. Customized Key[ ] You can configure the customized key for...

User Manual (user Manual) (ver.1.0) (English)
Page 15
Introduction Monitor & HAS stand Type 3 Monitor & Dual Hinge Stand Manuals Quick Setup Guide Cables Warranty Card (Not available in all locations) User's Guide D-Sub Cable Others Power Cord Cleaning Cloth Note Cleaning Cloth is only provided for highly polished black products as a product feature.
Introduction Monitor & HAS stand Type 3 Monitor & Dual Hinge Stand Manuals Quick Setup Guide Cables Warranty Card (Not available in all locations) User's Guide D-Sub Cable Others Power Cord Cleaning Cloth Note Cleaning Cloth is only provided for highly polished black products as a product feature.

User Manual (user Manual) (ver.1.0) (English)
Page 17
... blinks once when your preferences. Brightness button [ ] When OSD is not on and off. Introduction You can configure the customized key for a required function via Setup > Customized Key. Rear Note The configuration at the back of the product may vary from product to your adjustments are saved.
... blinks once when your preferences. Brightness button [ ] When OSD is not on and off. Introduction You can configure the customized key for a required function via Setup > Customized Key. Rear Note The configuration at the back of the product may vary from product to your adjustments are saved.

User Manual (user Manual) (ver.1.0) (English)
Page 31
... 7. Click "Update Driver..." and select the folder (for driver software" checkbox and click "Let me pick from a list of device drivers on Samsung Monitor homepage. 6. The certified driver will be posted on my computer". 8. Click "Have Disk..." Check the "Browse my computer for example, D:\...Drive) where the driver setup file is under certifying MS logo, and this installation doesn't damage your system. Note This monitor driver is located, and click "OK"....
... 7. Click "Update Driver..." and select the folder (for driver software" checkbox and click "Let me pick from a list of device drivers on Samsung Monitor homepage. 6. The certified driver will be posted on my computer". 8. Click "Have Disk..." Check the "Browse my computer for example, D:\...Drive) where the driver setup file is under certifying MS logo, and this installation doesn't damage your system. Note This monitor driver is located, and click "OK"....
User Manual (user Manual) (ver.1.0) (English)
Page 40
... and 270 orientations then do the following : • Close the application. • Select the Orientation (90, 180, 270) you want to work properly. 10. The "Setup Status" window appears. 9.
... and 270 orientations then do the following : • Close the application. • Select the Orientation (90, 180, 270) you want to work properly. 10. The "Setup Status" window appears. 9.

User Manual (user Manual) (ver.1.0) (English)
Page 45
... to your preferences. Adjusting the Monitor Note Though the OSD adjustment lock function is activated, you can configure the customized key for a required function via Setup > Customized Key. Customized key You can customize key assignment for a function, click the name of each function. (Image Size -
... to your preferences. Adjusting the Monitor Note Though the OSD adjustment lock function is activated, you can configure the customized key for a required function via Setup > Customized Key. Customized key You can customize key assignment for a function, click the name of each function. (Image Size -

User Manual (user Manual) (ver.1.0) (English)
Page 46
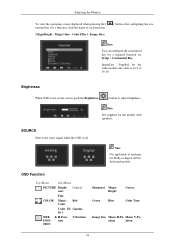
Picture Color Image Brightness Contrast MagicBright MagicColor Color Tone Color Con- Display ency Time Image Size Picture Brightness (Not available in MagicBright mode of Dynamic Contrast.) Color Effect Gamma trol Coarse Fine Sharpness H-Position V-Position OSD Language Setup Reset Information H-Position Customized Key V-Position Off Timer Transpar- Brightness Adjusting the Monitor When OSD is not on the screen, push the Brightness ( OSD Function ) button to adjust brightness.
Picture Color Image Brightness Contrast MagicBright MagicColor Color Tone Color Con- Display ency Time Image Size Picture Brightness (Not available in MagicBright mode of Dynamic Contrast.) Color Effect Gamma trol Coarse Fine Sharpness H-Position V-Position OSD Language Setup Reset Information H-Position Customized Key V-Position Off Timer Transpar- Brightness Adjusting the Monitor When OSD is not on the screen, push the Brightness ( OSD Function ) button to adjust brightness.

User Manual (user Manual) (ver.1.0) (English)
Page 59
You can set the amount of time the menu will be automatically turned off . • 5 sec • 10 sec • 20 sec • 200 sec MENU MENU Setup Reset Display Time Adjusting the Monitor The menu will wait before it is turned off if no adjustments are made for a certain time period.
You can set the amount of time the menu will be automatically turned off . • 5 sec • 10 sec • 20 sec • 200 sec MENU MENU Setup Reset Display Time Adjusting the Monitor The menu will wait before it is turned off if no adjustments are made for a certain time period.


