

User Manual (user Manual) (ver.1.0) (English)
Page 5
...) Power Cord 15-pin D-Sub Signal Cable Warranty Card (Not available in all locations) Manual PC V1 V2 TV Source PIP Exit Menu SyncMaster 150MP CH VOL Monitor DC Adapter Stereo-RCA Cable (option) Scart Jack 1 2 3 4 5 6 7 8 9 Display 0 Pre.CH Stereo-Stereo Cable Batteries (AAA x 2) Remote Controller PAL-NTSC Connector (option) English 3 If any items are...
...) Power Cord 15-pin D-Sub Signal Cable Warranty Card (Not available in all locations) Manual PC V1 V2 TV Source PIP Exit Menu SyncMaster 150MP CH VOL Monitor DC Adapter Stereo-RCA Cable (option) Scart Jack 1 2 3 4 5 6 7 8 9 Display 0 Pre.CH Stereo-Stereo Cable Batteries (AAA x 2) Remote Controller PAL-NTSC Connector (option) English 3 If any items are...
User Manual (user Manual) (ver.1.0) (English)
Page 33
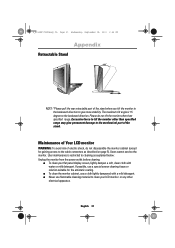
...fied range may give more stability. I To clean the monitor cabinet, use a special screen cleaning tissue or solution suitable for gaining access to the cable connectors as explained below: Unplug the monitor from the power outlet before cleaning. 4_E150MP170MPbody.fm Page 31 Wednesday, September 19, 2001 2:54 PM Appendix Retractable Stand...
...fied range may give more stability. I To clean the monitor cabinet, use a special screen cleaning tissue or solution suitable for gaining access to the cable connectors as explained below: Unplug the monitor from the power outlet before cleaning. 4_E150MP170MPbody.fm Page 31 Wednesday, September 19, 2001 2:54 PM Appendix Retractable Stand...
User Manual (user Manual) (ver.1.0) (English)
Page 34
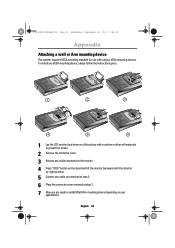
...device The monitor supports VESA mounting standard for use with a cushion or other soft materials to protect the screen. 2 Remove the connector cover 3 Remove any cable connected on the monitor. 4 Press "FOLD" button on the stand and tilt the monitor backward until the stand in up -...please follow the instructions given. 1 2 3 4 5 6 1 Lay the LCD monitor face-down on your applications. To install any cable you removed at step 3. 6 Place the connector cover removed at step 2. 7 Now you are ready to install Wall/Arm mounting device depending on a flat surface with various VESA...
...device The monitor supports VESA mounting standard for use with a cushion or other soft materials to protect the screen. 2 Remove the connector cover 3 Remove any cable connected on the monitor. 4 Press "FOLD" button on the stand and tilt the monitor backward until the stand in up -...please follow the instructions given. 1 2 3 4 5 6 1 Lay the LCD monitor face-down on your applications. To install any cable you removed at step 3. 6 Place the connector cover removed at step 2. 7 Now you are ready to install Wall/Arm mounting device depending on a flat surface with various VESA...
User Manual (user Manual) (ver.1.0) (English)
Page 35
5_E150MP170MPix.fm Page 33 Wednesday, September 19, 2001 4:02 PM A Audio control 17 Automatic Save 9 Auto adjustment 12 B Bass 17 Beep 18 Brightness 12 C Cable connections 5 CH 9 Channel 10 Channel Sort 16 Coarse 13 Color 14 Contrast 12 D DC adapter 3 Display Modes 28 Duration 18 E Exit 8 F Fine 13 ... slot 4 L Language 18 M Manual Tune 15 Menu 8 MTS/S-Mode 20 O ON-Screen Display 11 Index OSD Lock/Unlock 10 OSD Control 18 P PAL-NTSC connector 3 PAL Broadcasting System 29 Pan 17 Pin Assignments 27 PIP 8, 14 Plug and Play 6 Power 8 Power Indicator 6 Power-saving modes 21 Program 10 R Remote ...
5_E150MP170MPix.fm Page 33 Wednesday, September 19, 2001 4:02 PM A Audio control 17 Automatic Save 9 Auto adjustment 12 B Bass 17 Beep 18 Brightness 12 C Cable connections 5 CH 9 Channel 10 Channel Sort 16 Coarse 13 Color 14 Contrast 12 D DC adapter 3 Display Modes 28 Duration 18 E Exit 8 F Fine 13 ... slot 4 L Language 18 M Manual Tune 15 Menu 8 MTS/S-Mode 20 O ON-Screen Display 11 Index OSD Lock/Unlock 10 OSD Control 18 P PAL-NTSC connector 3 PAL Broadcasting System 29 Pan 17 Pin Assignments 27 PIP 8, 14 Plug and Play 6 Power 8 Power Indicator 6 Power-saving modes 21 Program 10 R Remote ...


