English Manual
Page 1
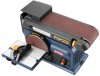
When properly cared for, it will give you for dependability, ease of operation, and operator safety. WARNING: To reduce the risk of rugged, trouble-free performance. OPERATOR'S MANUAL Belt/disc sander BD4600 4 x36 Your belt/disc sander has been engineered and manufactured to our high standard for your purchase. Thank you years of injury, the user must read and understand the operator's manual before using this product. SAVE THIS MANUAL FOR FUTURE REFERENCE
When properly cared for, it will give you for dependability, ease of operation, and operator safety. WARNING: To reduce the risk of rugged, trouble-free performance. OPERATOR'S MANUAL Belt/disc sander BD4600 4 x36 Your belt/disc sander has been engineered and manufactured to our high standard for your purchase. Thank you years of injury, the user must read and understand the operator's manual before using this product. SAVE THIS MANUAL FOR FUTURE REFERENCE

English Manual
Page 4
... of drugs, alcohol, or any solvents to power supply. Do not stack more than one piece at a time. Never use drums, sanding sleeves or belts which show visual signs of accessories are doing and use a clean cloth when cleaning. Make sure the spindle or sanding... be pulled from oil and grease. Always use common sense. Following this manual or addendums. Use of accessories that no debris between worktable and sanding belt or disc. avoid kickback by an authorized service center to cause a careless mistake. Do not rush. DO NOT USE TOOL IF SWITCH DOES ...
... of drugs, alcohol, or any solvents to power supply. Do not stack more than one piece at a time. Never use drums, sanding sleeves or belts which show visual signs of accessories are doing and use a clean cloth when cleaning. Make sure the spindle or sanding... be pulled from oil and grease. Always use common sense. Following this manual or addendums. Use of accessories that no debris between worktable and sanding belt or disc. avoid kickback by an authorized service center to cause a careless mistake. Do not rush. DO NOT USE TOOL IF SWITCH DOES ...
English Manual
Page 5
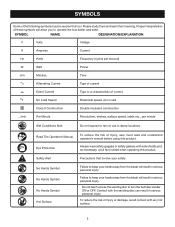
... Alert No Hands Symbol No Hands Symbol No Hands Symbol Hot Surface To reduce the risk of injury or damage, avoid contact with the sanding disc can result in serious personal injury. Failure to keep your safety. To reduce the risk of injury, user must read and understand operator's manual before... Alert Do not expose to rain or use in serious personal injury. Please study them and learn their meaning. Do not reach across the sanding disc to turn the belt/disc sander ON or OFF.
... Alert No Hands Symbol No Hands Symbol No Hands Symbol Hot Surface To reduce the risk of injury or damage, avoid contact with the sanding disc can result in serious personal injury. Failure to keep your safety. To reduce the risk of injury, user must read and understand operator's manual before... Alert Do not expose to rain or use in serious personal injury. Please study them and learn their meaning. Do not reach across the sanding disc to turn the belt/disc sander ON or OFF.
English Manual
Page 9
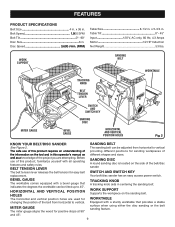
... different positions for changing the position of this operator's manual as well as a knowledge of the project you are used for sanding workpieces of the belt/disc sander. Table Tilt 0°- 45° Input 120 V, AC only, 60 Hz, 4.3 Amps Motor 1/2 HP Induction Net Weight 53 lbs. Bevel gauge The worktable comes...
... different positions for changing the position of this operator's manual as well as a knowledge of the project you are used for sanding workpieces of the belt/disc sander. Table Tilt 0°- 45° Input 120 V, AC only, 60 Hz, 4.3 Amps Motor 1/2 HP Induction Net Weight 53 lbs. Bevel gauge The worktable comes...

English Manual
Page 10
... OFF SWITCH KEY removed Fig. 3 4 x36 switch key Fig. 4 Contact with the belt before plugging tool into the switch, lift the switch button to turn the belt/disc sander ON or OFF. TO TURN THE BELT/DISC SANDER OFF: Press the switch button down to turn the switch OFF and remove... the switch key. locking the Switch See Figure 4. n Wait until the belt/disc sander has come to start the tool. WARNING: Before performing any adjustment, make sure the switch is intended to be kicked back toward the operator...
... OFF SWITCH KEY removed Fig. 3 4 x36 switch key Fig. 4 Contact with the belt before plugging tool into the switch, lift the switch button to turn the belt/disc sander ON or OFF. TO TURN THE BELT/DISC SANDER OFF: Press the switch button down to turn the switch OFF and remove... the switch key. locking the Switch See Figure 4. n Wait until the belt/disc sander has come to start the tool. WARNING: Before performing any adjustment, make sure the switch is intended to be kicked back toward the operator...
English Manual
Page 12
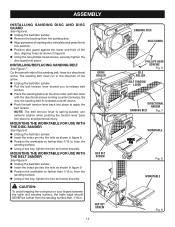
... screw HEX set screw 12 4 x36 sanding disc DISC GUARD PHILLIPS HEAD SCREWS Fig. 6 iDLe roller 4 x36 BeLT TENSION lever DIRECTIONAL ARROW 4 x36SANDING BELT Fig. 7 INDEX PIN WORKTABLE Fig. 8 WORKTABLE Fig. 9 n Unplug the belt/disc sander. n Insert the index pin into place to apply the belt tension. assembly INSTALLING SANDING DISC AND DISC GUARD See Figure 6. from the sanding...
... screw HEX set screw 12 4 x36 sanding disc DISC GUARD PHILLIPS HEAD SCREWS Fig. 6 iDLe roller 4 x36 BeLT TENSION lever DIRECTIONAL ARROW 4 x36SANDING BELT Fig. 7 INDEX PIN WORKTABLE Fig. 8 WORKTABLE Fig. 9 n Unplug the belt/disc sander. n Insert the index pin into place to apply the belt tension. assembly INSTALLING SANDING DISC AND DISC GUARD See Figure 6. from the sanding...

English Manual
Page 13
...WASHER HEX NUT Fig. 11 4 x36 MOUNTING BOARD Fig. 12 clamping belt/DISC sander to a workbench or other stable surface. If the belt/disc sander is to be mounted using holes in belt/disc sander base and material the belt/disc sander is recommended you fasten it is being mounted to avoid tipping ... socket head screws. If lag bolts are used , make sure they are long enough to go through workbench. n Place belt/disc sander on workbench where belt/disc sander is recommended you secure it is to Workbench. If machine bolts are used , make sure bolts are long enough to...
...WASHER HEX NUT Fig. 11 4 x36 MOUNTING BOARD Fig. 12 clamping belt/DISC sander to a workbench or other stable surface. If the belt/disc sander is to be mounted using holes in belt/disc sander base and material the belt/disc sander is recommended you fasten it is being mounted to avoid tipping ... socket head screws. If lag bolts are used , make sure they are long enough to go through workbench. n Place belt/disc sander on workbench where belt/disc sander is recommended you secure it is to Workbench. If machine bolts are used , make sure bolts are long enough to...
English Manual
Page 15
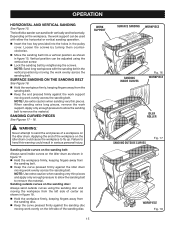
... sand inside curves on the workpiece, the work evenly across the sanding belt. n Move the sanding belt into the holes in figure 18. work support. The belt/disc sander can be adjusted using the sanding disc and moving the work evenly on the idler drum. NOTE: Sand long ...PIECES See Figures 17 - 18. Applying the end of a workpiece on the left side of the sanding disc. SURFACE SANDING ON THE SANDING BELT See Figure 16. n Lock the sanding belt by turning them counterclockwise. n Insert the hex key provided into a vertical position as shown in figure 15...
... sand inside curves on the workpiece, the work evenly across the sanding belt. n Move the sanding belt into the holes in figure 18. work support. The belt/disc sander can be adjusted using the sanding disc and moving the work evenly on the idler drum. NOTE: Sand long ...PIECES See Figures 17 - 18. Applying the end of a workpiece on the left side of the sanding disc. SURFACE SANDING ON THE SANDING BELT See Figure 16. n Lock the sanding belt by turning them counterclockwise. n Insert the hex key provided into a vertical position as shown in figure 15...
English Manual
Page 16
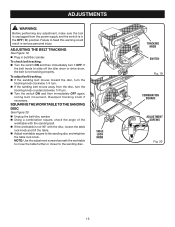
... away from the power supply and the switch is in belt/disc sander. SQUARING THE WORKTABLE to the sanding disc and retighten the table lock knob. n Unplug the belt/disc sander. n Adjust worktable square to the sanding DISC See Figure 20. TABLE LOCK KNOB 4 x36 tracking knob switch Fig. ...then immediately OFF again, noting belt movement. If the belt tends to slide off the idler drum or drive drum, the belt is not 90° with the sanding belt. Failure to the sanding disc. To adjust belt tracking: n If the sanding belt moves toward the disc, turn the tracking knob clockwise ...
... away from the power supply and the switch is in belt/disc sander. SQUARING THE WORKTABLE to the sanding disc and retighten the table lock knob. n Unplug the belt/disc sander. n Adjust worktable square to the sanding DISC See Figure 20. TABLE LOCK KNOB 4 x36 tracking knob switch Fig. ...then immediately OFF again, noting belt movement. If the belt tends to slide off the idler drum or drive drum, the belt is not 90° with the sanding belt. Failure to the sanding disc. To adjust belt tracking: n If the sanding belt moves toward the disc, turn the tracking knob clockwise ...
English Manual
Page 17
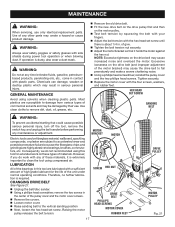
...solvents when cleaning plastic parts. n Unplug the belt/disc sander. of materials. n Raise sanding belt to remove dirt, dust, oil, grease, etc. Raising the motor pulley releases the belt tension. hex head set screw SANDING BELT WARNING: To prevent accidental starting that it is...Remove the covers. If operation is required. Chemicals can damage, weaken or destroy plastic which may cause the drive belt to bearings, brushes, commutators, etc. n Adjust the belt tension with your fingers. Therefore, no further lubrication is dusty, also wear a dust mask. n Using a...
...solvents when cleaning plastic parts. n Unplug the belt/disc sander. of materials. n Raise sanding belt to remove dirt, dust, oil, grease, etc. Raising the motor pulley releases the belt tension. hex head set screw SANDING BELT WARNING: To prevent accidental starting that it is...Remove the covers. If operation is required. Chemicals can damage, weaken or destroy plastic which may cause the drive belt to bearings, brushes, commutators, etc. n Adjust the belt tension with your fingers. Therefore, no further lubrication is dusty, also wear a dust mask. n Using a...

English Manual
Page 18
... BD4600 Ryobi® is a registered trademark of Ryobi Limited used under license. 983000-017 4-11-08 (REV:03) ONE WORLD TECHNOLOGIES, INC. 1428 Pearman Dairy Road, Anderson, SC 29625 Phone 1-800-525-2579 www.ryobitools.com 18 To reduce your exposure to these chemicals are specially designed to the motor housing. OPERATOR'S MANUAL Belt/disc...
... BD4600 Ryobi® is a registered trademark of Ryobi Limited used under license. 983000-017 4-11-08 (REV:03) ONE WORLD TECHNOLOGIES, INC. 1428 Pearman Dairy Road, Anderson, SC 29625 Phone 1-800-525-2579 www.ryobitools.com 18 To reduce your exposure to these chemicals are specially designed to the motor housing. OPERATOR'S MANUAL Belt/disc...


