English Manual
Page 4
... ALERT AND EXERCISE CONTROL. If damaged, have 3-prong grounding plugs and 3-pole receptacles that are tight. STOP THE MACHINE and recheck the hex head bolts and blades for safe use only identical replacement parts. The conductor with insulation having an outer surface that could break or chip the blades. ...
... ALERT AND EXERCISE CONTROL. If damaged, have 3-prong grounding plugs and 3-pole receptacles that are tight. STOP THE MACHINE and recheck the hex head bolts and blades for safe use only identical replacement parts. The conductor with insulation having an outer surface that could break or chip the blades. ...
English Manual
Page 13
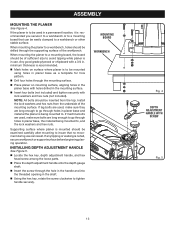
...recommended. Mark holes on mounting surface, aligning holes in the planer base with holes drilled in the mounting surface. Insert four bolts (not included) and tighten securely with a 3/4 in the shaft. Using the hex key, rotate the screw clockwise to a workbench ...or other stable surface. NOTE: All bolts should be inserted from the underside of the workbench. Supporting surface where planer is being mounted to . INSTALLING DEPTH ADJUSTMENT HANDLE See Figure 5. &#...
...recommended. Mark holes on mounting surface, aligning holes in the planer base with holes drilled in the mounting surface. Insert four bolts (not included) and tighten securely with a 3/4 in the shaft. Using the hex key, rotate the screw clockwise to a workbench ...or other stable surface. NOTE: All bolts should be inserted from the underside of the workbench. Supporting surface where planer is being mounted to . INSTALLING DEPTH ADJUSTMENT HANDLE See Figure 5. &#...
English Manual
Page 17
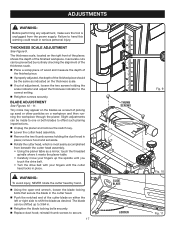
...; If properly adjusted, the depth of the finished piece should be prevented by hand. Using the open-end wrench, loosen the blade locking bolts that secure the blade in the cutter head. Push the notched end of the cutter blade on the right front of the planer, shows...the two thumb screws holding the scale indicator and adjust the thickness indicator to heed this warning could result in . Retighten the blade locking bolts securely. Replace dust hood; Slight adjustments can be made to one or both blades to shift the blade as a mirror, touch the ...
...; If properly adjusted, the depth of the finished piece should be prevented by hand. Using the open-end wrench, loosen the blade locking bolts that secure the blade in the cutter head. Push the notched end of the cutter blade on the right front of the planer, shows...the two thumb screws holding the scale indicator and adjust the thickness indicator to heed this warning could result in . Retighten the blade locking bolts securely. Replace dust hood; Slight adjustments can be made to one or both blades to shift the blade as a mirror, touch the ...
English Manual
Page 20
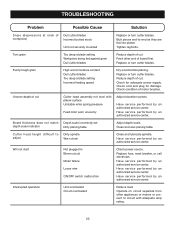
... failure Loose wire ON/OFF switch malfunction Check power source. Butt pieces end-to Dirty spindle adjust Worn chain Clean and lubricate spindle. Tighten lag bolts.
... failure Loose wire ON/OFF switch malfunction Check power source. Butt pieces end-to Dirty spindle adjust Worn chain Clean and lubricate spindle. Tighten lag bolts.


