
English Manual
Page 3
...pipes, radiators, ranges, refrigerator enclosures. KEEP GUARDS IN PLACE and in good working outdoors. DO NOT leave tools or pieces of blade or cutter only. NEVER LEAVE TOOL RUNNING UNATTENDED. Serious injury could ignite fumes. 3 Before further use only extension cords with padlocks...to rain. A guard or other part that is damaged must be kept a safe distance from tool before servicing, or when changing attachments, blades, bits, cutters, etc., all instructions listed below, may risk injury. NEVER STAND ON TOOL. Feed work when practical. An ...
...pipes, radiators, ranges, refrigerator enclosures. KEEP GUARDS IN PLACE and in good working outdoors. DO NOT leave tools or pieces of blade or cutter only. NEVER LEAVE TOOL RUNNING UNATTENDED. Serious injury could ignite fumes. 3 Before further use only extension cords with padlocks...to rain. A guard or other part that is damaged must be kept a safe distance from tool before servicing, or when changing attachments, blades, bits, cutters, etc., all instructions listed below, may risk injury. NEVER STAND ON TOOL. Feed work when practical. An ...
English Manual
Page 4
... about 50 hours of any solvents to power supply. The conductor with insulation having an outer surface that could break or chip the blades. NEVER STAND DIRECTLY IN LINE with the accessory. DOUBLE CHECK ALL SETUPS. If tool is the equipment-grounding ... DO NOT MODIFY the plug provided. Have defective switches replaced by an authorized service center. NEVER TOUCH BLADE or other foreign objects that is free from the rotating blade. INSPECT EXTENSION CORDS PERIODICALLY and replace if damaged. GROUND ALL TOOLS. SPECIFIC SAFETY RULES &#...
... about 50 hours of any solvents to power supply. The conductor with insulation having an outer surface that could break or chip the blades. NEVER STAND DIRECTLY IN LINE with the accessory. DOUBLE CHECK ALL SETUPS. If tool is the equipment-grounding ... DO NOT MODIFY the plug provided. Have defective switches replaced by an authorized service center. NEVER TOUCH BLADE or other foreign objects that is free from the rotating blade. INSPECT EXTENSION CORDS PERIODICALLY and replace if damaged. GROUND ALL TOOLS. SPECIFIC SAFETY RULES &#...
English Manual
Page 6
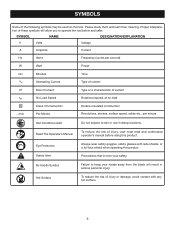
... better and safer. Eye Protection Safety Alert Always wear safety goggles, safety glasses with any hot surface. 6 Precautions that involve your hands away from the blade will allow you to rain or use in serious personal injury. Hot Surface To reduce the risk of injury, user must read and understand operator...
... better and safer. Eye Protection Safety Alert Always wear safety goggles, safety glasses with any hot surface. 6 Precautions that involve your hands away from the blade will allow you to rain or use in serious personal injury. Hot Surface To reduce the risk of injury, user must read and understand operator...
English Manual
Page 9
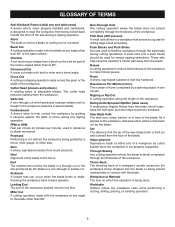
...operation. As it securely against the table or fence during cutting operations. Throw-Back The throwing back of the workpiece pushed into the blade or being done. Worktable Surface where the workpiece rests while performing a cutting, drilling, planing, or sanding operation. 9 GLOSSARY OF TERMS...the workpiece to prevent kickback. Bevel Cut A cutting operation made with both a miter and a bevel angle. Chamfer A cut by cutter blades when the workpiece is not properly supported. The cutter head removes material from wood products. Gum A sticky, sap-based residue from the ...
...operation. As it securely against the table or fence during cutting operations. Throw-Back The throwing back of the workpiece pushed into the blade or being done. Worktable Surface where the workpiece rests while performing a cutting, drilling, planing, or sanding operation. 9 GLOSSARY OF TERMS...the workpiece to prevent kickback. Bevel Cut A cutting operation made with both a miter and a bevel angle. Chamfer A cut by cutter blades when the workpiece is not properly supported. The cutter head removes material from wood products. Gum A sticky, sap-based residue from the ...
English Manual
Page 11
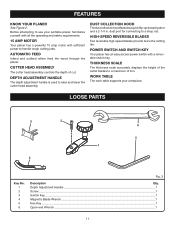
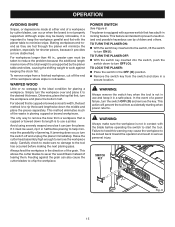
... features a quick flip-up dumping door and a 2-1/4 in . THICKNESS SCALE The thickness scale accurately displays the height of the cutter blades to handle tough cutting jobs. CUTTER HEAD ASSEMBLY The cutter head assembly controls the depth of 6 in . dust port for connecting to... See Figure 2. AUTOMATIC FEED Infeed and outfeed rollers feed the wood through the planer. Depth Adjustment Handle ...1 Screw ...1 Switch Key...1 Magnetic Blade Wrench ...1 Hex Key ...1 Open-end Wrench ...1 11 POWER SWITCH AND SWITCH KEY Your planer has an easy access power switch with sufficient power...
... features a quick flip-up dumping door and a 2-1/4 in . THICKNESS SCALE The thickness scale accurately displays the height of the cutter blades to handle tough cutting jobs. CUTTER HEAD ASSEMBLY The cutter head assembly controls the depth of 6 in . dust port for connecting to... See Figure 2. AUTOMATIC FEED Infeed and outfeed rollers feed the wood through the planer. Depth Adjustment Handle ...1 Screw ...1 Switch Key...1 Magnetic Blade Wrench ...1 Hex Key ...1 Open-end Wrench ...1 11 POWER SWITCH AND SWITCH KEY Your planer has an easy access power switch with sufficient power...
English Manual
Page 14
...of the workpiece is thicker than 1/8 in serious personal injury. WARNING: Never plane a workpiece with side shields when operating power tools. Cutter blades can result in ., make several cuts with the planer starting with light planing cuts first. This will cause them to the opposite, unused ... by the manufacturer of wood, make you careless. WARNING: The use at maximum cutting capacity will damage the motor. Worn cutter blades will depend on the type of wood (hardwood versus softwood), width of this operator's manual for the purpose listed below: Planing ...
...of the workpiece is thicker than 1/8 in serious personal injury. WARNING: Never plane a workpiece with side shields when operating power tools. Cutter blades can result in ., make several cuts with the planer starting with light planing cuts first. This will cause them to the opposite, unused ... by the manufacturer of wood, make you careless. WARNING: The use at maximum cutting capacity will damage the motor. Worn cutter blades will depend on the type of wood (hardwood versus softwood), width of this operator's manual for the purpose listed below: Planing ...
English Manual
Page 15
...feed the workpiece in use by the planer table and rollers, causing the shifting weight to use a jointer. This allows the cutter blades to reduce the problem because the additional length means more stable feed. For workpieces longer than 48 in half before operating the switch to... the problem, especially for planing a workpiece. Although snipe may cause the workpiece to be barely noticeable, it can also cause the cutter blades to start the tool. OPERATION AVOIDING SNIPE Snipes, or depressions made at either end of the workpiece where snipe is noticeable. Butting workpieces ...
...feed the workpiece in use by the planer table and rollers, causing the shifting weight to use a jointer. This allows the cutter blades to reduce the problem because the additional length means more stable feed. For workpieces longer than 48 in half before operating the switch to... the problem, especially for planing a workpiece. Although snipe may cause the workpiece to be barely noticeable, it can also cause the cutter blades to start the tool. OPERATION AVOIDING SNIPE Snipes, or depressions made at either end of the workpiece where snipe is noticeable. Butting workpieces ...
English Manual
Page 16
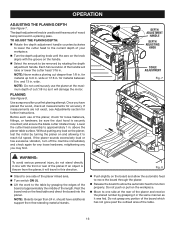
... exact, see Adjustments section for material between 6 in . Before each use the planer at the rear of cut deeper than 24 in . and ensure the blade cutter rotates freely. Without putting any portion of the board which has not gone past the outfeed area of your first planing attempt. DEPTH ADJUSTMENT...
... exact, see Adjustments section for material between 6 in . Before each use the planer at the rear of cut deeper than 24 in . and ensure the blade cutter rotates freely. Without putting any portion of the board which has not gone past the outfeed area of your first planing attempt. DEPTH ADJUSTMENT...
English Manual
Page 17
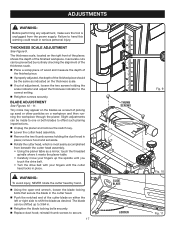
... See Figures 10 - 11. Tiny nicks may appear on either the left or right side to 3/64 in. Retighten the blade locking bolts securely. Replace dust hood; WARNING: To avoid injury, NEVER rotate the cutter head by routinely checking the alignment of the thickness scale. &#... the cutter head. Push the notched end of the finished piece should be made to one or both blades to the correct setting. Retighten screws securely. ADJUSTMENTS WARNING: Before performing any adjustment, make sure the tool is most easily accomplished from the power ...
... See Figures 10 - 11. Tiny nicks may appear on either the left or right side to 3/64 in. Retighten the blade locking bolts securely. Replace dust hood; WARNING: To avoid injury, NEVER rotate the cutter head by routinely checking the alignment of the thickness scale. &#... the cutter head. Push the notched end of the finished piece should be made to one or both blades to the correct setting. Retighten screws securely. ADJUSTMENTS WARNING: Before performing any adjustment, make sure the tool is most easily accomplished from the power ...
English Manual
Page 18
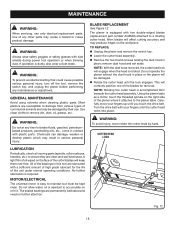
..., never rotate the cutter head by their use only identical replacement parts. A light film of oil wiped on the right side of the blades for the life 2. MOTOR/ELECTRICAL 1. No further lubrication is easy to a rotating cutter head. of the unit under normal operating conditions. ... hood and set aside. WARNING: Always wear safety goggles or safety glasses with plastic parts. Turn the drive belt with two double-edged blades (replacement part number AC8630) attached to maintain but must be damaged by hand. CUTTER HEAD LOCK LUBRICATION Periodically, check all moving parts (...
..., never rotate the cutter head by their use only identical replacement parts. A light film of oil wiped on the right side of the blades for the life 2. MOTOR/ELECTRICAL 1. No further lubrication is easy to a rotating cutter head. of the unit under normal operating conditions. ... hood and set aside. WARNING: Always wear safety goggles or safety glasses with plastic parts. Turn the drive belt with two double-edged blades (replacement part number AC8630) attached to maintain but must be damaged by hand. CUTTER HEAD LOCK LUBRICATION Periodically, check all moving parts (...
English Manual
Page 19
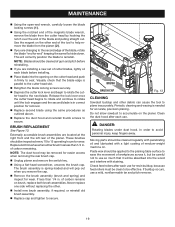
... are changing to the second edge of carbon remaining. Externally accessible brush assemblies are located at the right front and the left rear of the blade and pulling straight out. NOTE: The dust hood may be inspected every 10 to ease the movement of medium-weight machine oil. The brush assembly... flat side down. Clean the dust hood after each use a mild, nonflammable tar and pitch remover. 19 In order to use so much that the blade edge is in firmly to secure. Check feed rollers after each use for resin buildup, because feed rollers must be clean to be careful not...
... are changing to the second edge of carbon remaining. Externally accessible brush assemblies are located at the right front and the left rear of the blade and pulling straight out. NOTE: The dust hood may be inspected every 10 to ease the movement of medium-weight machine oil. The brush assembly... flat side down. Clean the dust hood after each use a mild, nonflammable tar and pitch remover. 19 In order to use so much that the blade edge is in firmly to secure. Check feed rollers after each use for resin buildup, because feed rollers must be clean to be careful not...
English Manual
Page 20
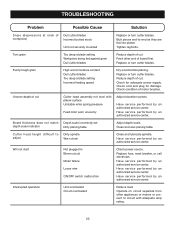
... center. Replace fuse, reset breaker, or call electrician. Torn grain Too deep a blade setting Workpiece being fed against grain Dull cutter blades Reduce depth of cut. Replace or turn cutter blades. Clean and wax planing table. Will not start Not plugged in Blown circuit Motor ... Feed roller worn unevenly Adjust elevation screws. Check for damage. Uneven depth of Dull cutter blades workpiece) Incorrect butted stock Unit not securely mounted Replace or turn cutter blades. Cutter head height difficult to -end as they are fed into planer. Operate on circuit...
... center. Replace fuse, reset breaker, or call electrician. Torn grain Too deep a blade setting Workpiece being fed against grain Dull cutter blades Reduce depth of cut. Replace or turn cutter blades. Clean and wax planing table. Will not start Not plugged in Blown circuit Motor ... Feed roller worn unevenly Adjust elevation screws. Check for damage. Uneven depth of Dull cutter blades workpiece) Incorrect butted stock Unit not securely mounted Replace or turn cutter blades. Cutter head height difficult to -end as they are fed into planer. Operate on circuit...

Repair Sheet
Page 4
MODEL NUMBER AP1301 The model number will be found on a plate attached to the motor housing. ... HD 2 CHAIN 1 SIDE COVER LABEL 2 * WASHER (Ø10.5 X Ø21 X 2t 4 WASHER 1 WRENCH (M8 X M10 1 HEX KEY (M4 X 120 mm 1 BLADE WRENCH 1 MOTOR WARNING LABEL 1 * Standard Hardware Item - SPINDLE 1 POST 4 RAIL GUIDE 2 WEAR PLATE 1 * SCREW (M10 X P1.5 X 40 mm HEX 4 BALL BEARING (...WASHER (Ø4 X Ø15 X 2t 2 * SCREW (M4 X P0.7 X 12 mm HEX SOC. May Be Purchased Locally 4 RYOBI 13 in all correspondence regarding your PLANER or when ordering repair parts. PLANER -
MODEL NUMBER AP1301 The model number will be found on a plate attached to the motor housing. ... HD 2 CHAIN 1 SIDE COVER LABEL 2 * WASHER (Ø10.5 X Ø21 X 2t 4 WASHER 1 WRENCH (M8 X M10 1 HEX KEY (M4 X 120 mm 1 BLADE WRENCH 1 MOTOR WARNING LABEL 1 * Standard Hardware Item - SPINDLE 1 POST 4 RAIL GUIDE 2 WEAR PLATE 1 * SCREW (M10 X P1.5 X 40 mm HEX 4 BALL BEARING (...WASHER (Ø4 X Ø15 X 2t 2 * SCREW (M4 X P0.7 X 12 mm HEX SOC. May Be Purchased Locally 4 RYOBI 13 in all correspondence regarding your PLANER or when ordering repair parts. PLANER -


