English Manual
Page 3
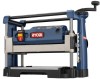
...Consult the operator's manual for better and safer performance. Before further use only extension cords with padlocks and master switches, or by an authorized service center to determine that it for a purpose not intended. USE THE...KEYS AND WRENCHES. When not in good working outdoors. Check for . Don't force the tool or attachment to follow all instructions. For example: pipes, radiators, ranges, refrigerator enclosures. KEEP GUARDS IN PLACE and in use outdoors and so marked. NEVER USE IN AN EXPLOSIVE ATMOSPHERE. Be sure switch...
...Consult the operator's manual for better and safer performance. Before further use only extension cords with padlocks and master switches, or by an authorized service center to determine that it for a purpose not intended. USE THE...KEYS AND WRENCHES. When not in good working outdoors. Check for . Don't force the tool or attachment to follow all instructions. For example: pipes, radiators, ranges, refrigerator enclosures. KEEP GUARDS IN PLACE and in use outdoors and so marked. NEVER USE IN AN EXPLOSIVE ATMOSPHERE. Be sure switch...
English Manual
Page 10
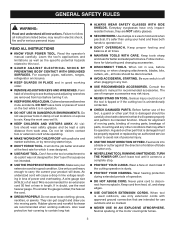
Max. Planing Depth 1/8 in . Planing Width 13 in . FEATURES PRODUCT SPECIFICATIONS Feed Rate 26 FPM No Load Speed 10,000 r/min. (RPM) Motor 2 HP Peak Input 120 V, AC Only, 60Hz, 15 A Max Planing Height 6 in. Net Weight 53.5 lbs. DEPTH ADJUSTMENT HANDLE SWITCH KEY POWER SWITCH DUST PORT WORK TABLE 10 THICKNESS SCALE Fig. 2 Max.
Max. Planing Depth 1/8 in . Planing Width 13 in . FEATURES PRODUCT SPECIFICATIONS Feed Rate 26 FPM No Load Speed 10,000 r/min. (RPM) Motor 2 HP Peak Input 120 V, AC Only, 60Hz, 15 A Max Planing Height 6 in. Net Weight 53.5 lbs. DEPTH ADJUSTMENT HANDLE SWITCH KEY POWER SWITCH DUST PORT WORK TABLE 10 THICKNESS SCALE Fig. 2 Max.
English Manual
Page 11
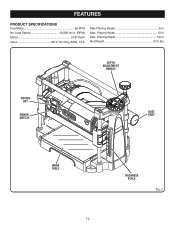
... Depth Adjustment Handle ...1 Screw ...1 Switch Key...1 Magnetic Blade Wrench ...1 Hex Key ...1 Open-end Wrench ...1 11 dust port for connecting to raise and lower the cutter head assembly. POWER SWITCH AND SWITCH KEY Your planer has an easy access power switch with sufficient power to use your ...familiarize yourself with all the operating and safety requirements. 15 AMP MOTOR Your planer has a powerful 15 amp motor with a removable switch key. FEATURES KNOW YOUR PLANER See Figure 2. DUST COLLECTION HOOD The dust collection hood features a quick flip-up dumping door and a...
... Depth Adjustment Handle ...1 Screw ...1 Switch Key...1 Magnetic Blade Wrench ...1 Hex Key ...1 Open-end Wrench ...1 11 dust port for connecting to raise and lower the cutter head assembly. POWER SWITCH AND SWITCH KEY Your planer has an easy access power switch with sufficient power to use your ...familiarize yourself with all the operating and safety requirements. 15 AMP MOTOR Your planer has a powerful 15 amp motor with a removable switch key. FEATURES KNOW YOUR PLANER See Figure 2. DUST COLLECTION HOOD The dust collection hood features a quick flip-up dumping door and a...
English Manual
Page 15
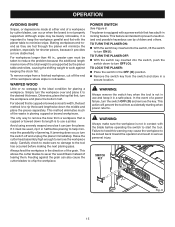
... that has a built-in locking feature. Always feed the workpiece in serious personal injury. TO TURN THE PLANER ON: With the switch key inserted into the switch, push the switch down to turn ON ( l ). In the event of the grain. OPERATION AVOIDING SNIPE Snipes, or depressions made at either end of a... possibility of the waste in use a jointer. If it must be used, rip it in a secure location. WARNING: Always remove the switch key when the tool is to use and keep the workpiece parallel and flat with the blade before planing to start the tool. The only way...
... that has a built-in locking feature. Always feed the workpiece in serious personal injury. TO TURN THE PLANER ON: With the switch key inserted into the switch, push the switch down to turn ON ( l ). In the event of the grain. OPERATION AVOIDING SNIPE Snipes, or depressions made at either end of a... possibility of the waste in use a jointer. If it must be used, rip it in a secure location. WARNING: Always remove the switch key when the tool is to use and keep the workpiece parallel and flat with the blade before planing to start the tool. The only way...
English Manual
Page 17
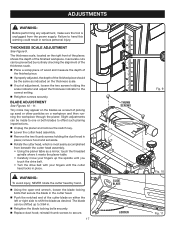
..., loosen the two screws holding the scale indicator and adjust the thickness indicator to offset such planing imperfections. Unplug the planer and remove the switch key. Lower the cutter head assembly. Remove the two thumb screws holding the dust hood in place; The thickness scale, located on the right...
..., loosen the two screws holding the scale indicator and adjust the thickness indicator to offset such planing imperfections. Unplug the planer and remove the switch key. Lower the cutter head assembly. Remove the two thumb screws holding the dust hood in place; The thickness scale, located on the right...
English Manual
Page 18
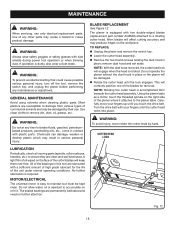
...The universal motor is rotated. Use clean cloths to a rotating cutter head. TO REPLACE: Unplug the planer and remove the switch key. Lower the cutter head assembly. Remove the two thumb screws holding the dust hood in place or the planer will... dust. MOTOR/ELECTRICAL 1. WARNING: To prevent accidental starting that could cause possible serious personal injury, turn off the tool, remove the switch key, and unplug the planer before performing any time let brake fluids, gasoline, petroleumbased products, penetrating oils, etc., come in serious personal ...
...The universal motor is rotated. Use clean cloths to a rotating cutter head. TO REPLACE: Unplug the planer and remove the switch key. Lower the cutter head assembly. Remove the two thumb screws holding the dust hood in place or the planer will... dust. MOTOR/ELECTRICAL 1. WARNING: To prevent accidental starting that could cause possible serious personal injury, turn off the tool, remove the switch key, and unplug the planer before performing any time let brake fluids, gasoline, petroleumbased products, penetrating oils, etc., come in serious personal ...
English Manual
Page 19
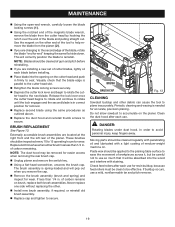
... tool to the next blade. Moving parts should be removed for easier access when removing the rear brush cap. Unplug planer and remove the switch key. Using a flat-head screwdriver, unscrew the brush cap. If buildup occurs, use . of the planer. Check feed rollers after each blade before reinstalling. ...
... tool to the next blade. Moving parts should be removed for easier access when removing the rear brush cap. Unplug planer and remove the switch key. Using a flat-head screwdriver, unscrew the brush cap. If buildup occurs, use . of the planer. Check feed rollers after each blade before reinstalling. ...
Repair Sheet
Page 4
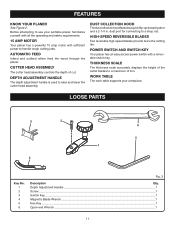
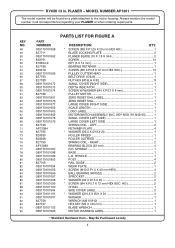
... SCALE LENGTH 1 LOGO LABEL 1 MOTOR/SWITCH ASSEMBLY (INC. RIGHT 2 BEARING BLOCK (23 mm 4 R.H. May Be Purchased Locally 4 RYOBI 13 in all correspondence regarding your PLANER or when ordering repair parts. KEY NOS. 66 AND 95) ......... 1 ...SMALL COVER (LEFT SIDE 1 LARGE COVER (LEFT SIDE 1 SPRING COIL - LEFT 2 RETAINER PLATE 4 * WASHER (Ø5.5 X Ø19 X 2t 1 ROLLER INFEED 1 ROLLER OUTFEED 1 SPRING COIL - SPINDLE 1 BASE 1 L.H. MODEL NUMBER AP1301...
... SCALE LENGTH 1 LOGO LABEL 1 MOTOR/SWITCH ASSEMBLY (INC. RIGHT 2 BEARING BLOCK (23 mm 4 R.H. May Be Purchased Locally 4 RYOBI 13 in all correspondence regarding your PLANER or when ordering repair parts. KEY NOS. 66 AND 95) ......... 1 ...SMALL COVER (LEFT SIDE 1 LARGE COVER (LEFT SIDE 1 SPRING COIL - LEFT 2 RETAINER PLATE 4 * WASHER (Ø5.5 X Ø19 X 2t 1 ROLLER INFEED 1 ROLLER OUTFEED 1 SPRING COIL - SPINDLE 1 BASE 1 L.H. MODEL NUMBER AP1301...
Repair Sheet
Page 6
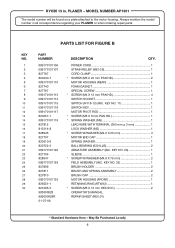
...(M5 X 12 mm HEX SOC 2 OPERATOR'S MANUAL REPAIR SHEET (REV:01) * Standard Hardware Item - MODEL NUMBER AP1301 The model number will be found on a plate attached to the motor housing. May Be Purchased Locally 6 KEY NO. 11 1 SWITCH KEY 1 MOTOR PIVOT ROD 1 * SCREW (M5 X 8 mm PAN HD 1 * SPRING WASHER (M5 1 LEAD WIRE... (6B3-2S 1 CORD CLAMP 1 * SCREW (M5 X 20 mm PAN HD 2 MOTOR HOUSING (REAR 1 FOAM GASKET 1 SPECIAL SCREW 1 * SCREW (M4 X 12 mm PAN HD 4 SWITCH SOCKET 1 SWITCH (HY18-13) (INC. RYOBI 13 in all correspondence regarding your PLANER or when ordering repair parts. PLANER -
...(M5 X 12 mm HEX SOC 2 OPERATOR'S MANUAL REPAIR SHEET (REV:01) * Standard Hardware Item - MODEL NUMBER AP1301 The model number will be found on a plate attached to the motor housing. May Be Purchased Locally 6 KEY NO. 11 1 SWITCH KEY 1 MOTOR PIVOT ROD 1 * SCREW (M5 X 8 mm PAN HD 1 * SPRING WASHER (M5 1 LEAD WIRE... (6B3-2S 1 CORD CLAMP 1 * SCREW (M5 X 20 mm PAN HD 2 MOTOR HOUSING (REAR 1 FOAM GASKET 1 SPECIAL SCREW 1 * SCREW (M4 X 12 mm PAN HD 4 SWITCH SOCKET 1 SWITCH (HY18-13) (INC. RYOBI 13 in all correspondence regarding your PLANER or when ordering repair parts. PLANER -


