English Manual
Page 4
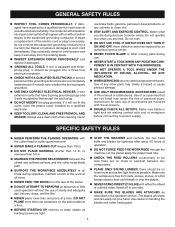
... as described in this manual or addendums. Use of sturdy and adequate jigs, fixtures, stops, and the like. NEVER plane more than 14 in handling the blades and cutter head guard. 4 Watch what you are tight. STOP THE MACHINE and recheck the hex head bolts and blades for safe...
... as described in this manual or addendums. Use of sturdy and adequate jigs, fixtures, stops, and the like. NEVER plane more than 14 in handling the blades and cutter head guard. 4 Watch what you are tight. STOP THE MACHINE and recheck the hex head bolts and blades for safe...
English Manual
Page 10
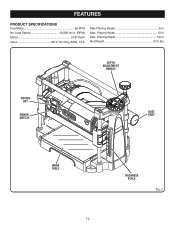
Planing Width 13 in . Net Weight 53.5 lbs. Max. Planing Depth 1/8 in . Max. DEPTH ADJUSTMENT HANDLE SWITCH KEY POWER SWITCH DUST PORT WORK TABLE 10 THICKNESS SCALE Fig. 2 FEATURES PRODUCT SPECIFICATIONS Feed Rate 26 FPM No Load Speed 10,000 r/min. (RPM) Motor 2 HP Peak Input 120 V, AC Only, 60Hz, 15 A Max Planing Height 6 in.
Planing Width 13 in . Net Weight 53.5 lbs. Max. Planing Depth 1/8 in . Max. DEPTH ADJUSTMENT HANDLE SWITCH KEY POWER SWITCH DUST PORT WORK TABLE 10 THICKNESS SCALE Fig. 2 FEATURES PRODUCT SPECIFICATIONS Feed Rate 26 FPM No Load Speed 10,000 r/min. (RPM) Motor 2 HP Peak Input 120 V, AC Only, 60Hz, 15 A Max Planing Height 6 in.
English Manual
Page 11
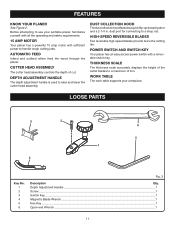
...with all the operating and safety requirements. 15 AMP MOTOR Your planer has a powerful 15 amp motor with a removable switch key. Depth Adjustment Handle ...1 Screw ...1 Switch Key...1 Magnetic Blade Wrench ...1 Hex Key ...1 Open-end Wrench ...1 11 FEATURES KNOW YOUR PLANER See Figure 2. Before attempting... to use your workpiece. AUTOMATIC FEED Infeed and outfeed rollers feed the wood through the planer. dust port for connecting to handle tough cutting jobs. DUST COLLECTION HOOD The dust collection hood features a quick flip-up dumping door and a 2-1/4 in . HIGH-...
...with all the operating and safety requirements. 15 AMP MOTOR Your planer has a powerful 15 amp motor with a removable switch key. Depth Adjustment Handle ...1 Screw ...1 Switch Key...1 Magnetic Blade Wrench ...1 Hex Key ...1 Open-end Wrench ...1 11 FEATURES KNOW YOUR PLANER See Figure 2. Before attempting... to use your workpiece. AUTOMATIC FEED Infeed and outfeed rollers feed the wood through the planer. dust port for connecting to handle tough cutting jobs. DUST COLLECTION HOOD The dust collection hood features a quick flip-up dumping door and a 2-1/4 in . HIGH-...
English Manual
Page 13
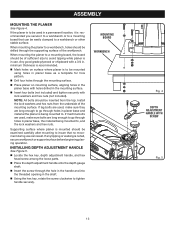
...nuts from the top. If machine bolts are used , make sure bolts are long enough to go through the hole in the handle and into the threaded opening in planer base and material the planer is mounted should be inserted from the underside of the workbench...for hole pattern. Drill four holes through the supporting surface of the mounting surface. Supporting surface where planer is being mounted to tighten handle securely. ASSEMBLY MOUNTING THE PLANER See Figure 4. When mounting the planer to a mounting board, the board should be drilled through the mounting surface....
...nuts from the top. If machine bolts are used , make sure bolts are long enough to go through the hole in the handle and into the threaded opening in planer base and material the planer is mounted should be inserted from the underside of the workbench...for hole pattern. Drill four holes through the supporting surface of the mounting surface. Supporting surface where planer is being mounted to tighten handle securely. ASSEMBLY MOUNTING THE PLANER See Figure 4. When mounting the planer to a mounting board, the board should be drilled through the mounting surface....
English Manual
Page 16
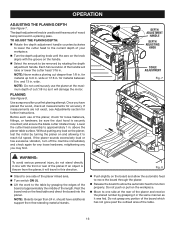
...any you have additional support from the planer, it to 6 in . TO ADJUST THE PLANING DEPTH: Rotate the depth adjustment handle counterclockwise to lower the cutter head to be sure the dust hood is used to approximately 1 in this direction. above the planer table surface... make a planing cut (1/8 in.) as it will travel in . for further instructions. and ensure the blade cutter rotates freely. DEPTH ADJUSTMENT HANDLE DEPTH ADJUSTING KNOB SCALE ADJUSTMENT Fig. 7 CELNINTEER WARNING: To avoid serious personal injury, do not stand directly in a planing pass. Rest the...
...any you have additional support from the planer, it to 6 in . TO ADJUST THE PLANING DEPTH: Rotate the depth adjustment handle counterclockwise to lower the cutter head to be sure the dust hood is used to approximately 1 in this direction. above the planer table surface... make a planing cut (1/8 in.) as it will travel in . for further instructions. and ensure the blade cutter rotates freely. DEPTH ADJUSTMENT HANDLE DEPTH ADJUSTING KNOB SCALE ADJUSTMENT Fig. 7 CELNINTEER WARNING: To avoid serious personal injury, do not stand directly in a planing pass. Rest the...
English Manual
Page 18
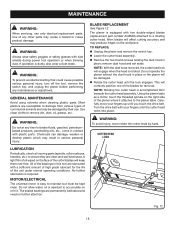
... is equipped with side shields during power tool operation or when blowing dust. CUTTER HEAD LOCK LUBRICATION Periodically, check all moving parts (spindle, roller surfaces, handles, etc.) to damage from beneath the cutter head assembly. No further lubrication is dusty, also wear a dust mask. MOTOR/ELECTRICAL 1. Use clean cloths to maintain...
... is equipped with side shields during power tool operation or when blowing dust. CUTTER HEAD LOCK LUBRICATION Periodically, check all moving parts (spindle, roller surfaces, handles, etc.) to damage from beneath the cutter head assembly. No further lubrication is dusty, also wear a dust mask. MOTOR/ELECTRICAL 1. Use clean cloths to maintain...
Repair Sheet
Page 3
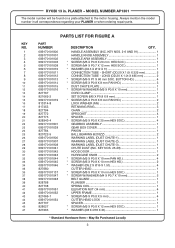
...BALL BEARING (6203ZZ 2 WARNING LABEL (DUST CHUTE-1 1 WARNING LABEL (DUST CHUTE-2 1 WARNING LABEL (DUST CHUTE-3 1 CHUTE DUST (INC. KEY NOS. 2-6 AND 91 1 HANDLE KNOB ASSEMBLY 1 HANDLE ARM ASSEMBLY 1 * SCREW (M5 X P0.8 X 20 mm HEX SOC 1 * SCREW (M4 X P0.7 X 12 mm HEX SOC 1 * WASHER (Ø4.3 X ... X 12 mm HEX SOC 1 * WASHER (Ø8 X Ø18 X 2t 1 * Standard Hardware Item - May Be Purchased Locally 3 RYOBI 13 in all correspondence regarding your PLANER or when ordering repair parts. MODEL NUMBER AP1301 The model number will be found on a plate attached to the motor housing.
...BALL BEARING (6203ZZ 2 WARNING LABEL (DUST CHUTE-1 1 WARNING LABEL (DUST CHUTE-2 1 WARNING LABEL (DUST CHUTE-3 1 CHUTE DUST (INC. KEY NOS. 2-6 AND 91 1 HANDLE KNOB ASSEMBLY 1 HANDLE ARM ASSEMBLY 1 * SCREW (M5 X P0.8 X 20 mm HEX SOC 1 * SCREW (M4 X P0.7 X 12 mm HEX SOC 1 * WASHER (Ø4.3 X ... X 12 mm HEX SOC 1 * WASHER (Ø8 X Ø18 X 2t 1 * Standard Hardware Item - May Be Purchased Locally 3 RYOBI 13 in all correspondence regarding your PLANER or when ordering repair parts. MODEL NUMBER AP1301 The model number will be found on a plate attached to the motor housing.


