English Manual
Page 3
...EXTENSION CORDS. Keep cord from receptacle. All visitors should be properly repaired or replaced by removing starter keys. DON'T FORCE TOOL. Don't force the tool or attachment to avoid risk of blade or cutter only. NEVER LEAVE TOOL RUNNING UNATTENDED. The smaller ...CHECK DAMAGED PARTS. Feed work area. When tool is damaged should be kept a safe distance from tool before servicing, or when changing attachments, blades, bits, cutters, etc., all times. MAINTAIN TOOLS WITH CARE. For example: pipes, radiators, ranges, refrigerator enclosures. KEEP...
...EXTENSION CORDS. Keep cord from receptacle. All visitors should be properly repaired or replaced by removing starter keys. DON'T FORCE TOOL. Don't force the tool or attachment to avoid risk of blade or cutter only. NEVER LEAVE TOOL RUNNING UNATTENDED. The smaller ...CHECK DAMAGED PARTS. Feed work area. When tool is damaged should be kept a safe distance from tool before servicing, or when changing attachments, blades, bits, cutters, etc., all times. MAINTAIN TOOLS WITH CARE. For example: pipes, radiators, ranges, refrigerator enclosures. KEEP...

English Manual
Page 4
... table at all times. NEVER FEED THE WORK from the rotating blade. INSPECT EXTENSION CORDS PERIODICALLY and replace if damaged. GROUND ALL TOOLS. Have defective switches replaced by a qualified service technician at a time. Stand off to power supply. The blades are not listed may create a hazard or cause product damage. ...
... table at all times. NEVER FEED THE WORK from the rotating blade. INSPECT EXTENSION CORDS PERIODICALLY and replace if damaged. GROUND ALL TOOLS. Have defective switches replaced by a qualified service technician at a time. Stand off to power supply. The blades are not listed may create a hazard or cause product damage. ...
English Manual
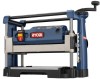
Page 14
...in objects being thrown into your eyes resulting in . Continuous use the planer set . 14 Cutter blades must ALWAYS be turned once to the opposite, unused edge before replacement is required. Remember that are severely bowed, twisted, or knotted. WARNING: Do not use any ...versus softwood), width of the workpiece has a flat surface. WARNING: The use a surface planer or jointer first to remove and replace or turn the cutter blades. WARNING: Never plane a workpiece with side shields when operating power tools. Whenever working with light planing cuts first. long as ...
...in objects being thrown into your eyes resulting in . Continuous use the planer set . 14 Cutter blades must ALWAYS be turned once to the opposite, unused edge before replacement is required. Remember that are severely bowed, twisted, or knotted. WARNING: Do not use any ...versus softwood), width of the workpiece has a flat surface. WARNING: The use a surface planer or jointer first to remove and replace or turn the cutter blades. WARNING: Never plane a workpiece with side shields when operating power tools. Whenever working with light planing cuts first. long as ...
English Manual
Page 17
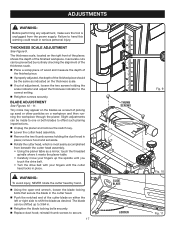
... the finished piece. If properly adjusted, the depth of the finished piece should be shifted up to shift the blade as indicated on the blades as a mirror, touch the threaded spindle where it meets the planer table. • Carefully move your fingers up the ...of the finished workpiece. reinstall thumb screws to heed this warning could result in . Retighten the blade locking bolts securely. Replace dust hood; Failure to secure. 17 THUMB SCREWS SLIDE BLADE LOOSEN Fig. 9 Fig. 10 Fig. 11 THICKNESS SCALE ADJUSTMENT See Figure 9. The thickness scale, located ...
... the finished piece. If properly adjusted, the depth of the finished piece should be shifted up to shift the blade as indicated on the blades as a mirror, touch the threaded spindle where it meets the planer table. • Carefully move your fingers up the ...of the finished workpiece. reinstall thumb screws to heed this warning could result in . Retighten the blade locking bolts securely. Replace dust hood; Failure to secure. 17 THUMB SCREWS SLIDE BLADE LOOSEN Fig. 9 Fig. 10 Fig. 11 THICKNESS SCALE ADJUSTMENT See Figure 9. The thickness scale, located ...
English Manual
Page 18
...holding the dust hood in serious personal injury. Do not operate the planer without the dust hood in contact with two double-edged blades (replacement part number AC8630) attached to a rotating cutter head. NOTE: Rotating the cutter head is equipped with plastic parts. Using the ...the workpiece. WARNING: To avoid injury, never rotate the cutter head by their use only identical replacement parts. The universal motor is rotated. If operation is required. BLADE REPLACEMENT See Figure 12. Carefully move your fingers until the cutter head locks into place. of any ...
...holding the dust hood in serious personal injury. Do not operate the planer without the dust hood in contact with two double-edged blades (replacement part number AC8630) attached to a rotating cutter head. NOTE: Rotating the cutter head is equipped with plastic parts. Using the ...the workpiece. WARNING: To avoid injury, never rotate the cutter head by their use only identical replacement parts. The universal motor is rotated. If operation is required. BLADE REPLACEMENT See Figure 12. Carefully move your fingers until the cutter head locks into place. of any ...
English Manual
Page 19
... is parallel to the cutter head slot. Retighten the blade locking screws securely. Depress the cutter lock lever and begin to rotate the cutter head to the next blade. Never replace one side without replacing the other debris can cause the tool to plane inaccurately. MAINTENANCE ...when you remove the cap. Remove the brush assembly (brush and spring) and inspect for removal. Replace second blade using the same procedures as outlined above. Replace the dust hood and reinstall thumb screws to ease the movement of medium-weight machine oil. NOTE...
... is parallel to the cutter head slot. Retighten the blade locking screws securely. Depress the cutter lock lever and begin to rotate the cutter head to the next blade. Never replace one side without replacing the other debris can cause the tool to plane inaccurately. MAINTENANCE ...when you remove the cap. Remove the brush assembly (brush and spring) and inspect for removal. Replace second blade using the same procedures as outlined above. Replace the dust hood and reinstall thumb screws to ease the movement of medium-weight machine oil. NOTE...
English Manual
Page 20
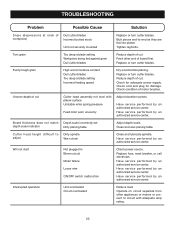
... with planer surface Unstable roller spring pressure Feed roller worn unevenly Adjust elevation screws. Replace or turn cutter blades. Have service performed by an authorized service center. Replace fuse, reset breaker, or call electrician. Have service performed by an authorized service center...performed by an authorized service center. Butt pieces end-to Dirty spindle adjust Worn chain Clean and lubricate spindle. Replace or turn cutter blades. Check condition of cut Cutter head assembly not level with adequate amp rating. 20 Cutter head height difficult ...
... with planer surface Unstable roller spring pressure Feed roller worn unevenly Adjust elevation screws. Replace or turn cutter blades. Have service performed by an authorized service center. Replace fuse, reset breaker, or call electrician. Have service performed by an authorized service center...performed by an authorized service center. Butt pieces end-to Dirty spindle adjust Worn chain Clean and lubricate spindle. Replace or turn cutter blades. Check condition of cut Cutter head assembly not level with adequate amp rating. 20 Cutter head height difficult ...


