Operating Instructions
Page 2
... Certain options might result from the machine. We assume no event will the company be slightly different from the use genuine print cartridges from the supplier with your safety and benefit, read this machine refer to the metric version. Important Contents of parts other countries...the U.S. We disclaim any item for its completeness or accuracy. PCL® is a registered trademark of Hewlett-Packard Company. IPS-PRINT Printer Language Emulation Copyright© 1999-2000 Oak Technology, Inc., All rights reserved. The preceding list is meant as follows: Microsoft® ...
... Certain options might result from the machine. We assume no event will the company be slightly different from the use genuine print cartridges from the supplier with your safety and benefit, read this machine refer to the metric version. Important Contents of parts other countries...the U.S. We disclaim any item for its completeness or accuracy. PCL® is a registered trademark of Hewlett-Packard Company. IPS-PRINT Printer Language Emulation Copyright© 1999-2000 Oak Technology, Inc., All rights reserved. The preceding list is meant as follows: Microsoft® ...

Operating Instructions
Page 4
... Installing a Site Certificate...70 Installing Device Certificate...71 Setting Items of Paper and Other Media...78 Paper Not Supported by this Printer...82 Print Area...83 Loading Paper...85 Loading Paper in Tray 1 and the Optional Paper Feed Unit 85 Loading Paper in ... Bypass Tray...94 Loading Envelopes...100 Switching Between Paper Trays...105 6. Cleaning the Printer Cautions to Take When Cleaning...129 2 Replacing Consumables and Maintenance Kit Replacing the Toner Cartridge (Print Cartridge 107 Replacing the Maintenance Kit...112 Before Replacing...112 Replacing the Friction Pad...113 ...
... Installing a Site Certificate...70 Installing Device Certificate...71 Setting Items of Paper and Other Media...78 Paper Not Supported by this Printer...82 Print Area...83 Loading Paper...85 Loading Paper in Tray 1 and the Optional Paper Feed Unit 85 Loading Paper in ... Bypass Tray...94 Loading Envelopes...100 Switching Between Paper Trays...105 6. Cleaning the Printer Cautions to Take When Cleaning...129 2 Replacing Consumables and Maintenance Kit Replacing the Toner Cartridge (Print Cartridge 107 Replacing the Maintenance Kit...112 Before Replacing...112 Replacing the Friction Pad...113 ...
Operating Instructions
Page 5
Appendix Moving and Transporting the Printer...185 Moving the Printer...185 Consumables...187 Toner Cartridge (Print Cartridge)...187 Maintenance Kit...188 Specifications...189 Mainframe...189 3 Adjusting the Printer Adjusting the Image Density...139 Adjusting Tray Registration...141 Reducing Paper Curl...144 9. Removing ......132 Cleaning the Registration Roller...135 8. Troubleshooting Error & Status Messages on the Control Panel 145 Panel Tone...152 Printer Does Not Print...153 Checking the Port Connection...154 Other Printing Problems...156 When You Cannot Print Properly...156 Paper...
Appendix Moving and Transporting the Printer...185 Moving the Printer...185 Consumables...187 Toner Cartridge (Print Cartridge)...187 Maintenance Kit...188 Specifications...189 Mainframe...189 3 Adjusting the Printer Adjusting the Image Density...139 Adjusting Tray Registration...141 Reducing Paper Curl...144 9. Removing ......132 Cleaning the Registration Roller...135 8. Troubleshooting Error & Status Messages on the Control Panel 145 Panel Tone...152 Printer Does Not Print...153 Checking the Port Connection...154 Other Printing Problems...156 When You Cannot Print Properly...156 Paper...
Operating Instructions
Page 15
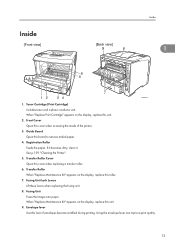
... "Replace Maintenance Kit" appears on the display, replace this board to remove misfed paper. 4. See p.129 "Cleaning the Printer". 5. Toner Cartridge (Print Cartridge) Includes toner and a photo conductor unit. Transfer Roller When "Replace Maintenance Kit" appears on the display, replace this cover... when accessing the inside of the printer. 3. Guide Board Open this unit. 2. Fusing Unit Lock Levers Lift these levers when ...
... "Replace Maintenance Kit" appears on the display, replace this board to remove misfed paper. 4. See p.129 "Cleaning the Printer". 5. Toner Cartridge (Print Cartridge) Includes toner and a photo conductor unit. Transfer Roller When "Replace Maintenance Kit" appears on the display, replace this cover... when accessing the inside of the printer. 3. Guide Board Open this unit. 2. Fusing Unit Lock Levers Lift these levers when ...
Operating Instructions
Page 109
...eyes, flush immediately with plenty of them according to a light for Standardization. 107 Replacing Consumables and Maintenance Kit Replacing the Toner Cartridge (Print Cartridge) • Do not incinerate spilled toner or used toner, or toner containers in a place with cold water. Toner dust is... with ISO/IEC 19752 and the image density is inhaled, gargle with large amounts of water. Replace the toner cartridge immediately. • The toner cartridge packaged with the printer can print up to an open flame. • Do not store toner, used toner. Consult a doctor if...
...eyes, flush immediately with plenty of them according to a light for Standardization. 107 Replacing Consumables and Maintenance Kit Replacing the Toner Cartridge (Print Cartridge) • Do not incinerate spilled toner or used toner, or toner containers in a place with cold water. Toner dust is... with ISO/IEC 19752 and the image density is inhaled, gargle with large amounts of water. Replace the toner cartridge immediately. • The toner cartridge packaged with the printer can print up to an open flame. • Do not store toner, used toner. Consult a doctor if...
Operating Instructions
Page 110
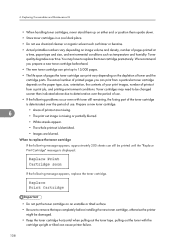
... environment conditions. When to remove the tape completely before installing the new toner cartridge, otherwise the printer might be changed sooner than indicated above due to replace the toner cartridge prematurely. Replacing Consumables and Maintenance Kit • When handling toner cartridges, never stand them up to 15,000 pages. • The life span of...
... environment conditions. When to remove the tape completely before installing the new toner cartridge, otherwise the printer might be changed sooner than indicated above due to replace the toner cartridge prematurely. Replacing Consumables and Maintenance Kit • When handling toner cartridges, never stand them up to 15,000 pages. • The life span of...

Operating Instructions
Page 111
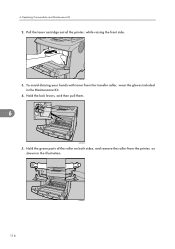
Lift the front side of the toner cartridge, and then pull it out of the printer. 6 AUB103S 3. AUB101S 2. AUB300S 5. Be sure to get toner dust on a stable, flat surface. 4. Take the new toner cartridge from the box. 109 Open the front cover by turning with a soft damp cloth. Wipe around the metallic registration roller by pushing the front cover release button. Replacing the Toner Cartridge (Print Cartridge) • Be careful not to put the toner cartridge on your hands or clothes. 1.
Lift the front side of the toner cartridge, and then pull it out of the printer. 6 AUB103S 3. AUB101S 2. AUB300S 5. Be sure to get toner dust on a stable, flat surface. 4. Take the new toner cartridge from the box. 109 Open the front cover by turning with a soft damp cloth. Wipe around the metallic registration roller by pushing the front cover release button. Replacing the Toner Cartridge (Print Cartridge) • Be careful not to put the toner cartridge on your hands or clothes. 1.

Operating Instructions
Page 112
Pull out the tape inside the unit horizontally while holding the cartridge with one hand as shown in appropriate position. 110 AUB105S AFE007S 7. 6. Place the toner cartridge on a flat surface. Push down the toner cartridge to settle it stops. 6 AUB106S 8. Hold the grips of the cartridge, and then insert it into the printer until it in the illustration. Replacing Consumables and Maintenance Kit 6.
Pull out the tape inside the unit horizontally while holding the cartridge with one hand as shown in appropriate position. 110 AUB105S AFE007S 7. 6. Place the toner cartridge on a flat surface. Push down the toner cartridge to settle it stops. 6 AUB106S 8. Hold the grips of the cartridge, and then insert it into the printer until it in the illustration. Replacing Consumables and Maintenance Kit 6.

Operating Instructions
Page 113
After that, close the cover easily, pull out the toner cartridge from the printer and insert it again. Replacing the Toner Cartridge (Print Cartridge) AUB107S 10. If you cannot close the front cover again. 111 Wait while the toner loads. To avoid malfunction, do not turn off the ...power until "Ready" appears on the display. • Do not shake or shock the toner cartridge after pulling out the toner seal to avoid dirt on paper surfaces, toner spillage, or printer failure. • Please cooperate with force. For details, consult with the store where the...
After that, close the cover easily, pull out the toner cartridge from the printer and insert it again. Replacing the Toner Cartridge (Print Cartridge) AUB107S 10. If you cannot close the front cover again. 111 Wait while the toner loads. To avoid malfunction, do not turn off the ...power until "Ready" appears on the display. • Do not shake or shock the toner cartridge after pulling out the toner seal to avoid dirt on paper surfaces, toner spillage, or printer failure. • Please cooperate with force. For details, consult with the store where the...
Operating Instructions
Page 118
To avoid dirtying your hands with toner from the printer, as shown in the Maintenance Kit. 4. Replacing Consumables and Maintenance Kit 2. Hold the lock levers, and then pull them. 6 AUB304S 5. Hold the green parts of the printer, while raising the front side. Pull the toner cartridge out of the roller on both sides, and remove the roller from the transfer roller, wear the gloves included in the illustration. 116 AUB305S AUB103S 3. 6.
To avoid dirtying your hands with toner from the printer, as shown in the Maintenance Kit. 4. Replacing Consumables and Maintenance Kit 2. Hold the lock levers, and then pull them. 6 AUB304S 5. Hold the green parts of the printer, while raising the front side. Pull the toner cartridge out of the roller on both sides, and remove the roller from the transfer roller, wear the gloves included in the illustration. 116 AUB305S AUB103S 3. 6.
Operating Instructions
Page 119
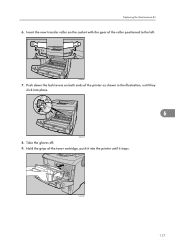
AUB306S 7. Take the gloves off. 9. Hold the grips of the printer as shown in the illustration, until it stops. Push down the lock levers on the socket with the gear of the roller positioned to the left. Replacing the Maintenance Kit 6. AUB106S 117 Insert the new transfer roller on both ends of the toner cartridge, push it into the printer until they click into place. 6 AUB307S 8.
AUB306S 7. Take the gloves off. 9. Hold the grips of the printer as shown in the illustration, until it stops. Push down the lock levers on the socket with the gear of the roller positioned to the left. Replacing the Maintenance Kit 6. AUB106S 117 Insert the new transfer roller on both ends of the toner cartridge, push it into the printer until they click into place. 6 AUB307S 8.

Operating Instructions
Page 120
... 11. Replacing the Paper Feed Roller Replace all feed rollers including the printer and the optional paper feed unit(s). AUB105S 6 AUB107S • Be sure to its original position automatically. Turning the printer sideways or tilting it slowly. Lifting it carelessly or dropping it in... toner leakage. 118 Replacing Consumables and Maintenance Kit 10. Push down the toner cartridge to replace the paper feed rollers of it, and then...
... 11. Replacing the Paper Feed Roller Replace all feed rollers including the printer and the optional paper feed unit(s). AUB105S 6 AUB107S • Be sure to its original position automatically. Turning the printer sideways or tilting it slowly. Lifting it carelessly or dropping it in... toner leakage. 118 Replacing Consumables and Maintenance Kit 10. Push down the toner cartridge to replace the paper feed rollers of it, and then...
Operating Instructions
Page 137
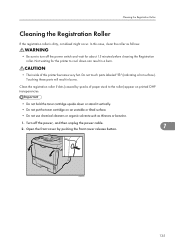
Do not touch parts labeled " " (indicating a hot surface). Turn off the power switch and wait for the printer to turn off the power, and then unplug the power cable. 2. Clean the registration roller if dots (caused by pushing the front cover release button. 7 ...: • Be sure to cool down or stand it vertically. • Do not put the toner cartridge on printed OHP transparencies. • Do not hold the toner cartridge upside down can result in burns. In this printer becomes very hot. Open the front cover by specks of this case, clean the roller as...
Do not touch parts labeled " " (indicating a hot surface). Turn off the power switch and wait for the printer to turn off the power, and then unplug the power cable. 2. Clean the registration roller if dots (caused by pushing the front cover release button. 7 ...: • Be sure to cool down or stand it vertically. • Do not put the toner cartridge on printed OHP transparencies. • Do not hold the toner cartridge upside down can result in burns. In this printer becomes very hot. Open the front cover by specks of this case, clean the roller as...
Operating Instructions
Page 138
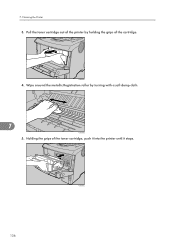
Pull the toner cartridge out of the printer by turning with a soft damp cloth. 7 AUB300S 5. Cleaning the Printer 3. AUB103S 4. Wipe around the metallic Registration roller by holding the grips of the toner cartridge, push it into the printer until it stops. 7. AUB106S 136 Holding the grips of the cartridge.
Pull the toner cartridge out of the printer by turning with a soft damp cloth. 7 AUB300S 5. Cleaning the Printer 3. AUB103S 4. Wipe around the metallic Registration roller by holding the grips of the toner cartridge, push it into the printer until it stops. 7. AUB106S 136 Holding the grips of the cartridge.
Operating Instructions
Page 139
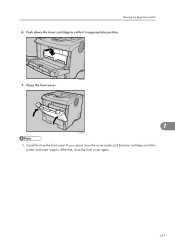
If you cannot close the front cover. AUB105S 7 AUB107S • Carefully close the cover easily, pull the toner cartridge out of the printer and insert it in appropriate position. 7. After that, close the front cover again. 137 Close the front cover. Push down the toner cartridge to settle it again. Cleaning the Registration Roller 6.
If you cannot close the front cover. AUB105S 7 AUB107S • Carefully close the cover easily, pull the toner cartridge out of the printer and insert it in appropriate position. 7. After that, close the front cover again. 137 Close the front cover. Push down the toner cartridge to settle it again. Cleaning the Registration Roller 6.

Operating Instructions
Page 151
...rear cover and remove jammed paper. • See p.167 "Removing Misfed Paper". Replace Print Cartridge It is out of toner. • Replace the toner cartridge. • See p.107 "Replacing the Toner Cartridge (Print Cartridge)". 149 RC Gate connection error The printer cannot communicate with Remote Communication Gate. • Contact your sales or service representative. Error... Name/Password error Proxy user name and password are incorrect. • Change the current user name and password to replace the waste toner. The printer is time to the correct user name and password.
...rear cover and remove jammed paper. • See p.167 "Removing Misfed Paper". Replace Print Cartridge It is out of toner. • Replace the toner cartridge. • See p.107 "Replacing the Toner Cartridge (Print Cartridge)". 149 RC Gate connection error The printer cannot communicate with Remote Communication Gate. • Contact your sales or service representative. Error... Name/Password error Proxy user name and password are incorrect. • Change the current user name and password to replace the waste toner. The printer is time to the correct user name and password.
Operating Instructions
Page 152
...; See p.61 "IEEE 802.11b (Wireless LAN) Configuration". 150 Troubleshooting Replace Print Cartridge soon The printer is not entered. • Enter the SSID of toner. • Prepare a new toner Cartridge. Reset the Job or Form Feed/Paper Size: Paper Type: The printer detected that appears. If the message appears again, contact your fusing unit...
...; See p.61 "IEEE 802.11b (Wireless LAN) Configuration". 150 Troubleshooting Replace Print Cartridge soon The printer is not entered. • Enter the SSID of toner. • Prepare a new toner Cartridge. Reset the Job or Form Feed/Paper Size: Paper Type: The printer detected that appears. If the message appears again, contact your fusing unit...
Operating Instructions
Page 158
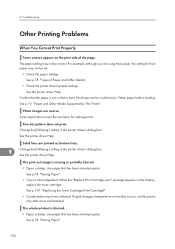
... resolution for thick paper may not be curled easily. When the "Replace Print Cartridge soon" message appears on the print side of Paper and Other Media". • Check the printer driver's paper settings. Troubleshooting Other Printing Problems When You Cannot Print Properly Toner ...smears appear on the display, replace the toner cartridge. Fine dot pattern does not print. See p.107 "Replacing the Toner Cartridge (Print Cartridge)". • Condensation may not be correct. If rapid change in the printer driver's dialog box. The paper setting may have collected....
... resolution for thick paper may not be curled easily. When the "Replace Print Cartridge soon" message appears on the print side of Paper and Other Media". • Check the printer driver's paper settings. Troubleshooting Other Printing Problems When You Cannot Print Properly Toner ...smears appear on the display, replace the toner cartridge. Fine dot pattern does not print. See p.107 "Replacing the Toner Cartridge (Print Cartridge)". • Condensation may not be correct. If rapid change in the printer driver's dialog box. The paper setting may have collected....

Operating Instructions
Page 159
... the [Print Quality] tab in temperature or humidity occurs, use this printer. See p.107 "Replacing the Toner Cartridge (Print Cartridge)". • Condensation may be set. • Check the paper settings of the printer may have collected. For example, although thick paper is dirty. Clean the...until they come out clean. • If document size is deteriorated or damaged. The setting of the printer driver. See p.107 "Replacing the Toner Cartridge (Print Cartridge)". The registration roller is used, the setting for thick paper may not be correct. Switch to Thick Paper...
... the [Print Quality] tab in temperature or humidity occurs, use this printer. See p.107 "Replacing the Toner Cartridge (Print Cartridge)". • Condensation may be set. • Check the paper settings of the printer may have collected. For example, although thick paper is dirty. Clean the...until they come out clean. • If document size is deteriorated or damaged. The setting of the printer driver. See p.107 "Replacing the Toner Cartridge (Print Cartridge)". The registration roller is used, the setting for thick paper may not be correct. Switch to Thick Paper...
Operating Instructions
Page 161
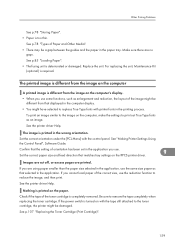
... no gaps. If you use the same size paper as that matches tray settings on the computer, make the settings to the toner cartridge, the printer might be a gap between the guides and the paper in the paper tray. For replacing the unit, Maintenance Kit (optional) is ...printed in the application. See p.107 "Replacing the Toner Cartridge (Print Cartridge)". 159 See "Making Printer Settings Using the Control Panel", Software Guide. Make sure there are printed. To print an image similar to remove the tape completely...
... no gaps. If you use the same size paper as that matches tray settings on the computer, make the settings to the toner cartridge, the printer might be a gap between the guides and the paper in the paper tray. For replacing the unit, Maintenance Kit (optional) is ...printed in the application. See p.107 "Replacing the Toner Cartridge (Print Cartridge)". 159 See "Making Printer Settings Using the Control Panel", Software Guide. Make sure there are printed. To print an image similar to remove the tape completely...


