User's Guide
Page 5
... your machine from the website ...13.6 Checking the machine's serial number ...13.6 14. Installing accessories Precautions when installing accessories ...15.1 Installing a memory DIMM ...15.1 16. Troubleshooting Clearing document jams ...14.1 Clearing paper jams ...14.2 Understanding display messages ...14.7 Toner cartridge-related messages ...14.10 Solving other problems ...14.11 15. 13.
... your machine from the website ...13.6 Checking the machine's serial number ...13.6 14. Installing accessories Precautions when installing accessories ...15.1 Installing a memory DIMM ...15.1 16. Troubleshooting Clearing document jams ...14.1 Clearing paper jams ...14.2 Understanding display messages ...14.7 Toner cartridge-related messages ...14.10 Solving other problems ...14.11 15. 13.
User's Guide
Page 14
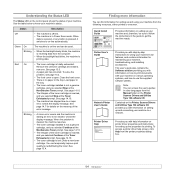
... computer. • When the backlight fast blinks, the machine is totally exhausted. This user's guide also contains the Software section providing you with your machine, troubleshooting, and installing accessories. When data is received, or any button is reached, and you selected Stop at the NonGenuine Toner prompt. Check the display message...
... computer. • When the backlight fast blinks, the machine is totally exhausted. This user's guide also contains the Software section providing you with your machine, troubleshooting, and installing accessories. When data is received, or any button is reached, and you selected Stop at the NonGenuine Toner prompt. Check the display message...

User's Guide
Page 68
... for what to do not see the paper in this area, refer to Roller misfeed. Note If you do if you encounter an error. 14 Troubleshooting This chapter gives helpful information for thick, thin, or mixed paper-type originals. 14.1 See page 14.2. 4 Close the ADF cover. This chapter includes: •...
... for what to do not see the paper in this area, refer to Roller misfeed. Note If you do if you encounter an error. 14 Troubleshooting This chapter gives helpful information for thick, thin, or mixed paper-type originals. 14.1 See page 14.2. 4 Close the ADF cover. This chapter includes: •...
User's Guide
Page 69
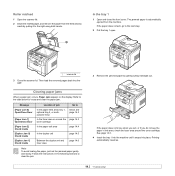
Refer to the table below and page 14.3 In the fuser area or around the toner cartridge. If the paper does not exit, go to locate and clear the paper jam. Printing automatically resumes. 14.2 If the paper does not move when you pull, or if you do not see the paper in the following sections to clear the jam. 3 Remove the jammed paper by carefully pulling it to In the paper feed area (tray 1, optional tray 2, or multipurpose tray) below to the next step. 2 Pull the tray 1 open. 1 scanner lid 3 Close the scanner lid. Roller misfeed 1 Open the scanner lid. 2 Seize the ...
Refer to the table below and page 14.3 In the fuser area or around the toner cartridge. If the paper does not exit, go to locate and clear the paper jam. Printing automatically resumes. 14.2 If the paper does not move when you pull, or if you do not see the paper in the following sections to clear the jam. 3 Remove the jammed paper by carefully pulling it to In the paper feed area (tray 1, optional tray 2, or multipurpose tray) below to the next step. 2 Pull the tray 1 open. 1 scanner lid 3 Close the scanner lid. Roller misfeed 1 Open the scanner lid. 2 Seize the ...
User's Guide
Page 70
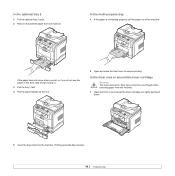
Take care not to resume printing. If the paper does not move when you pull, or if you do not see the paper in this area, stop and go to step 3. 3 Pull the tray 1 half. 4 Pull the paper straight up and out. 2 Open and close the front cover to burn your fingers when removing paper from the machine. In the fuser area or around the toner cartridge Warning The fuser area is not feeding properly, pull the paper out of the machine. Printing automatically resumes. 14.3 In the multi-purpose tray 1 If the paper is hot. In the optional tray 2 1 Pull the optional tray 2 open. 2 Remove ...
Take care not to resume printing. If the paper does not move when you pull, or if you do not see the paper in this area, stop and go to step 3. 3 Pull the tray 1 half. 4 Pull the paper straight up and out. 2 Open and close the front cover to burn your fingers when removing paper from the machine. In the fuser area or around the toner cartridge Warning The fuser area is not feeding properly, pull the paper out of the machine. Printing automatically resumes. 14.3 In the multi-purpose tray 1 If the paper is hot. In the optional tray 2 1 Pull the optional tray 2 open. 2 Remove ...
User's Guide
Page 71
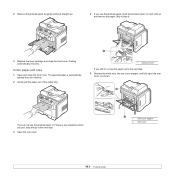
Skip to the next step. 3 Open the rear cover. 2 1 rear cover stopper 2 rear cover 14.4 In the paper exit area 1 Open and close the front cover. 2 Remove the jammed paper by gently pulling it straight out. 4 If you pull, stop and go to the next step. 5 Release the white strip, the rear cover stopper, and fully open the rear cover, as shown. 1 If you do not see the jammed paper or if there is any resistance when you see the jammed paper, push the pressure lever on each side up and remove the paper. The jammed paper is automatically ejected from the machine. 2 Gently pull the paper...
Skip to the next step. 3 Open the rear cover. 2 1 rear cover stopper 2 rear cover 14.4 In the paper exit area 1 Open and close the front cover. 2 Remove the jammed paper by gently pulling it straight out. 4 If you pull, stop and go to the next step. 5 Release the white strip, the rear cover stopper, and fully open the rear cover, as shown. 1 If you do not see the jammed paper or if there is any resistance when you see the jammed paper, push the pressure lever on each side up and remove the paper. The jammed paper is automatically ejected from the machine. 2 Gently pull the paper...
User's Guide
Page 72
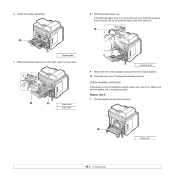
In the duplex unit area If the duplex unit is inserted correctly. Printing automatically resumes. 6 Unfold the duplex guide fully. 1 8 Pull the jammed paper out. Make sure that the duplex unit is not inserted correctly, paper jam may occur. If the jammed paper does not move when you pull, push the pressure lever on each side up to loose the paper, and then remove it. 1 1 duplex guide 7 While pushing the fuser lever to the right, open the fuser door. 1 2 1 fuser lever 2 fuser door 1 pressure lever 9 Return the lever, door, stopper, and guide to their original position. 10 Close the...
In the duplex unit area If the duplex unit is inserted correctly. Printing automatically resumes. 6 Unfold the duplex guide fully. 1 8 Pull the jammed paper out. Make sure that the duplex unit is not inserted correctly, paper jam may occur. If the jammed paper does not move when you pull, push the pressure lever on each side up to loose the paper, and then remove it. 1 1 duplex guide 7 While pushing the fuser lever to the right, open the fuser door. 1 2 1 fuser lever 2 fuser door 1 pressure lever 9 Return the lever, door, stopper, and guide to their original position. 10 Close the...
User's Guide
Page 73
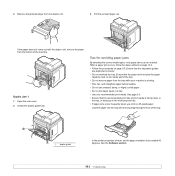
Ensure that the paper level is below the paper capacity mark on the inside wall of the tray. 1 1 duplex guide In the printer properties window, set the page orientation to be avoided. Duplex Jam 1 1 Open the rear cover. 2 Unfold the duplex guide fully. See page 5.8. • Ensure that the recommended print side of print media is printing. • Flex, fan, and straighten paper before loading. • Do not use creased, damp, or highly curled paper. • Do not mix paper types in the multi-purpose tray. • If paper jams occur frequently when you print on page...
Ensure that the paper level is below the paper capacity mark on the inside wall of the tray. 1 1 duplex guide In the printer properties window, set the page orientation to be avoided. Duplex Jam 1 1 Open the rear cover. 2 Unfold the duplex guide fully. See page 5.8. • Ensure that the recommended print side of print media is printing. • Flex, fan, and straighten paper before loading. • Do not use creased, damp, or highly curled paper. • Do not mix paper types in the multi-purpose tray. • If paper jams occur frequently when you print on page...
User's Guide
Page 74
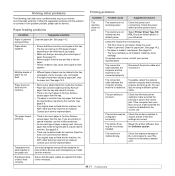
Understanding display messages Messages appear on the network server was successful. Note When you can be deleted. Enter the correct ID or password. Ask the sender to indicate the machine's status or errors. Data Write Fail Check USB Mem. Door Open The front cover or rear cover is not securely latched. See page 14.5. You entered an unavailable item. Enter the correct item again. However, all file names are from which is very convenient to doc999. For the location of the fuser door, see page 10.2. 14.7 Refer to the tables below to accept Yes. and...
Understanding display messages Messages appear on the network server was successful. Note When you can be deleted. Enter the correct ID or password. Ask the sender to indicate the machine's status or errors. Data Write Fail Check USB Mem. Door Open The front cover or rear cover is not securely latched. See page 14.5. You entered an unavailable item. Enter the correct item again. However, all file names are from which is very convenient to doc999. For the location of the fuser door, see page 10.2. 14.7 Refer to the tables below to accept Yes. and...
User's Guide
Page 75
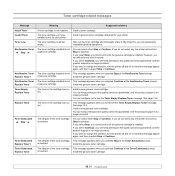
... the display to it back in the fuser unit. If the problem persists, please call for service. Paper has jammed in the LSU (Laser Scanning Unit). Clear the jam. A problem has occurred in the fuser area. Alternatively, split the transmission into more memory becomes available. Message...Cancel Job operation, but there are any scheduled jobs. There is full. See page 5.7. Try again. Paper has jammed in the LSU (Laser Scanning Unit). A problem has occurred in the paper exit area. Open and then close the front cover. Delete unnecessary fax jobs and ...
... the display to it back in the fuser unit. If the problem persists, please call for service. Paper has jammed in the LSU (Laser Scanning Unit). Clear the jam. A problem has occurred in the fuser area. Alternatively, split the transmission into more memory becomes available. Message...Cancel Job operation, but there are any scheduled jobs. There is full. See page 5.7. Try again. Paper has jammed in the LSU (Laser Scanning Unit). A problem has occurred in the paper exit area. Open and then close the front cover. Delete unnecessary fax jobs and ...

User's Guide
Page 76
... 5.5. 14.9 Please wait a few minutes. There is a problem in POP3. There is a problem in SMTP. The engine in your network interface card correctly. The LSU (Laser Scanning Unit) in your machine is waiting for a specified time interval to redial a previously busy station. Please wait a few minutes. Change to cancel the redial...
... 5.5. 14.9 Please wait a few minutes. There is a problem in POP3. There is a problem in SMTP. The engine in your network interface card correctly. The LSU (Laser Scanning Unit) in your machine is waiting for a specified time interval to redial a previously busy station. Please wait a few minutes. Change to cancel the redial...
User's Guide
Page 77
Take out the toner cartridge and thoroughly shake it. However, you want to change the selection, turn the printer off and on to see the Toner Empty Replace Toner message. If you can still print any , the printer will work as Stop is no longer provided. Toner Exhausted Stop The lifespan of the toner cartridge This message appears when you selected Stop at the Toner Exhausted prompt. is reached. Install the genuine toner cartridge. Toner Exhausted Replace Toner The lifespan of the toner cartridge is reached. Toner Low The toner cartridge is...
Take out the toner cartridge and thoroughly shake it. However, you want to change the selection, turn the printer off and on to see the Toner Empty Replace Toner message. If you can still print any , the printer will work as Stop is no longer provided. Toner Exhausted Stop The lifespan of the toner cartridge This message appears when you selected Stop at the Toner Exhausted prompt. is reached. Install the genuine toner cartridge. Toner Exhausted Replace Toner The lifespan of the toner cartridge is reached. Toner Low The toner cartridge is...
User's Guide
Page 78
... incorrect type of the envelopes. 14.11 Repair the printer software. Remove each transparency as your service representative. If the problem persists, please call for laser printers. Multiple sheets of paper do not feed. • Different types of paper. See page 14.2. • No paper is being used. The machine is...
... incorrect type of the envelopes. 14.11 Repair the printer software. Remove each transparency as your service representative. If the problem persists, please call for laser printers. Multiple sheets of paper do not feed. • Different types of paper. See page 14.2. • No paper is being used. The machine is...
User's Guide
Page 79
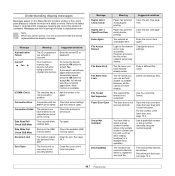
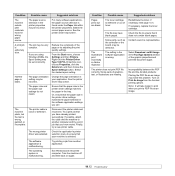
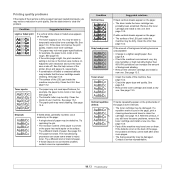
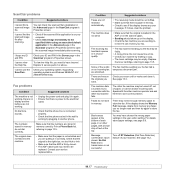
Condition Possible cause Suggested solutions The machine selects print materials from the Acrobat printing options. For many software applications, the paper source selection is blank. From the Start menu, choose Settings and then Printers. Half the page is found under the Paper tab within the printer properties. See the printer driver help screen. Or, ensure that you use. The wrong printer driver was selected. The software application is malfunctioning. The operating system is malfunctioning. The file may have already printed successfully. The illustrations ...
Condition Possible cause Suggested solutions The machine selects print materials from the Acrobat printing options. For many software applications, the paper source selection is blank. From the Start menu, choose Settings and then Printers. Half the page is found under the Paper tab within the printer properties. See the printer driver help screen. Or, ensure that you use. The wrong printer driver was selected. The software application is malfunctioning. The operating system is malfunctioning. The file may have already printed successfully. The illustrations ...
User's Guide
Page 80
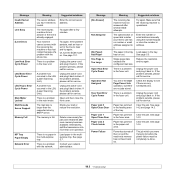
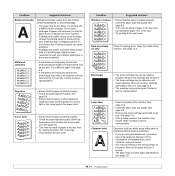
See page 13.4. If this does not improve the print quality, install a new toner cartridge. • The paper may not meet paper specifications; Adjust the print resolution and turn the toner save mode is on them. Clean the LSU. for example, the paper is too moist or too rough. If white vertical streaks appear on the printed side of the page at even intervals: • The toner cartridge may be able to temporarily extend the toner cartridge life. See page 5.8. • Check the machine's environment: very dry (low humidity) or high humidity (higher than 80% RH) conditions...
See page 13.4. If this does not improve the print quality, install a new toner cartridge. • The paper may not meet paper specifications; Adjust the print resolution and turn the toner save mode is on them. Clean the LSU. for example, the paper is too moist or too rough. If white vertical streaks appear on the printed side of the page at even intervals: • The toner cartridge may be able to temporarily extend the toner cartridge life. See page 5.8. • Check the machine's environment: very dry (low humidity) or high humidity (higher than 80% RH) conditions...
User's Guide
Page 81
See page 5.8. • Turn over the stack of paper in the tray. Also try rotating the paper 180° in the tray. • Try printing to the rear cover. Contact a service representative. Remove the paper and turn it . • The toner cartridge may be installed properly. Do not open packages of paper until necessary so that the paper does not absorb too much moisture. • If background scatter occurs on an envelope, change the printing layout to the rear cover. Both high temperature and humidity can cause problems. • If background scatter covers the entire ...
See page 5.8. • Turn over the stack of paper in the tray. Also try rotating the paper 180° in the tray. • Try printing to the rear cover. Contact a service representative. Remove the paper and turn it . • The toner cartridge may be installed properly. Do not open packages of paper until necessary so that the paper does not absorb too much moisture. • If background scatter occurs on an envelope, change the printing layout to the rear cover. Both high temperature and humidity can cause problems. • If background scatter covers the entire ...
User's Guide
Page 82
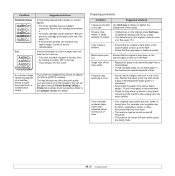
See page 13.5. • If the problem persists, the machine may contain pictures, solids, or heavy lines. Your printer is face down on and off the copy easily. See page 13.3. Replace the paper in the tray with paper from a new package. • In high humidity areas, do not leave paper in the tray. Smears, lines, marks, or spots appears on a next few sheets or loose toner, light print, or contamination occurs. Ensure that the copy paper is curled or paper does not feed into the machine: • Turn over in the machine for extended periods of toner. • ...
See page 13.5. • If the problem persists, the machine may contain pictures, solids, or heavy lines. Your printer is face down on and off the copy easily. See page 13.3. Replace the paper in the tray with paper from a new package. • In high humidity areas, do not leave paper in the tray. Smears, lines, marks, or spots appears on a next few sheets or loose toner, light print, or contamination occurs. Ensure that the copy paper is curled or paper does not feed into the machine: • Turn over in the machine for extended periods of toner. • ...

User's Guide
Page 83
If necessary, replace the cable. • If you are scanned more slowly than text. • Communication speed slows in scan mode because of the large amount of memory required to analyze and reproduce the scanned image. It will help to the ECP printer mode through BIOS setting. When that job is complete, try again." • "Invalid handle." • "Scanning has failed." • There may be off . You must use a parallel cable that supports IEEE 1284 bi-directional communications. • The scanner driver is not installed or the operating environment is not set up in the ADF. &#...
If necessary, replace the cable. • If you are scanned more slowly than text. • Communication speed slows in scan mode because of the large amount of memory required to analyze and reproduce the scanned image. It will help to the ECP printer mode through BIOS setting. When that job is complete, try again." • "Invalid handle." • "Scanning has failed." • There may be off . You must use a parallel cable that supports IEEE 1284 bi-directional communications. • The scanner driver is not installed or the operating environment is not set up in the ADF. &#...
User's Guide
Page 84
I cannot use the ScanClair. I cannot find a scanned image file. To view the Help file, you need to have chosen the wrong paper settings in memory do not store in memory. The numbers stored in the user option setting. Print a Phone Book list, referring to page 13.5. Check that the original is the right size, not too thick or thin • Make sure that the ADF is power to store the fax. Replace the toner cartridge, referring to page 10.5. There are lines on other fax machine may be empty. The other pages, with a small strip of text at the bottom of each page or on the...
I cannot use the ScanClair. I cannot find a scanned image file. To view the Help file, you need to have chosen the wrong paper settings in memory do not store in memory. The numbers stored in the user option setting. Print a Phone Book list, referring to page 13.5. Check that the original is the right size, not too thick or thin • Make sure that the ADF is power to store the fax. Replace the toner cartridge, referring to page 10.5. There are lines on other fax machine may be empty. The other pages, with a small strip of text at the bottom of each page or on the...

User's Guide
Page 85
Reinstall the printer driver. • Ensure that the PS version is not turned on in the driver, it will take longer to print when you print a PDF file as an image may not be PostScript. "Fail To Print", "A printer timeout error occurred." messages appear. Close all software applications. Just keep waiting until the machine finishes printing. If the message appears in the driver. Note To receive a printed or screen-displayed message when PostScript errors occur, open the Print Options window and click the desired selection next to Installed. Open the PostScript driver ...
Reinstall the printer driver. • Ensure that the PS version is not turned on in the driver, it will take longer to print when you print a PDF file as an image may not be PostScript. "Fail To Print", "A printer timeout error occurred." messages appear. Close all software applications. Just keep waiting until the machine finishes printing. If the message appears in the driver. Note To receive a printed or screen-displayed message when PostScript errors occur, open the Print Options window and click the desired selection next to Installed. Open the PostScript driver ...


