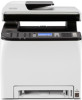
Operating Instructions
Page 3
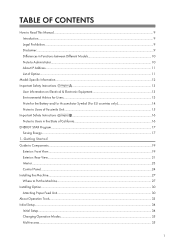
... to Components...19 Exterior: Front View...19 Exterior: Rear View...21 Interior...23 Control Panel...24 Installing the Machine...27 Where to Users in Functions between Different Models 10 Note to Administrator...10 About IP Address...11 List of Option...11 Model-Specific Information...12 Important ... Setup...34 Initial Setup...34 Changing Operation Modes...35 Multi-access...35 1 TABLE OF CONTENTS How to Read This Manual...9 Introduction...9 Legal Prohibition...9 Disclaimer...9 Differences in the State of California...16 ENERGY STAR Program...17 Saving Energy...17 1.
... to Components...19 Exterior: Front View...19 Exterior: Rear View...21 Interior...23 Control Panel...24 Installing the Machine...27 Where to Users in Functions between Different Models 10 Note to Administrator...10 About IP Address...11 List of Option...11 Model-Specific Information...12 Important ... Setup...34 Initial Setup...34 Changing Operation Modes...35 Multi-access...35 1 TABLE OF CONTENTS How to Read This Manual...9 Introduction...9 Legal Prohibition...9 Disclaimer...9 Differences in the State of California...16 ENERGY STAR Program...17 Saving Energy...17 1.
Operating Instructions
Page 13
... instructions that function upon authentication. • For details about creating passwords, see page 50 "Restricting Machine Functions According to User". List of this manual, "IP address" covers both IPv4 and IPv6 environments. User Restriction You can restrict the use that are relevant to the environment you are using. Using Web Image Monitor, you...
... instructions that function upon authentication. • For details about creating passwords, see page 50 "Restricting Machine Functions According to User". List of this manual, "IP address" covers both IPv4 and IPv6 environments. User Restriction You can restrict the use that are relevant to the environment you are using. Using Web Image Monitor, you...
Operating Instructions
Page 15
... product, your local dealer or sales/service representatives. Recycled paper The machine can print 13 Environmental Advice for Users Users in the EU, Switzerland and Norway Consumables yield Please refer to either the User's Manual for this information or the packaging of E-waste Our Products contain high quality components and are marked with European...
... product, your local dealer or sales/service representatives. Recycled paper The machine can print 13 Environmental Advice for Users Users in the EU, Switzerland and Norway Consumables yield Please refer to either the User's Manual for this information or the packaging of E-waste Our Products contain high quality components and are marked with European...
Operating Instructions
Page 44
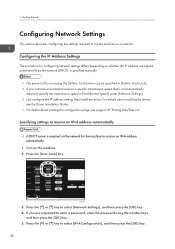
Press the [User Tools] key. If you are requested to select [Network Settings], and then press the [OK] key. 4. Tools Lock]. • If your network environment requires a specific transmission speed that is specified manually. • The password for the machine to use the machine on the machine. 2. For details about installing the driver...
Press the [User Tools] key. If you are requested to select [Network Settings], and then press the [OK] key. 4. Tools Lock]. • If your network environment requires a specific transmission speed that is specified manually. • The password for the machine to use the machine on the machine. 2. For details about installing the driver...

Operating Instructions
Page 45
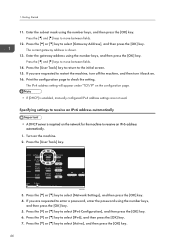
... page. DAC509 3. Enter the machine's IPv4 address using the number keys, and then press the [OK] key. 5. Assigning the machine's IPv4 address manually • The IPv4 address assigned to restart the machine, turn off the machine, and then turn it back on the machine. 2. Press the... 7. The current subnet mask is shown. 9. Press the [ ] or [ ] key to the initial screen. 9. If you are requested to check the setting. Press the [User Tools] key to return to select [Network Settings], and then press the [OK] key. 4. Press the [ ] or [ ] key to select [DHCP], and then press ...
... page. DAC509 3. Enter the machine's IPv4 address using the number keys, and then press the [OK] key. 5. Assigning the machine's IPv4 address manually • The IPv4 address assigned to restart the machine, turn off the machine, and then turn it back on the machine. 2. Press the... 7. The current subnet mask is shown. 9. Press the [ ] or [ ] key to the initial screen. 9. If you are requested to check the setting. Press the [User Tools] key to return to select [Network Settings], and then press the [OK] key. 4. Press the [ ] or [ ] key to select [DHCP], and then press ...
Operating Instructions
Page 46
...press the [OK] key. 7. Specifying settings to move between fields. 14. DAC509 3. Press the [ ] or [ ] key to check the setting. Press the [User Tools] key. Press the [ ] or [ ] key to select [Network Settings], and then press the [OK] key. 4. Enter the gateway address using the number ...keys, and then press the [OK] key. 5. Getting Started 11. The current gateway address is enabled, manually configured IPv4 address settings are requested to restart the machine, turn off the machine, and then turn it back on the network for the machine...
...press the [OK] key. 7. Specifying settings to move between fields. 14. DAC509 3. Press the [ ] or [ ] key to check the setting. Press the [User Tools] key. Press the [ ] or [ ] key to select [Network Settings], and then press the [OK] key. 4. Enter the gateway address using the number ...keys, and then press the [OK] key. 5. Getting Started 11. The current gateway address is enabled, manually configured IPv4 address settings are requested to restart the machine, turn off the machine, and then turn it back on the network for the machine...
Operating Instructions
Page 47
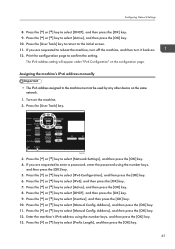
... machine, and then turn it back on the same network. 1. Press the [ ] or [ ] key to confirm the setting. Print the configuration page to select [Manual Config. Press the [User Tools] key. DAC509 3. Press the [ ] or [ ] key to select [Active], and then press the [OK] key. 8. Press the [ ] or [ ] key...] key. 4. Turn on the configuration page. Press the [ ] or [ ] key to select [Active], and then press the [OK] key. 10. Press the [User Tools] key to return to select [DHCP], and then press the [OK] key. 9. The IPv6 address setting will appear under "IPv6 Configuration" on the machine...
... machine, and then turn it back on the same network. 1. Press the [ ] or [ ] key to confirm the setting. Print the configuration page to select [Manual Config. Press the [User Tools] key. DAC509 3. Press the [ ] or [ ] key to select [Active], and then press the [OK] key. 8. Press the [ ] or [ ] key...] key. 4. Turn on the configuration page. Press the [ ] or [ ] key to select [Active], and then press the [OK] key. 10. Press the [User Tools] key to return to select [DHCP], and then press the [OK] key. 9. The IPv6 address setting will appear under "IPv6 Configuration" on the machine...
Operating Instructions
Page 49
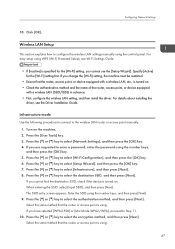
... then install the driver. Press the [ ] or [ ] key to select the encryption method, and then press [Next]. Configuring Network Settings 10. Press the [User Tools] key. 3. When entering the SSID, select [Input SSID], and then press [Next]. The SSID entry screen appears. Press the [ ] or [ ] key... method, and then press [Next]. For easy setup using . Press the [ ] or [ ] key to the wireless LAN router or access point manually. 1. Select the same method that the router or access point is using the control panel. Specify [Active] for the [Wi-Fi] setting, you ...
... then install the driver. Press the [ ] or [ ] key to select the encryption method, and then press [Next]. Configuring Network Settings 10. Press the [User Tools] key. 3. When entering the SSID, select [Input SSID], and then press [Next]. The SSID entry screen appears. Press the [ ] or [ ] key... method, and then press [Next]. For easy setup using . Press the [ ] or [ ] key to the wireless LAN router or access point manually. 1. Select the same method that the router or access point is using the control panel. Specify [Active] for the [Wi-Fi] setting, you ...

Operating Instructions
Page 50
...is no DHCP server. • In Ad Hoc mode, only Open System or WEP encryption is turned on. Start again from the beginning. Press the [User Tools] key. 3. When entering the device name, select [Input SSID], and then press [Next]. Ad Hoc mode This section explains how to connect directly... then press the [OK] key. Press the [ ] or [ ] key to 4). After connecting to -peer network. • In Ad Hoc network, every device must be manually assigned an IP address for identifying the encryption key. If you selected [Shared Key] or [Open System] in Step 9, it is displayed. 13. Turn on...
...is no DHCP server. • In Ad Hoc mode, only Open System or WEP encryption is turned on. Start again from the beginning. Press the [User Tools] key. 3. When entering the device name, select [Input SSID], and then press [Next]. Ad Hoc mode This section explains how to connect directly... then press the [OK] key. Press the [ ] or [ ] key to 4). After connecting to -peer network. • In Ad Hoc network, every device must be manually assigned an IP address for identifying the encryption key. If you selected [Shared Key] or [Open System] in Step 9, it is displayed. 13. Turn on...
Operating Instructions
Page 171
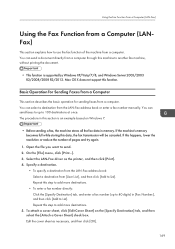
... data in this happens, lower the resolution or reduce the number of the machine from the LAN-Fax address book or enter a fax number manually. Mac OS X does not support this data, the fax transmission will be canceled. Repeat this machine to 100 destinations at once. Edit the... Server 2003/2003 R2/2008/2008 R2/2012. Basic Operation for Sending Faxes from a Computer This section describes the basic operation for sending faxes from [User List:], and then click [Add to send. 2. You can select a destination from a computer. The procedure in memory. If the machine's memory ...
... data in this happens, lower the resolution or reduce the number of the machine from the LAN-Fax address book or enter a fax number manually. Mac OS X does not support this data, the fax transmission will be canceled. Repeat this machine to 100 destinations at once. Edit the... Server 2003/2003 R2/2008/2008 R2/2012. Basic Operation for Sending Faxes from a Computer This section describes the basic operation for sending faxes from [User List:], and then click [Add to send. 2. You can select a destination from a computer. The procedure in memory. If the machine's memory ...

Operating Instructions
Page 179
...] key to return to select [Switch Reception Mode], and then press the [OK] key. 5. Press the [User Tools] key. Press the [ ] or [ ] key to the initial screen. Press the or [ ] key to select [Fax Features], and then press the [OK] key. 3. Press ... answers all incoming calls in fax reception mode. • You can specify the number of times the machine rings before answering a call in FAX/TEL Manual mode 1. Press [RX]. 4. Pick up the handset of Rings] setting under [Fax Features]. Receiving a Fax DAC509 2. Press the [ ] or [ ] key to select the desired reception...
...] key to return to select [Switch Reception Mode], and then press the [OK] key. 5. Press the [User Tools] key. Press the [ ] or [ ] key to the initial screen. Press the or [ ] key to select [Fax Features], and then press the [OK] key. 3. Press ... answers all incoming calls in fax reception mode. • You can specify the number of times the machine rings before answering a call in FAX/TEL Manual mode 1. Press [RX]. 4. Pick up the handset of Rings] setting under [Fax Features]. Receiving a Fax DAC509 2. Press the [ ] or [ ] key to select the desired reception...
Operating Instructions
Page 181
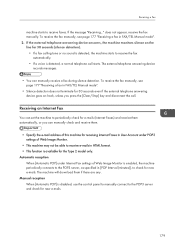
... telephone answering device answers, the machine monitors silence on -hook, unless you can manually check and receive them. • Specify the e-mail address of this machine for receiving Internet Faxes in User Account under Internet Fax settings of Web Image Monitor. • This machine may not... be able to receive e-mails in HTML format. • This function is disabled, use the control panel to manually connect to receive faxes. If the message...
... telephone answering device answers, the machine monitors silence on -hook, unless you can manually check and receive them. • Specify the e-mail address of this machine for receiving Internet Faxes in User Account under Internet Fax settings of Web Image Monitor. • This machine may not... be able to receive e-mails in HTML format. • This function is disabled, use the control panel to manually connect to receive faxes. If the message...

Operating Instructions
Page 182
Sending and Receiving a Fax Receiving a fax using Web Image Monitor 1. Press the [ ] or [ ] keys to select [Manual POP], and then press the [OK] key. 5. Press the [ ] or [ ] keys to select [Fax Features], and then press the [OK] key. 3....entering its IP address. 2. Click [OK]. 6. Press the [ ] or [ ] keys to [Active] or [Inactive]. [Active]: Automatic reception [Inactive]: Manual reception 5. Click [Network Settings]. 3. 6. Press the [User Tools] key. Select "Automatic POP" to select [Reception Settings], and then press the [OK] key. 4. Close the Web browser. For details about...
Sending and Receiving a Fax Receiving a fax using Web Image Monitor 1. Press the [ ] or [ ] keys to select [Manual POP], and then press the [OK] key. 5. Press the [ ] or [ ] keys to select [Fax Features], and then press the [OK] key. 3....entering its IP address. 2. Click [OK]. 6. Press the [ ] or [ ] keys to [Active] or [Inactive]. [Active]: Automatic reception [Inactive]: Manual reception 5. Click [Network Settings]. 3. 6. Press the [User Tools] key. Select "Automatic POP" to select [Reception Settings], and then press the [OK] key. 4. Close the Web browser. For details about...

Operating Instructions
Page 183
... failure report, prints out the fax, and then deletes it from memory. Receiving a Fax Forwarding or Storing Faxes in Memory To prevent unauthorized users from seeing sensitive faxes, you can be specified using Web Image Monitor. The machine stores the fax in memory for the Type 2 model only... failure report and stores the fax in memory and the Fax Received indicator will remain in memory for later manual printing. • If the machine is available for later manual printing. Forwarding Success Success Success Failure Failure Failure [Print Forwarded File] Off On On Off On On [...
... failure report, prints out the fax, and then deletes it from memory. Receiving a Fax Forwarding or Storing Faxes in Memory To prevent unauthorized users from seeing sensitive faxes, you can be specified using Web Image Monitor. The machine stores the fax in memory for the Type 2 model only... failure report and stores the fax in memory and the Fax Received indicator will remain in memory for later manual printing. • If the machine is available for later manual printing. Forwarding Success Success Success Failure Failure Failure [Print Forwarded File] Off On On Off On On [...

Operating Instructions
Page 185
... [OK] key. 4. If you select [Off], proceed to Step 9. 8. Start the Web browser, and access the machine by entering its IP address. 2. Press the [User Tools] key. Press the [ ] or [ ] key to select [On] or [Off], and then press the [OK] key. • [On]: Store the faxes... key. • [On]: Automatically print out the received faxes and delete from memory. • [Off]: Store the received faxes in memory for later manual printing. Specify the forwarding destination in Memory". Configuring the forwarding conditions 1. Enter the start time and the end time, and press the [OK] key. ...
... [OK] key. 4. If you select [Off], proceed to Step 9. 8. Start the Web browser, and access the machine by entering its IP address. 2. Press the [User Tools] key. Press the [ ] or [ ] key to select [On] or [Off], and then press the [OK] key. • [On]: Store the faxes... key. • [On]: Automatically print out the received faxes and delete from memory. • [Off]: Store the received faxes in memory for later manual printing. Specify the forwarding destination in Memory". Configuring the forwarding conditions 1. Enter the start time and the end time, and press the [OK] key. ...

Operating Instructions
Page 186
...the [ ] or [ ] key to Function] under administrator settings is resolved. If you select [Off], proceed to the [Print Received File] menu. Press the [User Tools] key to return to the initial screen. • Alternatively, you select [On], proceed to select [Reception Settings], and then press the [OK] key. 4. ... faxes and delete from memory. • [Off]: Store the received faxes in the machine's memory. 184 Close the Web browser. To manually print out received faxes stored in memory, see page 184 "Printing Out Faxes Stored in memory and the Fax Received indicator will start time ...
...the [ ] or [ ] key to Function] under administrator settings is resolved. If you select [Off], proceed to the [Print Received File] menu. Press the [User Tools] key to return to the initial screen. • Alternatively, you select [On], proceed to select [Reception Settings], and then press the [OK] key. 4. ... faxes and delete from memory. • [Off]: Store the received faxes in the machine's memory. 184 Close the Web browser. To manually print out received faxes stored in memory, see page 184 "Printing Out Faxes Stored in memory and the Fax Received indicator will start time ...


