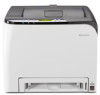

Operating Instructions
Page 5
... Restricting Machine Functions According to User 112 Configuring the Network Settings...113 Network Status Tab...113 IPv6 Configuration Tab...114 Network Application Tab...114 DNS Tab...115 Auto E-mail Notification Tab...116 3 4. Configuring the Machine Using the Control Panel Basic Operation...81 Menu Chart...82 Paper Input Menu...83 List/Test Print Menu...86 Printing the Configuration Page...86 Types of Lists/Reports...86 Maintenance Menu...88 System Menu...89 Host Interface Menu...92 PCL Menu...96 PS Menu...98 Language Menu...99 Changing the Language Menu...99 5.
... Restricting Machine Functions According to User 112 Configuring the Network Settings...113 Network Status Tab...113 IPv6 Configuration Tab...114 Network Application Tab...114 DNS Tab...115 Auto E-mail Notification Tab...116 3 4. Configuring the Machine Using the Control Panel Basic Operation...81 Menu Chart...82 Paper Input Menu...83 List/Test Print Menu...86 Printing the Configuration Page...86 Types of Lists/Reports...86 Maintenance Menu...88 System Menu...89 Host Interface Menu...92 PCL Menu...96 PS Menu...98 Language Menu...99 Changing the Language Menu...99 5.
Operating Instructions
Page 10
... password-protected: • Configuring the [System Settings], [Restrict Available Functions], [Network Settings], [IPsec Settings], or [Administrator Tools] menu using Web Image Monitor By default, the access to User". 8 User Restriction You can restrict the use that can use of certain functions of this machine to create your own password immediately. The following are as follows: Type Restrictions on available functions User Restriction Locked Print Notification to replace a component (Fusing unit, Transfer roller, Intermediate transfer belt) SP...
... password-protected: • Configuring the [System Settings], [Restrict Available Functions], [Network Settings], [IPsec Settings], or [Administrator Tools] menu using Web Image Monitor By default, the access to User". 8 User Restriction You can restrict the use that can use of certain functions of this machine to create your own password immediately. The following are as follows: Type Restrictions on available functions User Restriction Locked Print Notification to replace a component (Fusing unit, Transfer roller, Intermediate transfer belt) SP...
Operating Instructions
Page 35
... back to check the setting. Enter the gateway address using a different version of the printer you are using another operating system, the procedure might differ slightly. 1. Print the configuration page to the previous field, press the [Escape] key. 18. If you are using a computer that is based on the configuration page. Configuring Network Settings 12. If you are requested to configure this printer] during the printer driver installation, proceed to...
... back to check the setting. Enter the gateway address using a different version of the printer you are using another operating system, the procedure might differ slightly. 1. Print the configuration page to the previous field, press the [Escape] key. 18. If you are using a computer that is based on the configuration page. Configuring Network Settings 12. If you are requested to configure this printer] during the printer driver installation, proceed to...

Operating Instructions
Page 36
... [Open]. 7. Click [OK]. 8. Infrastructure mode Use the following procedure to connect to select [Network Setting], and then press the [OK] key. 5. Press the [ ] or [ ] key to the wireless LAN router or access point manually. 1. Press the [ ] or [ ] key to select [Setup Wizard], and then press the [OK] key. 7. 1. On the [Advanced] tab, click the [Printing Defaults...] button. Click [Apply]. 10. For easy setup using the control panel...
... [Open]. 7. Click [OK]. 8. Infrastructure mode Use the following procedure to connect to select [Network Setting], and then press the [OK] key. 5. Press the [ ] or [ ] key to the wireless LAN router or access point manually. 1. Press the [ ] or [ ] key to select [Setup Wizard], and then press the [OK] key. 7. 1. On the [Advanced] tab, click the [Printing Defaults...] button. Click [Apply]. 10. For easy setup using the control panel...
Operating Instructions
Page 71
... Locked Print file so that your job is printed only after you want to identify your Locked Print file on the machine's control panel. 6. Open the file you enter the password using the PCL printer driver, and printing from the machine's memory when it is printed out, or when the machine's power is an example based on your computer account or the user code used to print on Windows 7. Execute a print command. In the [Select Printer...
... Locked Print file so that your job is printed only after you want to identify your Locked Print file on the machine's control panel. 6. Open the file you enter the password using the PCL printer driver, and printing from the machine's memory when it is printed out, or when the machine's power is an example based on your computer account or the user code used to print on Windows 7. Execute a print command. In the [Select Printer...
Operating Instructions
Page 79
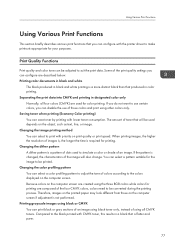
... print quality settings you can configure are composed of those on print quality or print speed. If you do not want to use of the four CMYK colors, colors need to be printed. Saving toner when printing (Economy Color printing) You can disable the use certain colors, you can print black or gray sections of an image using black toner only, instead of dots used for color printing. Changing the color profiling pattern You can select to suit the print data...
... print quality settings you can configure are composed of those on print quality or print speed. If you do not want to use of the four CMYK colors, colors need to be printed. Saving toner when printing (Economy Color printing) You can disable the use certain colors, you can print black or gray sections of an image using black toner only, instead of dots used for color printing. Changing the color profiling pattern You can select to suit the print data...

Operating Instructions
Page 84
Page], [Menu List], [Test Page], [PCL Font List], [PS Font List], [Maintenance Pg.] Maintenance [Color Dens/Reg], [TonerAlmstEmpty], [Anti-Humid Lvl] System [Auto Continue], [Copies], [Sub Paper Size], [Def Ppr Size], [Duplex], [Blank Pg. Paper Input [Paper Size], [Paper Type], [Tray Priority], [Bypass Priority], [Tray1 Priority] List/Test Print [Config. Err.Report], [BW Prt Priority] [Auto Cleaning], [PCL6 Mode] Host Interface [Timeout:LockPrt], [Timeout: USB], [Timeout: NW], [Network Setting], [Fixed USB Port] PCL Menu [Orientation], [Form Lines], [Font Number], [Point Size], [Font Pitch], [...
Page], [Menu List], [Test Page], [PCL Font List], [PS Font List], [Maintenance Pg.] Maintenance [Color Dens/Reg], [TonerAlmstEmpty], [Anti-Humid Lvl] System [Auto Continue], [Copies], [Sub Paper Size], [Def Ppr Size], [Duplex], [Blank Pg. Paper Input [Paper Size], [Paper Type], [Tray Priority], [Bypass Priority], [Tray1 Priority] List/Test Print [Config. Err.Report], [BW Prt Priority] [Auto Cleaning], [PCL6 Mode] Host Interface [Timeout:LockPrt], [Timeout: USB], [Timeout: NW], [Network Setting], [Fixed USB Port] PCL Menu [Orientation], [Form Lines], [Font Number], [Point Size], [Font Pitch], [...
Operating Instructions
Page 86
... size print jobs, printing proceeds even if the paper size/type settings of the printer and printer driver do not match. For standard size print jobs, an error will be cropped. • Any Custom S/T The printer prints custom size print jobs according to the printer driver's settings and prints standard size print jobs according to all print jobs. Default: [Machine Setting] 84 Default: [Tray 1] • Tray 1 • Tray 2 Bypass Priority Specifies how print jobs using the Tray 1 are handled. However, if the paper is installed. Configuring the Machine Using the Control Panel Default...
... size print jobs, printing proceeds even if the paper size/type settings of the printer and printer driver do not match. For standard size print jobs, an error will be cropped. • Any Custom S/T The printer prints custom size print jobs according to the printer driver's settings and prints standard size print jobs according to all print jobs. Default: [Machine Setting] 84 Default: [Tray 1] • Tray 1 • Tray 2 Bypass Priority Specifies how print jobs using the Tray 1 are handled. However, if the paper is installed. Configuring the Machine Using the Control Panel Default...
Operating Instructions
Page 91
... the control panel. Default: [Off] • Off • Auto Def Ppr Size Specifies the paper size to print onto paper of sets. The printing stops temporarily when an error is not loaded in the print job. Default: "1" • 1 - 999 Sub Paper Size Sets the printer to be used when the paper size is specified by command or the printer driver. Default: [Off] • Off • Short Edge Bind • Long Edge Bind 89 System Menu System Menu Auto Continue Sets the printer...
... the control panel. Default: [Off] • Off • Auto Def Ppr Size Specifies the paper size to print onto paper of sets. The printing stops temporarily when an error is not loaded in the print job. Default: "1" • 1 - 999 Sub Paper Size Sets the printer to be used when the paper size is specified by command or the printer driver. Default: [Off] • Off • Short Edge Bind • Long Edge Bind 89 System Menu System Menu Auto Continue Sets the printer...
Operating Instructions
Page 92
... mode 1 if the machine has been idle for this setting has lower priority than in Energy Saver mode 1, but power consumption is enabled from Energy Saver mode 2 than in 1 minute increments) • Off B&W Page Detect Sets the printer to their factory-set defaults. Configuring the Machine Using the Control Panel Blank Pg. Default: [On] • On • Off Restore Default Resets the printer settings to print all monochrome pages in Energy Saver mode 2 than the printer driver's blank page setting...
... mode 1 if the machine has been idle for this setting has lower priority than in Energy Saver mode 1, but power consumption is enabled from Energy Saver mode 2 than in 1 minute increments) • Off B&W Page Detect Sets the printer to their factory-set defaults. Configuring the Machine Using the Control Panel Blank Pg. Default: [On] • On • Off Restore Default Resets the printer settings to print all monochrome pages in Energy Saver mode 2 than the printer driver's blank page setting...
Operating Instructions
Page 97
... installation, if the printer is not used for information about the network configuration. 95 Default: [Off] • On The same printer driver you have installed in your computer can be recognized as a new device upon USB connection. • Contact your network administrator for multiple printers or not under USB connection. Displays the IPv6 link local address. Host Interface Menu • IP Ad. (DHCP) Displays the IPv6 address obtained from a Router Advertisement. • Address 1 • Address 2 • Address 3 • Address...
... installation, if the printer is not used for information about the network configuration. 95 Default: [Off] • On The same printer driver you have installed in your computer can be recognized as a new device upon USB connection. • Contact your network administrator for multiple printers or not under USB connection. Displays the IPv6 link local address. Host Interface Menu • IP Ad. (DHCP) Displays the IPv6 address obtained from a Router Advertisement. • Address 1 • Address 2 • Address 3 • Address...

Operating Instructions
Page 103
... control panel. Configuring the Machine Using Web Image Monitor Using Web Image Monitor • To operate the machine via Web Image Monitor, you are using. • Some items can be configured using Web Image Monitor on a computer: • Displaying the machine's status or settings • Configuring the machine's settings • Configuring the user restriction settings • Configuring the network settings • Configuring the IPsec settings • Printing reports • Setting the administrator password • Resetting the machine's configuration to the factory default...
... control panel. Configuring the Machine Using Web Image Monitor Using Web Image Monitor • To operate the machine via Web Image Monitor, you are using. • Some items can be configured using Web Image Monitor on a computer: • Displaying the machine's status or settings • Configuring the machine's settings • Configuring the user restriction settings • Configuring the network settings • Configuring the IPsec settings • Printing reports • Setting the administrator password • Resetting the machine's configuration to the factory default...
Operating Instructions
Page 107
... it is installed. Checking the System Information Item Transfer Roller Paper Tray Item Tray 1 Tray 2 Bypass Tray Description Shows the remaining life of Tray 2. Counter Tab Machine Counter Item Machine Counter Black Description Shows the following for pages printed, including lists/reports: • Total number of pages • Number of color pages • Number of black-and-white pages Shows the following for the Type 2 model. • The information about intermediate transfer unit, fusing unit, and transfer roller appear only for pages printed, including lists/reports...
... it is installed. Checking the System Information Item Transfer Roller Paper Tray Item Tray 1 Tray 2 Bypass Tray Description Shows the remaining life of Tray 2. Counter Tab Machine Counter Item Machine Counter Black Description Shows the following for pages printed, including lists/reports: • Total number of pages • Number of color pages • Number of black-and-white pages Shows the following for the Type 2 model. • The information about intermediate transfer unit, fusing unit, and transfer roller appear only for pages printed, including lists/reports...
Operating Instructions
Page 113
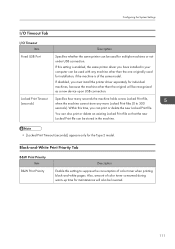
You can also print or delete an existing Locked Print file so that the new Locked Print file can be recognized as a new device upon USB connection. If disabled, you must install the printer driver separately for individual machines, because the machine other than the original will also be used for the Type 2 model. Within this setting to 300 seconds). Configuring the System Settings I/O Timeout Tab I/O Timeout Item Fixed USB Port Locked Print Timeout (seconds...
You can also print or delete an existing Locked Print file so that the new Locked Print file can be recognized as a new device upon USB connection. If disabled, you must install the printer driver separately for individual machines, because the machine other than the original will also be used for the Type 2 model. Within this setting to 300 seconds). Configuring the System Settings I/O Timeout Tab I/O Timeout Item Fixed USB Port Locked Print Timeout (seconds...
Operating Instructions
Page 132
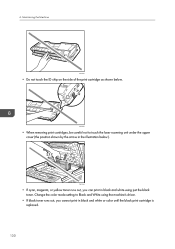
... shown below ). DAC044 • If cyan, magenta, or yellow toner runs out, you cannot print in black and white using the machine's driver. • If black toner runs out, you can print in black and white or color until the black print cartridge is replaced. 130 Change the color mode setting to touch the laser scanning unit under the upper cover (the position shown by the arrow in the illustration below .
... shown below ). DAC044 • If cyan, magenta, or yellow toner runs out, you cannot print in black and white using the machine's driver. • If black toner runs out, you can print in black and white or color until the black print cartridge is replaced. 130 Change the color mode setting to touch the laser scanning unit under the upper cover (the position shown by the arrow in the illustration below .
Operating Instructions
Page 175
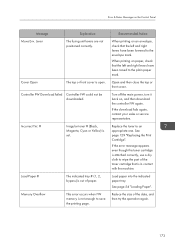
... the data, and then try the operation again. 173 Error & Status Messages on , and then download the controller FW again. Turn off the main power, turn it back on the Control Panel Message Move Env. Cover Open The top or front cover is set. Controller FW Download failed Controller FW could not be downloaded. If the download fails again, contact your sales or service representative. Replace the toner to save the printing page. Load paper into the indicated paper tray.
... the data, and then try the operation again. 173 Error & Status Messages on , and then download the controller FW again. Turn off the main power, turn it back on the Control Panel Message Move Env. Cover Open The top or front cover is set. Controller FW Download failed Controller FW could not be downloaded. If the download fails again, contact your sales or service representative. Replace the toner to save the printing page. Load paper into the indicated paper tray.
Operating Instructions
Page 176
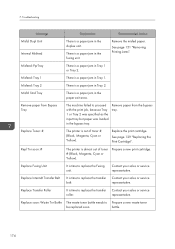
.... Replace soon: Waste Tnr Bottle The waste toner bottle needs to proceed with the print job, because Tray 1 or Tray 2 was specified as the input tray but paper was loaded in the fusing unit. Misfeed: PprTray There is time to replace the transfer Contact your sales or service roller. Remove paper from the bypass tray. Replace Toner: # The printer is almost out of toner # (Black, Magenta, Cyan or Yellow). Prepare a new print cartridge. representative. bottle. 174 7. See page 151 "Removing Printing Jams...
.... Replace soon: Waste Tnr Bottle The waste toner bottle needs to proceed with the print job, because Tray 1 or Tray 2 was specified as the input tray but paper was loaded in the fusing unit. Misfeed: PprTray There is time to replace the transfer Contact your sales or service roller. Remove paper from the bypass tray. Replace Toner: # The printer is almost out of toner # (Black, Magenta, Cyan or Yellow). Prepare a new print cartridge. representative. bottle. 174 7. See page 151 "Removing Printing Jams...

Operating Instructions
Page 177
Error & Status Messages on the print cartridge surface. Using a dry cloth, carefully wipe the interface area on the Control Panel Message Replace Waste Toner Bottle Tnr Set Error: # Fusing Unit Setting Error Waste Tnr Bottle Setting Error Service call SCXXX Density Sensor Require Cleaning Explanation Recommended Action It is time to replace the waste toner bottle. Install the waste toner bottle correctly. Clean the toner density sensor. Replace the waste toner bottle with the printer's controller. The indicated print cartridge is not installed or Install the fusing ...
Error & Status Messages on the print cartridge surface. Using a dry cloth, carefully wipe the interface area on the Control Panel Message Replace Waste Toner Bottle Tnr Set Error: # Fusing Unit Setting Error Waste Tnr Bottle Setting Error Service call SCXXX Density Sensor Require Cleaning Explanation Recommended Action It is time to replace the waste toner bottle. Install the waste toner bottle correctly. Clean the toner density sensor. Replace the waste toner bottle with the printer's controller. The indicated print cartridge is not installed or Install the fusing ...

Operating Instructions
Page 201
... Envelope 44, 59 Error messages 172 expat 194 Extending tray 1 56 Exterior 17 F Fusing Unit 140 G General status 113 H Host Interface 92 I I/O timeout 111 IKE settings 121 Important safety instructions 11, 13 Installing the machine 22 Interior 20 Intermediate transfer unit 140 Introduction 7 Iperf 194 IPsec global settings 121 IPsec policy settings 121 IPsec settings 121 IPsec transmission 178 IPv6 configuration 114 IPv6 environment 177 J Job cancel 65 L Label paper...
... Envelope 44, 59 Error messages 172 expat 194 Extending tray 1 56 Exterior 17 F Fusing Unit 140 G General status 113 H Host Interface 92 I I/O timeout 111 IKE settings 121 Important safety instructions 11, 13 Installing the machine 22 Interior 20 Intermediate transfer unit 140 Introduction 7 Iperf 194 IPsec global settings 121 IPsec policy settings 121 IPsec settings 121 IPsec transmission 178 IPv6 configuration 114 IPv6 environment 177 J Job cancel 65 L Label paper...
Operating Instructions
Page 202
... Print area 52 Print cartridge 129, 187 Print counter 105 Print functions 77 Print output functions 78 Print quality functions 77 Printer function 192 Priority tray 109 PS Menu 98 R Recycled paper 44 Replacing the Fusing Unit and Transfer Rollor.. 140 Replacing the intermediate transfer unit 140 Reports 125 Reset settings 126 Restore settings 127 Restrict user function 37, 40, 112 S SA (Security Association 179 SMTP settings 118 SNMP settings 117 Specifications 190, 192 Status information 104 Status messages 172 Supported paper...
... Print area 52 Print cartridge 129, 187 Print counter 105 Print functions 77 Print output functions 78 Print quality functions 77 Printer function 192 Priority tray 109 PS Menu 98 R Recycled paper 44 Replacing the Fusing Unit and Transfer Rollor.. 140 Replacing the intermediate transfer unit 140 Reports 125 Reset settings 126 Restore settings 127 Restrict user function 37, 40, 112 S SA (Security Association 179 SMTP settings 118 SNMP settings 117 Specifications 190, 192 Status information 104 Status messages 172 Supported paper...


