

User Guide
Page 34
Print area 2. Feed direction 3. Approx. 4.2 mm (0.2 inches) 4. Approx. 4.2 mm (0.2 inches) • The print area may vary depending on . Loading Paper Print Area The diagram below shows the area of the paper that the machine can print on the paper size and printer driver settings. • Adjust the print position by specifying [Registration] in [System Settings]. 32 From the printer driver 4 4 3 1 3 2 CHZ904 1. 2.
Print area 2. Feed direction 3. Approx. 4.2 mm (0.2 inches) 4. Approx. 4.2 mm (0.2 inches) • The print area may vary depending on . Loading Paper Print Area The diagram below shows the area of the paper that the machine can print on the paper size and printer driver settings. • Adjust the print position by specifying [Registration] in [System Settings]. 32 From the printer driver 4 4 3 1 3 2 CHZ904 1. 2.

User Guide
Page 37
When printing a document, specify the paper size and paper type and select the paper tray in the printer driver so that the settings configured when paper is loaded can be sure to configure the paper size and paper type for printing. • To print ...
When printing a document, specify the paper size and paper type and select the paper tray in the printer driver so that the settings configured when paper is loaded can be sure to configure the paper size and paper type for printing. • To print ...

User Guide
Page 51
... multiple sheets • Printing on both sides of sheets • Not having blank pages printed • Having prints sorted • Saving printer driver settings as a file • Recalling and deleting saved printer properties settings • Printing on a custom size paper • Printing a large paper size document on smaller size paper • Reducing and...
... multiple sheets • Printing on both sides of sheets • Not having blank pages printed • Having prints sorted • Saving printer driver settings as a file • Recalling and deleting saved printer properties settings • Printing on a custom size paper • Printing a large paper size document on smaller size paper • Reducing and...
User Guide
Page 84
On the [Start] menu, click [Devices and Printers]. 3. Original Scan Method Specify the method to all settings can adjust the image quality. The ..., Sharpness, Curves, Levels, Color Balance, and Hue/Saturation. If [ADF] is selected in [Original Scan Method], specify the orientation of the printer model you want to use, and then click [Start scan]. 4. When [Auto] is selected, all settings. 5. Scanning Originals 7. Image Quality... [Manual] is selected, the default values will be adjusted as required. • For details, see the TWAIN driver Help. Place the original. 2.
On the [Start] menu, click [Devices and Printers]. 3. Original Scan Method Specify the method to all settings can adjust the image quality. The ..., Sharpness, Curves, Levels, Color Balance, and Hue/Saturation. If [ADF] is selected in [Original Scan Method], specify the orientation of the printer model you want to use, and then click [Start scan]. 4. When [Auto] is selected, all settings. 5. Scanning Originals 7. Image Quality... [Manual] is selected, the default values will be adjusted as required. • For details, see the TWAIN driver Help. Place the original. 2.

User Guide
Page 102
... from a computer through this machine to use the fax function of the machine from a computer. Select the PC FAX driver as Destination]. Click [Send]. • For details, see the PC FAX driver Help. 100 You can send faxes to up to send. 2. Repeat this step to add more destinations. • ... in [Fax Number:], and then click [Set as Destination]. Also, you want to 40 digits) in the [Address List:], and then click [Set as the printer, and then click [Print]. 4. Repeat this section is an example based on Windows 7. • Using PC FAX, you want to ten pages (including the...
... from a computer through this machine to use the fax function of the machine from a computer. Select the PC FAX driver as Destination]. Click [Send]. • For details, see the PC FAX driver Help. 100 You can send faxes to up to send. 2. Repeat this step to add more destinations. • ... in [Fax Number:], and then click [Set as Destination]. Also, you want to 40 digits) in the [Address List:], and then click [Set as the printer, and then click [Print]. 4. Repeat this section is an example based on Windows 7. • Using PC FAX, you want to ten pages (including the...

User Guide
Page 103
... "T" (tone), " ", and " ". • To use tone services on the status of Destinations:], and then click [Delete from List]. Double-click the printer icon on the task bar of your computer, depending on a pulse-dialing line, insert "T" in a fax number. Canceling a fax using the control panel Cancel ... key (1: Yes). Press the [Stop/Clear] key. 3. Canceling a fax You can contain 0 to cancel another user's fax. 1. Select the PC Fax driver as the printer, and then click a button such as necessary, and then click [OK]. 101 On the [File] menu, click [Print...]. 2. "T" switches the dialing mode...
... "T" (tone), " ", and " ". • To use tone services on the status of Destinations:], and then click [Delete from List]. Double-click the printer icon on the task bar of your computer, depending on a pulse-dialing line, insert "T" in a fax number. Canceling a fax using the control panel Cancel ... key (1: Yes). Press the [Stop/Clear] key. 3. Canceling a fax You can contain 0 to cancel another user's fax. 1. Select the PC Fax driver as the printer, and then click a button such as necessary, and then click [OK]. 101 On the [File] menu, click [Print...]. 2. "T" switches the dialing mode...

User Guide
Page 104
... PC FAX Address Book This section describes the PC FAX address book. Right-click the PC FAX driver icon, and then click [Printing Preferences...]. 3. Enter the destination information. On the [Start] menu, click [Devices and Printers]. 2. Open the PC FAX address book. 2. To change the information. Registering groups This section describes how...
... PC FAX Address Book This section describes the PC FAX address book. Right-click the PC FAX driver icon, and then click [Printing Preferences...]. 3. Enter the destination information. On the [Start] menu, click [Devices and Printers]. 2. Open the PC FAX address book. 2. To change the information. Registering groups This section describes how...

User Guide
Page 105
Using the Fax Function from the [Address List:] area, and then click [Add to edit a fax cover sheet in the PC FAX driver's properties. 1. Click [OK]. 7. Click [Cover Sheet] tab. 4. Enter the group name, and then click [OK]. To delete a destination from [Group Members List:], and then click [... appears. To save the changes, click [Yes]. Select the destination you want to include in the group from a Computer (PC FAX) 4. Select the PC FAX driver as necessary. 103 Click [OK]. 6. Editing a Fax Cover Sheet This section describes how to Group]. Configure settings as the...
Using the Fax Function from the [Address List:] area, and then click [Add to edit a fax cover sheet in the PC FAX driver's properties. 1. Click [OK]. 7. Click [Cover Sheet] tab. 4. Enter the group name, and then click [OK]. To delete a destination from [Group Members List:], and then click [... appears. To save the changes, click [Yes]. Select the destination you want to include in the group from a Computer (PC FAX) 4. Select the PC FAX driver as necessary. 103 Click [OK]. 6. Editing a Fax Cover Sheet This section describes how to Group]. Configure settings as the...
User Guide
Page 152
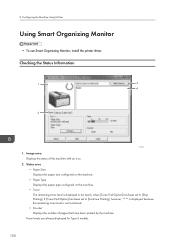
... levels are always displayed for Type 3 models. 150 Configuring the Machine Using Utilities Using Smart Organizing Monitor • To use Smart Organizing Monitor, install the printer driver. Image area Displays the status of pages that have been printed by the machine. Status area • Paper Size Displays the paper size configured on...
... levels are always displayed for Type 3 models. 150 Configuring the Machine Using Utilities Using Smart Organizing Monitor • To use Smart Organizing Monitor, install the printer driver. Image area Displays the status of pages that have been printed by the machine. Status area • Paper Size Displays the paper size configured on...

User Guide
Page 172
... on a level surface. See page 155 "Maintaining the Machine", and clean the machine as required. 170 Make sure that the paper type setting of the printer driver matches the type of the machine. Place the machine where it will not be opened . Make sure that the machine is dirty. The paper type...
... on a level surface. See page 155 "Maintaining the Machine", and clean the machine as required. 170 Make sure that the paper type setting of the printer driver matches the type of the machine. Place the machine where it will not be opened . Make sure that the machine is dirty. The paper type...
User Guide
Page 173
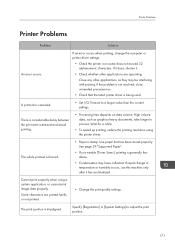
...be interfering with printing. If rapid change the computer or printer driver settings. • Check the printer icon name does not exceed 32 alphanumeric characters. High volume data, such as they may have collected. Printer Problems Printer Problems Problem Solution An error occurs. If an error ... faintly or not printed. • Change the print quality settings. A print job is damp. Cannot print properly when using the printer driver. Specify [Registration] in temperature or humidity occurs, use this machine only after it . • Check whether other applications, as graphics...
...be interfering with printing. If rapid change the computer or printer driver settings. • Check the printer icon name does not exceed 32 alphanumeric characters. High volume data, such as they may have collected. Printer Problems Printer Problems Problem Solution An error occurs. If an error ... faintly or not printed. • Change the print quality settings. A print job is damp. Cannot print properly when using the printer driver. Specify [Registration] in temperature or humidity occurs, use this machine only after it . • Check whether other applications, as graphics...

User Guide
Page 174
Possible Cause Solution Page layout settings are properly configured in the application. Check that of the loaded paper. 172 printer driver matches that the page layout settings are not configured properly. Troubleshooting Print Positions Do Not Match Display Positions If the position of the following. The paper size setting does not match the paper Check whether the paper size specified on the computer screen, the cause may be one of items on the printed page differs from the position displayed on the loaded. 10.
Possible Cause Solution Page layout settings are properly configured in the application. Check that of the loaded paper. 172 printer driver matches that the page layout settings are not configured properly. Troubleshooting Print Positions Do Not Match Display Positions If the position of the following. The paper size setting does not match the paper Check whether the paper size specified on the computer screen, the cause may be one of items on the printed page differs from the position displayed on the loaded. 10.

User Guide
Page 183
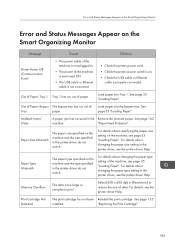
... in the bypass tray. Set [I/O Timeout] to be sent, complete the transmission or delete the file. For details, see the Printer Driver Help. Error and Status Indicate on the Control Panel Message RX Memory Overflow Memory Data Lost Cancel Printing I/O Timeout Cannot Print Memory ...memory fault. Select [600 x 600dpi] in the memory was too large. The timeout period set to print. For details, see page 131 "Printer Features Settings". If [Auto Continue] is a file waiting to a larger value than the current setting. The specified paper size of the file does...
... in the bypass tray. Set [I/O Timeout] to be sent, complete the transmission or delete the file. For details, see the Printer Driver Help. Error and Status Indicate on the Control Panel Message RX Memory Overflow Memory Data Lost Cancel Printing I/O Timeout Cannot Print Memory ...memory fault. Select [600 x 600dpi] in the memory was too large. The timeout period set to print. For details, see page 131 "Printer Features Settings". If [Auto Continue] is a file waiting to a larger value than the current setting. The specified paper size of the file does...
User Guide
Page 187
...Inner/ Outer A paper jam has occurred in . • The power of data. For details about changing the paper type setting in the printer driver, see the printer driver Help. Memory Overflow The data is too large or complex to reduce the size of the machine is not turned ON. • The ...Tray 1. For details about changing the paper type setting of Tray paper. Paper Type Mismatch The paper type specified on the machine, see the printer driver Help. For details about specifying the paper size setting on the machine and the type specified in [Resolution:] to print. Select [600 x ...
...Inner/ Outer A paper jam has occurred in . • The power of data. For details about changing the paper type setting in the printer driver, see the printer driver Help. Memory Overflow The data is too large or complex to reduce the size of the machine is not turned ON. • The ...Tray 1. For details about changing the paper type setting of Tray paper. Paper Type Mismatch The paper type specified on the machine, see the printer driver Help. For details about specifying the paper size setting on the machine and the type specified in [Resolution:] to print. Select [600 x ...


